To avoid these ads, REGISTER NOW!

Odd couple's shop projects

gastgarage

Well-known member
Joined
Mar 15, 2010
Messages
51
Location
Rawleigh NC
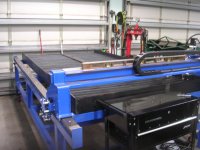
I really wasn't sure of what to do about the plasma computer and I toyed with a few different options before I went forward.

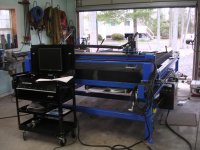
I bought a Harbor Freight tool cart. I drilled a bunch of holes in it and then started cutting it up. I mounted the computer monitor on the lid. Then I cut the front to the cart off and made a drawer for the keyboard and mouse to reside on. I put a hinge on the front piece of the cart that I cut off so that the cart can go back together closed in its original configuration.

Lift the lid, open the front, pull out the drawer and I have a self contained computer station to run the plasma table from.

Sorry for the blurry pics.

Nice idea! Have been pondering how to keep a computer in the shop without getting dust & s**t in the electronics, this approach solves that problem with flair, and pretty cheap to boot.
 
To avoid these ads, REGISTER NOW!

fnieto

Well-known member
Joined
Aug 27, 2013
Messages
1,401
Location
Tucson,Arizona
Trevor is 25 years old and its his build for a daily driver. I was 25 years old almost 30 years ago and I remember my youth so I try not to distract him when he's on a roll.

What would have happened if my Dad told me I was nuts for putting a 471 Detroit in a '59 power wagon. I don't even want to think about it.

Well said Mac!

Sharing a workspace with your son is every dads dreams. I sure miss those days.

Enjoy following your posts, seems we share the same eclectic work and equipment.

Thanks for sharing.

Paco
 

zmotorsports

ALLIANCE MEMBER
Joined
Oct 20, 2009
Messages
21,350
Location
Northern Utah
Don't know how I missed this thread Mac, but I will keep an eye on it now.

Great projects and spending time with son in the shop is a bonus.:thumbup:
 
OP
R

rmack898

Well-known member
Joined
Jan 23, 2007
Messages
3,151
Location
Honu Grove NE Florida
Paco and Mike,
Thanks for peeking in to our world.

The plasma table was officially finished tonight. So now the fine tuning and getting all the bugs worked out starts. I have no experience with CNC and have done very little CAD work without getting frustrated. I guess now that I have a machine, I'll have to get serious about learning.

All 3 axis's are running under computer control but I'm having issues with the DTHC so I'm going to have to go back and make sure I have all the settings right and start again.

I made a test file of just straight lines in QCAD and was able to run it through Sheet CAM to create a post file to load into Command CNC (Linux CNC). I tried to run the file but that's when the DTHC became a problem, I turned it off but I'm still having issue getting the Z to zero.

With any luck I should have it sorted out by the weekend and be cutting for real.
 
OP
R

rmack898

Well-known member
Joined
Jan 23, 2007
Messages
3,151
Location
Honu Grove NE Florida
I was out of town finalizing the deal on our new (Not in NJ) homestead, look for some updates in my escape thread.

So the plasma table is officially done. I had a little software and wiring issue with the THC but I managed to get it all sorted out and everything is working. Now I just need to become more proficient with inkscape and Fusion 360.
 

Attachments

  • DSCN5129.jpg
    DSCN5129.jpg
    144.2 KB · Views: 85
  • DSCN5146.jpg
    DSCN5146.jpg
    148.4 KB · Views: 78
OP
R

rmack898

Well-known member
Joined
Jan 23, 2007
Messages
3,151
Location
Honu Grove NE Florida
Now that the plasma table is done, I'll help Trevor with the fire truck for a little bit before I start on my next project.

Trev got the doors and interior ripped out of the cab. I originally made a frame that the cab was bolted to and then bolted some legs on the frame to keep the cab high enough to roll the chassis out from underneath. So now to ge the cab in the shop we welded some fork pockets to the frame and unbolted the legs. I carried in the shop with the machine and held it in the air while Trev welded some casters to it. Now we can roll it around on the shop and easily take it outside if we need the floor space.

The next thing that needs to get done is all the stuff on the roof needs to come off and all the holes need to be filled. The light bar left four 1/2" holes and the horn left a few 1/2" holes and a 3/4" hole. Trevor decided to put a piece of 18ga. on the plasma table and cut the circular blanks to fill in the holes in the roof. The plasma cut once blanks with no dross. Trev used a magnet to hold them in place while he tacked them in. He is off for the next few days and should have all the holes filled before he goes back to work. He has one section of rocker cut out and two sections of floor cut out. He ordered some replacement steel and we will weld them in next weekend. With any luck he will get the cab to paint in the next week or so.
 

Attachments

  • Vl3yxWfJR8SB7wA70iAQDA.jpg
    Vl3yxWfJR8SB7wA70iAQDA.jpg
    157.1 KB · Views: 148
  • 7buBYtxnQ%CcS+Tg2YOo8A.jpg
    7buBYtxnQ%CcS+Tg2YOo8A.jpg
    154 KB · Views: 128
  • bB5aNsU7R1mPZoBRG905OQ.jpg
    bB5aNsU7R1mPZoBRG905OQ.jpg
    147.1 KB · Views: 132
OP
R

rmack898

Well-known member
Joined
Jan 23, 2007
Messages
3,151
Location
Honu Grove NE Florida
Trevor found a little bit more rust and ordered a rocker panel for the drivers side and floor pans for both sides.

He cut out the bad section of rocker on the drivers side front and welded in the replacement piece.

Next up was the drivers side floor. He cut out the bad section and fit the replacement piece in and started welding it in but after he started welding it in, he decided that he wasn't really happy with the fit so it may come out and he will start over.
 

Attachments

  • DSCN5156.jpg
    DSCN5156.jpg
    144.3 KB · Views: 105
  • DSCN5152.jpg
    DSCN5152.jpg
    149.4 KB · Views: 106
  • DSCN5151.jpg
    DSCN5151.jpg
    153.9 KB · Views: 103
OP
R

rmack898

Well-known member
Joined
Jan 23, 2007
Messages
3,151
Location
Honu Grove NE Florida
My projects for the day were to get my diesel Samurai running, some yard work, and start picking my way through the pile of boats that are starting to show up in my yard.

It took me all morning to get the fuel system bled on the Samurai but I finally got fuel flowing to all injectors and got it running. I drove it for a few errands and had no issues, but when I went to move it at the end of the day it had lost the fuel prime and would not start. This will be continued tomorrow.

I got most of the driveway sprayed with ground clear to get the weeds in control before it gets out of hand.

I grabbed the first boat out of the pile and found that the fuel system was filled with water. I drained the primary filter and it was filled with salt and water. I have to pull off the intake manifold and throttle body to get access to the vapor separator tank and drain it and the fuel rail. I have some errands to run tomorrow morning and should be able to get it all torn down, drained, flushed, and back to gather running tomorrow afternoon.
 

Attachments

  • DSCN5157.jpg
    DSCN5157.jpg
    159.9 KB · Views: 123

zmotorsports

ALLIANCE MEMBER
Joined
Oct 20, 2009
Messages
21,350
Location
Northern Utah
Cool projects Mac.

I didn't realize you were looking to move, now I'll have to find your thread for that.

Congrats on the new homestead.
 
OP
R

rmack898

Well-known member
Joined
Jan 23, 2007
Messages
3,151
Location
Honu Grove NE Florida
Mike,
With the exception of 12 years at sea and 2 years living in the Caribbean, I have lived in NJ all my life and all I want to do is get out.

We just bought a blank canvass of property in NE Florida and over the next 3 years we will be building our forever house and my new shop. I'm quite sure you're familiar with the concept;) I am very much looking forward to the whole project.

I'm not savvy enough to make a link out of it, but the addy to my move thread is in my Sig line and you have to cut and paste.
 
OP
R

rmack898

Well-known member
Joined
Jan 23, 2007
Messages
3,151
Location
Honu Grove NE Florida
A little progress on the fire truck today. Trevor finished the driver's side floor and got 90% of the passenger side floor welded in. He has about another hour on the floor and then about 6 or 7 small screw holes to weld up and then it's ready for sanding.

He figures next weekend will be a sand-a-thon. A bunch of his friends with sanders for a day or two and then its off to paint with the cab.
 

Attachments

  • DSCN5161.jpg
    DSCN5161.jpg
    151.6 KB · Views: 104
  • DSCN5160.jpg
    DSCN5160.jpg
    151.7 KB · Views: 106
  • DSCN5159.jpg
    DSCN5159.jpg
    151.7 KB · Views: 104
OP
R

rmack898

Well-known member
Joined
Jan 23, 2007
Messages
3,151
Location
Honu Grove NE Florida
The other day, the reality of me moving to Florida finally hit Trevor like a ton of bricks. He asked me what machines in the shop I planned on leaving behind for him. I told him I was taking everything but the Bridgeport. He had this look on his face like he was being abandoned.

I have 2 lathes in my shop. A Monarch 10EE and an American Pacemaker 14 x 60
Trevor never really liked running the 10EE and any job he would work on, no matter how small would always get done on the Pacemaker. The Pace maker can take 3/8" cut in a single pass and hold a 10th with no sweat.

So when I leave for work this morning at 5 am there is a note on the door for me to take Trevor's truck to work. When ever he needs my truck he just tells me to take his truck. About an hour after I came home from work this afternoon, Trevor rolls in with my truck pulling a trailer with HIS new lathe on it.

He bought a 1949 American Pacemaker 16X30 with a bunch of tooling. When Pacemaker calls a lathe a 16" swing, that means it can swing 16" over the cross slide. The 16 can swing almost 20" over the bed.

We called the guy next door to come over with his loader and we lifted it off the trailer and stuffed it as far into the garage as he could get it without ripping the roof off with the bucket. Then with a pallet jack, a bunch of 3/4" pipes, a johnson bar, a porta-power, and some timber cribbing, we moved the lathe into it's storage spot in the garage.

Trevor got to run the lathe under power before he bought it and everything ran great. He got 2 Aloris CXA tool holders, 3 boring bar holders, about 6 boring bars (one was brand new), a bunch of carbide tools, some drills, and several sets of jobs for the chuck. The tooling alone is worth almost $2k
 

Attachments

  • DSCN5200.jpg
    DSCN5200.jpg
    140.8 KB · Views: 136
  • DSCN5197.jpg
    DSCN5197.jpg
    112.2 KB · Views: 139
  • DSCN5191.jpg
    DSCN5191.jpg
    153.8 KB · Views: 140
  • DSCN5189.jpg
    DSCN5189.jpg
    158.8 KB · Views: 135
  • DSCN5182.jpg
    DSCN5182.jpg
    153 KB · Views: 134
  • DSCN5176.jpg
    DSCN5176.jpg
    161 KB · Views: 138
  • DSCN5167.jpg
    DSCN5167.jpg
    157.3 KB · Views: 153
To avoid these ads, REGISTER NOW!

zmotorsports

ALLIANCE MEMBER
Joined
Oct 20, 2009
Messages
21,350
Location
Northern Utah
Damn, that things a BEAST!!!

Mac, can I ask why you're leaving the Bridgeport behind? Do you have another one you are eyeing in Florida?
 
OP
R

rmack898

Well-known member
Joined
Jan 23, 2007
Messages
3,151
Location
Honu Grove NE Florida
The guy that I bought my property in FL from is a part owner of Wells Index and he offered me a good deal.

My Bridgeport has a fair amount of backlash and the head is starting to get a little bit noisy. I figure it's not worth the hassle of moving it and them making repairs to it. Trevor can have the BP.
 

zmotorsports

ALLIANCE MEMBER
Joined
Oct 20, 2009
Messages
21,350
Location
Northern Utah
The guy that I bought my property in FL from is a part owner of Wells Index and he offered me a good deal.

My Bridgeport has a fair amount of backlash and the head is starting to get a little bit noisy. I figure it's not worth the hassle of moving it and them making repairs to it. Trevor can have the BP.

Gotcha.

Just curious as it would be hard to walk away from having a mill so I figured you must have a plan to acquire one in FL.

Thanks, just being nosey.:lol_hitti
 
OP
R

rmack898

Well-known member
Joined
Jan 23, 2007
Messages
3,151
Location
Honu Grove NE Florida
It's been a while since I posted an update.

I haven't been doing too much in the shop as I have been busy with planning the new house and move, not to mention getting a job and starting my 4th career in Florida.

Trevor has been making good progress on his truck. He finished all the body work and got the cab and doors back from paint. He installed a bunch of sound deadening panels in the cab and has got almost everything insulated. The front and rear glass is back in and the rear doors are hung. The front doors come back from paint next week and as soon as the cab is weather tight, it will go back on the chassis.
 

Attachments

  • IMG_3071.jpg
    IMG_3071.jpg
    106.4 KB · Views: 106
  • IMG_3070.jpg
    IMG_3070.jpg
    148 KB · Views: 108
  • IMG_3069.jpg
    IMG_3069.jpg
    150.7 KB · Views: 109
  • IMG_3068.jpg
    IMG_3068.jpg
    121.4 KB · Views: 125
  • IMG_3067.jpg
    IMG_3067.jpg
    117.7 KB · Views: 110
OP
R

rmack898

Well-known member
Joined
Jan 23, 2007
Messages
3,151
Location
Honu Grove NE Florida
After running my Pacemaker for a while, Trevor decided that if I'm taking my Pacemaker to Florida then he needed to have his own.

They are not as plentiful as other lathes and difficult to find for sale. Trevor lucked out and found on not too far from home and in good shape.
 
OP
R

rmack898

Well-known member
Joined
Jan 23, 2007
Messages
3,151
Location
Honu Grove NE Florida
Well things are getting pretty hectic as I get closer to my move out date.
I have pretty much neglected my truck for the past several years and I needed to make amends. Over the past few weeks I have rebuilt the entire front suspension, installed a new steering box, power steering pump, PS hoses, and ne w airbags on the rear axle.

Living 1 mile from the ocean can take a toll on vehicles. The salt air is bad enough but often we have to drive through coastal floods during moon tides. Salt on the road for snow and ice is nothing compared to close coastal living.

Next up on my truck was to replace the front bumper. If I had some more time I would have made a nice one on the plasma table but since I am leaving in less than 3 weeks, a new chrome replacement was the way to go.

I wasn't sure how to get the bumper and valance off so I took a look on U Tube and all I found were a bunch of morons that pretended to know how to get the bumper off. It turns out that there a 6 easy to get at bolts to remove that bumper and valance as one piece.

I spent more time taking the plastic rivets out to get the valance off the bumper than it took to get the bumper off the truck.

I bought a new chrome bumper from Amazon that was made in Taiwan. For $139 delivered I am happy with it. The fit was perfect and all the holes were where they were supposed to be. It took almost 4 hours start to finish but I'm sure if I had to do it again it would take about an hour.

I got my truck starting to look half way decent again. I figured since it just turned 200K i should give it a little bit of love.
 

Attachments

  • IMG_3117.jpg
    IMG_3117.jpg
    156.7 KB · Views: 64
  • IMG_3114.jpg
    IMG_3114.jpg
    132.1 KB · Views: 64
  • IMG_3113.jpg
    IMG_3113.jpg
    155.8 KB · Views: 67
  • IMG_3112.jpg
    IMG_3112.jpg
    154 KB · Views: 60
  • IMG_3111.jpg
    IMG_3111.jpg
    154.6 KB · Views: 60
Last edited:

timbitca

Well-known member
Joined
Aug 7, 2012
Messages
966
Location
Moncton, NB, Canada
That's a good price on the bumper. Best I can find here in Canada is about 300$ to my door. Mine still isn't as bad as yours (only a big hole on the drivers side) but it will keep getting worse and it annoys me.
 
OP
R

rmack898

Well-known member
Joined
Jan 23, 2007
Messages
3,151
Location
Honu Grove NE Florida
I'm not sure how amazon works north of the border but here is a link for the bumper I bought https://www.amazon.com/gp/product/B0747YYRMT/?tag=atomicindus08-20

Not to throw salt in the wound but my original OEM bumper was made in Canada. I'm pretty sure that GM figured if they can get the bumper to last 15 years, then they are doing good. My bumper started rusting out about 3 years ago and I just let it go. Like you, it finally got to the point that it pissed me off to the point that I had to take action.
 

shortykorte

Well-known member
Joined
Sep 1, 2014
Messages
8,037
Location
Tallahassee, Fl
I know CAD and I’m just down the road (I-10) lol. Learning Fusion 360. ec6b2a2d1e0a28e2c844b41a5c2298e6.jpga9521976a282e42c6c0b130f8d667f31.jpg
It’s a bandsaw guide that broke so drew in Fusion. Friend here 3D printed it and I will get it tomorrow.

The Plasma table casters are sweet. Looking forward to a tour of your new shop one day.


Sent from my iPhone using The Garage Journal mobile app
 

Attachments

  • ec6b2a2d1e0a28e2c844b41a5c2298e6.jpg
    ec6b2a2d1e0a28e2c844b41a5c2298e6.jpg
    254.6 KB · Views: 0
  • a9521976a282e42c6c0b130f8d667f31.jpg
    a9521976a282e42c6c0b130f8d667f31.jpg
    240.7 KB · Views: 0
Last edited:
To avoid these ads, REGISTER NOW!
Top Bottom