To avoid these ads, REGISTER NOW!

Above 1200 Sq/FT Oh ****, it won't fit there

Wokspaces above 1200 squarefeet.

j p smith

Well-known member
Joined
May 22, 2013
Messages
1,213
Location
Glendale, Arizona
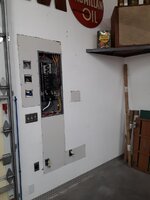
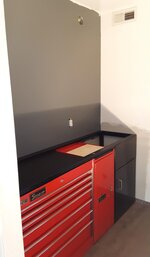
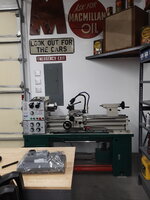
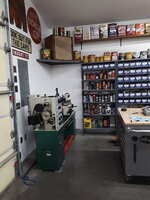
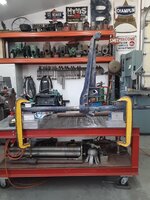
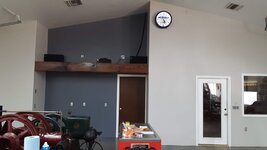
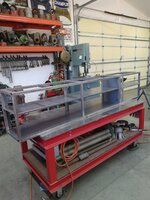
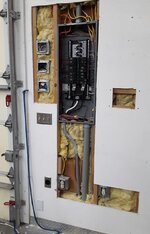
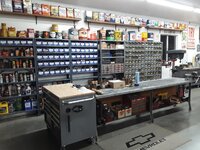
So I bought a lathe, this was the start of an unplanned shuffle of equipment and shelving. I finally decided on a location after trying to put the lathe in 5 different places in the shop. Then I discovered I did not have another breaker available. Dang it! This ended up requiring a larger load center, which meant opening up the wall to allow putting in the larger panel. 1st picture shows the box, next 3 show the south wall in our shop. I ended up reversing the order of the shelf units on the wall so it wasn't so tight by the lathe. I wanted the 12" deep shelf unit next to the lathe instead of an 18" deep unit.
This ended the first stage
 

Attachments

  • GJ 1.jpg
    GJ 1.jpg
    353.2 KB · Views: 571
  • GJ 2.jpg
    GJ 2.jpg
    245.1 KB · Views: 472
  • GJ 3.jpg
    GJ 3.jpg
    241.8 KB · Views: 422
  • GJ 4.jpg
    GJ 4.jpg
    202.2 KB · Views: 429
  • GJ 5.jpg
    GJ 5.jpg
    282.4 KB · Views: 430
Last edited:
To avoid these ads, REGISTER NOW!
OP
J

j p smith

Well-known member
Joined
May 22, 2013
Messages
1,213
Location
Glendale, Arizona
Next step the load center. I removed the old load center and also a future use junction box. It was a pain to get the conduit cut with out nicking the wiring and then getting the threaded ends on the conduit so I could get the new load center into position again without nicking the wiring while maneuvering the load center into place. I am pretty sure this would have been a walk in the park for an experienced electrician.
 

Attachments

  • GJ 6.jpg
    GJ 6.jpg
    167.3 KB · Views: 422
  • GJ 7.jpg
    GJ 7.jpg
    196.3 KB · Views: 381
  • GJ 8.jpg
    GJ 8.jpg
    218.9 KB · Views: 370
  • GJ 9.jpg
    GJ 9.jpg
    205.1 KB · Views: 383
OP
J

j p smith

Well-known member
Joined
May 22, 2013
Messages
1,213
Location
Glendale, Arizona
This is where I ended up, drill press moved to the window area next to the 18" deep drawer unit, new shelf for the speaker in the corner.
 

Attachments

  • shop after 1.jpg
    shop after 1.jpg
    304.9 KB · Views: 368
  • shop after 2.jpg
    shop after 2.jpg
    324.2 KB · Views: 361
  • shop after 3.jpg
    shop after 3.jpg
    329.1 KB · Views: 353
  • shop after 4.jpg
    shop after 4.jpg
    262.6 KB · Views: 387
OP
J

j p smith

Well-known member
Joined
May 22, 2013
Messages
1,213
Location
Glendale, Arizona
As with so many things we do there is always something that makes the project more involved. When I was working on the corner shelf for the speaker i need several pair of vise grips. I had put up a bracket made up using 3 brackets I had purchased which ended up not being enough once I had located my vise grips that I had stored in 3 different places. I ordered 2 more brackets then made a new back piece. Then I went back to finish the corner shelf.
 

Attachments

  • vise grips 1st.jpg
    vise grips 1st.jpg
    177.3 KB · Views: 367
  • vise grips 1.jpg
    vise grips 1.jpg
    219.9 KB · Views: 338
  • vise grips 2.jpg
    vise grips 2.jpg
    197.5 KB · Views: 322
  • vise grips 3.jpg
    vise grips 3.jpg
    167.8 KB · Views: 320
Last edited:
OP
J

j p smith

Well-known member
Joined
May 22, 2013
Messages
1,213
Location
Glendale, Arizona
And then since my neighbor the drywaller was going to be doing some patching I thought while he is here I should move the light in the bathroom and finish the door trim which would also require some patching around the door on the inside.
My wife when looking at the progress said why don't you finish your wiring for the TV and the Speaker wires, and so it goes. Thanks for following along.
 

Attachments

  • bathroom.jpg
    bathroom.jpg
    133.9 KB · Views: 353
OP
J

j p smith

Well-known member
Joined
May 22, 2013
Messages
1,213
Location
Glendale, Arizona
What's the skid mount engine you're working on? Love watching and hearing old oilfield and hit-n-miss engines doing their thing.
cvairwerks that is a 1911 Bessemer 10hp engine. It was built in August of 1911 and installed on a Gas Well in Lecrone Pa. Here is a better picture. It now belongs to good friend of mine, I am building him a cart for it to live on
 

Attachments

  • bessemer.jpg
    bessemer.jpg
    190.3 KB · Views: 326
OP
J

j p smith

Well-known member
Joined
May 22, 2013
Messages
1,213
Location
Glendale, Arizona
made good progress over the weekend, I finished the light wiring and then started on the counter installation. The counter was a gift from my brother. He cut and finished the 1 1/2" Oak for me, I just needed to cut it to the correct length, do the sink cutout and drill for the faucet. At this point i am ready for my drywall buddy when he has time. While I wait I will look over the new lathe and see about installing drains for the headstock and gear box
 

Attachments

  • 20210725_095646.jpg
    20210725_095646.jpg
    225.6 KB · Views: 272
  • 20210725_095903.jpg
    20210725_095903.jpg
    149.3 KB · Views: 207
  • 20210725_095923.jpg
    20210725_095923.jpg
    249.1 KB · Views: 187
  • 20210725_095744.jpg
    20210725_095744.jpg
    206.3 KB · Views: 186
  • 20210725_095659.jpg
    20210725_095659.jpg
    174.9 KB · Views: 224
OP
J

j p smith

Well-known member
Joined
May 22, 2013
Messages
1,213
Location
Glendale, Arizona
Had a hard day at work today dealing with a issue in a Air Handler Duct above a ceiling grid, after I got home and went out to the shop for some QST I began to relax. I took a little bit of time to enjoy a ice cold Beer and relax, then as things usually go for me I found something to do to take my mind off my day. I got one of the drain lines installed on the headstock for the new Lathe. They ship the lathe with no oil in the headstock yet the gearbox and the apron have the full level of in them. I will do the gear box drain line at the suggested time period.
 

Attachments

  • lathe drain line.jpg
    lathe drain line.jpg
    236.4 KB · Views: 236
OP
J

j p smith

Well-known member
Joined
May 22, 2013
Messages
1,213
Location
Glendale, Arizona
Looks like my drywall buddy is ******* for while so I will go ahead and put the cabinet back under the counter in the bathroom tomorrow evening
 
OP
J

j p smith

Well-known member
Joined
May 22, 2013
Messages
1,213
Location
Glendale, Arizona
Thanks Justin!
I have been storing it for a good friend, I wore myself out using the clay bar to get all the embedded dust from the paint. Greg one of my best friends passed away from cancer in 2013 and he had restored the tractor 4 or 5 years before he got sick. His dad purchased the tractor new around 1967. I have been storing it for Greg's son since 2016. Unfortunately it never occurred to me to put cover on it
 
To avoid these ads, REGISTER NOW!
OP
J

j p smith

Well-known member
Joined
May 22, 2013
Messages
1,213
Location
Glendale, Arizona
Got the call last night, be there at 7am tomorrow! Looks great, I will be painting Monday morning. Yipee
 

Attachments

  • dry wall 1.jpg
    dry wall 1.jpg
    188.2 KB · Views: 198
  • dry wall 2.jpg
    dry wall 2.jpg
    182.6 KB · Views: 222
OP
J

j p smith

Well-known member
Joined
May 22, 2013
Messages
1,213
Location
Glendale, Arizona
Took time to start getting the shop bathroom back together so I could make room in the shop. I discovered that I **** at cutting in the corners, lol. I painted the wall behind the counter and the lower sections both ends of the counter
 

Attachments

  • loo 1.jpg
    loo 1.jpg
    194.1 KB · Views: 178
  • loo 2.jpg
    loo 2.jpg
    127.5 KB · Views: 158
  • loo 3.jpg
    loo 3.jpg
    117.6 KB · Views: 148
  • loo 4.jpg
    loo 4.jpg
    270.3 KB · Views: 167
Last edited:
OP
J

j p smith

Well-known member
Joined
May 22, 2013
Messages
1,213
Location
Glendale, Arizona
Completed the painting in the corner where the new Lathe will live, got the panel and box covers installed and the signs hung up. Next up is getting the Lathe in place and leveling
 

Attachments

  • corner 1.jpg
    corner 1.jpg
    143.1 KB · Views: 141
  • corner 2.jpg
    corner 2.jpg
    138.6 KB · Views: 135
  • corner 3.jpg
    corner 3.jpg
    210.1 KB · Views: 174

vwpieces

Well-known member
Joined
Apr 28, 2020
Messages
5,925
Location
Hills, PA
I tried to follow the lathe and the work done to get'er in there but I just keep looking at the neat Shtuff all around the shop.

Cool place!!
 
OP
J

j p smith

Well-known member
Joined
May 22, 2013
Messages
1,213
Location
Glendale, Arizona
Yipee! Got the lathe moved into place last night and some of the mess cleaned up. Tonight's plan is get it leveled and this weekend I can make some chips fly.
 

Attachments

  • 20210908_184349.jpg
    20210908_184349.jpg
    319.7 KB · Views: 143
  • 20210908_184319.jpg
    20210908_184319.jpg
    279.2 KB · Views: 130
  • 20210908_184247.jpg
    20210908_184247.jpg
    343.8 KB · Views: 167
OP
J

j p smith

Well-known member
Joined
May 22, 2013
Messages
1,213
Location
Glendale, Arizona
Well, dang it, I was exposed to the COVID last week and now am off work till I get a negative test which is scheduled for this morning. My work requires the Molecular test which is 2 days or so for the results. So I was exiled to the shop by the wife and thought since I have some forced time off I would use it to assemble a wooden bladed windmill I bought that was just a pile of parts and have no idea if everything was there. The only bad issue was a repair by the previous owners grandfather, he had welded up and ground down a worn spot on the mast where it turns in the tower cap. This repair caused the mast to have a pretty good lean. Long story short, I cut out the worn area straightened the mast and welded in a patch. Next was the assembly to see what was missing. The good news is it looks like I only am missing a couple of things that I came easily make. I was able to mostly assemble the windmill with 4 of the 6 blade sections. The other 2 blade sections were too deteriorated to use. The 2nd picture is what the fan looks like when it is in the turned off position, the wind will blow thru, last picture shows the blades in the flat position where the wind will turn the fan and pump water.
 

Attachments

  • dempster 1.jpg
    dempster 1.jpg
    326.3 KB · Views: 149
  • dempster 2.jpg
    dempster 2.jpg
    264 KB · Views: 151
  • dempster 3.jpg
    dempster 3.jpg
    271.4 KB · Views: 173
OP
J

j p smith

Well-known member
Joined
May 22, 2013
Messages
1,213
Location
Glendale, Arizona
Got quite a bit done last week, painting is finished, baseboards installed, wires fished thru the wall from the attic, receptacle for the TV and pass thru for the hdmi cable, bathroom counter installed and sink hooked back up
 

Attachments

  • 20210919_100300.jpg
    20210919_100300.jpg
    199.9 KB · Views: 116
  • 20210919_095750.jpg
    20210919_095750.jpg
    211.5 KB · Views: 98
  • 20210919_141545.jpg
    20210919_141545.jpg
    146.6 KB · Views: 94
  • 20210919_141427.jpg
    20210919_141427.jpg
    123 KB · Views: 105
OP
J

j p smith

Well-known member
Joined
May 22, 2013
Messages
1,213
Location
Glendale, Arizona
This area gets the next attention, I need to build a upper cabinet to store cups, plates, misc and a shelf for the receiver and satellite boxes. Have a sketch, just need to get started. The black wires hanging down from the ceiling in the 2nd picture have been fished down thru the wall and will run to the receiver in it's new location when I get the cabinet in place.
 

Attachments

  • 20210919_095437.jpg
    20210919_095437.jpg
    133.9 KB · Views: 89
  • 20210915_162704.jpg
    20210915_162704.jpg
    125.8 KB · Views: 119
OP
J

j p smith

Well-known member
Joined
May 22, 2013
Messages
1,213
Location
Glendale, Arizona
No progress on the shop remodel but I did finish the rebuild on my neighbor Debra's Dempster windmill so we could put back on the tower. One of my windmill buddies was in town with one of his Smeal Hoist Rigs to pull a well in Cave Creek over the weekend, just in time to help me. I needed to get this completed since the neighbors daughter was getting married in their backyard this coming Saturday. I'm sure Debra would have forgiven me sometime in the future if I had not finished the work so the windmill could be in the background of the many pictures that will be taken at the wedding.
 

Attachments

  • IMG_20211005_095030.jpg
    IMG_20211005_095030.jpg
    181.5 KB · Views: 88
  • IMG_20211002_182118000.jpg
    IMG_20211002_182118000.jpg
    210.9 KB · Views: 86
  • IMG_20211002_194613599_MP.jpg
    IMG_20211002_194613599_MP.jpg
    97 KB · Views: 85
  • IMG_20211002_200359729.jpg
    IMG_20211002_200359729.jpg
    50.2 KB · Views: 118
OP
J

j p smith

Well-known member
Joined
May 22, 2013
Messages
1,213
Location
Glendale, Arizona
Last weekend I got a start on the cabinet, yesterday and this morning I was able to finish up. Almost ready for primer & paint and of course we have a windy day.
 

Attachments

  • IMG_20211016_114048318.jpg
    IMG_20211016_114048318.jpg
    306.3 KB · Views: 96
  • IMG_20211016_114020221.jpg
    IMG_20211016_114020221.jpg
    299.2 KB · Views: 93
  • IMG_20211015_102017554.jpg
    IMG_20211015_102017554.jpg
    321.5 KB · Views: 134
To avoid these ads, REGISTER NOW!
Top Bottom