To avoid these ads, REGISTER NOW!

Ohm’s shenanigans

Ohmthis

Well-known member
Joined
Jan 20, 2013
Messages
3,009
Location
Outside of Louisville KY
I’ve been here for 8 years and have never made a project thread. I’ve really enjoyed reading everyone else’s escapades. I thought it was time to make my own. My projects range from remodeling homes to rebuilding engines. So I’ll start with my two latest projects.
we have a lake house and have been remodeling it over the last 7 years. It was a huge project when we bought it, but it had major potential. Here are some pictures of the hardwood floors.
 

Attachments

  • 6F33AB1D-1E9B-4433-8FB5-A57F36ACEDA3.jpeg
    6F33AB1D-1E9B-4433-8FB5-A57F36ACEDA3.jpeg
    281.9 KB · Views: 315
  • DF49DB03-36F9-4BB8-90A1-4B50F4448CC6.jpeg
    DF49DB03-36F9-4BB8-90A1-4B50F4448CC6.jpeg
    355.5 KB · Views: 259
To avoid these ads, REGISTER NOW!
OP
O

Ohmthis

Well-known member
Joined
Jan 20, 2013
Messages
3,009
Location
Outside of Louisville KY
all of the walls were paneling and some fiber board tiles on the ceiling. I hung drywall and had a local finish it. We couldn’t decide on the fireplace. Stone was out of our budget at this time so shiplap was agreed upon.
 
OP
O

Ohmthis

Well-known member
Joined
Jan 20, 2013
Messages
3,009
Location
Outside of Louisville KY
Sorry, forgot pictures!
 

Attachments

  • 13B692DB-9710-46BA-8185-69B01A96229A.jpeg
    13B692DB-9710-46BA-8185-69B01A96229A.jpeg
    179.3 KB · Views: 168
  • 55A5F128-B18A-45D0-A29C-603604456C60.jpeg
    55A5F128-B18A-45D0-A29C-603604456C60.jpeg
    239 KB · Views: 161
  • 171BAEBF-2FB5-427B-958B-BEE4F297D66A.jpeg
    171BAEBF-2FB5-427B-958B-BEE4F297D66A.jpeg
    205.4 KB · Views: 174
OP
O

Ohmthis

Well-known member
Joined
Jan 20, 2013
Messages
3,009
Location
Outside of Louisville KY
My neighbor has a Jeep Grand Wagoneer that runs terrible. After a decent discussion we decided to add the Holley Sniper efi on it. Here it is before starting it. The carb was so terrible, it took forever to start, idled really high and when warm ran like complete garbage.
 

Attachments

  • 04F06A86-2C9F-40D3-A1E0-9534DF9F1B3E.jpeg
    04F06A86-2C9F-40D3-A1E0-9534DF9F1B3E.jpeg
    298.1 KB · Views: 182
  • 964398BD-4005-4A2F-AD5B-D72EE80B8D04.jpeg
    964398BD-4005-4A2F-AD5B-D72EE80B8D04.jpeg
    446.4 KB · Views: 167
  • B3B9B76B-FC4C-46BE-B94F-53BADBD57872.jpeg
    B3B9B76B-FC4C-46BE-B94F-53BADBD57872.jpeg
    358.4 KB · Views: 159
OP
O

Ohmthis

Well-known member
Joined
Jan 20, 2013
Messages
3,009
Location
Outside of Louisville KY
I have a YouTube channel and I’ll be posting a new series of videos on this project. I haven’t finished all of the videos yet, so it will be a little bit before it’s done. Taking the old carb off was uneventful. I did have a challenge mounting the fuel pump. The instructions want the pump as close to the tank as possible with it also below the tank. This Jeep has the fuel tank encased with a box/skid plate. On the inside is the drive shaft, with the suspension directly behind it. There here’s the location I picked.
 

Attachments

  • 05BD0D27-D92E-42FA-8842-92E826094AAE.jpeg
    05BD0D27-D92E-42FA-8842-92E826094AAE.jpeg
    206.5 KB · Views: 146
OP
O

Ohmthis

Well-known member
Joined
Jan 20, 2013
Messages
3,009
Location
Outside of Louisville KY
Transferred over to 16 gauge steel. I don’t have anything to really bend this well. I cut a groove in the steel, bent it, and put some spot welds all along the groove to give it strength.
 

Attachments

  • 9F649296-6282-43BF-820A-DF694DD2D10E.jpeg
    9F649296-6282-43BF-820A-DF694DD2D10E.jpeg
    315.3 KB · Views: 127
  • 40B2DA9A-3456-45E0-B0CC-98B09403FD2B.jpeg
    40B2DA9A-3456-45E0-B0CC-98B09403FD2B.jpeg
    225.2 KB · Views: 125
OP
O

Ohmthis

Well-known member
Joined
Jan 20, 2013
Messages
3,009
Location
Outside of Louisville KY
Before drilling into the frame I needed to make sure there weren’t any wires or fuel lines behind it. I used my endoscope to look inside the frame.
 

Attachments

  • E90FB3D6-A994-4FC4-A4F8-718C9BDA7334.jpeg
    E90FB3D6-A994-4FC4-A4F8-718C9BDA7334.jpeg
    168.7 KB · Views: 122
  • 0A039A77-B4A7-4BC3-B97F-8EFA41801568.jpeg
    0A039A77-B4A7-4BC3-B97F-8EFA41801568.jpeg
    216.2 KB · Views: 122
OP
O

Ohmthis

Well-known member
Joined
Jan 20, 2013
Messages
3,009
Location
Outside of Louisville KY
So finished up the Jeep and got the tune started on it. Here is the o2 sensor and cable. I used the clamp mount for the sensor. I’d rather have welded a bung in, but I didn’t want to have to remove the pipe. The studs at the manifolds were crusty and we agreed not to chance breaking one. I used adle clamps to keep the wiring away from the hot exhaust system and to protect it from any road debris.
 

Attachments

  • 0DB2C778-D509-44ED-9A2C-D789FA2BB022.jpeg
    0DB2C778-D509-44ED-9A2C-D789FA2BB022.jpeg
    245.8 KB · Views: 114
  • E5558A83-AB6C-4A73-95E8-9693A457DBFC.jpeg
    E5558A83-AB6C-4A73-95E8-9693A457DBFC.jpeg
    273.3 KB · Views: 105
  • 9E8B6D48-C2CF-4B78-A40D-8C2451F18B4E.jpeg
    9E8B6D48-C2CF-4B78-A40D-8C2451F18B4E.jpeg
    370.3 KB · Views: 121
OP
O

Ohmthis

Well-known member
Joined
Jan 20, 2013
Messages
3,009
Location
Outside of Louisville KY
Here’s the engine side of things. I wrapped all of the wiring with friction tape to make it hide in the engine compartment. In the second picture you can see the relays for the system. One is factory the other I added to give the system clean 12v when ignition is on and cranking. The directions (really who the hell reads directions) were very adamant about this clean power. I tried finding that for a little while and then decided on the relay.
 

Attachments

  • 04F78C1A-60C8-4816-85DA-46662036BCF7.jpeg
    04F78C1A-60C8-4816-85DA-46662036BCF7.jpeg
    433 KB · Views: 117
  • 4769BACE-5078-4ED9-A870-7501A0166FB8.jpeg
    4769BACE-5078-4ED9-A870-7501A0166FB8.jpeg
    428.1 KB · Views: 144
OP
O

Ohmthis

Well-known member
Joined
Jan 20, 2013
Messages
3,009
Location
Outside of Louisville KY
And lastly, here is the completed job. I really wanted it to look like it came from the factory this way. There is a piece of ducting from the breather that fell apart on removal (it was held together with gorilla tape) that will be replaced.
 
OP
O

Ohmthis

Well-known member
Joined
Jan 20, 2013
Messages
3,009
Location
Outside of Louisville KY
So how does it run, idle and so on?
It definitely starts like butter. I found the timing was off quite a bit. Someone had set base timing at 0! So between that and the efi it is so nice. Literally turn the key, wait till it primes, twist the key and it fires within a 1/2 second. I had to play with the tuning a little on the idle. It wanted to idle at 10-1 afr. It was way too rich. There is a setting for the coolant temp to enrichment. It adds more fuel at cooler coolant temps to get it warmer faster. I had to play with that to get the idle afr in range. Throttle response is instant, to say that the owner is tickled pink is an understatement. She sat down and wanted to start pushing the pedal to feed fuel. I explained the process and I watched in amazement as it fired right up and idled nice and smooth. We went for a ride and when she went to pull out of our street she literally threw us back into the seat. “Whoa, it’s never done that before!” Was what I got. I’m very happy with it in general. My only con is that I used the external fuel pump. I wish I had tried to figure out a way to modify the stock sending unit for an in tank pump. Maybe I’ll figure out a way and go back later with it.
 
OP
O

Ohmthis

Well-known member
Joined
Jan 20, 2013
Messages
3,009
Location
Outside of Louisville KY
I’m rebuilding 2 Big Block Chevys for a guy at work. He has a 60 something Chris Craft and lost one of the old fords in it. These were salvaged from a boat that sunk. They were “pickled” by filling the engines with diesel fuel. It didn’t work, the engines were locked up from rust. Mind you it wasn’t heavy or pitted, but a couple of cylinders had light rust. It’s a shame, these were rebuilt shortly before the sinking. The pistons looked brand new with no visible wear. I have them torn down and everything labeled and bagged/tagged. They go to the machinist and hopefully (I don’t have much faith though) the cylinders can be honed or cleaned up. This is the only picture I have, I didn’t even think about documenting anything until after I was done.
 

Attachments

  • 430E9003-AA7F-4979-98E8-F2F960C68258.jpeg
    430E9003-AA7F-4979-98E8-F2F960C68258.jpeg
    324.6 KB · Views: 180
To avoid these ads, REGISTER NOW!

MBfreak

MEMBER EMERITUS
Joined
Dec 10, 2010
Messages
2,301
Location
Linkoping , Sweden
Cheap electricians joke on your Ohmthis name.
No offense meant:
Is there a "Mhothis" also?
All in the vein of nerdy me who loves Tshirts with a "j" logo and the text "Get Real"

Ola
 
OP
O

Ohmthis

Well-known member
Joined
Jan 20, 2013
Messages
3,009
Location
Outside of Louisville KY
HaHaHa! Well, I am an electrician so it makes sense on the joke part. When I was younger and had my first boat, we’d go to the lake and see all the names on boats. Most had something to do with the owner’s career or passion. I came up with “ohmthis” as a boat name. I always envisioned it on a 30 ish gofast with twin big blocks. I never got that boat and probably never will with three kids. It’s just stuck with me I guess. It’s the name of my YouTube channel too. Thanks for looking
 
OP
O

Ohmthis

Well-known member
Joined
Jan 20, 2013
Messages
3,009
Location
Outside of Louisville KY
Quick update on the engines. One has a crack so off to find another block. The other is getting punched out for new pistons. Besides going aftermarket BBC blocks are fairly hard to find around here. I have a couple leads and will follow up on those.
 
OP
O

Ohmthis

Well-known member
Joined
Jan 20, 2013
Messages
3,009
Location
Outside of Louisville KY
Thanks Robert! When we built our house we hit rock. We decided to raise the house as well as dig some more. We more or less split the difference. The extra height let me put the lift in. I had a very respectable garage flooring company come. The coating is an industrial coating based on what I had planned on doing. I have used a torch, plasma cutter, and welded without even a burn mark. It’s very tough.
 
OP
O

Ohmthis

Well-known member
Joined
Jan 20, 2013
Messages
3,009
Location
Outside of Louisville KY
Man!!! Time flys. I promise I have been doing stuff in the shop. I get out there and forget to take pictures. I finished the shiplap at the lake. I painted it all, cut in an outlet for the TV, and prepped, cleaned and painted the fireplace cover with high temp paint. I think it turned out nice.
 

Attachments

  • 37D26647-08A1-4C0A-AA1F-A8DCE26A3D75.jpeg
    37D26647-08A1-4C0A-AA1F-A8DCE26A3D75.jpeg
    277.7 KB · Views: 93
OP
O

Ohmthis

Well-known member
Joined
Jan 20, 2013
Messages
3,009
Location
Outside of Louisville KY
The BBC project got scrapped for me. The owner was dragging his feet for much too long and I ran out of available time. I modified one of the oil pans so that the dipsticks are both on the inside of the engines. I didn’t have an engine to make sure that there isn’t anything in the way so we will see. First I drilled the riveted (I later found that the dipstick holder is copper) holder.
 

Attachments

  • 8F12BBC6-41E6-4170-B1B7-B8ECA28C99D9.jpeg
    8F12BBC6-41E6-4170-B1B7-B8ECA28C99D9.jpeg
    237.8 KB · Views: 79
OP
O

Ohmthis

Well-known member
Joined
Jan 20, 2013
Messages
3,009
Location
Outside of Louisville KY
I made measurements to replicate the dipstick to the other side. After marking the hole correctly I used a unibit and opened the hole to fit the dipstick.
 

Attachments

  • 1EE14C09-F344-4B4C-926C-EDBD3F7F3F3A.jpeg
    1EE14C09-F344-4B4C-926C-EDBD3F7F3F3A.jpeg
    378 KB · Views: 68
  • 172506B0-D5CC-4031-A1DC-961686A1F2BD.jpeg
    172506B0-D5CC-4031-A1DC-961686A1F2BD.jpeg
    416 KB · Views: 57
OP
O

Ohmthis

Well-known member
Joined
Jan 20, 2013
Messages
3,009
Location
Outside of Louisville KY
I found a piece of scrap and cut out a section to weld and cover the old hole. I didn’t know it was galvanized and it caused me some grief later.
 

Attachments

  • 60E17EAC-7AAE-43BE-98F5-DFB737BC0357.jpeg
    60E17EAC-7AAE-43BE-98F5-DFB737BC0357.jpeg
    346.5 KB · Views: 64
OP
O

Ohmthis

Well-known member
Joined
Jan 20, 2013
Messages
3,009
Location
Outside of Louisville KY
So I fitted up the dipstick to the hole I made and put 3 plug welds on. I will put gasket silicone around the edges to keep oil from leaking out. Although the original dipstick placement didn’t have anything.
 

Attachments

  • 798DC6F1-B3BB-40E6-81C0-2524621D08A9.jpeg
    798DC6F1-B3BB-40E6-81C0-2524621D08A9.jpeg
    299 KB · Views: 59
  • 737C998C-58F8-4C91-AA41-E5C630A4FCE8.jpeg
    737C998C-58F8-4C91-AA41-E5C630A4FCE8.jpeg
    311.5 KB · Views: 61
OP
O

Ohmthis

Well-known member
Joined
Jan 20, 2013
Messages
3,009
Location
Outside of Louisville KY
And finally I welded up the blank to cover the existing hole. My plan was to tig weld it, but the galvanized piece made the weld pop and spark. The mig was already to go, I just welded it in. The owner can clean up the plug if he wants to. It’s in a place no one will see.
 

Attachments

  • 3D99F4BC-9E11-40D7-A83F-D825FE3BEB3A.jpeg
    3D99F4BC-9E11-40D7-A83F-D825FE3BEB3A.jpeg
    271.2 KB · Views: 90
OP
O

Ohmthis

Well-known member
Joined
Jan 20, 2013
Messages
3,009
Location
Outside of Louisville KY
I haven’t done squat with this thread, I always got going on something and never remember to document it. So I’ll ask a question. I have a 66 F100. It’s ready for it’s rebirth. Should I add it here or start a new thread. Here is a picture of it being loaded up.
 

Attachments

  • E358E418-8880-40BA-991E-CD50BAD936E3.jpeg
    E358E418-8880-40BA-991E-CD50BAD936E3.jpeg
    589.8 KB · Views: 95
OP
O

Ohmthis

Well-known member
Joined
Jan 20, 2013
Messages
3,009
Location
Outside of Louisville KY
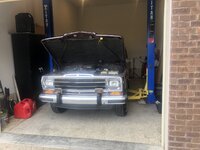
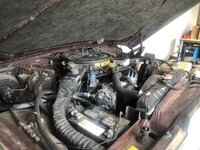
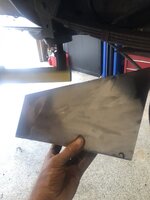
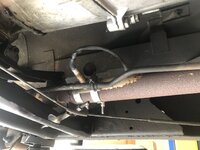
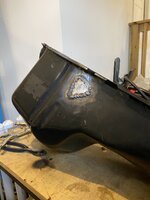
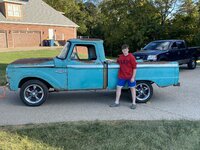
I’ve had my old truck for 8 years now. It’s moved with me three times and as the kids have gotten bigger taken a back seat. I finally brought it home and I’m getting a plan together. I really want to keep it simple and most importantly doable. So my plan is to do absolutely nothing to the outside. I’m liking the shop truck look with a nice interior and a more modern drivetrain. The body is solid, the body mounts are solid, and the frame is in great shape. I’ll be doing the Crown Vic IFS swap with an 91 5.0 EFI (I have a YouTube channel where I convert the harness for stand alone usage) and a 5 speed manual. I’ll keep the 9” rear end. With the front suspension I’ll get power steering and will upgrade the brake master cylinder to utilize a booster. The wiring has been butchered something fierce, so I’ll replace all of that. Along with the wiring I’ll upgrade the alternator to a 3G unit. I’ve already got the engine, transmission, wheels/tires and some odds and ends. I have a solid plan (to me anyway) and I have a can’t go over budget. It can be a long term project although I’d like to have it moving by next summer. Here is a picture of it with the wheels it will wear. That’s my son who has hated the rusty looks. He now thinks it’s a “pretty cool” truck. Do you guys have any advice for me? Potential pitfalls? Let me know what you think!
 

Attachments

  • 0BEE4DFB-6D96-49E5-81D4-EF51827DBBF0.jpeg
    0BEE4DFB-6D96-49E5-81D4-EF51827DBBF0.jpeg
    644.8 KB · Views: 85

rattle_snake

Well-known member
Joined
Jun 25, 2015
Messages
5,180
Location
Chandler, AZ
A solid plan is key. Be realistic with time and money.

There are 2 main paths
-blow apart and do everything. This may take years.
-Do one or two modifications at a time, and drive/enjoy the project as you go.

I suggest the latter. Do the engine/trans, wiring, brakes. go from there.
 
OP
O

Ohmthis

Well-known member
Joined
Jan 20, 2013
Messages
3,009
Location
Outside of Louisville KY
Thanks Justin! I’ve done projects before, but they were racing related. I feel like I have to be really organized so as to not waste the time that I get to play. I plan to inventory all of my parts and even have a place of storage written on the inventory so I’m not looking for stuff or god forbid buy something twice. I’ve already started a parts needed list trying to be as specific as I can. Goal one is to get the old suspension removed and the frame cleaned and ready for the CV. If I think it will take 3 days, I’ve written 10 days of actual time.
 

Monza Harry

Well-known member
Joined
Dec 29, 2018
Messages
1,433
Location
Windsor ON
"66 F100" Should I add it here or start a new thread.
I'd suggest a "parallel" ie: do both, not much extra work most should likely be "cut & paste" may actually increase the view count and then there is the cross traffic. I have been known to wander around lost down a couple of those rabbit holes, the "Salvage Garage" being one of my first to explore. Oh your son needs to leave the rust is cool camp and get back to his original position. Patina I just [usually] don't get the attraction. Harry
 
OP
O

Ohmthis

Well-known member
Joined
Jan 20, 2013
Messages
3,009
Location
Outside of Louisville KY
Before starting on my truck I have to finish up some other things. My son is big into fishing and has a small boat. He has been saving money for some time and came to me this past summer with a proposition. He had found a bigger boat, but the engine was bad. He wanted to buy the boat and with my help (I’ve built a dozen or so outboard engines) fix the engine. We went to look at it and we deemed it a good candidate. Well it’s back together and ready to go on the boat. Next job for him is to rebuild the carburetors. Here’s the engine on a stand.
 

Attachments

  • 1BCBC2F2-CEFA-431E-9D32-3E55DDFF6CCC.jpeg
    1BCBC2F2-CEFA-431E-9D32-3E55DDFF6CCC.jpeg
    822 KB · Views: 55
  • 14A6498F-60A1-4B54-941D-45E5AE6531CE.jpeg
    14A6498F-60A1-4B54-941D-45E5AE6531CE.jpeg
    762.1 KB · Views: 86
To avoid these ads, REGISTER NOW!
Top Bottom