Long time forum watcher, I've just moved into a new place with a "real" garage, and am getting ready to coat the garage floor with epoxy. I have been talking with Christine at Epoxy-Coat about this, but wanted to post on here to get feedback and thoughts on it.
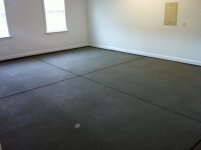
It's new construction, it sat on the market for about 9 months unoccupied prior to us buying it, so the slab is of a decent age to go ahead with the project. It's clean and, once I get the moving boxes off of it, clear. I haven't even pulled a car into it yet, trying to keep it as clean as possible before I coat it. It's a really nice rough finish for the epoxy to adhere to, wasn't sealed or polished. I'm just planning to sweep/blow, acid etch, wash, dry, and start the epoxy from there.
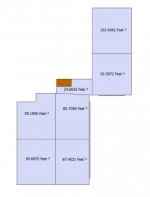
Maybe I'm over-analyzing this, but here it goes. I have a three car "L" shaped layout, drawing attached. It's conveniently got control cuts dividing it into six sections approx. 100 SF each plus a small patch near the steps to the house that's about 25 SF (total is 580 sf, so each section is actually 85-95 sf, not exactly 100). Don't mind the four decimal places on the drawing! That's just the default calculation format for the free "CAD" software I was using! I'm not going to fill the control cuts before coating, just going to try to coat the epoxy into the cuts to let the epoxy crack with the concrete if that's what the slab needs over time.
For logistical reasons, I'm going to do this in two phases: first will be the single car stall (two rectangular sections, 195 sf, planning for a 1/2 kit to be a generous coat on that section) and then the rest of the garage, approx. 385 sf (including the little patch by the stairs), full kit for that section. That should give me about the same DFT coverage on each section.
I've got a little spreadsheet I put together to help me weigh out the chips so each section gets about the right "level" of chips, accounting for the differences in square footage. I know that may be overkill... What I'm not planning on doing is varying the mixing batch size for the epoxy for each section (except maybe that little 25 sf patch). So I know there will be some minor difference in coating coverage for each section but I don't think that will be noticeable. Any thoughts?
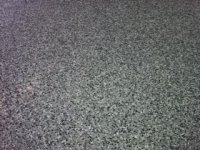
Oh yeah, most important, color will be gray, with fine flakes, three color "gray" blend. Boring, I know, but I want it to be nice and low key. Although I did think about "assembly blue" for a while! I had the builder finish out and paint all the walls/ceilings with a flat white paint, so there's plenty of light reflecting surfaces.
I'll keep a status update on the project on the forum, and welcome any feedback on it.
Thanks!
It's new construction, it sat on the market for about 9 months unoccupied prior to us buying it, so the slab is of a decent age to go ahead with the project. It's clean and, once I get the moving boxes off of it, clear. I haven't even pulled a car into it yet, trying to keep it as clean as possible before I coat it. It's a really nice rough finish for the epoxy to adhere to, wasn't sealed or polished. I'm just planning to sweep/blow, acid etch, wash, dry, and start the epoxy from there.
Maybe I'm over-analyzing this, but here it goes. I have a three car "L" shaped layout, drawing attached. It's conveniently got control cuts dividing it into six sections approx. 100 SF each plus a small patch near the steps to the house that's about 25 SF (total is 580 sf, so each section is actually 85-95 sf, not exactly 100). Don't mind the four decimal places on the drawing! That's just the default calculation format for the free "CAD" software I was using! I'm not going to fill the control cuts before coating, just going to try to coat the epoxy into the cuts to let the epoxy crack with the concrete if that's what the slab needs over time.
For logistical reasons, I'm going to do this in two phases: first will be the single car stall (two rectangular sections, 195 sf, planning for a 1/2 kit to be a generous coat on that section) and then the rest of the garage, approx. 385 sf (including the little patch by the stairs), full kit for that section. That should give me about the same DFT coverage on each section.
I've got a little spreadsheet I put together to help me weigh out the chips so each section gets about the right "level" of chips, accounting for the differences in square footage. I know that may be overkill... What I'm not planning on doing is varying the mixing batch size for the epoxy for each section (except maybe that little 25 sf patch). So I know there will be some minor difference in coating coverage for each section but I don't think that will be noticeable. Any thoughts?
Oh yeah, most important, color will be gray, with fine flakes, three color "gray" blend. Boring, I know, but I want it to be nice and low key. Although I did think about "assembly blue" for a while! I had the builder finish out and paint all the walls/ceilings with a flat white paint, so there's plenty of light reflecting surfaces.
I'll keep a status update on the project on the forum, and welcome any feedback on it.
Thanks!