I just purchased an old ClarK probally 70's supposedly 3500# Serial plate is gone & I can't find the one stamped in frame. The issue is it has a 3 stage mask & the Top seal is leaking like crasy. Trying to figure out how to fix. Will I have to take the whole cyl out or can it be done by pulling the top cap off. Should I get it out and take it to a repair place or can I come up with a seal. I have a good mechanic available but his expertise is not fork lifts. Any help would be appreciated.

You are using an out of date browser. It may not display this or other websites correctly.
You should upgrade or use an alternative browser.
You should upgrade or use an alternative browser.
Old Clark fork Lift
- Thread starter Sunguard
- Start date
IndyGarage
Well-known member
I saw a thread where a guy - I think he joined here and shared it - fixed a leaky lift cylinder for his Toyota Forklift.
You might try searching on it.
You might try searching on it.
Spudland_Dave
Well-known member
Hmm...First off, without seeing your mast, I'm guessing you'll need to remove the cylinder one way or the other to repair it.
IF you can do the seal repair yourself, pull it apart and take the seals down to local hydraulic shop to match up. OR take the whole cylinder down to them and have them do the repair....
Either way, leaky cylinders aren't usually a big deal.
IF you can do the seal repair yourself, pull it apart and take the seals down to local hydraulic shop to match up. OR take the whole cylinder down to them and have them do the repair....
Either way, leaky cylinders aren't usually a big deal.
MF'er
Well-known member
There should be a number stamped on the mast somewhere. If i remember right, Clark put theirs on the left side close to the tilt cylinder. That's the number you need if you're ordering any parts for the mast. The Clark lift cylinders were always the hardest to remove/install, but once its out, repacking them all are about the same.
Hyster Gareth
Well-known member
As a former lift truck tech I would remove the cylinder to repair. Ensure that everything is scrupulously clean before install.
I previously worked for a forklift dealership, so any questions ya have about the repair, just ask. Typically the clarks are standard hydraulic seals, not metric, so matching should be pretty easy at any hydraulic shop. If ordering the seals, get the model and serial number off the machine, along with the mast numbers on the side of the mast itself. There are usually, but not always, numbers stamped into the side of the hydraulic cylinders as well. If you can not find the serial number for the machine, look on the frame...it WILL be somewhere on there. Usually to remove an outside lift cylinder, I raise the mast all the way, chain off the center support on one stage to the main center support on the main upright. Then slowly lower the mast until the chain takes all the weight, then the cylinders should retract all the way in for removal. Most lift cylinders have either a snap ring or bolt holding the lift cylinder rod onto the mast at the top, so this will have to be removed before you do ANYTHING else. The hardest part is removing the entire cylinder as they as usually a pain to worm them out of there. I used an overhead hoist, but some are small enough to man handle. The gland nuts are usually on tight, so put the entire thing in a vise and beat it with a hammer to remove...and the same goes for tightening.
If any questions, just ask!
If any questions, just ask!
I just realized you mentioned a top cap. Some of the older clarks had a telescopic lift cylinder, some would telescope up, and some would telescope out from the bottom for the first stage, then out the top the rest of the way. If it is the telescopic style of lift cylinder, then it will have to be removed and take to a hydraulic shop due to the major pain of trying to take these things apart.
Provincial
Well-known member
Speaking from experience, if one seal is leaking, replace all the seals in the cylinder. Also, expect the other cylinders on the machine to need work fairly soon, as age affects tend to be fairly consistent.
Clark tended to stamp serial numbers on the outside of the frame near the valve handles. They are often obscured by many layers of paint.
If you are not in a rush to get the machine working, it is often cheaper to get the seals by matching the old ones. A good hydraulic shop may be able to upgrade the seals to a more durable design for little or no additional expense.
I agree with the advice of farming out the repair of a multi-stage cylinder unless you have experience and proper tools.
Jbullfrog
ALLIANCE MEMBER
My Clark forklift had the serial number stamped in the casting under the swing-out battery tray on the right side.
bimmer1980
Well-known member
I know this is an old thread........
Any chance you were able to complete this repair? Did you take any pictures of it?
I'm getting ready to do the seals on my Clark C500-30 forklift and trying to get prepared.....
I do have the manual, but it does look a bit daunting!
Any chance you were able to complete this repair? Did you take any pictures of it?
I'm getting ready to do the seals on my Clark C500-30 forklift and trying to get prepared.....
I do have the manual, but it does look a bit daunting!
milwaukeephil
Well-known member
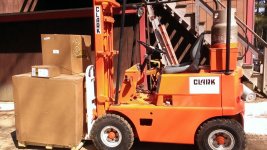
Can't help you with the seals but hopefully put a smile on your face with my Clark. People either get it or they don't...

RedneckWelder
Well-known member
Can't help you with the seals but hopefully put a smile on your face with my Clark. People either get it or they don't...

Did you consider painting it that baby **** green?
bimmer1980
Well-known member
Can't help you with the seals but hopefully put a smile on your face with my Clark. People either get it or they don't...
I'd be happy to trade mine to you! Even up???
I have seen the picture of your forklift in another thread. It's great! Nice job!
rustyjames
Well-known member
I have a 73 Clark 5,000 lb. lift and there's a serial number stamped on the right side, near the top. They are great lifts.
454ragtop
Well-known member
I want a forklift, don't want to work on one for a project. I want to be able to lift items onto a metal loft etc. Right now inside work only but.
clinebarger
Well-known member
Can't help you with the seals but hopefully put a smile on your face with my Clark. People either get it or they don't...
A dog collar & leash would finish it out....
")
matt_i
Well-known member
@ bimmer I also have a C500-30 of mid 80s vintage and I have rebuilt the telescoping mast. Removing the cylinder is the tricky part...I was lucky enough to have another forklift. Some type of overhead hoisting would be preferred. I have pics of the whole thing but they're stuck in the hell of Photobuckt and I'm trying to remedy that....let me see what I can dig up over the weekend....
I bought the seals from Hercules Bulldog (now Bulldog), the material was much nicer than what I could get from OEM clark. I did have to get the mast serial number for them to cross the seals I needed without measuring them. The mast is heavy but two strong people can handle it. I setup a folding table with many layers of newspaper to handle the mess from the hydraulic fluid and give a relatively clean place to work.
@ milwaukeephil...that's simply fantastic!!!!
Last edited:
matt_i
Well-known member
Here we go...extricated some photos...I'm going to guess this was 2006 or 7.
Aligning the two forklifts so I could remove the cylinder...can't tell you how it was done exactly, there are many warnings in the manuals not to get your hands or arms crushed or pinched when the carriage goes free of the chains. Use clamps and wood blocks. There's enough weight there to cleanly snip off a body part so pay attention.

So I used sawhorses, plywood, and black plastic to keep oil from soaking thru. Slightly in conflict with above recollection without the benefit of pictures

Disassembly of parts, trying to keep everything in order.

The old U-cup seals were all cracked just like this. Still functioning with some weepage but it was a near-max lift that really got them leaking as I recall.

Originally I had these green colored seals. I think OEM Clark. And I damaged a couple of them with my initial installation plan. So I was hoping I could get individual seals from Hercules Bulldog (now its Hercules). They told me they had an entire kit with a "premium material" cup and so I ended up buying the entire kit from Hercules. I had to buy it thru Motion Industries as a pass-through since H-B would only sell to an entity with an industrial account.

The rings that are pictured there are very important, read-on. The U-cup has something like a quad ring pushed inside the center of the "U" and so its very stiff in the radial direction. This has to bypass a set of internal threads for the endcap, while compressed, to avoid damage. My solution was the rings, some are metal, some are steel banding material, and some are PVC. I was in full experimentation mode. But I would now try to go with the PVC since its cheap and easily machined.
The procedure is basically this. Slip the ID of the cup over the OD of the inner rod. Then using pliers and substantial clean hydraulic oil, gently compress the seal inside the comperssion-ring. Its a fight for it to want to spit back out, hence the vise grips.

So now the seal is fully compressed inside the ring. Same as the smooth bore as its about to go into.

Generously lube and slide the whole assembly forward until it bottoms out. The ring is protecting the seal from the sharp threads.

Now using a flat rod, tap the seal in, working around the circumference, until it leaves the plastic ring and enters the smooth bore. Once seated, its ready for the end cap to be installed.

Same concept with steel band material. This worked but was a lot more time involved to get the correct length of band, bronze-braze it together, smooth all of the edges with a file, and finally test fit it to make sure it cleared the internal threads. It was fully deformed due to the stresses in the joint until the now-compressed seal forces it round. The alternative is trying to machine a thin ring, which has its own challenges. Maybe someone with a 3D printer could create one to-size on the first try with minimum effort

I had the carriage completely off. A little crusty.

Refreshed as well as grease cutting cleaner could get it.

I put on new side shift hoses, the old ones were cracked where they rolled over the sheaves, from the Parker store, nice and flexible. These are not super high pressure.

Its been all good ever since
Aligning the two forklifts so I could remove the cylinder...can't tell you how it was done exactly, there are many warnings in the manuals not to get your hands or arms crushed or pinched when the carriage goes free of the chains. Use clamps and wood blocks. There's enough weight there to cleanly snip off a body part so pay attention.
So I used sawhorses, plywood, and black plastic to keep oil from soaking thru. Slightly in conflict with above recollection without the benefit of pictures
Disassembly of parts, trying to keep everything in order.
The old U-cup seals were all cracked just like this. Still functioning with some weepage but it was a near-max lift that really got them leaking as I recall.
Originally I had these green colored seals. I think OEM Clark. And I damaged a couple of them with my initial installation plan. So I was hoping I could get individual seals from Hercules Bulldog (now its Hercules). They told me they had an entire kit with a "premium material" cup and so I ended up buying the entire kit from Hercules. I had to buy it thru Motion Industries as a pass-through since H-B would only sell to an entity with an industrial account.
The rings that are pictured there are very important, read-on. The U-cup has something like a quad ring pushed inside the center of the "U" and so its very stiff in the radial direction. This has to bypass a set of internal threads for the endcap, while compressed, to avoid damage. My solution was the rings, some are metal, some are steel banding material, and some are PVC. I was in full experimentation mode. But I would now try to go with the PVC since its cheap and easily machined.
The procedure is basically this. Slip the ID of the cup over the OD of the inner rod. Then using pliers and substantial clean hydraulic oil, gently compress the seal inside the comperssion-ring. Its a fight for it to want to spit back out, hence the vise grips.
So now the seal is fully compressed inside the ring. Same as the smooth bore as its about to go into.
Generously lube and slide the whole assembly forward until it bottoms out. The ring is protecting the seal from the sharp threads.
Now using a flat rod, tap the seal in, working around the circumference, until it leaves the plastic ring and enters the smooth bore. Once seated, its ready for the end cap to be installed.
Same concept with steel band material. This worked but was a lot more time involved to get the correct length of band, bronze-braze it together, smooth all of the edges with a file, and finally test fit it to make sure it cleared the internal threads. It was fully deformed due to the stresses in the joint until the now-compressed seal forces it round. The alternative is trying to machine a thin ring, which has its own challenges. Maybe someone with a 3D printer could create one to-size on the first try with minimum effort
I had the carriage completely off. A little crusty.
Refreshed as well as grease cutting cleaner could get it.
I put on new side shift hoses, the old ones were cracked where they rolled over the sheaves, from the Parker store, nice and flexible. These are not super high pressure.
Its been all good ever since
Last edited:
bimmer1980
Well-known member
Matt--- thanks for the pictures!!
I'm dreading the process, but it needs to be done! I need the forklift back into action.....
I'm dreading the process, but it needs to be done! I need the forklift back into action.....
IndyGarage
Well-known member
I want a forklift, don't want to work on one for a project. I want to be able to lift items onto a metal loft etc. Right now inside work only but.
Forklifts seem to follow me home. I have three right now and have had about a 10 of them total. I always say they are the one tool that makes your shop work so much better.
I always recommend electric for an indoor home shop. They are much simpler, work better and much quieter. The electric walkies are actually pretty nice and don't take up a ton of space. Just make sure you get one with a decent battery.
bimmer1980
Well-known member
Here's my old Clark. Was using it to unload my buddies 572 crate motor.
That's a beaut! A pneumatic tire forklift is tough to find at a decent price! What did you have to pay for that one?
bimmer1980
Well-known member
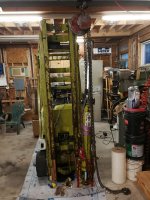
I was able to get the mast cylinder out.
I removed the whole cylinder with the top bracket attached. I removed the four bolts that hold it to the mast.
How does the top bracket come off the top of the cylinder? I removed a snap ring, but so far I have not been able to get it to budge. Manual has not shown any details... I'm suspecting it might be rusted in....
Thoughts?
Attachments

rtz
Well-known member
Bunch of good videos of working on a Clark lift:
el monte slim
Well-known member
Love this, great job!
bimmer1980
Well-known member
I was able to get the top bracket loose. There is a ring that is wedged in that hold down some keys in a land on the cylinder.
I was able to get those pieces out and then get the bracket to loosen up from the cylinder. It is not quite off, but close....
And there is hydraulic oil all over the floor... What a mess...
I was able to get those pieces out and then get the bracket to loosen up from the cylinder. It is not quite off, but close....
And there is hydraulic oil all over the floor... What a mess...
454ragtop
Well-known member
That's a beaut! A pneumatic tire forklift is tough to find at a decent price! What did you have to pay for that one?
$1500, had to paint it and replace the brake hydraulics.