To avoid these ads, REGISTER NOW!

Old gas torch leather pump cup repair

Hemlock

Well-known member
Joined
Apr 14, 2013
Messages
129
Location
Orlando, FL
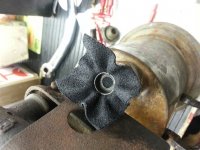
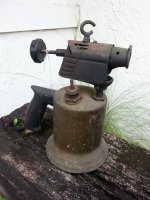
I picked up a torch from 1921 at an estate sale this morning. I've been interested in these for a while now, and want to get it working. I took the pump apart to check it out and hopefully make it operational with some neats foot oil, and found that the leather cup was torn.

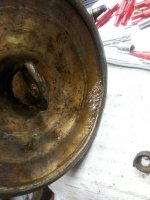
I want to try molding a new cup out of punched leather, but can't get the metal inner cup off. I don't want to force it, have it soaking with blaster now. I'll go back in the garage and try some heat next. I have nothing thin enough to reach either hex but needle nose pliers.

The inner, smaller hex behind the cup looks like it's been rounded somewhat in the past. There isn't enough clearance to get a wrench in there. The bigger nut I can't get a socket on, there isn't enough room inside the metal cup, nor does the cup push back far enough to get on the nut that way.

Any thoughts before I lose my patience and wreck something?
 

Attachments

  • Pic3.jpg
    Pic3.jpg
    91.8 KB · Views: 47
  • Pic4.jpg
    Pic4.jpg
    78.8 KB · Views: 47
  • Pic5.jpg
    Pic5.jpg
    60.5 KB · Views: 51
  • Pic6.jpg
    Pic6.jpg
    74.5 KB · Views: 42
To avoid these ads, REGISTER NOW!

jakemac

Well-known member
Joined
May 21, 2013
Messages
9,035
Location
New England
Grind down a cheap chinese socket to get into the cup. Once you have the cup off you should be able to get to the other nut.
 

cbogg

Well-known member
Joined
Feb 4, 2013
Messages
93
How big is the large nut? Spark plug socket maybe? The ones I have are thinner than standard, hopefully it's 5/8's? Can't get a grasp on the size in the pic. Don't know about old torches, but I'm guessing the big one holds the cup on and the little holds the disc behind it so once the big one is off maybe get on it with a deep well? Might be able to get the rod in a vise with something to protect it? If the spark plug socket fits I'd put a little heat on it then while it's hot douse it with some pb or ATF/acetone. I would think that ting isn't on there too crazy tight, and isn't severely corroded so it shouldn't fight too much. The rounding of the other I'm guessing was probably just misuse of the wrong size of wrench at some point.
 
OP
H

Hemlock

Well-known member
Joined
Apr 14, 2013
Messages
129
Location
Orlando, FL
I think the size is misleading in the pictures. I managed to tap a socket far enough into the cup to take the nut off, after heating and cooling. Now I've got some leather I cut from an old wallet I soaked drying in the bore with the metal cup shaping it. The leather is a bit thin, so I'll probably pick something thicker up tomorrow and have another go at it. Picture shows it before I trimmed most of the excess.
 

Attachments

  • Pic7.jpg
    Pic7.jpg
    87.5 KB · Views: 46

Outlawmws

Well-known member
Joined
Aug 9, 2011
Messages
39,315
Location
The Badlands
Compare that bore to a Coleman lantern or stove. Long odds its the same bore, and there is your replacement parts source.

And BTW, if you have and old leather that is dry, but intact, soak it in olive oil (use an inch of olive oil in an old medicine bottle), for at least overnight. Many times they are god to go again.
 
Last edited:

F124C

Well-known member
Joined
Aug 19, 2013
Messages
1,829
Location
Ireland
I think the size is misleading in the pictures. I managed to tap a socket far enough into the cup to take the nut off, after heating and cooling. Now I've got some leather I cut from an old wallet I soaked drying in the bore with the metal cup shaping it. The leather is a bit thin, so I'll probably pick something thicker up tomorrow and have another go at it. Picture shows it before I trimmed most of the excess.

I've used leather from the tongue? of an old shoe with some success.

Al.
 
OP
H

Hemlock

Well-known member
Joined
Apr 14, 2013
Messages
129
Location
Orlando, FL
The black leather is from an old wallet. It seems a bit thinner than what was in there originally. I also tried some leather scrap I picked up which was the right thickness, but it swelled too much when I soaked it. I'll put the wallet piece in today and see if it pumps up.
 

G_P

Well-known member
Joined
Jul 11, 2010
Messages
7,135
Location
Central CT
Compare that bore to a Coleman lantern or stove. Long odds its the same bore, and there is your replacement parts source.

Yup. That pump cup looks exactly like the leather pump cup assembly from a Coleman lantern. Parts are available at Walmart and a lot of local hardware stores.
 

ttpete

Well-known member
Joined
Mar 8, 2011
Messages
6,737
Location
Dearborn, MI
Before going too much farther, turn the torch over and look at what the bottom's made of. Brass is OK, but if it's steel, look inside for corrosion. The problem here is that a corroded bottom can fail under pressure, and considering that there is a flame nearby, it can be catastrophic.

These torches should only be fueled with naphtha. Coleman lantern fuel is the most available source.

To light, pump up some pressure in the tank. Then hold your hand over the end of the torch and crack the needle valve. Fuel will run down into the priming cup. When it's full, close the valve and light the fuel in the cup and let it preheat. Just before it burns out, crack the needle valve slightly and the torch will light off. Carefully open it a little more and let it warm up more before you do any work with it. Opening the valve too much too early will just squirt burning fuel out.

ALWAYS light the torch outside away from anything that will burn. The hook on top is meant to be used to hold a soldering copper using the V notch on the torch nozzle to steady it.
 
To avoid these ads, REGISTER NOW!

G_P

Well-known member
Joined
Jul 11, 2010
Messages
7,135
Location
Central CT
Good call on examining the bottom of the tank. I had a steel Coleman lantern fount pop a pinhole once while it was lit. Luckily it was hanging from a tree bracket so the fuel just shot straight down on the ground. I did not even notice it until the lantern got dim real fast as pressure dropped. Had that lantern been on a table it likely would have ignited the fuel vapor and turned into one hell of a mess.
 
OP
H

Hemlock

Well-known member
Joined
Apr 14, 2013
Messages
129
Location
Orlando, FL
Bottom is brass, and thanks for the tips. There is a fill plug in the bottom, hope that seals. I checked, but the pump is bigger diameter than my lantern's. Still haven't put it together again, but will update when I do.
 
Last edited:
OP
H

Hemlock

Well-known member
Joined
Apr 14, 2013
Messages
129
Location
Orlando, FL
Well, brass bottom or no, it's shot. I think it's soldered, so maybe I can reflow the joint and seal it.

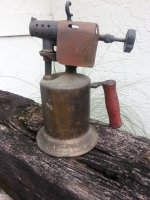
Anyway, I looked over the second torch I picked up on Saturday and found the check valve was missing a spring and the seal cup was pretty beat up. I worked it back round, packed it with leather (is that what was used for the seal?), sacrificed a ballpoint pen and it worked pretty well!
 

Attachments

  • Leak.jpg
    Leak.jpg
    78.4 KB · Views: 19
  • torch2.jpg
    torch2.jpg
    87.3 KB · Views: 16
  • Flame.jpg
    Flame.jpg
    38.5 KB · Views: 14

G_P

Well-known member
Joined
Jul 11, 2010
Messages
7,135
Location
Central CT
That leaking seam is fixable. Just drain all the fuel and purge all vapors from the tank. Then flux and resolder the seam.
 

Outlawmws

Well-known member
Joined
Aug 9, 2011
Messages
39,315
Location
The Badlands
Well, brass bottom or no, it's shot. I think it's soldered, so maybe I can reflow the joint and seal it.

Anyway, I looked over the second torch I picked up on Saturday and found the check valve was missing a spring and the seal cup was pretty beat up. I worked it back round, packed it with leather (is that what was used for the seal?), sacrificed a ballpoint pen and it worked pretty well!

That leaking seam is fixable. Just drain all the fuel and purge all vapors from the tank. Then flux and resolder the seam.

This^^^ with the added proviso that you do the soldering with a soldering copper, not a flame. and you already have a working torch to heat he copper with! :D
 

jakemac

Well-known member
Joined
May 21, 2013
Messages
9,035
Location
New England
BOOM !!!

Besides, you run the risk of disturbing the solder on the rest of the seam by over heating.
 

Outlawmws

Well-known member
Joined
Aug 9, 2011
Messages
39,315
Location
The Badlands
Just curious; why not solder it with a flame?

BOOM !!!

Besides, you run the risk of disturbing the solder on the rest of the seam by over heating.

This ^^^ You can NEVER get all the fuel out of the pores of the seams and metal. I know, I tried. While It didn't go BOOM! It DID flash, like three times. As you heat the tank to soldering temps, the old fuel boils out of any pore or crevasse, and you get fumes.

Mind you, this was after a strenuous regimen of cleaning and rinsing and letting the tank dry in the sun "completely dry"

That first flash scared the bajesus out of me... :FIREdevil
 
OP
H

Hemlock

Well-known member
Joined
Apr 14, 2013
Messages
129
Location
Orlando, FL
This one I picked up from an estate sale, it's been drying for decades. Probably as safe as it gets. I'll have a go at fixing the seam when I get
the urge to play again.

The second one, which I had working last night, has a slow leak back through the check valve. I put leather in the cup shaped piece that gets pushed against the seal with a cut down ball point pen spring, so that doesn't really surprise me. I emptied it, think I'll leave it alone.
 
To avoid these ads, REGISTER NOW!
Top Bottom