To avoid these ads, REGISTER NOW!

Old Work Electric Single Gang Box for Thick Wall?

larry4406

Well-known member
Joined
Jan 27, 2006
Messages
19,420
Location
Northern Virginia
I need a single gang old work box that can grip on a wall that is 1.25" thick (minimum) and possibly as much as 1.75" thick. Needs to accommodate (2) 12/2 wires for a duplex receptacle.

The PVC flapper boxes max out at a grip of 3/4". You can't simply replace the screws with longer screws as the flapper stop won't engage and it then just goes round and round.

Any ideas? I am not familiar with metal old work boxes and their max grip.

Trying to replicate similar to this look. Note how the box and trim is centered vertically on the 4" splash. No margin for error. Box is obviously mounted horizontal. I won't have a GFCI device to contend with at this location as this outlet is on the load side of an upstream GFCI.
1775827108575.jpeg
This installation was done in the following sequence: (1) looped hang wire during roughin. (2) install counter top and fabricate splash with proper cutout, but leave splash off. (3) position splash on top of countertop and against drywall, scribe box location on drywall, remove splash. (4) install PVC flapper box and secure to drywall. (5) counter top fabricator returns to site and installs the splash. (6) electrician returns to site, installs extension ring with longer screws, and finals the outlet. Ceramic was then run to the installed splash. PIA to coordinate and too many return trips.

The difference this time is that the splash on top dies into the bottom of a sill/shelf made of matching countertop material. Similar to this except the splash will only be 4" tall and will match the countertop material. Unlike the above example where only the vertical positioning had to be controlled, this time I also have to control the left/right positioning so that the outlet stacks centered on a cabinet.
IMG_4517.JPGIMG_4518.JPG

The desired effect is this. No I don't want to move the outlet to above the shelf/sill.
1775828018614.png

Ideally, the electrician is last leaving just a looped 12/2 hang wire from the rough. Countertop fabricator shows up once for the top, splashes, and sill and makes the perfect hole centered left/right and up/down and test fits the ideal electric box. Then the electrician uses whatever deep access old work box that grips the 1.25" thick splash and the 1/2" thick drywall behind it. If necessary, the drywall could locally be removed to grip only on the 1.25" thick splash.

This will be a heavy use outlet in my opinion so I want a very secure mount.

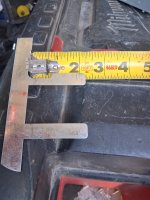
This is the current state of the roughin. The tape measure is hanging from where the sill will be glued into position. The 4" position shows the splash-to-countertop interface. The 5.25" position is the top of the cabinet and where the cabinet blocking is placed. To the left of the tap measure on the sill is where I have sketched out where the sill support needs to be notched/removed to accommodate the future electric box. Might just take that section out all together.
1775828590758.jpeg

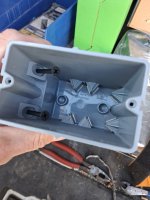
I thought about using one of these Southwire Smart Boxes but I would have to fully block the area then use an oscillating tool to notch it just perfect to the splash hole and then engage the screws.
1775829354140.png
 
To avoid these ads, REGISTER NOW!

sparky 1971

Well-known member
Joined
Oct 9, 2018
Messages
7,977
Location
Central Iowa
Southwire makes that style of box made to be mounted horizontally. There are also extra deep F clamps with 2-1/4" deep fingers. I keep both of those on my van...
 

Attachments

  • 17758308067273129367055605647102.jpg
    17758308067273129367055605647102.jpg
    459.7 KB · Views: 26
  • 17758308841355291461712961530415.jpg
    17758308841355291461712961530415.jpg
    729.4 KB · Views: 26
Last edited:

mm08822

Well-known member
Joined
Jan 13, 2012
Messages
6,004
Location
NJ
Since the wall is open, you could route out enough lumber to neatly seat a 4" square x 1.5" deep box into the framing so it sits flush with the surface of framing. Secure the box with screws in the rear corners. Then add a 1", 1.25 or 1.5" single gang tile mud ring horizontally before sheet rock.
(Left-right positioning is fixed by the framing alcove.)

The drawback with this method is you lock yourself into height and depth before even the vanity is in place. Depth is not so bad as long as it isn't sticking out and the last 3/4" is not combustable. Tile guy has to template to your location vs. you getting what he gives you.
 

sparky 1971

Well-known member
Joined
Oct 9, 2018
Messages
7,977
Location
Central Iowa
Since the wall is open, you could route out enough lumber to neatly seat a 4" square x 1.5" deep box into the framing so it sits flush with the surface of framing. Secure the box with screws in the rear corners. Then add a 1", 1.25 or 1.5" single gang tile mud ring horizontally before sheet rock.
(Left-right positioning is fixed by the framing alcove.)

The drawback with this method is you lock yourself into height and depth before even the vanity is in place. Depth is not so bad as long as it isn't sticking out and the last 3/4" is not combustable. Tile guy has to template to your location vs. you getting what he gives you.
That's pretty much how I wire kitchens, using 4X4 boxes with a stud bracket and a mud ring of the appropriate depth for the finished wall. In this case, I wouldn't do it unless everybody, and I mean everybody, signed off on the centerline from the subfloor. Then everybody would be signing off on it again after it's roughed in.

Yeah, I'm a ***** that way but I've been told something that turned out to be different at the other end of the job too many times. Somehow, it was always my fault. Even the time the customer was being his own GC, picked up the kitchen cabinets that were for someone else and made them work with what he had. He couldn't understand why there were at least five extra lower cabinets and two uppers after he install three more uppers than were on the plan. The only thing that was right was the sink base.
 

mm08822

Well-known member
Joined
Jan 13, 2012
Messages
6,004
Location
NJ
That's pretty much how I wire kitchens, using 4X4 boxes with a stud bracket and a mud ring of the appropriate depth for the finished wall. In this case, I wouldn't do it unless everybody, and I mean everybody, signed off on the centerline from the subfloor. Then everybody would be signing off on it again after it's roughed in.
It has it's drawbacks when multiple trades are involved.....everybody likes to point left and right when there is conflict!
 
OP
L

larry4406

Well-known member
Joined
Jan 27, 2006
Messages
19,420
Location
Northern Virginia
Southwire makes that style of box made to be mounted horizontally. There are also extra deep F clamps with 2-1/4" deep fingers. I keep both of those on my van...
1775845334853.png
Thank you!

I think this box is the solution. I need to find a source local or order it. Name or link anyone?

I know the left/right center of the outlet with certainty (cabinets go wall to wall with fillers each end). I can thus place blocking left and right of where the box will go and set the 3.5" of blocking parallel to the sides. Then screw one side only after placing the box flush with the splash. Likely will install washers with screw at each of the device threaded holes to ensure that the box anchor screws doesn't pull it past flush.

I am not certain how this device works.
1775845545270.png

This is my master bath project so I am controlling the cabinets, the counter top, and I am the electrician. So I don't want to eff this up.
 
OP
L

larry4406

Well-known member
Joined
Jan 27, 2006
Messages
19,420
Location
Northern Virginia
Since the wall is open, you could route out enough lumber to neatly seat a 4" square x 1.5" deep box into the framing so it sits flush with the surface of framing. Secure the box with screws in the rear corners. Then add a 1", 1.25 or 1.5" single gang tile mud ring horizontally before sheet rock.
(Left-right positioning is fixed by the framing alcove.)

The drawback with this method is you lock yourself into height and depth before even the vanity is in place. Depth is not so bad as long as it isn't sticking out and the last 3/4" is not combustable. Tile guy has to template to your location vs. you getting what he gives you.

That's pretty much how I wire kitchens, using 4X4 boxes with a stud bracket and a mud ring of the appropriate depth for the finished wall. In this case, I wouldn't do it unless everybody, and I mean everybody, signed off on the centerline from the subfloor. Then everybody would be signing off on it again after it's roughed in.

Yeah, I'm a ***** that way but I've been told something that turned out to be different at the other end of the job too many times. Somehow, it was always my fault. Even the time the customer was being his own GC, picked up the kitchen cabinets that were for someone else and made them work with what he had. He couldn't understand why there were at least five extra lower cabinets and two uppers after he install three more uppers than were on the plan. The only thing that was right was the sink base.

It has it's drawbacks when multiple trades are involved.....everybody likes to point left and right when there is conflict!
I thought about this but....

I know with certainty the left/right position.

I know the target for the vertical. But once the cabinets are shimmed level, the top is shimmed, I could be off by just enough. Thus the desire to have a solution that installs at the end with wherever the location ends up.

I think that side mount Southwire box works for this. After drywall, I will cut it out to the studs exposing the left and right blocking which forces the outlet center. Then the counter top guy cuts the splash while checking the box on hand to make sure it fits. Then I can slip it in and finish.

Thank you all!
 
Last edited:

sparky 1971

Well-known member
Joined
Oct 9, 2018
Messages
7,977
Location
Central Iowa
1775845334853.png
Thank you!

I think this box is the solution. I need to find a source local or order it. Name or link anyone?
I buy them off the shelf at Menards but I'm sure it's an easy Google search. Arlington also makes one in what they refer to as a One Box. It's way more user friendly but nobody around me carries them.


I know the left/right center of the outlet with certainty (cabinets go wall to wall with fillers each end). I can thus place blocking left and right of where the box will go and set the 3.5" of blocking parallel to the sides. Then screw one side only after placing the box flush with the splash. Likely will install washers with screw at each of the device threaded holes to ensure that the box anchor screws doesn't pull it past flush.

I am not certain how this device works.
1775845545270.png
An old work box would go in the hole with the ears catching on the outside. An F clamp slides in on each side; the long part gets pulled tight on the backside of the drywall and the two ears bend around the edge of the box ending up inside of it. Hopefully you can get the idea from the picture.
This is my master bath project so I am controlling the cabinets, the counter top, and I am the electrician. So I don't want to eff this up.
 

Attachments

  • 17758473165428765385651394770687.jpg
    17758473165428765385651394770687.jpg
    641.8 KB · Views: 29
Last edited:

manwithtools

ALLIANCE MEMBER
Joined
Aug 24, 2015
Messages
13,983
Location
Lebanon, TN
An old work box would go in the hole with the ears catching on the outside. An F clamp slides in on each side; the long part gets pulled tight on the backside of the drywall and the two ears bend around the edge of the box ending up inside of it. Hopefully you can get the idea from the picture.
I know how these are supposed to work, but I must have missed the special bus you take to the class that shows how to make these work perfectly :). I've just never been happy with the end results from those F clamps.
 

sparky 1971

Well-known member
Joined
Oct 9, 2018
Messages
7,977
Location
Central Iowa
I know how these are supposed to work, but I must have missed the special bus you take to the class that shows how to make these work perfectly :). I've just never been happy with the end results from those F clamps.
I've screwed up more than my share but there isn't much choice when it comes to metal boxes. They're also pretty slick in a house where the stud has just enough twist in it that the opposite side is sticking out a little past the drywall. Shove that baby back and put a F clamp in to hold it. It also helps that I do service work and have plenty of experience.
 
Last edited:

sparky 1971

Well-known member
Joined
Oct 9, 2018
Messages
7,977
Location
Central Iowa
1775845334853.png
Thank you!

I think this box is the solution. I need to find a source local or order it. Name or link anyone?

I know the left/right center of the outlet with certainty (cabinets go wall to wall with fillers each end). I can thus place blocking left and right of where the box will go and set the 3.5" of blocking parallel to the sides. Then screw one side only after placing the box flush with the splash. Likely will install washers with screw at each of the device threaded holes to ensure that the box anchor screws doesn't pull it past flush.

I am not certain how this device works.
1775845545270.png

This is my master bath project so I am controlling the cabinets, the counter top, and I am the electrician. So I don't want to eff this up.
I got home and found a link the Arlington box that in my opinion is much better than the Southwire due to the full size KO in it, you might be able to find it at a local supply house; part number F101HGC When I am installing two cables in a Southwire box, I usually run a step bit through the end, those little wire slots they provide aren't worth a damn.


mm08822

Well-known member
Joined
Jan 13, 2012
Messages
6,004
Location
NJ
I know how these are supposed to work, but I must have missed the special bus you take to the class that shows how to make these work perfectly :). I've just never been happy with the end results from those F clamps.
It starts with a clean hole through the sheetrock. Cut the entire hole perimeter....no blown out sections.

Make sure the box ears are set flush with the box perimeter and not bent in or out.

Set the box in the hole plumb pressing the ears tight to the surface. (Cables already installed.)

Insert the left dog ear and pull it tight to you and bend the ear over the edge of the box forming a crisp fold in it.
Do the same for the bottom tab.

Repeat for right dog ear.

Pinch all 4 dog ears tight around the box wall with linemans.

Double check for plumb. Tweak if needed tapping 1 corner.
 

sparky 1971

Well-known member
Joined
Oct 9, 2018
Messages
7,977
Location
Central Iowa
It starts with a clean hole through the sheetrock. Cut the entire hole perimeter....no blown out sections.

Make sure the box ears are set flush with the box perimeter and not bent in or out.

Set the box in the hole plumb pressing the ears tight to the surface. (Cables already installed.)

Insert the left dog ear and pull it tight to you and bend the ear over the edge of the box forming a crisp fold in it.
Do the same for the bottom tab.

Repeat for right dog ear.

Pinch all 4 dog ears tight around the box wall with linemans.

Double check for plumb. Tweak if needed tapping 1 corner.
Dammit! I just figured out where I've been screwing up for all these years. I always put the right clamp in first and squeeze them down with needle nose. I'm such an idiot.
 
To avoid these ads, REGISTER NOW!

35Ford

Well-known member
Joined
Apr 4, 2020
Messages
140
Location
Central MA
You could also pad out an area behind where the box is going to go, then fasten an old or new work box through the back into the blocking.
A 2 x 4 on the flat and a 3 or 3 1/2" deep box will get you close to where you want to be. An additional 1/4 or 1/2" plywood shim could be added after the finish work is done if needed.
 
OP
L

larry4406

Well-known member
Joined
Jan 27, 2006
Messages
19,420
Location
Northern Virginia
I got home and found a link the Arlington box that in my opinion is much better than the Southwire due to the full size KO in it, you might be able to find it at a local supply house; part number F101HGC When I am installing two cables in a Southwire box, I usually run a step bit through the end, those little wire slots they provide aren't worth a damn.

I do like that Arlington box better than the MSBHZ Southwire smart box. I like the single knockout that you pointed out.

Searching, it appears that the Arlington box is sold in packages of 50 only, and does not appear to be stocked locally.

Lowe's has the Southwire MSBHZ allegedly in stock, so I will run up there this morning.
 
OP
L

larry4406

Well-known member
Joined
Jan 27, 2006
Messages
19,420
Location
Northern Virginia
Here are pics of the horizontal smart box by Southwire.

The screws exit the box about 2” back from the face.

Lowes had them on clearance for $2.97. Bought 2.


IMG_4528.jpegIMG_4527.jpeg
 

Bert_

Well-known member
Joined
Dec 24, 2016
Messages
9,758
Location
NW Iowa
Often when I have to put a box in a plaster wall it's an inch thick. Metal device box with ears and F straps are great for that scenario. F straps are rock solid if you install then tight.
 
To avoid these ads, REGISTER NOW!
Top Bottom