To avoid these ads, REGISTER NOW!

On building a driveway gate

myredracer

Well-known member
Joined
Nov 1, 2015
Messages
557
Location
Langley, BC
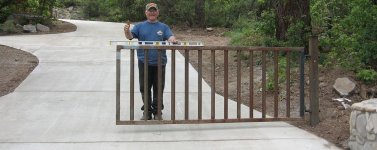
Will be building a 14' x 4' high swinging gate this summer. Will have two sections and be made from thinwall 1.5x5" or 1.5x6" tubing for the main frame and will look like this photo but won't have the curved pieces on top and will be square. The center/inset area will have 3/4 or 1" wide by 1/8" (maybe thinner?) flat bar in a woven pattern.

How can I weld the corners and get the frames in the same plane without distortion? I have a laser level. Would that be accurate enough? Maybe clamp the 2 sections together while welding to help keep it from distorting?

How to paint this thing? Should it be powder coated which I assume would not be cheap and would need to go to a shop? What about epoxy primer then a urethane finish coat at home? What about going the cheapest way and using rattle can primer + finish coat or maybe brush on? Doesn't need to be perfect like a car and is for on a farm but I don't want to have to touch it up every year. We get a ton of rain a year.

Thx
 

Attachments

  • 4448310c-5e34-4c31-b80b-76c725f4b845.jpg
    4448310c-5e34-4c31-b80b-76c725f4b845.jpg
    38.8 KB · Views: 123
To avoid these ads, REGISTER NOW!

dogdog

Well-known member
Joined
Nov 15, 2011
Messages
12,711
I paint mine with POR15 then a top coat of regular paint with brush. POR15 have this thing about can't do well in UV lights at least it is in the fine print. Nasty to my skin too.
 

Ign

Well-known member
Joined
Jul 7, 2006
Messages
12,769
Location
Butte Peak ND
I don't fully understand. First, is this a 2-piece gate like French doors?

Second are you asking how to weld without distortion? You don't. You clamp it down as best you can and move around not laying too much heat into any one section. It'll move, but not enough to matter.

Or are you asking how to hang the 2 pcs at the same height??
 

dogdog

Well-known member
Joined
Nov 15, 2011
Messages
12,711
for welding I build some jigs using 2x4s to keep them some what square (strap tie them with those ratching straps), and do what IGN suggested. and weld a little move to other spot opposite them move and come back to keep the heat affect zone down and prevent it from twisting/pulling...

my noobish way for hanging was, the same thing a jig, hang one door as straight as level and plumb. then hang the other aligning it to the hung door, build jigs from 2x4 as necessary. Not sure how the pros do it.... my re-hung door was way better than the "pro" I think I had an old thread few years back.....
 
OP
M

myredracer

Well-known member
Joined
Nov 1, 2015
Messages
557
Location
Langley, BC
Yes, similar to a French door and will have motor operators.

It's not corner to corner that I'm wondering about, it's keeping flat so it doesn't develop a twist. I'm thinking thinner wall tubing is more susceptible to distortion. I don't have a 4'x7' welding table and would have to use some sawhorses and shim the 4 corners first (it'd be laid out on the flat). I want to go as thin as available on the tubing to make each 1/2 of the gate as light as possible.

I don't want each 1/2 getting twist in them so they don't match up in the middle. There' won't be a way of adjusting them once they are to make sure they match up together when closed. (hinges are welded on and fixed)
 
Last edited:

koditten

Well-known member
Joined
Apr 10, 2008
Messages
5,528
Location
Midland, Michigan
I'm just not seeing distortion being that big of a deal. Just alternate corners as you weld and warping will be minimal. You should be able to keep the frame within 1/4" of perfectly square.

Once you got the first one built, you use that as your form when building the second one. Clamp the second gate parts to the first and you will have a mirror image.
 

ducksface

Banned
Joined
Oct 25, 2012
Messages
2,477
So much cheaper to buy than build.

So many try to make gates, so many fail.
Unless you just really really need a project, consider standard gates or hiring out the custom work.

Only a suggestion. Big jigs, powder coating, finial work, be out of square by a half an inch and you'll see it like the Grand Canyon where the two gates meet. Miss that hinge by a degree from plumb....
 
Last edited:
To avoid these ads, REGISTER NOW!

matt_i

Well-known member
Joined
Mar 14, 2008
Messages
10,728
Location
SE Michigan
I don't want each 1/2 getting twist in them so they don't match up in the middle. There' won't be a way of adjusting them once they are to make sure they match up together when closed. (hinges are welded on and fixed)

You know if you welded each one exacttly the same sequence, as seen out from the hinges, it should match pretty well.

That said, I would try to build it on a floor or steel reference table. I think if you spend a lot of time tacking it all over, multiple tacks starting light and then getting heavier, you will have it pretty well self-fixtured.

I would think about making the hinges bolt-on, at least to start, so you have some ability to tweak, shim, and adjust within oversized holes. When you really like the result and it has run a little bit, then you can bring out a stick welder and put a little metal there to hold the position. if you really want, then pull out the bolts and plug-weld the holes.
 
OP
M

myredracer

Well-known member
Joined
Nov 1, 2015
Messages
557
Location
Langley, BC
You know if you welded each one exacttly the same sequence, as seen out from the hinges, it should match pretty well.

That said, I would try to build it on a floor or steel reference table. I think if you spend a lot of time tacking it all over, multiple tacks starting light and then getting heavier, you will have it pretty well self-fixtured.

I would think about making the hinges bolt-on, at least to start, so you have some ability to tweak, shim, and adjust within oversized holes. When you really like the result and it has run a little bit, then you can bring out a stick welder and put a little metal there to hold the position. if you really want, then pull out the bolts and plug-weld the holes.

Thanks, good info. I also just thinking that it would help to lay a piece of the 2x5 (or 2x5) from the second half and clamp it down a couple feet from the corners and when it's welded up it should be pretty true to lay the second half on it.

I agree it would probably be a good idea to make the hinges bolt on. Or maybe weld them to a say 2"x4" plate, clamp them in place and when all aligned, weld the plate on.

We looked into getting a gate made up a few years ago and it was really expensive. I'd assume stock gates would be kind of plain looking. We want something a little different and suits the house style.
 

2oolhound

Well-known member
Joined
Dec 18, 2010
Messages
5,918
Location
BC Canada
I agree to make the hinges adjustable. I've hung a few gates and big doors and the hinge adjustment is the final step. They should adjust in and out from the post and up and down at least. A tilt option would be even better to correct the problem you're anticipating.

Long bolts that go right through the posts with a steel plate welded to the heads is easiest so you get the gap to match in the middle of the gates by shimming behind the plate and tightening the nuts on the back side of the post. The plate has 4 heavy studs sticking off the front that a matching plate with horizontal slots fits over the 1st plate so it slides side to side. The second plate with the slots has a tongue sticking straight off at 90º and a pin sticking straight up that the gate could sit on and simple washers could be stacked to raise the height of the gates to match. You could put timken bearings on the pin on top of the washers.

I don't do cad but here's the idea. You could put pipes in the posts as you build to house the bolts. They control SAG.
Slots in 2nd plate control tilt of the face of the gates.
Washers raise the height of each gate of the pin.

attachment.php
 

Attachments

  • Gate Hinge.jpg
    Gate Hinge.jpg
    77.2 KB · Views: 331

jjgag60

Active member
Joined
Mar 27, 2011
Messages
28
nice picture. What do the bearing fit up into then? Wont they need some type of "race" to match up to in the bottom of the gate. What do you like to use as the "race". A round cylinder or pipe or?
 

2oolhound

Well-known member
Joined
Dec 18, 2010
Messages
5,918
Location
BC Canada
Yes the race goes in the gate. If you fab the gate upright with a pipe sized to fit the race it is simpler. The pipe can go inside the square tubing.

I just wanted to toss this in to stimulate ideas. I've only built wooden gates, never a steel one like this.

Typically with doors it's the door jamb that gets most of the tweaking. It's pretty well square, level and has no tilt so hanging doors is quite simple and not much adjustment is required with the doors. With gates the posts are pretty much independent of each other and the spans are greater so more adjustment is needed in the hinges.

The ideal thing would be pour a slab across the driveway for the posts to sit on and leave rebar sticking up to tie in the posts. Then cap it with an arch to lock the top in. Then the whole thing could only tilt frontward or backward. Depends on the type of ground and the amount of heavy traffic in the area as to how much effort you need to expend on it. A 4' high gate isn't too big a deal.
 
Last edited:

rsanter

Well-known member
Joined
Dec 22, 2007
Messages
18,522
Location
visalia ca
How to keep in the same plane?
Make all your cuts and tack the whole thing together and verify square before finish welding.
Tack the corners of the joint, weld the outer edge, then the inner edge of the corners first. Then weld the sides of the corner joints.
Make sure your joints fit tight, excessive gaps give the joints a place to pull.
Partly weld each joint while working your way around the whole gate.
If you do get a little out of plane you can heat the welds with a gas torch or a TIG torch to relive some of the stress from the welds.

On heavy things like this. I always drill a couple holes and weld a couple nuts in the top piece. This allows you to thread in eyelet bolts to be able to pick it up for handeling, transportation, installation, as well as giving the powder coat people a way to hang it when they are coating it.

Bob
 

Ign

Well-known member
Joined
Jul 7, 2006
Messages
12,769
Location
Butte Peak ND
First, I wouldn't worry about w.t. and warping. Keep it light and distribute your heat.

Do you have any table at you can clamp to? I've only got a 4x5' table but have welded much longer. Let it overhang and support w pipe stands. But still clamp it where the table ends.

For corners that wind up off the table, clamp a pc of flat bar under the joint, and clamp both sides of the work to that flat bar.

As for the mirror image idea....maybe. That wouldn't be my preference but there's more than one way to skin a cat. For one thing, you'll have to make sure there's no welds on one side of your first piece or you'll have to grind them down.

edit: actually I'd want no welds or ground welds on BOTH sides of my "jig" piece because the other side would be on my flat table, and if I wanted to clamp it all down to the table (which I would), I'd be causing it all to deflect the height of the welds. If you were JUST using pipe stands it'd be a different story.
 
Last edited:

Ign

Well-known member
Joined
Jul 7, 2006
Messages
12,769
Location
Butte Peak ND
Now I too would recommend some adjustment in your hinges if at all possible. The bottom line is no matter how well you build the uprights the earth moves. Things sag, things heave, soils rise and fall.

I'd just try to use the adjustable "all thread hinges" if possible, common at ag supplies and even TSC sells 'em. You can get them quite large, up to 3/4" all-thread and maybe bigger.

Anyway, I had to hang two sides of a double gate years ago as the OP is faced with. The driveway sloped and I just didn't have enough "cribbing" to mock up the second half at the same height as the first half (hanging the first half is easy).

So, I'll try to describe what I did as best I can. Stay with me (if you care).
1. gotta set your posts in concrete obviously
2. hang first half of gate, this is easy and determining the height is easy
3. make sure first half is perfectly level and take a laser level to shoot a line across to the second upright. In my case my Craftsman digi level told me my dot would be 1.125" above the level of the work. Mark that dot on your second upright, measure down 1.125" plus however far down you need for your hinge design mounting/pivot area. (Note: on something like 4" sq tube I wouldnt' just mark one side and drill through with a hand drill. Measure and mark both sides and drill from each corresponding side so that if your eyeball ***** for drilling a hole perfectly straight through you don't wind up wonky.)

My ag supply just flat ran out of hinges and said "we don't know when we're going to order more." Thanks guys. Needless to say I haven't stepped foot in there ever again. And I had to custom build a few hinges LOL This was around 2011 and the gate is still standing at a rental property.....

Oh and that's my dad in the one pic.....

Last pic, mostly unrelated: custom slotting for a locking mechanism, one advantage of having a machinist do your fab work LOL
 

Attachments

  • cr250gate 008.jpg
    cr250gate 008.jpg
    126.3 KB · Views: 56
  • cr250gate 003.jpg
    cr250gate 003.jpg
    131 KB · Views: 55
  • cr250gate 007.jpg
    cr250gate 007.jpg
    122.9 KB · Views: 60
  • cr250gate 006.jpg
    cr250gate 006.jpg
    137.5 KB · Views: 55
  • cr250gate 015.jpg
    cr250gate 015.jpg
    146.5 KB · Views: 58
  • cr250gate 014.jpg
    cr250gate 014.jpg
    88.1 KB · Views: 55
To avoid these ads, REGISTER NOW!
Top Bottom