To avoid these ads, REGISTER NOW!

One Wall at a Time Garage Renovation

z28snksknr

Well-known member
Joined
Jul 8, 2009
Messages
1,827
Location
Turnersville, NJ
I just bought a house with a garage back in March and after finishing all the “must-do’s” like a new kitchen from the studs out, new tile in the foyer, painting, and a few other half dozen tasks, it’s FINALLY time to get to the garage! Unfortunately, there’s no money left to fulfill my dreams of four post alignment lifts, tire changers, sandblasting cabinets, epoxy coated floors, and paint booths :mad:. Instead, I will focus on the basics of just getting the garage organized and an enjoyable place to be on a TIGHT (more emphasis than capitals letters provide) budget. :thumbup:

So far, I’ve hung what’s left of the old kitchen cabinets in the garage. They are hideously painted, falling apart, and besides holding up my yet-to-be-finished workbench and housing random stuff, they aren’t worth their rotted and warped particleboard they are made of. Having said that, I’m not starting there…..because I can’t afford or build new cabinets…. Yet.

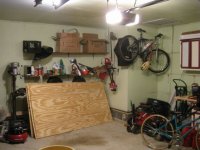
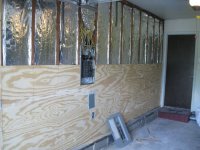
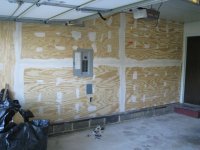
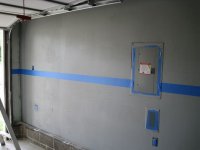
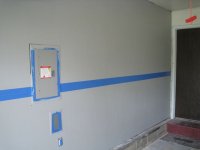
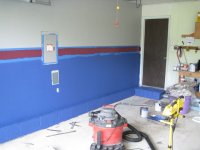
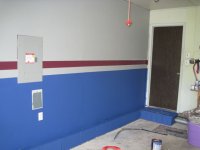
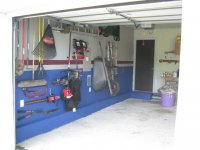
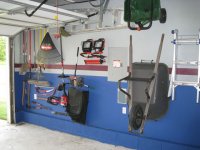
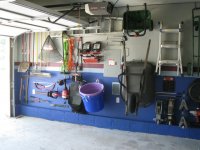
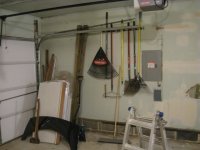
Instead, I figured I would start with one wall. I needed a place where I can hang items in an organized fashion since everything that didn't find a home in the new house has mysteriously made it's way into the garage...:headscrat I can't afford a shed for 2-3 years so a place for lawn / landscaping equipment as well as some of my Automotive tools was needed. I also got to try out a paint scheme so I have something to motivate me to do the other 2 large walls of punctured, crumbling drywall. I have taken many pics documenting my progress over about 5 days which I hope I can get to posting tonight.

This is a super minor project compared to most of what I see on here, but I’m sure there are a bunch of poor bastards like me out there that could use a starting point like me. After all, I “borrowed” a lot of the creative and organizational ideas from all you guys!! Here’s hoping this is helpful to someone….
 
To avoid these ads, REGISTER NOW!
OP
Z

z28snksknr

Well-known member
Joined
Jul 8, 2009
Messages
1,827
Location
Turnersville, NJ
Ok, so here is my starting point. I inherited the shelves from the previous owner. The nails holding the supports are just about falling out of the wall. The cabinets were the previous owner's kitchen cabinets (nice huh?).

I only worked on one wall, but included pics of the whole garage for reference and to give an idea.
 

Attachments

  • IMG_2479.jpg
    IMG_2479.jpg
    48.1 KB · Views: 1,507
  • IMG_2478.jpg
    IMG_2478.jpg
    45.2 KB · Views: 1,301
  • IMG_2471.jpg
    IMG_2471.jpg
    45.2 KB · Views: 1,210
  • IMG_2472.jpg
    IMG_2472.jpg
    56.7 KB · Views: 1,562
  • IMG_2477.jpg
    IMG_2477.jpg
    38.2 KB · Views: 1,232
OP
Z

z28snksknr

Well-known member
Joined
Jul 8, 2009
Messages
1,827
Location
Turnersville, NJ
Here's my best first attempt at working with the existing drywall (and the reason I tore it out the next day.

Before I get flamed for the quality of my work, I didn't bother to sand or even apply a second coat. I just threw in the towel.
 

Attachments

  • IMG_2480.jpg
    IMG_2480.jpg
    17.6 KB · Views: 1,069
  • IMG_2481.jpg
    IMG_2481.jpg
    15.8 KB · Views: 962
OP
Z

z28snksknr

Well-known member
Joined
Jul 8, 2009
Messages
1,827
Location
Turnersville, NJ
The wall after removing the drywall. I was glad to see 1972's best insulation lining the walls.
 

Attachments

  • IMG_2483.jpg
    IMG_2483.jpg
    63 KB · Views: 706
  • IMG_2482.jpg
    IMG_2482.jpg
    66.8 KB · Views: 778
OP
Z

z28snksknr

Well-known member
Joined
Jul 8, 2009
Messages
1,827
Location
Turnersville, NJ
I chose 1/2" (15/32" actually) BCX plywood. I looked at ACX for a better finish for painting, but since I was going to hang a bunch of stuff on the wall, I thought I would save that option for someone else.

I also considered hanging the plywood vertically since the wall was an even 8' x 20' to keep # of seams down, but went for the more structurally sound horizontal layout. In all, cutting, hanging, and screwing in the plywood took an afternoon of working by myself. If I had a buddy working the drill, that would easily be cut in half or less.
 

Attachments

  • IMG_2484.jpg
    IMG_2484.jpg
    60.2 KB · Views: 737
  • IMG_2485.jpg
    IMG_2485.jpg
    51.7 KB · Views: 658
OP
Z

z28snksknr

Well-known member
Joined
Jul 8, 2009
Messages
1,827
Location
Turnersville, NJ
I did choose to hang the last panel vertically (more out of laziness and the inability to justify cutting the sheet in two then hanging the pieces on top of each other. I had to cut the first panel (right most in the photos) so that the seams ended in the middle of studs. Also, since there was a slight slope in the garage, that required cutting the ends on a slight angle. I used the cut pieces for the end (to the left of the vertical board). Since that was in the corner of the garage where I couldn't utilize that area a lot, i didn't mind it being pieced together.

Here are pics of the finished plywood. The seams were pretty darn tight, although there was some edges and unevenness of the cuts (used a circular saw without a guide, just a line). It's all in how particular you get, but since I was painting the wall, I chose to mud the seams and screw holes.
 

Attachments

  • IMG_2486.jpg
    IMG_2486.jpg
    50.6 KB · Views: 854
  • IMG_2487.jpg
    IMG_2487.jpg
    37 KB · Views: 723
OP
Z

z28snksknr

Well-known member
Joined
Jul 8, 2009
Messages
1,827
Location
Turnersville, NJ
First step (after sanding the seams a bit) was to apply a primer. I went with Bullseye primer from Lowe's, which I found to be pretty watery and didn't really cover as well as I hoped. After one coat, you could still see the woodgrain in spots. Here's the first and second coat of primer for comparison. I had just enough to cover the wall with two coats (and no more). The pics are before the paint dried, but you'll get the idea.
 

Attachments

  • IMG_2489.jpg
    IMG_2489.jpg
    36.5 KB · Views: 765
  • IMG_2488.jpg
    IMG_2488.jpg
    24 KB · Views: 764

TONE

Well-known member
Joined
Jun 5, 2006
Messages
1,866
Looks good but I have a question.

Ive heard of people using plywood as a finishing surface like it appears youre doing.

But wont the joint compund crack as the wood expands and contracts with the weathers climate.

Drywall doesnt change size like wood so I understand how it hold up.

Or is this a special kind of compound?
 
OP
Z

z28snksknr

Well-known member
Joined
Jul 8, 2009
Messages
1,827
Location
Turnersville, NJ
My paint scheme was a gray (tinted primer) top with a blue bottom. I also chose to add a maroon and baby blue stripe which were actually vintage Phillies colors (I'm from S. Jersey and have been a Phillies fan forever).

I laid out the stripes by first measuring from the floor (not the bottom of the plywood) to the ceiling and cutting it in half. I planned for one stripe above and one below, so I drew a level line from one end of the garage to the other and laid two widths of 2" blue 3M painters tape for the bottom stripe. Then I measured 4" up from the top of the tape and drew another level line the length of the wall and applied one width of tape with the bottom edge touching the level line.

Here's the complete taping. Notice that I ran out of tape just short of completion.... :mad::lol_hitti
 

Attachments

  • IMG_2490.jpg
    IMG_2490.jpg
    28.6 KB · Views: 445
  • IMG_2491.jpg
    IMG_2491.jpg
    22.4 KB · Views: 374
  • IMG_2494.jpg
    IMG_2494.jpg
    17.7 KB · Views: 364
OP
Z

z28snksknr

Well-known member
Joined
Jul 8, 2009
Messages
1,827
Location
Turnersville, NJ
Sorry, the above pics are of the one tape row, not the two stated above.

Anyway, here is the bottom portion painted and the top stripe painted as well. I hit a groove here, so I didn't stop to take pics. I'm sure you can figure it out.
 

Attachments

  • IMG_2495.jpg
    IMG_2495.jpg
    35.5 KB · Views: 516
  • IMG_2496.jpg
    IMG_2496.jpg
    38.6 KB · Views: 457
  • IMG_2498.jpg
    IMG_2498.jpg
    27.9 KB · Views: 639
OP
Z

z28snksknr

Well-known member
Joined
Jul 8, 2009
Messages
1,827
Location
Turnersville, NJ
I quit for the day after painting the stripe to allow for the paint to dry. It was a humid weekend, so i wanted to give it proper time. In the meantime, I started hanging things on the wall because I was getting impatient. That quickly escalated into me hanging a TON of stuff, being mindful of keeping things off the final line. I used mostly 2" exterior screws to hang stuff, with some specialty hangers for the trimmer, wheelbarrow, and the long-handled tools. Everything was purchased at Lowe's, so I'm sure you can find it.

I also bought a bunch of threaded J-hooks and eye-hooks which I used to hang items that were to large to be held by the exterior screws. I loved the fact that I could screw everything in wherever i wanted and it all seemed to be very sturdy for what I was hanging.
 

Attachments

  • IMG_2501.jpg
    IMG_2501.jpg
    34.9 KB · Views: 2,453
  • IMG_2500.jpg
    IMG_2500.jpg
    41.9 KB · Views: 1,013
  • IMG_2499.jpg
    IMG_2499.jpg
    52.1 KB · Views: 2,793

tcianci

Well-known member
Joined
Feb 7, 2009
Messages
4,242
Location
Walpole, Ma
Nice looking garage! I know the feeling of running out of money before you run out of projects! I think your approach has great merit from both a financial standpoint as well as a motivational standpoint!
 
OP
Z

z28snksknr

Well-known member
Joined
Jul 8, 2009
Messages
1,827
Location
Turnersville, NJ
I took everything off the wall and taped and painted the last stripe. I really like the look and the wife was also pretty enthusiastic about the results (she's an artist so I enlisted her help to paint and pic the colors. I do have to say that I picked out the vintage Phillies maroon / baby blue shades by sight without references and when I got them home, they were dead on:thumbup:. I just kept thinking of all the Mike Schmidt jerseys at the games and went from memory.

Here is the final paint job. I didn't plan on painting the concrete block, but after doing the wall, it just looked more ugly, so i went for it. I'm glad I did because it cleaned it up a lot. I also was concerned with the tape lines given the rough texture of the plywood, but for the most part, it turned out almost as good as my typical jobs in the house (which is why my wife paints, not me).
 

Attachments

  • IMG_2502.jpg
    IMG_2502.jpg
    24 KB · Views: 401
  • IMG_2503.jpg
    IMG_2503.jpg
    22.5 KB · Views: 441
OP
Z

z28snksknr

Well-known member
Joined
Jul 8, 2009
Messages
1,827
Location
Turnersville, NJ
Here's the finished product with the majority of my stuff hung on the wall. I'll admit, towards the end I went a little "hang-it-up" happy, but the clutter is virtually gone from the garage and I actually ran out of things to hang!!

I added the before pic for comparison.

Comment away!!!!
 

Attachments

  • IMG_2504.jpg
    IMG_2504.jpg
    57.5 KB · Views: 987
  • IMG_2505.jpg
    IMG_2505.jpg
    55 KB · Views: 847
  • IMG_2477.jpg
    IMG_2477.jpg
    38.2 KB · Views: 717
OP
Z

z28snksknr

Well-known member
Joined
Jul 8, 2009
Messages
1,827
Location
Turnersville, NJ
Looks good but I have a question.

Ive heard of people using plywood as a finishing surface like it appears youre doing.

But wont the joint compund crack as the wood expands and contracts with the weathers climate.

Drywall doesnt change size like wood so I understand how it hold up.

Or is this a special kind of compound?

No, I used just normal compound on the seams. I admit I am aware that it may not hold up (nor do I expect it to) , but since this was more if a "utility wall", with so much covering up all that nice paint job, I wasn't too concerned with it, especially after putting about 150 screws into the paint. I plan on filling any cracks with paintable caulk if it gets too noticeable. The garage isn't heated or cooled (directly), but since it is insulated and shares 2/3 walls with the house, it doesn't see the drastic temp swings of a detached or uninsulated garage. I'd say it never gets cooler than 50 in the winter and 75 in the summer.
 

Fuzz

Active member
Joined
Apr 1, 2009
Messages
41
Location
Wexford County, MI
Being an electrician, I would have suggested leaving a removable panel above the electrical service panel for any future changes/upgrades. It sure does make an easier job of adding cables without fishing into the panel.

j
 
OP
Z

z28snksknr

Well-known member
Joined
Jul 8, 2009
Messages
1,827
Location
Turnersville, NJ
Nice looking garage! I know the feeling of running out of money before you run out of projects! I think your approach has great merit from both a financial standpoint as well as a motivational standpoint!

Thanks!! Like I said, I probably spent $250 and a long weekend on the whole thing, so the "boundary to entry" is pretty low. Now that I have the one wall done, I can't wait to get started on the other two!!:beer:
 
OP
Z

z28snksknr

Well-known member
Joined
Jul 8, 2009
Messages
1,827
Location
Turnersville, NJ
Being an electrician, I would have suggested leaving a removable panel above the electrical service panel for any future changes/upgrades. It sure does make an easier job of adding cables without fishing into the panel.

j

Yeah, I though about that, but since the box is filled (no open spots for circuits), and I'm not going to have to money to upgrade any time soon, I went for it. If you were there to nudge me, I probably would have just cut out the panel and left the screws exposed on that part. Unfortunately, it was just lazy old me.... :lol_hitti
 

tcianci

Well-known member
Joined
Feb 7, 2009
Messages
4,242
Location
Walpole, Ma
Hey Z, something you said made me wonder... you posted that the garage shares 2/3 of its walls with the house.... shouldn't those common walls be firecode sheetrock?
 
To avoid these ads, REGISTER NOW!
OP
Z

z28snksknr

Well-known member
Joined
Jul 8, 2009
Messages
1,827
Location
Turnersville, NJ
Hey Z, something you said made me wonder... you posted that the garage shares 2/3 of its walls with the house.... shouldn't those common walls be firecode sheetrock?

Yes. You are correct.:thumbup: The wall I completed in the pictures was the exterior wall which does not need to be firewalled (5/8" sheetrock). I plan on attaching plywood over the sheetrock for the walls that share with the living space.

It's going to be a while before I get to the next wall :(, but my plans are to have one shelf up high for tote storage and a few sheets of pegboard for tool storage. I'm hoping I can keep that under $300. It's amazing how much floorspace has opened up now that everything has a home on the wall. It's also amazing how absolutely horrible the rest of the garage looks in comparison to the completed wall :)
 

1Garageman

Well-known member
Joined
May 12, 2009
Messages
4,417
Location
Columbus, Ohio
Hey that looks great. My wife and I are bidding on a house right now and the garage is just like that. At our current house we have a shed to put the lawn mower in, rakes, wheel barrowl, etc. We won't have that at are new house. This gives me GREAT ideas on what to do the the garage to store some things. GREAT JOB, and thanks for sharing it with us!
:beer:CHEERS!:beer:
 
OP
Z

z28snksknr

Well-known member
Joined
Jul 8, 2009
Messages
1,827
Location
Turnersville, NJ
I'm planning on starting on the next wall today. The plan for today is to get the wall stripped of the horrible shelves, locating and marking the studs for attaching plywood, and possibly priming the ceiling (so I can put up my lighting later on). My dad is supposed to come over to help me, so I might attempt to get the workbench attached to the wall since I can't lift it myself AND operate a drill to attach it. I'll post pics and details soon, regardless of which task i choose.
 

sigtauenus

Well-known member
Joined
Sep 16, 2009
Messages
45
I'm planning a shed right now and just last night priced out drywall for the interior, that is out now. Thanks for the idea of using plywood instead. That will make organizing the shed so much easier not having to worry about finding a stud to hang something heavy.
 
OP
Z

z28snksknr

Well-known member
Joined
Jul 8, 2009
Messages
1,827
Location
Turnersville, NJ
glad I could help. I have some pics of my budget colapseable workbench that I just completed that hopefully I can post soon. Finding 30 min. to upload pics has been hard to come by recently.
 
OP
Z

z28snksknr

Well-known member
Joined
Jul 8, 2009
Messages
1,827
Location
Turnersville, NJ
I finally found the time to upload pics of my workbench. It's made from 3 2" x 10"'s laid edge to edge and is hinged to the wall so it collapses down if I need the space. I bolted the 2x10's down and countersunk the bolts so they are flush with the work surface. I can easily unbolt each one to replace if needed.
IMG_2523.jpg


It's attached to the wall with 4 heavy duty hinges attached to a ledger board screwed into the wall studs that functions as a backsplash also. It's about 12' long and about 30" deep which gives a nice large surface.
IMG_2526.jpg

IMG_2524.jpg


The front legs are made from 4x4 pressure washed wood (it was actually cheaper than non-pressure treated 4x4's at Lowes for some reason. Since it's in contact with concrete and may see some moisture since I will be washing cars in the garage occasionally, I was ok with that. The legs are also hinged and they swing up to fold under the bench when needed. They are also adjustable and meet the concrete with large bolts that are screwed into nuts sunk into the bottom of the legs.
IMG_2525.jpg

IMG_2530.jpg


The whole thing cost me about $125 counting all hardware, soup to nuts and required maybe 8 cuts in total. It's really sturdy and doesn't even make a sound when I jump on it (200lbs). I'm pretty pleased with the design. The only thing I'm upset about is that I already filled underneath the bench with ****, so I couldn't fold it down to show you guys.

I WANT FEEDBACK!!

Anyway, enjoy the pics. I also cleaned up the garage a bit. I hope to start on the next wall shortly. Stay tuned.
 

coachrick

Well-known member
Joined
Jan 17, 2009
Messages
101
Location
N. Austin, TX
Well done...maybe it's my monitor but it looks like three support legs with nothing at the left corner??? I've considered something similar but would likely top with hardboard of some sort to provide a smooth surface...easily replaced when damaged. OTOH, you have a great work surface already. I know about filling empty spaces with 'stuff'...maybe only certain items should 'qualify' to go under the benchtop. My problem would be loading up the work surface with said 'stuff', rendering the fold-a-bility nearly useless:(

Keep us updated!:thumbup:

BTW, that bicycle looks at least as old as the cabs...what'cha got there?
 
OP
Z

z28snksknr

Well-known member
Joined
Jul 8, 2009
Messages
1,827
Location
Turnersville, NJ
The 4th leg I left off because under all that garbage is a hole in my concrete floor that is awaiting my attention. I didn't want to cut the leg to length because right now, it would not be the same level as the garage floor and be too short once I fix the floor.

I agree with the hardwood on top, since the lumber is very soft, But I figured if it got really badly torn up I could jsut replace a board (at $12 or so).

The stuff underneath is mainly 2x4 light fixtures which I'm currently installing. Then comes the shelving for the rest of the garbage I threw under there. The bike is the wife's from childhood. I had it hanging on the wall next to mine, but its so damn heavy that it pulled the mount right out of my plywood :shocking:. It feels like it's made from solid cast iron!! I'd rather it made its way back to the inlaws basement :thumbup:
 

coachrick

Well-known member
Joined
Jan 17, 2009
Messages
101
Location
N. Austin, TX
The 4th leg I left off because under all that garbage is a hole in my concrete floor that is awaiting my attention. .

The stuff underneath is mainly 2x4 light fixtures which I'm currently installing. Then comes the shelving for the rest of the garbage I threw under there. The bike is the wife's from childhood. I had it hanging on the wall next to mine, but its so damn heavy that it pulled the mount right out of my plywood :shocking:. It feels like it's made from solid cast iron!! I'd rather it made its way back to the inlaws basement :thumbup:

Whew! Glad to know my eyesight/monitor hasn't gone completely. You know some family member or visitor is going to test that corner first thing...Murphy's Law.:) Would you consider some sort of 'cushion' between the legs and floor for damping vibration? Might not bother you but my last workbench was wood on concrete until I snugged it up with some rubber 'feet' made of leftover something-or-other. Just made banging on stuff a little quieter and more solid feeling. My BowFlex mat is in front of my bench for standing--free with the purchase of my seldom-used BowFlex.

Good to hear you have a plan for all the stuff under the bench...I have a bit of trouble getting PAST the planning stage for such a project!

I hear you on the bicycle...we are beginning to clean out our 89-year-old aunt's garage and there is a Huffy from probably mid to late 70s ...I'll bet it doesn't have 10 miles on it! Weighs a ton!

Carry on...
 
OP
Z

z28snksknr

Well-known member
Joined
Jul 8, 2009
Messages
1,827
Location
Turnersville, NJ
Update time!!

I took this weekend and decided to tackle the 2nd wall of my garage. I removed all the shelving and moved the cabinets away. Here are some before shots:
IMG_2529.jpg

IMG_0301.jpg

IMG_0303.jpg
 
OP
Z

z28snksknr

Well-known member
Joined
Jul 8, 2009
Messages
1,827
Location
Turnersville, NJ
I was going to put up plywood, but I changed my plans since I want this wall to remain fairly unoccupied and uncluttered to keep the garage looking clean.

After spackeling all the nicks, holes, and bad tape job from 30 years ago:
IMG_0311.jpg


IMG_0313.jpg


While I was waiting for the wall to dry so I could sand it, I decided I was sick of replacing the dryer duct sticking out of the middle of my garage wall, so I took some scraps of plywood and built a chase for it. Since I plan on putting some sort of cabinet where the "hard pipe" is, I left that untouched.

Before:
IMG_0308.jpg


After:
IMG_0309.jpg
 
OP
Z

z28snksknr

Well-known member
Joined
Jul 8, 2009
Messages
1,827
Location
Turnersville, NJ
Next came priming (after I sanded the compound).

After 2 coats, the wall looked clean again!! (still wet in this pic, so you see some ghosts of the old wall. That went away once it dried.
IMG_2779.jpg


IMG_2780.jpg


After that dried (which took forever since it was 50 degrees in the garage), I laid out the stripe lines the same way as last time- holding a level up and drawing a level line down the whole wall (I took care of that drip by the garage opener, don't worry):
IMG_2782.jpg

Oh, and I used the rest of the primer to paint those god-awful cabinets that will soon be replaced by a custom built one when I get the time / money
IMG_2781.jpg
:
 
OP
Z

z28snksknr

Well-known member
Joined
Jul 8, 2009
Messages
1,827
Location
Turnersville, NJ
Then I taped using hte lines as a guide and painted the maroon stripe. I'll skip the details since it's the same as the first wall I did:
IMG_2833.jpg


I painted the bottom portion this evening. Then...... trouble....

I pulled off the tape, and evidently the primer didn't adhere to the wall as well as the tape did. I'm hoping any painters in here will point out what I did wrong to cause this- not enough dry time / too cold / didn't wipe off the sanded portions well enough / all three????:headscrat:(

Anyway, here is the result:
IMG_2838.jpg


IMG_2836.jpg


I post these so others can see what I did wrong. I'm going to skip taping the middle stripe since it will tear paint off the good stripe and the blue section. The wife is an artist, so she offered to hand paint the edges for me :thumbup:. Gotta love when the wife comes through to help in the garage:bounce:

Anyway, here is where I ended up tonight. I'll give it a day or two to set up properly and then I'll paint the last stripe and move everything back:
IMG_2839.jpg


Here's a before shot for comparison:
IMG_0303.jpg


Not bad for $60 worth of paint and part of a weekend, huh? :pimpflash
 
OP
Z

z28snksknr

Well-known member
Joined
Jul 8, 2009
Messages
1,827
Location
Turnersville, NJ
I'll try to post pics tonight after I paint the final stripe and touch up the part above the top stripe.

I plan on building a pegboard cabinet for the right side of the wall to keep my tools at arms reach while working in that bay. The left side (near the door, where the old cabinets are in the photo) is open for discussion. I was thinking of building a cabinet to house the three "worst offenders" as far as floor space goes: the shop vac, my mitre saw / stand, and the lawnmower. I also plan on hanging my above ground pool ladder (2 pieces) above the left hand bay garage door.

First order of buisness however, will be to put up a wire shelf across the top of the wall 2' from the ceiling so I can put up all the storage containers I bought a while back. After I see what fits up there, I'll have a better idea of what I will need from a floor level cabinet. :thumbup:
 

porphyre

Banned
Joined
Sep 2, 2009
Messages
1,321
Keep up the good work. I too hope someone chimes in with info about your tape peeling the paint. I'm going to be doing stripes and don't want it to happen to me!

Also, would you mind posting a shot of your bicycle hanging setup? I've got a 24x26 and I'm struggling pretty bad with finding a place to put the bikes that won't obscure work/walking area.

Thanks.
 
OP
Z

z28snksknr

Well-known member
Joined
Jul 8, 2009
Messages
1,827
Location
Turnersville, NJ
The bike hanger I got at Lowe's (but I've seen these same units everywhere). I like to get it as high up as possible to keep it out of the way. If you have the wall space somewhere, it works great. I don't have a pic right now of my setup, but here is the hardware:

0468205_160_CC_v1_m56577569830901931.jpg
 

idoine in toronto

Well-known member
Joined
Mar 5, 2005
Messages
168
Location
Toronto Ontario Canada
I don't know why your painter's tape pulled off the paint, but it's probably one or a combination of the reasons you mentioned in your post.

One simple trick when painting stripes with tape is to put a light coat of the base color down first after the tape, the light gray in your case. This will seal the tape edge for the final contrasting color. If there is any bleed-through under the tape it will be the same color as the base and the finish contrasting color will have a sharp edge. It will also not be necessary to press the tape as firmly to the wall and may reduce the amount of paint that is torn off when pulling the tape.

Good luck. Looks good so far.
 
OP
Z

z28snksknr

Well-known member
Joined
Jul 8, 2009
Messages
1,827
Location
Turnersville, NJ
Thanks. I'm leaning more towards the drywall compound still having some dust on it since there were so many spots to hit. There weren't any spots that peeled that had paint underneath, just compound.

Besides the corner where the red stripe got sucked under the tape and bled down the corner of the wall (wife taped that part), the lines were pretty sharp although I did rub the tape edges hard to get them "sealed".
 
To avoid these ads, REGISTER NOW!
Top Bottom