To avoid these ads, REGISTER NOW!

One year later 40'x80'

LXCam

ALLIANCE MEMBER
Joined
Apr 23, 2013
Messages
19,092
Location
AZ
Wuz up brother, I'm glad to finally see you back in action. And as usual, showing off some badass projects :bowdown:

I've made a few thumbscrews before. But how come yours look super sick :thumbup:

And mine just look unhealthy :wtf:

IMG_6473.JPG

Lol, keep up the great work bud and I hope those long weeks have settled down for a while. Between you and Mike not posting anything lately it's getting a bit boring here :spit:
 
To avoid these ads, REGISTER NOW!
OP
F

fnieto

Well-known member
Joined
Aug 27, 2013
Messages
1,401
Location
Tucson,Arizona
Hey Cam,
thanks man, I finally shut down the OT for the year and need to be better about posting current projects.

Couple more projects/upgrades on the Dmax.
rear diff cover increased the volume of gear oil to maintain lower temps.
The cover has a large sight glass to easy viewing of oil level. The cover seals with a single O-ring and also provides cooling via heat sinks. The second mod was adding air springs. With the suspension lift a spacer was required. I opted for a 4º angled spacer. I was pretty happy with the fit and finish of the air lift kit. The rig now sits level. The two Schrader valves are located on the bottom side of the rear bumper. The onboard compressor and holing tank provide the air.

The rear diff now hold 5.5 qts.
attachment.php


Sight glass.
attachment.php


The Air lift kit with internal joust bump.
attachment.php


Here the angled spacer (4") required for a 6" suspension lift.
https://www.garagejournal.com/forum/attachment.php?attachmentid=811427&stc=1&d=1537566302[/IMGl]
[IMG]https://www.garagejournal.com/forum/attachment.php?attachmentid=811428&stc=1&d=1537566302
Schrader valves locations.
attachment.php
 

Attachments

  • IMG_3618.jpg
    IMG_3618.jpg
    147.7 KB · Views: 1,121
  • IMG_3616.jpg
    IMG_3616.jpg
    131.1 KB · Views: 29
  • IMG_3613.jpg
    IMG_3613.jpg
    140.8 KB · Views: 1,134
  • IMG_3592.jpg
    IMG_3592.jpg
    154.1 KB · Views: 1,146
  • IMG_3591.jpg
    IMG_3591.jpg
    147.6 KB · Views: 1,144
  • IMG_3614.jpg
    IMG_3614.jpg
    147.7 KB · Views: 1,142
OP
F

fnieto

Well-known member
Joined
Aug 27, 2013
Messages
1,401
Location
Tucson,Arizona
Customer brought this new radiator for modification. Not sure what it goes into but he already had it laid out.
attachment.php

attachment.php


Used a 2" die grinder with cut off wheel to cut along the provided line.
attachment.php

attachment.php

The caps where .100 thick while the tank was .070"
attachment.php

attachment.php
 

Attachments

  • IMG_3781.jpg
    IMG_3781.jpg
    152.8 KB · Views: 1,137
  • IMG_3782.jpg
    IMG_3782.jpg
    153.9 KB · Views: 1,130
  • IMG_3717.jpg
    IMG_3717.jpg
    150.6 KB · Views: 1,133
  • IMG_3715.jpg
    IMG_3715.jpg
    137.3 KB · Views: 1,130
  • IMG_3716.jpg
    IMG_3716.jpg
    133.6 KB · Views: 1,134
  • IMG_3714.jpg
    IMG_3714.jpg
    142.4 KB · Views: 1,136

C_F

ALLIANCE MEMBER
Joined
Jan 21, 2005
Messages
9,675
Location
Utah...SNOW BLOWS!
That must be a heavy aluminum radiator, if you need a forklift to haul it around. :bounce:

Your welds look 1,000 times better than whoever did the other welds on that thing. :thumbup:
 
OP
F

fnieto

Well-known member
Joined
Aug 27, 2013
Messages
1,401
Location
Tucson,Arizona
Hahah, The FL was already parked outside, so I used it to position the rad to a comfortable hight for cutting. The rad is made by Champion, I don't believe its high end.
Thanks for looking.
 
OP
F

fnieto

Well-known member
Joined
Aug 27, 2013
Messages
1,401
Location
Tucson,Arizona
Put together another VFD control for the old 1440 lathe. My son purchased his first new home in Eugene OR. The lathe will end up in his garage soon. I wanted to make it plug and play as much as possible.

All the components where had for under $500. Just have to hunt around.
attachment.php


Laying out for drilling/mounting.
attachment.php

attachment.php


Drilling vent ans cooling fan.
attachment.php


Lathe electronic's
attachment.php


All wired up.
attachment.php

Ops check good. Once in place, the cabinet gets wall mounted and power circuit ran with receptacle.
attachment.php
 

Attachments

  • IMG_3744.jpg
    IMG_3744.jpg
    152.5 KB · Views: 1,121
  • IMG_3746.jpg
    IMG_3746.jpg
    131.9 KB · Views: 1,122
  • IMG_3671.jpg
    IMG_3671.jpg
    149.9 KB · Views: 1,124
  • fullsizeoutput_6ce.jpg
    fullsizeoutput_6ce.jpg
    138.4 KB · Views: 1,121
  • fullsizeoutput_6cc.jpg
    fullsizeoutput_6cc.jpg
    145.8 KB · Views: 1,131
  • fullsizeoutput_6c9.jpg
    fullsizeoutput_6c9.jpg
    148.9 KB · Views: 1,120
  • IMG_3661.jpg
    IMG_3661.jpg
    150.1 KB · Views: 1,119

rmack898

Well-known member
Joined
Jan 23, 2007
Messages
3,146
Location
Honu Grove NE Florida
Paco,

Good to see you taking a breather from the day job OT. I always take it when it's available, and while it's great to see those big checks it can most certainly burn you out if you push too hard.

I got a great laugh yesterday when I read your update and saw that you put air bags on you D-Max truck.

I spent the better part of yesterday ripping my old airbags off the truck and installing a new set. It's interesting to see the difference in the bottom of your truck versus the bottom of my truck. My truck is a 2005 and I live in a coastal town minutes away from the big salt pond. My truck is rust everywhere. You living in the desert and the bottom of your truck looks like new.

So I ripped out a 15 year old Air Lift system on my truck and installed a brand new Air Lift system. If I can get another 15 years out of the truck, I'll be happy.
 

Attachments

  • IMG_3066.jpg
    IMG_3066.jpg
    150.5 KB · Views: 61
  • IMG_3060.jpg
    IMG_3060.jpg
    75.3 KB · Views: 65
  • IMG_3063.jpg
    IMG_3063.jpg
    91.8 KB · Views: 62
OP
F

fnieto

Well-known member
Joined
Aug 27, 2013
Messages
1,401
Location
Tucson,Arizona
Hi Mac,

Yeah, the OT was getting old. I ended up averaging 108 hour work weeks for close to five months.
Coincidence on the air bags, what brand did you use? Air lift's next level for the ones I went with where Stainless steel. Like you stated, the SW desert stays pretty dry, but the SS version might have a place in you neck of the woods. Both our rigs are 05.
I can't believe I went so long with out the air springs. I really like them and the rig has a great stance.
 
OP
F

fnieto

Well-known member
Joined
Aug 27, 2013
Messages
1,401
Location
Tucson,Arizona
Put together a couple of "cowboy wine racks". Used silicon bronze (TIG) to tack together.

attachment.php

attachment.php

attachment.php


The old spurs are nickel plated with copper and brass accents. For this reason, I chose to use silicon bronze to TIG them without damage to the finish.
attachment.php
 

Attachments

  • IMG_3778.jpg
    IMG_3778.jpg
    152.1 KB · Views: 1,047
  • IMG_3779.JPG
    IMG_3779.JPG
    133.8 KB · Views: 1,049
  • IMG_3776.JPG
    IMG_3776.JPG
    124.7 KB · Views: 1,048
  • IMG_3777.JPG
    IMG_3777.JPG
    135 KB · Views: 1,059
OP
F

fnieto

Well-known member
Joined
Aug 27, 2013
Messages
1,401
Location
Tucson,Arizona
Thanks Mike,
Still have a few items to post up.

I joined that RV forum you recommended (iRV2.com). Left you a thanks in your in box.
Trying to get educated prior to taking the plunge. I'm liking the preowned Prevost coaches though. I'v always admired the Detroit series 60, we ran those in out larger fire apparatus.

Originally wanted something under 30' but the hell hounds are in excellent heath so a 40' is in the running hahah. Looking forward to traveling with four GSD's.
 

zmotorsports

ALLIANCE MEMBER
Joined
Oct 20, 2009
Messages
21,337
Location
Northern Utah
Thanks Mike,
Still have a few items to post up.

I joined that RV forum you recommended (iRV2.com). Left you a thanks in your in box.
Trying to get educated prior to taking the plunge. I'm liking the preowned Prevost coaches though. I'v always admired the Detroit series 60, we ran those in out larger fire apparatus.

Originally wanted something under 30' but the hell hounds are in excellent heath so a 40' is in the running hahah. Looking forward to traveling with four GSD's.

A Prevost is my dream coach from either Marathon or Liberty converters. Almost bought a 2001 Liberty on the XLII chassis about 8 months ago but opted to hold off until I get the new house paid off and closer to retirement.

Good luck in the search and hope you find what you're looking for, although it may be hard to find in 30', unless you go older even a 40' in a Prevost chassis is going to hard to find. Most everything they have built in the last 15~ish years have been in the 45' model length on either the H3-45 or the XL chassis.
 

LXCam

ALLIANCE MEMBER
Joined
Apr 23, 2013
Messages
19,092
Location
AZ
Great to see you back at your real job, making awesomeness. Lol

I got a question for ya. Why the independent air lines for the bags. I know the argument but on a pick up I just never thought it made sense. I've had three rides with bags and have always T'd them together without a problem.
 
OP
F

fnieto

Well-known member
Joined
Aug 27, 2013
Messages
1,401
Location
Tucson,Arizona
Thanks Cam, your too kind.
The drivers side airbag requires 10 more psi over the passengers for the rig not to list to the port side. The heavy off center spare tire is more than likely the couplet. I agree "T" would be the most applicable configuration just not on this rig. Good question though. Prior to install, I measured all four corners and realized I would need independent schrader valves.
I always thought the rig drove nice at highway speeds, yesterday, I had to drive to Casa Grande, MAN! it really felt like it was on rails. Who would have thunk it.
Forgot to mention I also fixed that preverbal "GM clunk" found on steering columns. I replaced the intermediate steering shaft bearing. I don't remember the p/n, but its a green color replacement made by Doorman ($20), the original is white.
Any of you out there with a 2000 and up GM 2500-3500 know what the clunk is.
 
OP
F

fnieto

Well-known member
Joined
Aug 27, 2013
Messages
1,401
Location
Tucson,Arizona
Last week I rebuilt (resealed) the filter head on the Dmax. I was picking up a mill for a friend when the rig failed to run after running perfectly. It was 103º that day, in less than five minutes I troubleshot the problem to losing fuel prime. Dmax don't use lift pumps and rely on vacuum to draw fuel from the tank. The filter head has a priming plunger that allows you to bleed any air out of the system. There's six O-rings that require replacement. I found a seal kit for under $15. I also installed a 1/2" spacer between the filter heads mounting flange to facilitate the removal of the second fuel filter.

The two smaller black O-rings where flat. The new O-rings are Viton (reddish color) and did the trick.
attachment.php


Here is the installed filter head, notice the black spacer where it mounts (2 hole flange). This spacer provided enough room to grip the filter when replacing.
attachment.php


The "T" valve was added shortly after the first filter change. This set up prevent diesel from ******* all over the place when bleeding the system after filter change. I run two fuel filters as GM had injected issues in the early 2000's. Seem this rig produces 24K psi at the injectors. That said, any small debris would ruin your day. The small bleeder tube is routed and zip tied to the inner fender. A small paper cup can be placed on the upper A-arm when bleeding to catch the smelly diesel.
 

Attachments

  • IMG_3870.jpg
    IMG_3870.jpg
    100.9 KB · Views: 807
  • IMG_3871.jpg
    IMG_3871.jpg
    98.1 KB · Views: 806

zmotorsports

ALLIANCE MEMBER
Joined
Oct 20, 2009
Messages
21,337
Location
Northern Utah
Nice work Paco.

I keep waffling on the spacer but found a webbing style filter strap wrench does the trip to get into that small gap between the body and the filter when removing.

Friend of mine called me about a month ago stating the same thing, his Dmax ran perfectly all the way up to their cabin in Island Park, ID then he went out to start it and it wouldn't start. He called me and I instructed him to try priming the system as it may have lost its prime. Sure enough it fired right up so I ended up rebuilding his filter head upon his arrival back home.

Nice idea with the nylon line and petcock for bleeding. One of the first things I did was replace the cheap plastic bleed plug with an aluminum one but I like your idea more.
 
To avoid these ads, REGISTER NOW!

jbmatth

Well-known member
Joined
Jun 3, 2013
Messages
5,681
Location
Northern Ok.
Paco and Mike, another Dmax owner that has had the same issues, that clunk drove me nuts until I saw on Mike's thread what the problem was. When my filter head decided to start leaking it was actually seeping fuel out when I was trying to prime it with the bleeder shut. I really like the T valve idea though, I may have to check that out when I get back into mine. Also great work on all that you do, I don't reply often as I have nothing to really add.

JB
 
OP
F

fnieto

Well-known member
Joined
Aug 27, 2013
Messages
1,401
Location
Tucson,Arizona
A Prevost is my dream coach from either Marathon or Liberty converters. Almost bought a 2001 Liberty on the XLII chassis about 8 months ago but opted to hold off until I get the new house paid off and closer to retirement.

Good luck in the search and hope you find what you're looking for, although it may be hard to find in 30', unless you go older even a 40' in a Prevost chassis is going to hard to find. Most everything they have built in the last 15~ish years have been in the 45' model length on either the H3-45 or the XL chassis.
Thanks Mike,
I have a lot to learn. whatever I end up with MUST fit in the drive through bay. The door is 12'x10'. I should have went 14'x14'.

Nice work on the recent projects Paco. Thanks for sharing!
Thank you for stopping by.

Only 2 pages in, but it's an awesome building with a great assortment of machines. Can't wait see all your projects.
Thanks, I've been in the building now close to 4.5 years, the machines have been a collection of close to 20.

Paco and Mike, another Dmax owner that has had the same issues, that clunk drove me nuts until I saw on Mike's thread what the problem was. When my filter head decided to start leaking it was actually seeping fuel out when I was trying to prime it with the bleeder shut. I really like the T valve idea though, I may have to check that out when I get back into mine. Also great work on all that you do, I don't reply often as I have nothing to really add.

JB
Those rigs are built well for the most part. The items I have needed to repair have been inexpensive so far. My 05 only has 86K miles and mostly used for hauling. The clunk had started last year but was hardly noticeable. I knew it would only get worse if ignored.
I can't see getting into a new diesel, too damn expensive and don't get me started on the regeneration system (DEF).
Thanks for stopping in.
 
OP
F

fnieto

Well-known member
Joined
Aug 27, 2013
Messages
1,401
Location
Tucson,Arizona
On August 27th, my MIL passed away unexpectedly. She was my second mother since 1987 and a kind soul. She had lost two sons and her husband over the years, and had expressed to be laid to rest in-between her two sons (family plot). This meant she was to be cremated to make this possible as her two sons are buried in caskets next to each other with no room for a third casket between them. She knew cremation was the only way, what she didn't know (non of us either) was the tight parameters we had to follow. This particular cemetery is located in Nogales, AZ and run by the city of Nogales. They require a 20"x20" x24" deep hole for a concrete vault. the urn is placed inside and filled with concrete. That did not sit well with me, knowing my mom would be backfilled in mud.
I was able to come up with a solution not only to keep the urn away from concrete but provided enough room for anther of my MIL wishes. She wanted to have her favorite dog "Lazy" whom died several years back and also was cremated and in a small urn.

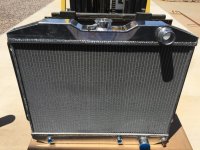
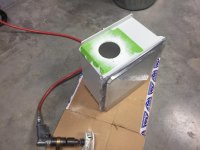
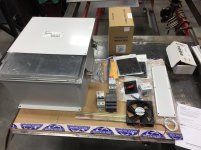
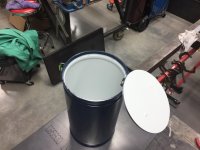
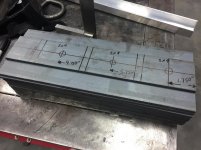
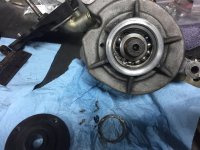
The Urn Capsule is 15" long and 8" diameter sch. 40 pipe. This will provide more than enough room for the two urns and any mementos family members wish to place prior to sealing and finally encase in concrete. The services have passes now but the actual burial will be October 8th 2018 allowing all family members ample time to plan for attendance.

I normally don't share personal experiences but having the honor and privilege of creating the vessel that will hold my MIL, and her pup was something created in my shop.
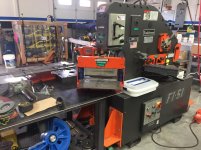
I have mentioned in past writing how the shop time feeds my soul and keeps me sane from nasty images seen during the past 25+ years of emergency work. In short, my shop is my temple and I'm closest to my creator there, second to hiking. I have found balance.
Another personal note, I have lost 8 people this year alone, people that I knew well and loved. From close co-workers to a close neighbor. "Life is short" is understated fellas, find balance any way you can. Enough, my eyes are sweating again....

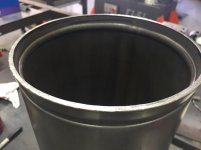
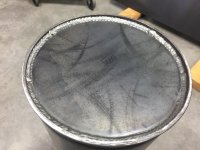
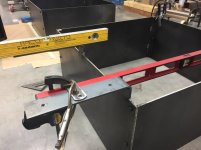
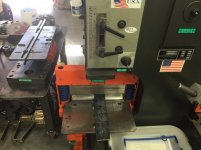
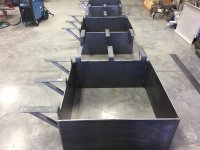
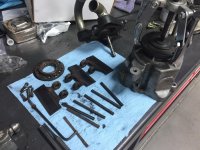
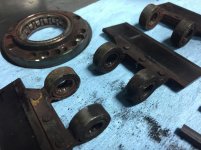
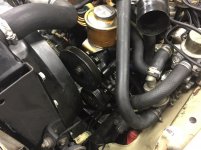
The large pipe was grooved at both ends. Two round caps where plasma cut to rest nicely against the grooves.

attachment.php


attachment.php


The groove provided a 1/4 lip for a weld fillet.

attachment.php


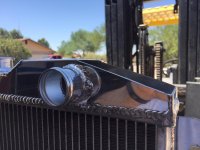
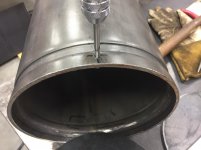
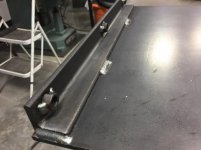
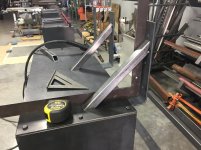
The top was drilled/tapped to close the lid. A bevel or ramp was filed for the screw to pull down the lid tight against the top groove.

attachment.php


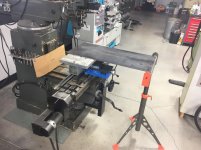
My son who was home on bereavement leave turned the barrel hinge on the new lathe.

attachment.php


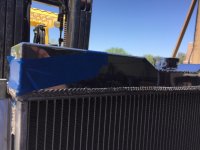
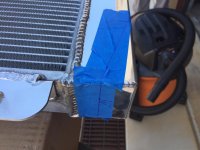
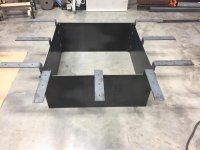
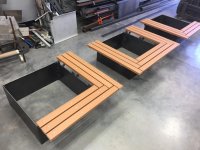
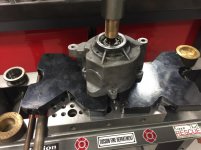
The inside was painted white and the exterior painted my MIL favorite color, Navy Blue.

attachment.php


attachment.php


I have pre dug the hole 12" diam X 27". We will fill the bottom with 4" of concrete, place the capsule in and fill around to cover the last 8".

RIP Yolanda Berrones 1937-2018

Paco
 

Attachments

  • IMG_3814.jpg
    IMG_3814.jpg
    135.3 KB · Views: 1,045
  • IMG_3815.jpg
    IMG_3815.jpg
    75.6 KB · Views: 1,042
  • IMG_3817.jpg
    IMG_3817.jpg
    96.8 KB · Views: 1,042
  • IMG_3857.jpg
    IMG_3857.jpg
    124 KB · Views: 1,042
  • IMG_3858.jpg
    IMG_3858.jpg
    113.4 KB · Views: 1,042
  • IMG_3819.jpg
    IMG_3819.jpg
    93.2 KB · Views: 1,043
  • IMG_3822.jpg
    IMG_3822.jpg
    139.7 KB · Views: 1,046

zmotorsports

ALLIANCE MEMBER
Joined
Oct 20, 2009
Messages
21,337
Location
Northern Utah
Thanks Mike,
I have a lot to learn. whatever I end up with MUST fit in the drive through bay. The door is 12'x10'. I should have went 14'x14'.


Those rigs are built well for the most part. The items I have needed to repair have been inexpensive so far. My 05 only has 86K miles and mostly used for hauling. The clunk had started last year but was hardly noticeable. I knew it would only get worse if ignored.
I can't see getting into a new diesel, too damn expensive and don't get me started on the regeneration system (DEF).
Thanks for stopping in.

I hear ya Paco. My wife couldn't figure out when we were building the new shop why I wanted it 50' deep and the RV door 16' wide by 14' tall. I told her that not only will it house our little 40-foot coach we currently have but it will house our 45' Prevost someday. She just rolled her eyes.:lol_hitti

As for the comment about diesel trucks and DEF (as well as EGR), we seem to think alike. My 2006 just turned over 90k and hopefully will be the last truck I ever own. I will keep it running and looking good as I have no interest in any of the newer ones. They won't do anything my old 2006 won't do. I will also rebuilt my Jeep ten times over before buying a new one for the same reasons, just not impressed with the newer ones.

Sorry to hear of the passing of your MIL but she would be proud and honored to be buried in the vault that you have hand built. Thank you for sharing your projects.
 
OP
F

fnieto

Well-known member
Joined
Aug 27, 2013
Messages
1,401
Location
Tucson,Arizona
Good planning on your part Mike. I do see some Prevost units have basement style A/C units. This would hopefully allow for a 12' door. Everything I see advertised out there has width, length, weight, but no information on overall height. With 14' eves, I'm pretty much stuck with a 12' high door. I have plenty of depth.

Thanks Mike.
 
OP
F

fnieto

Well-known member
Joined
Aug 27, 2013
Messages
1,401
Location
Tucson,Arizona
Had a repete customer request some tree box planters. He had a concept drawing provided by a landscape architect. No measurements just a concept in that abstract format.
He has three trees about 15 years old and are established, they provide nice shade and are spaced evenly along his western exposure. The concept drawing showed bench seating incorporated with each planter box. A small concrete curb will be poured around each tree to provide a flat level foundation for these 3' square planters to sit.

The material is 1/4" plate and is bolted together using welded 3/8" nuts to a 1/4"x1"x1" angle iron. The angle iron is welded on two sections of the box sides while the other two sides are drilled for the bolts that assemble to form the box.

Two 1/4"x4'x8' sheet where sheared at 16"x48" for a total of 12 pieces. I then plasma cut them down to 16"x36".
attachment.php


The angles where drilled on the mill and programed the three increments for precise hole location. The six sides that required bolt holes where laid out and drilled. I used a bolster in the vise to provide a nice flat surface for the plate to rest. The holes where just beyond the edge of the bolster.
attachment.php


attachment.php


The twelve sections of angle with welded capture nuts.
attachment.php


The angle sections are welded to six sides to form a box once bolted.
attachment.php


attachment.php


Three square boxes. 16" x 36" x 36"
attachment.php


Next are the brackets for the bench seating.
 

Attachments

  • IMG_3864.jpg
    IMG_3864.jpg
    136.1 KB · Views: 900
  • IMG_3854.jpg
    IMG_3854.jpg
    74.1 KB · Views: 897
  • IMG_3860.jpg
    IMG_3860.jpg
    102.2 KB · Views: 901
  • IMG_3852.jpg
    IMG_3852.jpg
    94.1 KB · Views: 901
  • IMG_3805.jpg
    IMG_3805.jpg
    148 KB · Views: 902
  • IMG_3804.jpg
    IMG_3804.jpg
    148.2 KB · Views: 904
  • IMG_3803.jpg
    IMG_3803.jpg
    141.4 KB · Views: 888
Last edited:
OP
F

fnieto

Well-known member
Joined
Aug 27, 2013
Messages
1,401
Location
Tucson,Arizona
The bench seating brackets are made from 1/4"x2.5" flat strap. I designed the brackets for the finished hight of the bench seating would be 19.5" with the boards installed.

All 21 brackets where sheared, punched, and bent on the iron worker. The first piece was laid out and the punch table fence was set up to punch the rest of the brackets without further measurements.

attachment.php


21 brackets with a total of 63 holes.

attachment.php


attachment.php


The tooling swap is made easy with the help of this "tooling cart". The heavy tooling slides from machine to cart.

attachment.php


The back gauge and limit stroke switch is set on the break tool for repeated bends.

attachment.php


attachment.php


The brackets are then tacked to the boxes.

attachment.php


More to follow.
 

Attachments

  • IMG_3909.jpg
    IMG_3909.jpg
    104.9 KB · Views: 897
  • IMG_3906.jpg
    IMG_3906.jpg
    107.5 KB · Views: 896
  • IMG_3905.jpg
    IMG_3905.jpg
    128.4 KB · Views: 891
  • IMG_3904.jpg
    IMG_3904.jpg
    142.1 KB · Views: 895
  • IMG_3902.jpg
    IMG_3902.jpg
    135.8 KB · Views: 899
  • IMG_3901.jpg
    IMG_3901.jpg
    153.9 KB · Views: 903
  • IMG_3900.jpg
    IMG_3900.jpg
    148.8 KB · Views: 896
OP
F

fnieto

Well-known member
Joined
Aug 27, 2013
Messages
1,401
Location
Tucson,Arizona
Once all the bench brackets where tacked, gussets where added using 14 ga. x 1.25"x1.25" square tubing.

attachment.php


attachment.php


The gussets.
attachment.php


After the brackets where welded, all edges where capped with 3/8" CR round bar to soften all edges. The brackets where also hit with a flap wheel and corners rounded.

attachment.php


Ready for boards.

attachment.php


The boards used came from Bear Boards out of Elgin IL.

attachment.php
 

Attachments

  • IMG_3924.jpg
    IMG_3924.jpg
    120.3 KB · Views: 891
  • IMG_3912.jpg
    IMG_3912.jpg
    151.5 KB · Views: 890
  • IMG_3911.jpg
    IMG_3911.jpg
    110.4 KB · Views: 894
  • IMG_3910.jpg
    IMG_3910.jpg
    141.9 KB · Views: 891
  • IMG_3928.jpg
    IMG_3928.jpg
    125.4 KB · Views: 894
  • IMG_3925.jpg
    IMG_3925.jpg
    118.6 KB · Views: 895
OP
F

fnieto

Well-known member
Joined
Aug 27, 2013
Messages
1,401
Location
Tucson,Arizona
Researching the composite board, I learned they tend to expand and contract up to 1/16-1/8". For this reason I decided not to miter the corners and maintain a 1/2" spacing. I also staggered the boards for for same reason.

The boards where cut with the same bandsaw I use for steel and left a nice cut finish. The 5/16" holes for the carriage bolts also drilled clean and crisp.

attachment.php


attachment.php


attachment.php


The boxes will be disassembled and delivered as a kit for the customer. The finish will eventually be rust to match the rest of his metal work in his yard.

Thanks for stopping in.

Paco
 

Attachments

  • IMG_3929.jpg
    IMG_3929.jpg
    138.8 KB · Views: 890
  • IMG_3930.jpg
    IMG_3930.jpg
    99.8 KB · Views: 895
  • IMG_3931.jpg
    IMG_3931.jpg
    126.3 KB · Views: 895

LXCam

ALLIANCE MEMBER
Joined
Apr 23, 2013
Messages
19,092
Location
AZ
Those rock paco, nice job! Last year when I built the deck for the spa and BBQ I laid out all the boards in the sun in the middle of summer so they'd be fully expanded. I was floored how much they shrank once it cooled off. Since everything was a mitered edge I did not want these end butting. The longest board is 8ft and those shrank just a tick over a 1/4". So good call (as expected btw) on how you finished the corners plus it looks great!
 
OP
F

fnieto

Well-known member
Joined
Aug 27, 2013
Messages
1,401
Location
Tucson,Arizona
Thanks Cam,
So you used a composite board as well? How are they holding up a year later?

Thanks for stopping by brother.
 

LXCam

ALLIANCE MEMBER
Joined
Apr 23, 2013
Messages
19,092
Location
AZ
Thanks Cam,
So you used a composite board as well? How are they holding up a year later?

Thanks for stopping by brother.


Oh it's still gorgeous. I got zero complaints. Here's a picture I took a week ago to show someone the chevron pattern I went with. It's dirty as heck in the pick since my puppies use this as a drying area after taking a dip in the pool. But it cleans up like new with nothing more then water and a lite brushing.

IMG_6341.jpg
 
OP
F

fnieto

Well-known member
Joined
Aug 27, 2013
Messages
1,401
Location
Tucson,Arizona
Put on a coat of wax on 40's patina, then adjusted the valve lash. intake set to .008" and exhaust to .014". Gained another inch of inHg for a steady reading of 19. Not bad for 153,** original miles.

Then adjusted the air gap in the dizzy, new rotor, cap and plugs.
The next day I was driving to work and heard some really strong rattling coming from the engine bay. At first I thought a jam nut had come loose and got a sloppy valve. Turns out it was the smog pump bearings.
Good to go for a while.

attachment.php


Got the goodies from rock auto including the valve cover gasket as well as the grommets.

attachment.php


Here's the smog pump opened up. The needle bearing where dry as can be.
attachment.php


attachment.php


The pulley end bearings where toast. I'm amazed the thing didn't seize up.
attachment.php


attachment.php

The smog pump back in under the steering pump.
The old girl is back to purring
attachment.php
 

Attachments

  • IMG_3889.jpg
    IMG_3889.jpg
    160.7 KB · Views: 767
  • IMG_3892.jpg
    IMG_3892.jpg
    152.6 KB · Views: 756
  • IMG_3936.jpg
    IMG_3936.jpg
    142.3 KB · Views: 755
  • IMG_3937.jpg
    IMG_3937.jpg
    136.9 KB · Views: 755
  • IMG_3939.jpg
    IMG_3939.jpg
    142.7 KB · Views: 758
  • IMG_3941.jpg
    IMG_3941.jpg
    132 KB · Views: 753
  • IMG_3942.jpg
    IMG_3942.jpg
    131.3 KB · Views: 757
Last edited:

zmotorsports

ALLIANCE MEMBER
Joined
Oct 20, 2009
Messages
21,337
Location
Northern Utah
Put on a coat of wax on 40's patina, then adjusted the valve lash. intake set to .008" and exhaust to .014". Gained another inch of inHg for a steady reading of 19. Not bad for 153,** original miles.

Then adjusted the air gap in the dizzy, new rotor, cap and plugs.
The next day I was driving to work and heard some really strong rattling coming from the engine bay. At first I thought a jam nut had come loose and got a sloppy valve. Turns out it was the smog pump bearings.
Good to go for a while.

attachment.php


Got the goodies from rock auto including the valve cover gasket as well as the grommets.

attachment.php


Here's the smog pump opened up. The needle bearing where dry as can be.
attachment.php


attachment.php


The pulley end bearings where toast. I'm amazed the thing didn't seize up.
attachment.php


attachment.php

The smog pump back in under the steering pump.
The old girl is back to purring
attachment.php

Nice job Paco.

Where did you perform the work at on the smog pump/tune-up? By the looks of the cinder block and wood work bench it doesn't appear to be the shop we've all drooled over. The pressing and the teardown of the smog pump appear to be in the new shop. Just curious?
 
OP
F

fnieto

Well-known member
Joined
Aug 27, 2013
Messages
1,401
Location
Tucson,Arizona
Hahaha! I'm so busted. The wax and tune up was done at the fire house while the crew slept (around 2 am), The valve lash was done the day prior at home. The pump was done yesterday. Nothing gets past you my friend. :)
 

zmotorsports

ALLIANCE MEMBER
Joined
Oct 20, 2009
Messages
21,337
Location
Northern Utah
Hahaha! I'm so busted. The wax and tune up was done at the fire house while the crew slept (around 2 am), The valve lash was done the day prior at home. The pump was done yesterday. Nothing gets past you my friend. :)

I won't tell. Your secrets safe with me.:beer:

Nice job regardless of the location the work was performed.:bounce:
 

C_F

ALLIANCE MEMBER
Joined
Jan 21, 2005
Messages
9,675
Location
Utah...SNOW BLOWS!
I haven't torn apart a smog pump before, I have always gone the lazy way & swapped them with a reman unit. :D So it's interesting to see what kind of guts yours has.

Anyway, looks like you caught that one just in time, nice job on the rebuild! :thumbup:

PS, sorry to hear about your MIL's passing.
 
To avoid these ads, REGISTER NOW!
Top Bottom