To avoid these ads, REGISTER NOW!

Orange Peel/Poor Adhesion (Spray Can)

peejay75

Well-known member
Joined
Sep 4, 2017
Messages
312
Well, my riding mower wheel painting project is not starting off on a good foot!

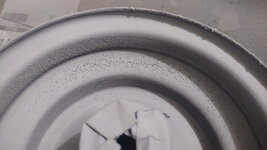
Getting a lot of orange peel (i think that's what this is) and general poor adhesion, ESPECIALLY on the vertical surfaces, can this be "easily" fixed, without starting over? And what may have caused this? Did I not sand those surfaces as well as I thought?

Quick rundown of my process (over the course of several days!):
- cleaned wheel (soap and water, i think)
- sanded wheel (320 grit wet or DRY)
- wiped off dust
- sprayed wheel with WD40 and stored in a container to slow down rusting, until I could find time to prime it
- wiped wheel with blue shop towels, applied wax/grease remover, let it sit, wiped if off
- used scotch brite pad (maroon) to scuff wheel up
- repeated wax grease remover
- primed it, 2 coats, heat gun and air dry in between; (kept checking the humidity (weather app), supposedly it was between 65-75%)

Used "Rust-Oleum Stops Rust Automotive Primer Spray Paint"

primer_wheel.jpg
 
To avoid these ads, REGISTER NOW!

K13

Well-known member
Joined
Oct 24, 2007
Messages
2,233
Location
St. Albert, AB Canada
Two things. One blue shop towels are terrible for wiping down anything before paint as they leave a ton of lint behind. Two wax and grease remover should not be left to sit. You wipe it on or spray it on and then wipe it off right away. You are not removing contaminants if you let it sit. Also agreed with above looks like dried paint. Definitely not orange peel.
 
OP
P

peejay75

Well-known member
Joined
Sep 4, 2017
Messages
312
Looks like dry over spray to me....

Does it wipe off?
Didn't try wiping it off (yet), was afraid I'd make matters worse! It's still "air-drying" now, I'll go check on it in a few minutes and see. Any guesses as to why the vertical surfaces were most affected? Bad technique?
 
OP
P

peejay75

Well-known member
Joined
Sep 4, 2017
Messages
312
Two things. One blue shop towels are terrible for wiping down anything before paint as they leave a ton of lint behind. Two wax and grease remover should not be left to sit. You wipe it on or spray it on and then wipe it off right away. You are not removing contaminants if you let it sit. Also agreed with above looks like dried paint. Definitely not orange peel.
Was the Scotch Brite a bad idea, too? Should I have just used sandpaper alone? Thinking of sanding it and using proper lint-free cloths next go 'round.
 

PCustoms

Well-known member
Joined
Jul 23, 2011
Messages
23,430
Location
VT
Didn't try wiping it off (yet), was afraid I'd make matters worse! It's still "air-drying" now, I'll go check on it in a few minutes and see. Any guesses as to why the vertical surfaces were most affected? Bad technique?

Yep.

The paint hit the other surfaces, bounced off and mostly dried before it stuck where you see it
 

K13

Well-known member
Joined
Oct 24, 2007
Messages
2,233
Location
St. Albert, AB Canada
Scotch brite is fine. Blow it off after scotchbrite no need for anything after that other than paint. Missed the heat gun part unfortunately another not great idea. If you didn't let it fully cool down between coats the heat would dry the paint before it could flow out. Especially any over spray.
 
OP
P

peejay75

Well-known member
Joined
Sep 4, 2017
Messages
312
Scotch brite is fine. Blow it off after scotchbrite no need for anything after that other than paint. Missed the heat gun part unfortunately another not great idea. If you didn't let it fully cool down between coats the heat would dry the paint before it could flow out. Especially any over spray.
Thanks for the tips, all!

The heat gun was my attempt at an "baked on" finish, I can ditch that next time. The paint was "bubbling"/not sticking even before that, though, so I'll make sure the surface is scuffed, cleaned and lint-free before I try again, may incorporate a paint box of some sort next time, too.
 

PCustoms

Well-known member
Joined
Jul 23, 2011
Messages
23,430
Location
VT
Stop with the fancy techniques.

Wipe with solvent and a lint free rag, maybe blow with air.

Paint with light coats, starting with the harder to reach spots (once you get those the rest get covered 90% of the time).

Follow the mfg recommended recoat times. Many light, light coats...
 
Last edited:
OP
P

peejay75

Well-known member
Joined
Sep 4, 2017
Messages
312
Stop with the fancy techniques.
A hearty LOL to you, my good sir!

The "paint" pebbled off with just a finger scrub...

PROPER tack cloths have been ordered, will scotch brite the entire wheel again, use the prep, wipe it down/blow with air, and respray, and post back!

pebbled_off.jpg
 

The Cobbler

Super Moderator
Staff member
Joined
Oct 24, 2013
Messages
25,966
Location
Niagara Region, Ontario, Canada
as already mentioned, the paint was dry before it hit the material. you need to spray it so it's wetter . basically spray it heavier so it's wet when it hits the surface & flows . maybe practice on something flatter to help you get the technique .
 
OP
P

peejay75

Well-known member
Joined
Sep 4, 2017
Messages
312
as already mentioned, the paint was dry before it hit the material. you need to spray it so it's wetter . basically spray it heavier so it's wet when it hits the surface & flows . maybe practice on something flatter to help you get the technique .
"Can"/will do!
 

Wamsutta

Well-known member
Joined
Jan 8, 2014
Messages
10,888
Location
Amarillo, Texas
I use microfiber towels for wiping down before painting. They don't have any lint. Bare steel, acetone. Painted surface, rubbing alcohol.

Looking at your picture, it looks like a whole lot of solids but very little solvent. That's typical when holding the can way too far away.

You need the solvents to hit the surface as well as the solids so that the primer will harden up.

Being that's a wheel, you'll need to wet sand with a very flexible backing pad. I'd recommend 800 to 1000 grit for primer.
 
OP
P

peejay75

Well-known member
Joined
Sep 4, 2017
Messages
312
I use microfiber towels for wiping down before painting. They don't have any lint. Bare steel, acetone. Painted surface, rubbing alcohol.

Looking at your picture, it looks like a whole lot of solids but very little solvent. That's typical when holding the can way too far away.

You need the solvents to hit the surface as well as the solids so that the primer will harden up.

Being that's a wheel, you'll need to wet sand with a very flexible backing pad. I'd recommend 800 to 1000 grit for primer.
Excellent advice! I'm gonna use a cardboard "spray booth" this time, so I can take the elements out of the equation.

Would you wet sand in addition to Scotch Brite, or is the Scotch Brite not necessary?

(Getting ahead of myself) If the primer is successful this time, should I wet sand it before applying the paint?
 

PCustoms

Well-known member
Joined
Jul 23, 2011
Messages
23,430
Location
VT
(Getting ahead of myself) If the primer is successful this time, should I wet sand it before applying the paint?

I personally think you're over thinking it.

Knock the high spots off, wipe it down and spray. Why re-prime?
 

OccupantRJ

Well-known member
Joined
May 15, 2009
Messages
11,235
Location
Eastern North Carolina
My method with utility items is to sand or scotchbrite, blow off, maybe prime, scuff with scotchbrite, blow off and wipe down and spray. If I have cabinet blasted it I blow it off and prime, then scuff, wipe, and spray. I use either spray bomb or HF gun to spray.
 
OP
P

peejay75

Well-known member
Joined
Sep 4, 2017
Messages
312
I personally think you're over thinking it.

Knock the high spots off, wipe it down and spray. Why re-prime?
It looked to me like primer didn't really "take" in many areas, mainly the vertical walls. I would imagine knocking down the low spots just enough to get 'em smooth then repriming those areas to bring then up to the high spots might get things looking uniform?

(Edit: had my highs and lows mixed up, you are correct, sir!)
 
Last edited:
To avoid these ads, REGISTER NOW!

Wamsutta

Well-known member
Joined
Jan 8, 2014
Messages
10,888
Location
Amarillo, Texas
Excellent advice! I'm gonna use a cardboard "spray booth" this time, so I can take the elements out of the equation.

Would you wet sand in addition to Scotch Brite, or is the Scotch Brite not necessary?

(Getting ahead of myself) If the primer is successful this time, should I wet sand it before applying the paint?
Scotch Brite is on the dry side of doing things. Guys use it because it doesn't get clogged up with paint. I see no reason to go the dry route unless you're dealing with body filler. Water is so much easier to work with in my experience.

Yes, wet sand the primer before laying down the paint; 800 to 1000 grit. And then wet sand the color coat with 2000 grit and then go to a manual rubbing compound like Meguiar's Ultimate Compound with a microfiber wax applicator.

Take a look at MotorGuard and Dura-Block. Those products are extremely helpful.
 
Last edited:

K13

Well-known member
Joined
Oct 24, 2007
Messages
2,233
Location
St. Albert, AB Canada
Nothing needs to be sanded with 1000 grit before paint and very little with 800. Way over kill. And colour sanding and polishing?🤣 It a mower wheel not a show car.
 

edge540

New member
Joined
Jun 30, 2016
Messages
1
Location
Edmond, OK
scuff it with 400 or 600 grit paper, wax and grease remove it and respray it.
You are holding spray can way too far away from part while painting
 
OP
P

peejay75

Well-known member
Joined
Sep 4, 2017
Messages
312
Update, finally got around to beginning to "fix" this...

Scuffed that first surface with 800 grit (that's the grit I ordered when I first posted the problems, and it's probably a "safe" grit for me to use!). My crappy cellphone camera is actually showing more detail than I thought it would, the surface is actually smooth to a finger's touch. Will proceed with the rest of the surfaces, then wax and grease removal and respray!

800_grit.png
 

gahrajmahal

Well-known member
Joined
Dec 12, 2008
Messages
2,542
Location
Cincinnati, Ohio
I think you need to see someone successfully using spray cans and preparing the surface. I learn a lot from watching the guy on”Paint society” do his various projects
 
OP
P

peejay75

Well-known member
Joined
Sep 4, 2017
Messages
312
I think you need to see someone successfully using spray cans and preparing the surface. I learn a lot from watching the guy on”Paint society” do his various projects
Just watched it, pretty detailed, thanks!

(Just ordered that prep SPRAY, too, as I had been using the wipe on kind in a bottle).
 
Last edited:

gahrajmahal

Well-known member
Joined
Dec 12, 2008
Messages
2,542
Location
Cincinnati, Ohio
Just watched it, pretty detailed, thanks!

(Just ordered that prep SPRAY, too, as I had been using the wipe on kind in a bottle).

He has more spray can videos than this one. Your success begins with practice of the technique, non so much with prep spray vs wipe on. Your wipe on wax and grease remover will work just fine. Notice the distance from the panel plus the overlap of the pattern. Proper wait times between coats is the most difficult to do. I always want to rush it.

Myself if I was doing a fender or something nice I’d use proper spray guns and automotive paints. If I’m using a spray can for wheel rims like your project, my prep is often just wipe it down with lacquer thinner then spray it. I don’t wash it, use wax and grease remover or tack it off. I spray a mist first coat then try to wait 15 minutes before finishing it off. Summer time is easier as the hot weather keeps me from getting runs.
 

gahrajmahal

Well-known member
Joined
Dec 12, 2008
Messages
2,542
Location
Cincinnati, Ohio
Ok, a few Gahrajmahal comments on this video.

I did not realize that the Duplicolor spray paint he was using was LACQUER. Most spray cans you purchase, Rustoleum, Tractor Supply, Krylon etc. are not lacquer. They are some type of enamel paint. The difference between Lacquer and Enamel is that Lacquer paint bonds by chemically bonding to the paint layers beneath it. Enamel paints bond due to mechanical adhesion. That is why Brian was sanding with 600 grit to prepare the surface. Brian is a young guy without significant lacquer spraying experience looking at his videos. Modern body work almost never uses lacquer paint any more. I’m an old painter from the 1970’s. Yes, that’s 50 years ago!

So, he was disappointed with his final paint finish using just two coats of clear lacquer. He also wasn’t satisfied with the satin type sheen. But that is exactly what a lacquer finish looks like before buffing out. And, since it ALWAYS needs buffing you need many more coats of lacquer to keep from buffing through the finish. Five coats is the minimum. So, you see why modern two part epoxy cured paints came to favor.

Rules for Lacquer and Enamel paints:

Lacquer paint can go over CURED factory paint jobs, new repair panels with their primer and lacquer paint jobs. If you watched the video where Brian finished spraying the Duplicolor clear lacquer, you could see a clear dry area defining how he sprayed only half way across the fender. Folks wanting to spray a whole car, you can get a smooth finish but you must use slow dry thinners. This does make Lacquer a great choice for the backyard painter. It dries fast, so bugs and dust are minimized and are easy to fix and smooth. Unlike modern Enamels, lacquer does not require finer and finer sanding before buffing. 600 grit will give you great results buffing from there.

If you put lacquer paints over etching primer, epoxy primers, generic spray can primers, any spray can enamel, repaired two part modern urethane enamels. IT WILL PROBABLY LIFT OR WRINKLE !

Enamel paints cure two ways. One, like spray cans and single stage enamels AIR DRY, or by Chemical Reaction via epoxy hardners. The negative to the addition of hardners is it makes spraying the catalyzed paint that much more of a health hazard to spray. I’m sure you noticed Brian going from t-shirt to full body coveralls just to spray the catalyzed clear. It enters your body through the skin and not just through the lungs. That includes the eyes too, so a full face respirator would have been a better choice. Some folks are severely sensitive to these chemicals, so also know that!

Brian’s caution regarding spraying catalyzed enamel over lacquer is true. An automotive clear sprayed from spraying equipment is often OK for spraying over lacquer. The longer the dry time for the lacquer, the less chance of lifting or wrinkling the paint. Often for a final clear coat a painter will add 25% reducer to help level out the finish, reducing orange peel in the paint. It is this reducer that can cause an un-cured or under cured color coat to lift or wrinkle regardless if it is a lacquer base coat or a fresh catalyzed base coat. If it is a single color like in the video, you just let it dry and harden completely, about a week, then sand the wrinkles out, re-prime, re-paint and re-clear. Let that harden and then sand the dry blend area and buff to finish.

None of this long explanation has anything to do with the OP’s wheel project other than spray can technique. Others on this board are much better painters than I am, I just have lots of ancient experience with lacquers.

Good luck
 
OP
P

peejay75

Well-known member
Joined
Sep 4, 2017
Messages
312
Update...

Alright, the wheel has been sanded, a second time...overall with 800-grit, but had to switch to 320-grit (the next lowest I had, 400 probably would've been better) for the really rough spots...I'm thinking those vertical areas were in worse shape than the rest of the wheel, but when I sanded/scotched it the first time, I just went over everything uniformly, my mistake.

About to take yet another one of my patented breaks, then I'll use the prep spray and the proper cloths (NOT blue shop towels), then prime and see what happens!

sand_2nd.jpg
 

PCustoms

Well-known member
Joined
Jul 23, 2011
Messages
23,430
Location
VT
At this rate you might get that done for next summer....

Don't overthink!
 
OP
P

peejay75

Well-known member
Joined
Sep 4, 2017
Messages
312
Alright, prepped/wiped, initial coat of primer on...gonna let that "cure" for 30 minutes, then 2nd coat, let that "cure" for about an hour, then do the other side...stay tuned!

paint_booth_50.jpg
 
OP
P

peejay75

Well-known member
Joined
Sep 4, 2017
Messages
312
Update...

Nope, it's "still doing it", never ran into this problem before. Gonna let it dry, sand out the "pebbles" with some ultra fine grit, and see what happens with the top coat in a few days.
 

dogdog

Well-known member
Joined
Nov 15, 2011
Messages
12,711
Update...

Nope, it's "still doing it", never ran into this problem before. Gonna let it dry, sand out the "pebbles" with some ultra fine grit, and see what happens with the top coat in a few days.
If you are getting orange peal you are spraying the layers too much or too often before you let it have a chance to flash. Not sure if this have been mentioned.

8” from object
Light first coat and does not need to be cover everything
Let object flash before applying next coat.

There is a YouTube video good advise on spray painting
 
OP
P

peejay75

Well-known member
Joined
Sep 4, 2017
Messages
312
If you are getting orange peal you are spraying the layers too much or too often before you let it have a chance to flash. Not sure if this have been mentioned.

8” from object
Light first coat and does not need to be cover everything
Let object flash before applying next coat.

There is a YouTube video good advise on spray painting
Thank you!

Well, I contacted Rust-Oleum, sent them pics, and they said (and as others have pointed out) that I'm most likely spraying too far away (better yet, NOT CLOSE ENOUGH) and the paint is atomizing and drying before it hits the substrate, and leaving a grainy feel on the top surface. (Still not understanding the science of why it's leaving a grainy surface instead of a very lightly coated surface, unless the "stuff" in the can is separating out instead of ALL going into the wheel, but anyhoo...)

So for the 3rd and FINAL time, I'm gonna get as close as possible, even to the point of runs, and take it from there!
 

dogdog

Well-known member
Joined
Nov 15, 2011
Messages
12,711
Thank you!

Well, I contacted Rust-Oleum, sent them pics, and they said (and as others have pointed out) that I'm most likely spraying too far away (better yet, NOT CLOSE ENOUGH) and the paint is atomizing and drying before it hits the substrate, and leaving a grainy feel on the top surface. (Still not understanding the science of why it's leaving a grainy surface instead of a very lightly coated surface, unless the "stuff" in the can is separating out instead of ALL going into the wheel, but anyhoo...)

So for the 3rd and FINAL time, I'm gonna get as close as possible, even to the point of runs, and take it from there!
aprox 8" away and always parallel to the object surface you are spraying.
let it flash for about 15-20 minutes before the next coat and don't rush the job is what I always do..

I don't know your Not close enough distance or your preparation or dusty environment. like super humid ?
 
OP
P

peejay75

Well-known member
Joined
Sep 4, 2017
Messages
312
aprox 8" away and always parallel to the object surface you are spraying.
let it flash for about 15-20 minutes before the next coat and don't rush the job is what I always do..

I don't know your Not close enough distance or your preparation or dusty environment. like super humid ?
Temps were in the 80s, humidity was in the 50s, distance was about 6-8", can at 45° to wheel, painted outdoors on a covered back porch, in a cardbox box. It's a new one to me, but I've never painted a wheel before, I think the different angles are what's tripping me up.
 
To avoid these ads, REGISTER NOW!
Top Bottom