To avoid these ads, REGISTER NOW!

Outdoor Front Door Light Help Please

drewcorvette

Active member
Joined
Apr 5, 2016
Messages
26
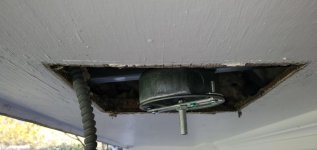
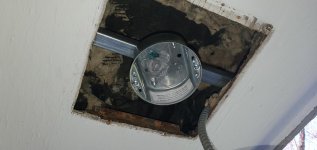
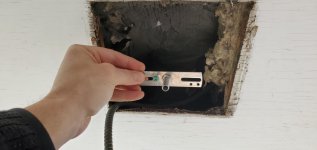
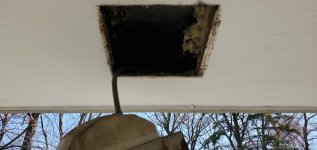
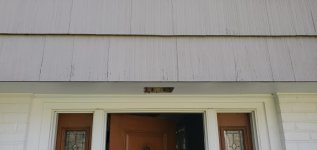
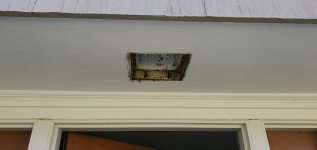
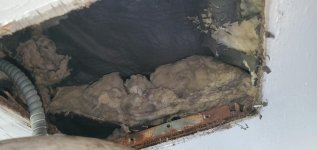
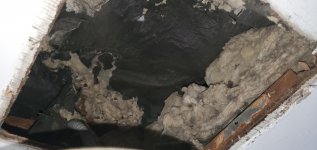
I bought a new front door fixture to update the recessed old light that was from years ago. Usually its very straight forward to remove and replace with the new fixture but when i removed the recessed can i noticed their was no junction box to use the mounting bracket on the new fixture. Also i have a huge gap from the recessed light.

Its about 8" inches across from the side to side. I've seen recessed lighting to pendant type conversion kits but don't know if that will work. Any suggestions how to make this work?
 

Attachments

  • 20210405_124114.jpg
    20210405_124114.jpg
    140.3 KB · Views: 124
  • 20210405_124300.jpg
    20210405_124300.jpg
    149.7 KB · Views: 115
  • 20210405_114135.jpg
    20210405_114135.jpg
    84.2 KB · Views: 116
  • 20210405_114122.jpg
    20210405_114122.jpg
    115.2 KB · Views: 116
To avoid these ads, REGISTER NOW!

grounded-b

Well-known member
Joined
Oct 23, 2012
Messages
285
Location
Milwaukee, WI
Recessed lights usually do not have a junction box. They are directly wired to the fizture as you have found out.

What I would do, is get a fan mount bracket ( the type which expands it's gripping teeth into the ceiling joists as you twist the center bar ) and use this bracket to mount an octagon box where you want the new light to go.

If you need to, patch the oversized opening with some outdoor rated plywood, patch and paint to match existing. Then hang the new light fixture

Steve
 

cybrdyke

Well-known member
Joined
Sep 9, 2014
Messages
3,442
Location
USA
There was no junction box necessary for that fixture. You're in a pickle.
Are there ceiling joists up there? If so, you can get a retrofit ceiling box like Raco 936. You'll still need to patch that huge hole.
CD
 
OP
D

drewcorvette

Active member
Joined
Apr 5, 2016
Messages
26
No ceiling joists, its an extension piece off the front of the house. See the images. Any other suggestions?
 

Attachments

  • 20210405_143859.jpg
    20210405_143859.jpg
    89.5 KB · Views: 70
  • 20210405_143905.jpg
    20210405_143905.jpg
    82 KB · Views: 68
  • 20210405_143758.jpg
    20210405_143758.jpg
    100 KB · Views: 69
  • 20210405_143751.jpg
    20210405_143751.jpg
    104.9 KB · Views: 60
  • 20210405_143744.jpg
    20210405_143744.jpg
    124 KB · Views: 58

Shiftless

Well-known member
Joined
Mar 9, 2014
Messages
14,479
Location
East Bay SFO
How about cutting a piece of 1/4 inch plywood big enough to cover the hole and overlap about 2 inches all the way around. Square or round..your choice.
Then cut a hole in the middle of the patch and install an old work box. Looks like you might need to extend the wires.
Then attach the patch with construction adhesive and short screws. Some filler will smooth the plywood edges. Or use molding. Prime and paint.

This might trigger the need to repaint the soffit in that area to better match up. It would on my 70 year old house. :)

I bet you’re having second thoughts about the whole “updating” movement.
You could just clean and polish the old fixture, put in a nice bright energy saving LED bulb, reinstall it and work on another project instead. :)
 

driftpin

Well-known member
Joined
Dec 22, 2016
Messages
11,189
Location
Miami-Dade/Broward Co. Florida
I expect the easiest would be to make a plate overlapping the hole, the plate could be either 3/4" exterior-grade plywood, or metal. Use structural fasteners like SPAX screws to fasten it to the soffit, then mount your new light fixture to a new steel box in the center of that.
 
OP
D

drewcorvette

Active member
Joined
Apr 5, 2016
Messages
26
Actually looking further in the hole i see wood on either side i don't know if you call i joists but wonder if i can take grounded-b's suggestion and use a Safe-t-brace for ceiling fans in the link below. i assume i just run the wires right through the plate?


https://www.amazon.com/dp/B00027EWNW/?tag=atomicindus08-20
 

Attachments

  • 20210405_151356.jpg
    20210405_151356.jpg
    91.9 KB · Views: 53
  • 0101000_callout-lg.jpg
    0101000_callout-lg.jpg
    17.1 KB · Views: 45
Last edited:

Shiftless

Well-known member
Joined
Mar 9, 2014
Messages
14,479
Location
East Bay SFO
Actually looking further in the hole i see wood on either side i don't know if you call i joists but wonder if i can take grounded-b's suggestion and use a Safe-t-brace for ceiling fans in the link below. i assume i just run the wires right through the plate?


https://www.amazon.com/dp/B00027EWNW/?tag=atomicindus08-20

The framing supporting the soffit plywood would be your roof rafter tails.
They’re probably 24 inches on center (measure!) so keep that in mind when looking for electrical box mounting hardware.
You don’t run the wires through the plate, you cut a hole in the plate the same size as the electrical box. The wires go through the box and are secured with a cable clamp. The box is supported by your framing. The plate is just to cover the big hole left by removing your old fixture.
I assume you want the new box to be flush with the soffit.
 
OP
D

drewcorvette

Active member
Joined
Apr 5, 2016
Messages
26
i got about 21" from side to side, yes i would image it would have to be flush to the soffit
 

alfredeneuman

Well-known member
Joined
Mar 3, 2011
Messages
4,580
Location
Fullerton, CA
Then cut a hole in the middle of the patch and install an old work box.
I don't know of a metal old work box built in an octagon style. The plastic O/W boxes aren't meant to be used with the armored cable.
ANY box will have to be mounted flush, or project beyond the plywood (because plywood's flammable).
 

Innovate1

Well-known member
Joined
Jul 28, 2014
Messages
4,274
Location
Illinois near St. Louis, Missouri
If you want things to be flush you could just take a length of 2 x 4 slightly wider than the hole. Put some shims of plywood on each side to give the depth needed for the new work metal box screwed to the 2 x 4. Put in the hole and secure with a couple screws on each end. If you need to close the hole put some lumber or strips of plywood around the edge behind the existing plywood. Then screw plywood to fit the hole and putty/caulk around the edge if it will show. I wouldn't be supporting huge fixtures or fans that way but it's plenty strong to support a modest light fixture. The flex conduit that went to the old fixture goes to the new metal box.
 

Skiff Builder

Well-known member
Joined
Jun 7, 2016
Messages
1,776
Location
Southern NJ Coast
I don't think your using the right kind of replacement fixture and forget the original under soffit (protected) location . Do what all my neighbors did- move the box down to the side wall ,as low as possible . Install a fixture with the highest output available and aim it directly across the street towards some ones house!
Obviously just kidding, think your location is best and did mine the same. Do see many the other way though
 

Dustball

Well-known member
Joined
Jun 25, 2011
Messages
2,081
Location
Hudson, WI
I would do similar to a drywall patch method but using wood instead. Cut a couple lengths of 1x4 and screw in place to act as backers. Cut a square of plywood of the right thickness (or shim as necessary) to fit into the square opening and screw to the wood backers (countersink the holes a bit). Cut a hole in the plywood square patch to fit a rework box and secure the box. Use wood filler to fill the small gap around the patch and the screw holes. Sand smooth and paint- install the new light afterwards.

attachment.php
 

Attachments

  • patch.jpg
    patch.jpg
    16.1 KB · Views: 242
OP
D

drewcorvette

Active member
Joined
Apr 5, 2016
Messages
26
Good suggestions here. I rather try the ceiling expandable mount between two joists, I just don't know if it will flush enough. Do I need be concerned safety wise going this method?
 

Terry D

Well-known member
Joined
Mar 25, 2015
Messages
2,202
Location
St. Louis, MO.
I would do similar to a drywall patch method but using wood instead. Cut a couple lengths of 1x4 and screw in place to act as backers. Cut a square of plywood of the right thickness (or shim as necessary) to fit into the square opening and screw to the wood backers (countersink the holes a bit). Cut a hole in the plywood square patch to fit a rework box and secure the box. Use wood filler to fill the small gap around the patch and the screw holes. Sand smooth and paint- install the new light afterwards.

attachment.php

I have done this before many times. You can also use one of those decorative medallions depending on what style fixture. You can fill it in with wood like you said and get a fixture larger than the old old and not even worry about finishing it off.
 
OP
D

drewcorvette

Active member
Joined
Apr 5, 2016
Messages
26
The new fixture is bigger than than the hole itself so i don't have to plug anything up. I just need a way to hang it over that hole.
 

Attachments

  • 20210406_081024.jpg
    20210406_081024.jpg
    84.2 KB · Views: 47
  • 20210406_081035.jpg
    20210406_081035.jpg
    76.7 KB · Views: 43
To avoid these ads, REGISTER NOW!

Terry D

Well-known member
Joined
Mar 25, 2015
Messages
2,202
Location
St. Louis, MO.
The new fixture is bigger than than the hole itself so i don't have to plug anything up. I just need a way to hang it over that hole.
You will need to mount a box in the center of the hole for the fixture to mount on. You can use a remodeler fan brace that will extend rafter to rafter and has prongs that will stick into the rafter when tightened, as already said. Or fill it in with plywood, cut a 4 inch hole in the center and use a plastic remodel box. The fixture needs to mount to a ceiling box, so there are no open splices.

https://www.lowes.com/pd/RACO-1-Gan...rd-Ceiling-Fan-Ceiling-Electrical-Box/3127059


https://www.lowes.com/pd/CARLON-1-G...ndard-Round-Ceiling-Electrical-Box/1000975984

Sent from my SM-G960U using The Garage Journal mobile app
 
Last edited:

grounded-b

Well-known member
Joined
Oct 23, 2012
Messages
285
Location
Milwaukee, WI
would it not be flush with Safe-t-brace bracket once the arms are extended?

The bracket is designed to leave the octagon box flush with the finished surface. It is designed for 1/2" drywall, so your 1/2" plywood will end up the same.

You will have to look at the instructions for the fan brace, to see if it calls for a 1 1/2" or a 2 1/8" deep octagon box.

Steve
 
OP
D

drewcorvette

Active member
Joined
Apr 5, 2016
Messages
26
I think the better option is the https://tinyurl.com/4wvxmp8v. I guess the question is will it be flush enough to mount the fixture. Once the box is mounted just pop one of the holes for the wires, clamp is down and just make the connections. Does the box need a cover at all or just push the connections into the box and mount the fixture to it.
 

grounded-b

Well-known member
Joined
Oct 23, 2012
Messages
285
Location
Milwaukee, WI
I think the better option is the https://tinyurl.com/4wvxmp8v. I guess the question is will it be flush enough to mount the fixture. Once the box is mounted just pop one of the holes for the wires, clamp is down and just make the connections. Does the box need a cover at all or just push the connections into the box and mount the fixture to it.

No box cover needed. The fixture will cover the box
 

Terry D

Well-known member
Joined
Mar 25, 2015
Messages
2,202
Location
St. Louis, MO.
I think the better option is the https://tinyurl.com/4wvxmp8v. I guess the question is will it be flush enough to mount the fixture. Once the box is mounted just pop one of the holes for the wires, clamp is down and just make the connections. Does the box need a cover at all or just push the connections into the box and mount the fixture to it.

The fixture mounts to the box with 8/32 screws. There are holes in the fixture that will line up with the spacing of the screws on the box
 

grounded-b

Well-known member
Joined
Oct 23, 2012
Messages
285
Location
Milwaukee, WI
The fixture mounts to the box with 8/32 screws. There are holes in the fixture that will line up with the spacing of the screws on the box

No. The fixture he showed, uses a fixture strap and a 1/4" pipe ****** to mount the fixture.

You mount the strap to the box with 8-32 RHMS and the fixture mounts to the ****** with a small locknut.

I would add a couple of wood screws through the back of the fixture into the plywood, to keep the fixture from rotating out of square with the soffit.

Steve
 

Terry D

Well-known member
Joined
Mar 25, 2015
Messages
2,202
Location
St. Louis, MO.
No. The fixture he showed, uses a fixture strap and a 1/4" pipe ****** to mount the fixture.

You mount the strap to the box with 8-32 RHMS and the fixture mounts to the ****** with a small locknut.

I would add a couple of wood screws through the back of the fixture into the plywood, to keep the fixture from rotating out of square with the soffit.

Steve
You dont know that, there are different types. Sometimes the ****** is part of the fixture, if there even is one, and yes, on that type the holes line up with the box, whether the fixture or strap. And you can tell all that from that fixture still with the packaging on it? Anyway, my point was the fixture needs to be mounted to a box, which encloses the box and contains the splices, which ever way it may be . His question was if the box needed a cover on it

Sent from my SM-G960U using The Garage Journal mobile app
 
Last edited:

Terry D

Well-known member
Joined
Mar 25, 2015
Messages
2,202
Location
St. Louis, MO.
I don't know of a metal old work box built in an octagon style. The plastic O/W boxes aren't meant to be used with the armored cable.
ANY box will have to be mounted flush, or project beyond the plywood (because plywood's flammable).

I didnt catch the armored cable when I recommended a plastic cut in. The do make a metal 4/0 old work box though

https://garvinindustries.com/54151-...DWfcFE3eR0CJyt2GG0yCurCc-_ahnR2BoCRZYQAvD_BwE

https://garvinindustries.com/54171-owbx
 
Last edited:

grounded-b

Well-known member
Joined
Oct 23, 2012
Messages
285
Location
Milwaukee, WI
You dont know that, there are different types. Sometimes the ****** is part of the fixture, if there even is one, and yes, on that type the holes line up with the box, whether the fixture or strap. And you can tell all that from that fixture still with the packaging on it? Anyway, my point was the fixture needs to be mounted to a box, which encloses the box and contains the splices, which ever way it may be . His question was if the box needed a cover on it

Sent from my SM-G960U using The Garage Journal mobile app

Yes, I do know that the fixture mounts with a strap. Go to the OP's first post. Pictures #2 and #3. He shows the fixture and the strap.

I also answered him previously, that the box does not need a cover

Steve
 

Terry D

Well-known member
Joined
Mar 25, 2015
Messages
2,202
Location
St. Louis, MO.
Yes, I do know that the fixture mounts with a strap. Go to the OP's first post. Pictures #2 and #3. He shows the fixture and the strap.

I also answered him previously, that the box does not need a cover

Steve
I didn't catch the strap in the 1st post. My point is that it needs to mount to the box, not just have open splices.

As far as you already answering the question, you will find that multiple people will give the same answer on a post. That assures the OP this is the correct way of doing something

Sent from my SM-G960U using The Garage Journal mobile app
 
OP
D

drewcorvette

Active member
Joined
Apr 5, 2016
Messages
26
ok ending up getting an expandable ceiling fan bracket with box. Please see the pictures this will dig into either side of the joist/roof. I will tighten everything up then push the wires through the box and wire it up. Then bolt up the fixture. Anyone see any issues electrical wise or safety?

I also assume the wires out of the existing fixture hopefully are just white, black and a copper wire for grounding?
 

Attachments

  • 20210406_144744.jpg
    20210406_144744.jpg
    88.9 KB · Views: 38
  • 20210406_144735.jpg
    20210406_144735.jpg
    128.9 KB · Views: 39
  • 20210406_144728.jpg
    20210406_144728.jpg
    112.8 KB · Views: 40
  • 20210406_144126.jpg
    20210406_144126.jpg
    106.3 KB · Views: 36
Last edited:

grounded-b

Well-known member
Joined
Oct 23, 2012
Messages
285
Location
Milwaukee, WI
ok ending up getting an expandable ceiling fan bracket with box. Please see the pictures this will dig into either side of the joist/roof. I will tighten everything up then push the wires through the box and wire it up. Then bolt up the fixture. Anyone see any issues electrical wise or safety?

I also assume the wires out of the existing fixture hopefully are just white, black and a copper wire for grounding?

You WILL need an armored cable ( BX ) connector and an insulated bushing (Red Head ) when you connect the cable to the box.

And, yes, it will be black to blacks, white to whites, and bare copper grounds to green ground screw. ( BX does not have a ground wire internally, it grounds through the armor)

Steve
 
OP
D

drewcorvette

Active member
Joined
Apr 5, 2016
Messages
26
How come you need a armored cable ( BX ) connector and an insulated bushing (Red Head ), this bushing in the image came with iti assume that will not work. Is it b/c its armored cable? So i once i feed the bx into the connector it will ground it?
 

Attachments

  • 20210406_153913.jpg
    20210406_153913.jpg
    76.3 KB · Views: 32

grounded-b

Well-known member
Joined
Oct 23, 2012
Messages
285
Location
Milwaukee, WI
How come you need a armored cable ( BX ) connector and an insulated bushing (Red Head ), this bushing in the image came with it i assume that will not work. Is it b/c its armored cable? So once i feed the bx into the connector it will ground it?

That is a non-metallic, push-in connector for "Romex"

Yes, in order to maintain continuity of the equipment ground, you need to use a listed connector for armored cable (BX). The "red-head" is use to protect the conductor insulation from the sharp edge of the BX armor.

Steve
 

grounded-b

Well-known member
Joined
Oct 23, 2012
Messages
285
Location
Milwaukee, WI
are their different sizes and configurations for the armored cable ( BX ) connector and an insulated bushing (Red Head )? If so how do i figure out which one i need?

Are you sure you are even qualified do DIY electrical?

This is baby stuff. Basically you need a 1/2" BX connector and a "red head" for whatever size BX you have. If I had to guess, I would be 95% sure it is 14-2 BX.

And before you ask, Yellow #74B wirenuts would be what I would use to splice the 3 fixture wires to the #14 black and white wires in the BX. ( your mileage may vary )

Steve
 
OP
D

drewcorvette

Active member
Joined
Apr 5, 2016
Messages
26
thanks for your help, and to answer your question yes i am a DIY in many areas, just want to be certain with anything electrical. Might have a question or two once I'm ready to button everything up
 

yeldogt

Well-known member
Joined
Jan 2, 2012
Messages
18,184
Have had situations like this ---- often you can simply attach the electrical box to the light and then attach the whole wired assembly to the framing. The larger lights often have holes for this as the ceiling box my not hold the fixture tight anyway.

I have also used a junction box .... no, it's not code. I really don't see how it is any different than what every recessed light has ... a buried junction. It's just as easy to get to it when you lower the fixture.
 
To avoid these ads, REGISTER NOW!
Top Bottom