To avoid these ads, REGISTER NOW!

Outlet Positioning for LM8500

Ro_Ja Boy

Well-known member
Joined
Oct 29, 2017
Messages
149
Im worried the current outlets run for the LM8500 placement might be where the actual unit needs to go and want to make sure if so, they move the outlets before they drywall. Can someone let me know if where it (they) are positioned is okay or if it needs to be moved?

Thanks in advance!
 

Attachments

  • IMG_1607.jpg
    IMG_1607.jpg
    70.9 KB · Views: 211
  • IMG_1601.jpg
    IMG_1601.jpg
    80.7 KB · Views: 173
  • IMG_1609.jpg
    IMG_1609.jpg
    73.3 KB · Views: 175
  • IMG_1611.jpg
    IMG_1611.jpg
    80.7 KB · Views: 153
To avoid these ads, REGISTER NOW!

blair683

Well-known member
Joined
Feb 21, 2017
Messages
460
Location
Ohio
It looks like it will definitely be cutting it close. Why not just have them raise the outlets regardless? The lm8500 has a cord on it so it’s not like the outlets need to be 2” from the unit.
 

Buckgnarly

Well-known member
Joined
Oct 8, 2010
Messages
7,652
Location
VT
Will the door have a high lift kit? The opener will be level with the spring, so have outlets a foot or so above or below.
 
OP
R

Ro_Ja Boy

Well-known member
Joined
Oct 29, 2017
Messages
149
Yes. Planned for a high lift. So move the outlets down or up a foot?
 

blair683

Well-known member
Joined
Feb 21, 2017
Messages
460
Location
Ohio
If it’s going to be a high lift then you should be good. Your spring/ opener should be well above your outlets. If it wasn’t going to be a high lift then I would move the outlets up a foot or two.
 

Buckgnarly

Well-known member
Joined
Oct 8, 2010
Messages
7,652
Location
VT
If it’s going to be a high lift then you should be good. Your spring/ opener should be well above your outlets. If it wasn’t going to be a high lift then I would move the outlets up a foot or two.

X2, you're fine where they are. The cord mine is like 2-3 feet long, you got plenty of room.
 
OP
R

Ro_Ja Boy

Well-known member
Joined
Oct 29, 2017
Messages
149
One more question for you people a lot smarter than me. What do you suppose are the electrical boxes installed above the electrical outlets?
 
OP
R

Ro_Ja Boy

Well-known member
Joined
Oct 29, 2017
Messages
149
Did they pull wire for the door sensors and control panel?

Yes. They put wiring for the sensors down lower on the garage door, for a light switch on one side of the door (not garage door) and the control panel on the other.

You can see the light switch power run in this picture (control panel is on other side of the door that you can't see) and the sensors are down low next to another outlet.
 

Attachments

  • 14.jpg
    14.jpg
    88.9 KB · Views: 116

Vintage Veloce

Well-known member
Joined
Feb 27, 2015
Messages
1,076
Location
San Diego
Be sure to put the outlets someplace you can reach. Mine ended up behind the unit in the corner and partially obscured by the cabinets I put in. Even with a ladder it is a pain to reach. And for security, like when you travel away for a week you may wish to unplug the openers.
 
OP
R

Ro_Ja Boy

Well-known member
Joined
Oct 29, 2017
Messages
149
The outlet will be high enough that I'll have to use a ladder or ride the lift to access it, but it won't be blocked.
 
OP
R

Ro_Ja Boy

Well-known member
Joined
Oct 29, 2017
Messages
149
If you still plan to use a hi lift track, ideally you need a better place to mount the spring than what is currently showing in your picture.

Can you explain a little more? Sorry...first time dealing with this type of stuff
 

gnpenning

Well-known member
Joined
Jan 25, 2015
Messages
2,754
Location
I have more questions than answers.
When mount your torsion shaft for your spring you will attach it at 3 points. 1 on each side going through the bearing plates. The horizontal track will generally attach to them as well. They will lag into king or trimmer studs. The center bearing will be in the center of the door or close to it. This bracket is what holds most the spring tension. Think of it this way, that all it wants to do is rip it's self off the wall. If it can't do that then the shaft turns and raises the garage door. This area needs to be solid. Lagging into the center of a single 2x 4 is asking for trouble down the road. Especially if it's covered with sheetrock, your guessing and hoping it holds. Yep, people do it every day. Not a risk I like to take with the largest and heaviest moving object in your home. You need to stack more 2xs. Depending on how much high lift you have will depend on how high you need to go. When we frame we go from the top of the header to the bottom of the trusses. I want it solid. Then we goal post it. Laying 2x6 flat on the king and trimmers from floor to 3/4 shy of the ceiling. This leaves room to slide sheetrock in. Then across the top of the door opening keep keeping a flush surface all the way around. In your case this can be a 2x4 since your spring will be higher. Now you need one for the spring. Use a 2x8 or 2x10 setting horizontal from one vertical goal post to the other one. The center line of this one will match the center of the spring shaft. This way you know you are lagging to solid wood and not between studs or on the edge. I like to stain the goal posts. Make sure you add blocking for sheetrock.

Here is a couple pictures to help you out.
 

Attachments

  • 20180628_000758.jpg
    20180628_000758.jpg
    117.9 KB · Views: 74
  • 20180628_000848.jpg
    20180628_000848.jpg
    99.8 KB · Views: 54

kj_mustang

Well-known member
Joined
Feb 9, 2011
Messages
1,213
Location
Harrisonburg, VA
The low voltage wires should be in those upper boxes too, you will have to trace them out or hope the electrician marked them to know which ones run down to the door sensor boxes and which runs to the control panel.
 
OP
R

Ro_Ja Boy

Well-known member
Joined
Oct 29, 2017
Messages
149
When mount your torsion shaft for your spring you will attach it at 3 points. 1 on each side going through the bearing plates. The horizontal track will generally attach to them as well. They will lag into king or trimmer studs. The center bearing will be in the center of the door or close to it. This bracket is what holds most the spring tension. Think of it this way, that all it wants to do is rip it's self off the wall. If it can't do that then the shaft turns and raises the garage door. This area needs to be solid. Lagging into the center of a single 2x 4 is asking for trouble down the road. Especially if it's covered with sheetrock, your guessing and hoping it holds. Yep, people do it every day. Not a risk I like to take with the largest and heaviest moving object in your home. You need to stack more 2xs. Depending on how much high lift you have will depend on how high you need to go. When we frame we go from the top of the header to the bottom of the trusses. I want it solid. Then we goal post it. Laying 2x6 flat on the king and trimmers from floor to 3/4 shy of the ceiling. This leaves room to slide sheetrock in. Then across the top of the door opening keep keeping a flush surface all the way around. In your case this can be a 2x4 since your spring will be higher. Now you need one for the spring. Use a 2x8 or 2x10 setting horizontal from one vertical goal post to the other one. The center line of this one will match the center of the spring shaft. This way you know you are lagging to solid wood and not between studs or on the edge. I like to stain the goal posts. Make sure you add blocking for sheetrock.

Here is a couple pictures to help you out.

Understood and makes sense. Appreciate the explanation!
 
To avoid these ads, REGISTER NOW!
OP
R

Ro_Ja Boy

Well-known member
Joined
Oct 29, 2017
Messages
149
Didn't proofread and did it in the middle of the night, so I'm glad it made sense, and was helpful. Good luck.

Given that the walls are already drywalled now, do you suggest I run 2x4's along the three locations on the exterior of the wall?
 

Radix2

Well-known member
Joined
May 28, 2014
Messages
1,853
Location
the thumb!, MI
Also with respect to the spring framing - the directions typically say the wood must not be SPF, so typically SYP is called out.

Almost nobody follows this, but if you are working on this, make sure you find some nice hard pine to drive the screws in rather than some of the typical punk stuff out there.

The issue is they supply fairly short lag screws to mount the spring bracket, so they can tear out of soft wood. If you can get your framing deeper than a flat 2x, you can use some longer lags and not worry about wood quality as much.
 
OP
R

Ro_Ja Boy

Well-known member
Joined
Oct 29, 2017
Messages
149
Also with respect to the spring framing - the directions typically say the wood must not be SPF, so typically SYP is called out.

Almost nobody follows this, but if you are working on this, make sure you find some nice hard pine to drive the screws in rather than some of the typical punk stuff out there.

The issue is they supply fairly short lag screws to mount the spring bracket, so they can tear out of soft wood. If you can get your framing deeper than a flat 2x, you can use some longer lags and not worry about wood quality as much.

So on each run a 2x4 SYP along the rails and in the middle run something wider like a 2x10 STP long-way instead of up and down?
 

Radix2

Well-known member
Joined
May 28, 2014
Messages
1,853
Location
the thumb!, MI
So on each run a 2x4 SYP along the rails and in the middle run something wider like a 2x10 STP long-way instead of up and down?

I'm not sure what long way means, but here is how mine is, you want the center board up and down so that the spring mount us sure to hit it.

You can also see how I wrapped it in coilstock so no painting!
 

Attachments

  • IMG_7490.jpg
    IMG_7490.jpg
    133.7 KB · Views: 39
  • IMG_7491.jpg
    IMG_7491.jpg
    121.9 KB · Views: 40
OP
R

Ro_Ja Boy

Well-known member
Joined
Oct 29, 2017
Messages
149
I don't have a stud directly in the middle of the garage door, so meant I assume I need a piece of wood wide enough that it taps into the studs on both sides of the center.
 

Vintage Veloce

Well-known member
Joined
Feb 27, 2015
Messages
1,076
Location
San Diego
Note all your mounting points need to be on the same plane. Meaning the surfaces for mounting everything, track, and torsion bar, and motor must stick out from the wall the same amount.
 
Last edited:
OP
R

Ro_Ja Boy

Well-known member
Joined
Oct 29, 2017
Messages
149
Note all your mounting opints need to be on the same plane. Meaning the surfaces for mounting everything, track, and torsion bar, and motor must stick out from the wall the same amount.

I'm slow, but finally getting it. So run a 3/4" thick board along each side of the garage door all the way from floor to roof and then one all the way across the door. How much gap should I assume from the top of the wall, 4" or so?

How about on the ceiling? Do I need to run boards or is the track okay to go to the ceiling without?
 
Last edited:

Radix2

Well-known member
Joined
May 28, 2014
Messages
1,853
Location
the thumb!, MI
I'm slow, but finally getting it. So run a 3/4" thick board along each side of the garage door all the way from floor to roof and then one all the way across the door. How much gap should I assume from the top of the wall, 4" or so?

How about on the ceiling? Do I need to run boards or is the track okay to go to the ceiling without?

Normally it is 2x material. Each side of Door, across the top of the opening and in the center for the spring. That way all your hardware has solid 2x to screw into.


The track fastens to the wall all the way up to the shaft, the track is hung from the ceiling. Best to run your boards on the side right up to the ceiling, leave flexibility for mounting since high lift are not standardized.
 

gnpenning

Well-known member
Joined
Jan 25, 2015
Messages
2,754
Location
I have more questions than answers.
Again use 2x 6 for your verticals, across the header 2x4. For the spring use 2x8 or 2x10. It's ok to off set the spring to one side as long as you have space for the spring. From what I can see of your framing you need more support blocking for the spring. Lagging the spring mount and hoping you hit the center of the cripple is wishful thinking.

1 5/8" is the standard length lags supplied with most doors. As long as you have solid backing this is more than adequate.
 

maxpat82

Well-known member
Joined
Dec 9, 2012
Messages
275
my installation guide says 2 x 3/4" plywood 18"x12" for the spring pad. (Screwed to stud, header obviously.)
 
OP
R

Ro_Ja Boy

Well-known member
Joined
Oct 29, 2017
Messages
149
Only 2" wide on the sides? Surprised that's enough. They are opening the walls back up tomorrow to run support for the opener.
 
OP
R

Ro_Ja Boy

Well-known member
Joined
Oct 29, 2017
Messages
149
Having the walls opened back up tomorrow to run the support. 2x4 along the sides/header and 2x18 in the center of the wall.
 

Gerald O

Well-known member
Joined
Mar 5, 2013
Messages
1,884
Location
NC
More examples. Here's mine during construction.

attachment.php


attachment.php


After sheetrock.

attachment.php
 
Last edited:

Radix2

Well-known member
Joined
May 28, 2014
Messages
1,853
Location
the thumb!, MI
Having the walls opened back up tomorrow to run the support. 2x4 along the sides/header and 2x18 in the center of the wall.


do at least a 2x6 along the sides. You have to be super precise to hit a 2x4 with the track brackets.

Are the doors on site to allow verification of the brackets landing just right?
 
OP
R

Ro_Ja Boy

Well-known member
Joined
Oct 29, 2017
Messages
149
No...door and track are all on order to install on the 19th. I think he's doing 2x6 sides.
 

Vintage Veloce

Well-known member
Joined
Feb 27, 2015
Messages
1,076
Location
San Diego
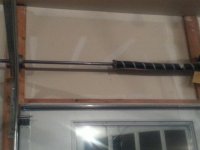
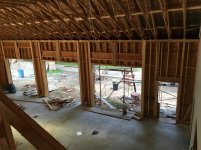
This picture might also help.
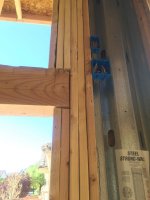
We put the proper reinforcement in the wall, but used a 2x6 as a door jam that protruded 3/4" to the inside of the doorway, proud of the sheetrock. It looked great and then the door guy showed up and informed me that the whole mounting surface for the track, motor, and cable tension sensor, etc, had to be on the same plane.
I put 1x6 on top of the sheetrock along the protruding jam to level everything out. It is an old building and actually took a bit of shimming to get everything level matched and square. And then I painted it green to match the other trim.
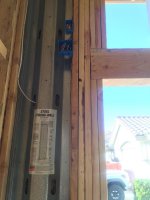
View media item 84538Note the location of the cable tension sensor next to the motor required an extra board there to support it too. It's just inside of the top pulley in this photo.
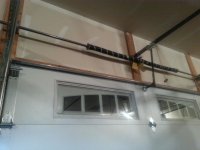
View media item 84411Everything really does need to be mounted on a surface that sticks out the same amount from the wall, in the same plane.
 
To avoid these ads, REGISTER NOW!
Top Bottom