To avoid these ads, REGISTER NOW!

PA Multitool Belt Grinder on Craftsman Block Grinders

Strouty

Well-known member
Joined
Mar 21, 2010
Messages
38,221
Location
Southern Maine
Nice build, tilting it to the side makes me think of a spindle sander. Have you used the disc sander portion much? I have a couple of belt sanders, I am looking for a nice disc sander or a combo one.
 
To avoid these ads, REGISTER NOW!
OP
M

McBrownie

Well-known member
Joined
Mar 27, 2014
Messages
1,827
Location
Cleveland, OH
Drives,

Thanks for the good reviews. ;) I got a raised eyebrow or two from my wife while I was filling those bags with sand. The garage is so messy that I can't get my car inside. I told her that this stand was the first critical step in cleaning up that mess. She didn't buy it. By the way, the locking casters are plenty solid. This is my third set of those. I have them on a radial arm saw, my Workmate dolly, and now this and they are good for all of those things. Great pictures of the falls. My two dachshunds get nervous around anything new. However, the other day, a fox was sitting right next to their fenced in area just watching (and waiting?) and neither of them saw it. I'm not sure what would happen if that fox would jump the fence. They are bred to go after badgers, but mine have had a pretty cushy life. That could be a rude awakening. We have coyotes too, which are a real concern.

Strouty,

I guess it is like a spindle sander, just a big one. They don't sell different sized contact wheels like on the bigger purpose-built belt grinders. I use the disc a little, but changing the discs is a pain compared to the belts. Dealing with the adhesive is the biggest issue. But for getting something flat, the disc is the way to go. I plan on using both.
 
Last edited:

Ozwelder

Well-known member
Joined
Feb 6, 2010
Messages
180
Location
Mackay, Queensland.Australia
Excellent post fella's.
As usual, I am a day late and dollar short, but for interest here it is anyway.

I too, have a MultiTool, had it for nearly 30 years and have had no trouble with it. Unfortunately in the last few years PA let the manufacturing out to China and the Chinese tooling is somewhat suspect.
I have seen quite a few crook ones on display in the shops here in Oz, but hopefully problems were weeded out before they hit your side of the pond.

It must be said the PA is fulfilling any warranty obligations pretty well and any defects are being remedied quickly. Watch for, run out on the driver wheel and tracking problems related to the right angle bracket not being a true right angle.

There's someone here in Australia making a platen for them which requires a 48" belt. It made a huge difference to the Multitool which I already use 5 times a week on average - easily the most used power tool in my workshop.

Here's a video about the platen and the bloke who makes it.
http://www.australianbladeforums.com/vb4/84-engineering/21983-multitool-upgrade-kit-video.html

No affiliation with him, just love the product.

Ozwelder
 
OP
M

McBrownie

Well-known member
Joined
Mar 27, 2014
Messages
1,827
Location
Cleveland, OH
Excellent post fella's.
As usual, I am a day late and dollar short, but for interest here it is anyway.

I too, have a MultiTool, had it for nearly 30 years and have had no trouble with it. Unfortunately in the last few years PA let the manufacturing out to China and the Chinese tooling is somewhat suspect.
I have seen quite a few crook ones on display in the shops here in Oz, but hopefully problems were weeded out before they hit your side of the pond.

It must be said the PA is fulfilling any warranty obligations pretty well and any defects are being remedied quickly. Watch for, run out on the driver wheel and tracking problems related to the right angle bracket not being a true right angle.

There's someone here in Australia making a platen for them which requires a 48" belt. It made a huge difference to the Multitool which I already use 5 times a week on average - easily the most used power tool in my workshop.

Here's a video about the platen and the bloke who makes it.
http://www.australianbladeforums.com/vb4/84-engineering/21983-multitool-upgrade-kit-video.html

No affiliation with him, just love the product.

Ozwelder

Oz,

Thank you for posting the link on this thread. The Multitools are not widely distributed here in the U.S. and almost have a bit of mystery about them. The attachment in that video is really interesting. Is there a website for it, or should we contact the OP directly through the Austrailian Blade Forum?
 
Last edited:

Ozwelder

Well-known member
Joined
Feb 6, 2010
Messages
180
Location
Mackay, Queensland.Australia
He can be contacted through the blade forum and has facebook ,not sure about a dedicated website.

yes there's some real good thought gone into the upgrade he has come up with. The fact that the front (small) wheel mount is utilised allows fitting back to original configuration if so desired.
Theres also a magnetic sliding surface grinder on a separate U tube -but this does not one fit the multitool from what I can see.

84 engineering is a good search tag if you look up U tube as he has some other belt grinder related toys shown there.
Cheers
Ozwelder
 
Last edited:

drivesitfar

Well-known member
Joined
Oct 23, 2013
Messages
36,044
Location
Pacific Northwest
McB: if you get that you'll be able to start sharpening knives or maybe making some after you get an anvil and a forge.

always like seeing your projects. keep thinking because you are amazing with your talent.
 
OP
M

McBrownie

Well-known member
Joined
Mar 27, 2014
Messages
1,827
Location
Cleveland, OH
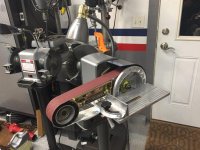
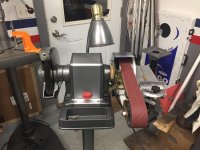
I did some work over the holidays to shrink the footprint of my belt grinder in my workroom by re-configuring the stand. I decided to remove the cast iron cooling tray/tool holder since it really wasn't being used. That thing is as heavy as the whole grinder. With that weight gone, I then cannibalized an old office chair along with parts of the original stand and came with something lighter weight and easier to move around. I still use this setup regularly and it still runs great. It is time to order more belts!

I posted these over on the "vise and grinder stands" thread, but they belong here too.

View media item 55938
View media item 55939
 

drivesitfar

Well-known member
Joined
Oct 23, 2013
Messages
36,044
Location
Pacific Northwest
McB: you never fail to find a way to make something that is awesome. thanks for sharing your ideas with us. are you still using the Blockmeister almost daily?

i'm almost getting caught up and maybe by the end of the month i'll get that thing i promised you with a couple other goodies that have been MIA with my KAOS around here.

cheers and are you still thinking you are going to make or buy the 3rd wheel unit or do you already own or have made it?

take care
 
OP
M

McBrownie

Well-known member
Joined
Mar 27, 2014
Messages
1,827
Location
Cleveland, OH
What do you do with that striking knife you made?

Sent from my MotoG3 using Tapatalk

It's used for scribing a line in wood instead of using pencil. It's sharp so it goes right up against a straight edge and it cuts the fibers of the wood too. You could use a utility knife too, but that would just be boring. :D
 

vertguy

Well-known member
Joined
Apr 6, 2010
Messages
1,262
Location
SE WI
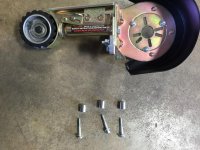
While I was repainting this grinder (the day after starting this thread), I did something that will make the installation mounting bracket easier. Finding the right length bolts to hold the bracket to the motor housing was a bit tedious. I would end up with bolts that would fit in 2 out of 3 holes. I couldn't just add washers because then the bolts heads would run into the shaft collar. I ended grinding them to lengths that worked. But, since I had the grinder apart, I tapped the holes all the way through the casting. They are 1/4-20 and we're only partially threaded on my grinder. I would NOT do this unless you have the grinder apart. I don't think it would be a good idea to have chips from the tap floating around inside the motor. It does make assembly easier and is worth doing if you are going to have your grinder apart anyway.

McBrownie:Taking your advise and prepping mine for this belt sander kit while it is apart. Did you just run the tap until it bottomed out as my tapped holes are not drilled all the way into the casting?
 
OP
M

McBrownie

Well-known member
Joined
Mar 27, 2014
Messages
1,827
Location
Cleveland, OH
McBrownie:Taking your advise and prepping mine for this belt sander kit while it is apart. Did you just run the tap until it bottomed out as my tapped holes are not drilled all the way into the casting?

Very,

Mine were drilled all of the way through but weren't tapped all of the way through. Just to be clear, the holes in your guards are not drilled all of the way through? If not, what model grinder do you have?
 

vertguy

Well-known member
Joined
Apr 6, 2010
Messages
1,262
Location
SE WI
This one is a 3/4hp 397.19450 and the tapped holes on the covers are not drilled through.


Sent from my iPad using Tapatalk
 

vertguy

Well-known member
Joined
Apr 6, 2010
Messages
1,262
Location
SE WI
I am over thinking this as drilling these out from the inside would easily solve the issue and allow for a full through tap. Here's a shot of the inside:
 

Attachments

  • End covers before stripping.jpg
    End covers before stripping.jpg
    126 KB · Views: 68
To avoid these ads, REGISTER NOW!
OP
M

McBrownie

Well-known member
Joined
Mar 27, 2014
Messages
1,827
Location
Cleveland, OH
I am over thinking this as drilling these out from the inside would easily solve the issue and allow for a full through tap. Here's a shot of the inside:

A flat top! I agree in that it won't hurt a thing drilling them through and will keep from breaking a tap. Super cool lamp on your grinder too. Surprised it doesn't have the plastic cover like most flat tops. Do you have the belt grinder attachment now or are you planning for the future?
 

exmaxima1

Well-known member
Joined
Jun 25, 2011
Messages
6,343
Location
Midwest
I am over thinking this as drilling these out from the inside would easily solve the issue and allow for a full through tap. Here's a shot of the inside:

While it's still apart, please advise the DIAMETER of the rotor, and the THICKNESS of the stator lamination stack. I'd like to compare it to some other grinders I'm toying with.
 

vertguy

Well-known member
Joined
Apr 6, 2010
Messages
1,262
Location
SE WI
The original lamp was trashed and I picked up this one last year on eBay thinking it would come in handy for a future project. Fairly sure it is off a 60s commercial block.

My plan was to get the grinder restored first, then order the belt sander kit from Trick tools. Also need to check with a friend about making the spacer you so kindly spec'd out.


Sent from my iPad using Tapatalk
 

vertguy

Well-known member
Joined
Apr 6, 2010
Messages
1,262
Location
SE WI
While it's still apart, please advise the DIAMETER of the rotor, and the THICKNESS of the stator lamination stack. I'd like to compare it to some other grinders I'm toying with.


Made a couple measurements, but want to be sure they are for the right parts. The rotor seems to be straight forward as that is the black area on the shaft, correct? Measured 2.62 in.

Stator lamination as in the large block that surrounds the windings? Measured 1.75 in. Thickness and 5.62 diameter on the the flat area, not the curved corners.

Let me know if you need anything else as it will be apart for a week or so while I clean up the other parts.


Sent from my iPad using Tapatalk
 
Last edited:

exmaxima1

Well-known member
Joined
Jun 25, 2011
Messages
6,343
Location
Midwest
Made a couple measurements, but want to be sure they are for the right parts. The rotor seems to be straight forward as that is the black area on the shaft, correct? Measured 2.62 in.

Stator lamination as in the large block that surrounds the windings? Measured 1.75 in.

Let me know if you need anything else as it will be apart for a week or so while I clean up the other parts.


Sent from my iPad using Tapatalk

Thanks! It saves me the effort of taking mine apart to measure it. Good Luck.
 

vertguy

Well-known member
Joined
Apr 6, 2010
Messages
1,262
Location
SE WI
McB - Now that the grinder is back together, I am in the process of confirming the spacer width for the Multi-tool that I picked up Thanksgiving week and found an interesting difference between our grinders. The distance from the side cover mounting surface and the shaft shoulder on your 3/4HP was 1-5/8 compared to 1-3/8 inches on mine. Add in the variable of our shaft collar widths with .51 vs .40 on yours, which explains why your 7/8 spacer width looked a bit wide.

Now I am doing some ciphering to get mine spec'd out, but ~ .5 inch looks to be the magic number and correlates to the combined delta between the shaft collars (.11) and exposed 17mm shaft length (.25). Now I need to spring for a couple beers and hit up a machinist friend to get one cranked out.
 
Last edited:
OP
M

McBrownie

Well-known member
Joined
Mar 27, 2014
Messages
1,827
Location
Cleveland, OH
McB - Now that the grinder is back together, I am in the process of confirming the spacer width for the Multi-tool that I picked up Thanksgiving week and found an interesting difference between our grinders. The distance from the side cover mounting surface and the shaft shoulder on your 3/4HP was 1-5/8 compared to 1-3/8 inches on mine. Add in the variable of our shaft collar widths with .51 vs .40 on yours, which explains why your 7/8 spacer width looked a bit wide.

Now I am doing some ciphering to get mine spec'd out, but ~ .5 inch looks to be the magic number and correlates to the combined delta between the shaft collars (.11) and exposed 17mm shaft length (.25). Now I need to spring for a couple beers and hit up a machinist friend to get one cranked out.

Vert,

That is interesting. For something that should be fairly straightforward, there are enough variables involved to make it more confusing than it should be. I started with some pieces of plywood to come up with the dimension that worked for me. Even with that, the position of the shaft collar, etc., gives some wiggle room with what you decide on. Hope to see the finished product soon. I'm actually finding myself using the side wheel for more and more things.
 

vertguy

Well-known member
Joined
Apr 6, 2010
Messages
1,262
Location
SE WI
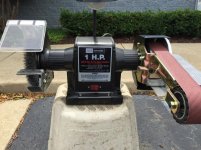
Almost done as one of the last remaining tasks is to enlarge the countersink holes on the disc plate as the 10-24 screws have larger heads than the originals and are not sitting flush (countersink on order). Also think the GFCI issue was resolved as the grinder fires up now without issue. I still need to get the permanent spacer made, but that is just a matter of finding some time to meet up with a machinist friend.

And surprisingly enough, it is very stable on the original CM stand.

McB: Thanks for the great write up as it made this project very straight forward :beer:
 

Attachments

  • multitool finished.jpg
    multitool finished.jpg
    113.3 KB · Views: 120
  • multitool finished 2.jpg
    multitool finished 2.jpg
    72.2 KB · Views: 115
  • multitool finished 3.jpg
    multitool finished 3.jpg
    116.7 KB · Views: 121

Bobioz1

Well-known member
Joined
Jun 26, 2013
Messages
821
Location
Northern il. (For now)
Almost done as one of the last remaining tasks is to enlarge the countersink holes on the disc plate as the 10-24 screws have larger heads than the originals and are not sitting flush (countersink on order). Also think the GFCI issue was resolved as the grinder fires up now without issue. I still need to get the permanent spacer made, but that is just a matter of finding some time to meet up with a machinist friend.

And surprisingly enough, it is very stable on the original CM stand.

McB: Thanks for the great write up as it made this project very straight forward :beer:

I got my spacer(s) at Menards
 

Attachments

  • IMG_0191.jpg
    IMG_0191.jpg
    147.7 KB · Views: 290

Bobioz1

Well-known member
Joined
Jun 26, 2013
Messages
821
Location
Northern il. (For now)
It's on a 3/4 block now. The 1 horse is now an open wheel for buffing/deburring/wire wheeling. Your build inspired me to get one. It's a great machine. Thanks!
 

Attachments

  • IMG_0241.jpg
    IMG_0241.jpg
    136.7 KB · Views: 338

Man Cave

Well-known member
Joined
Oct 29, 2009
Messages
94
Location
southern Indiana
Just read this entire thread and learned a lot. Thanks McBrownie and others for the scoop on setting up this shop tool. I already have a 6x48 JET belt sander but those can have their limits for accessibility. My old Craftsman 1 hp grinder looks like the one in post #108. I'm going for the 2x48.
 
OP
M

McBrownie

Well-known member
Joined
Mar 27, 2014
Messages
1,827
Location
Cleveland, OH
Just read this entire thread and learned a lot. Thanks McBrownie and others for the scoop on setting up this shop tool. I already have a 6x48 JET belt sander but those can have their limits for accessibility. My old Craftsman 1 hp grinder looks like the one in post #108. I'm going for the 2x48.

MC,

Let us know how you like the 2x48 and how it compares to the JET. A 1HP shouldn't have any trouble spinning up the 2x48.
 

lafester

Well-known member
Joined
Mar 1, 2017
Messages
2,191
Location
Northern CO
I don't think we can let this thread just die out can we?

How is everyone's Multitools holding up? I have one coming and will be putting it on a 1hp block. Currently don't plan up using the disk much as I have a 9" disc with a cast iron table on the craftsman 6x48 sander.

I love the 48" accessories that guy made... looks like he stopped production shortly after he started making them. Curious if anybody here has made anything like that.
 

lafester

Well-known member
Joined
Mar 1, 2017
Messages
2,191
Location
Northern CO
Curious where you are getting your shaft collars from? I see a wide variety of prices online and am also wondering if any chain store carries them locally.
 

lafester

Well-known member
Joined
Mar 1, 2017
Messages
2,191
Location
Northern CO
Just read this entire thread and learned a lot. Thanks McBrownie and others for the scoop on setting up this shop tool. I already have a 6x48 JET belt sander but those can have their limits for accessibility. My old Craftsman 1 hp grinder looks like the one in post #108. I'm going for the 2x48.

How do you like your 2x48?
 

drivesitfar

Well-known member
Joined
Oct 23, 2013
Messages
36,044
Location
Pacific Northwest
Laf: I think McBrownie made a post on the Block grinder thread on another improvement he made to his Blockmeister and maybe he'll see yours and now my posts and post it up here too.

i never have put one of these attachments on one of my blocks, but I do have a nice stand alone sander that seems to work well for me so far.
 

lafester

Well-known member
Joined
Mar 1, 2017
Messages
2,191
Location
Northern CO
Thinking about mounting on the left, vertical so the platon is facing out. Then maybe I can position a tool rest at the bottom. Hard to visualize until I have it in hand tomorrow though.
 
To avoid these ads, REGISTER NOW!
Top Bottom