

You are using an out of date browser. It may not display this or other websites correctly.
You should upgrade or use an alternative browser.
You should upgrade or use an alternative browser.
paging J. Olsen..building new cabinets
- Thread starter ed_v
- Start date
Dan in Pasadena
Well-known member
I suggest plywood. Its dimensionally stable and less susceptible to moisture damage than MDF. Jacks upper cabinet doors are tempered hardboard if I remember correctly. No idea what the carcass skins are made of though. I think he just primed and painted with regular exterior latex paint.
I'm sure he'll chime in with more detailed info.
I'm sure he'll chime in with more detailed info.
bww_mnm
Well-known member
I want to build some upper wall cabinets similar to Jack Olsens. Do you guys suggest plywood or mdf?
Jack,
The finish on your cabinets look very durable. What process and type of paint did you use?
Ed
MDF is heavy and doesn't handle weight as good as plywood over a span.
anythingfastxxx
Well-known member
I used to build/install custome cabinets for a couple of years. We used melamine/particle board for most of our boxes but also built quite a bit using prefinished plywood. They both have pros/cons. It's a bit more costly than regular old MDF but depending on how many cabinets you're looking for may be minimal. Melamine is extremely durable and has a nice finish inside that you can wipe out very easily. Melamine is tough and durable. If you get prefinished plywood it looks very nice too. What exactly are you looking for? More concerned about durability? Looks?.....
Check this out.
http://www.woodweb.com/knowledge_base/Melamine_Versus_Plywood.html
Check this out.
http://www.woodweb.com/knowledge_base/Melamine_Versus_Plywood.html
Last edited:
ddawg16
Well-known member
That pretty much sums it up....
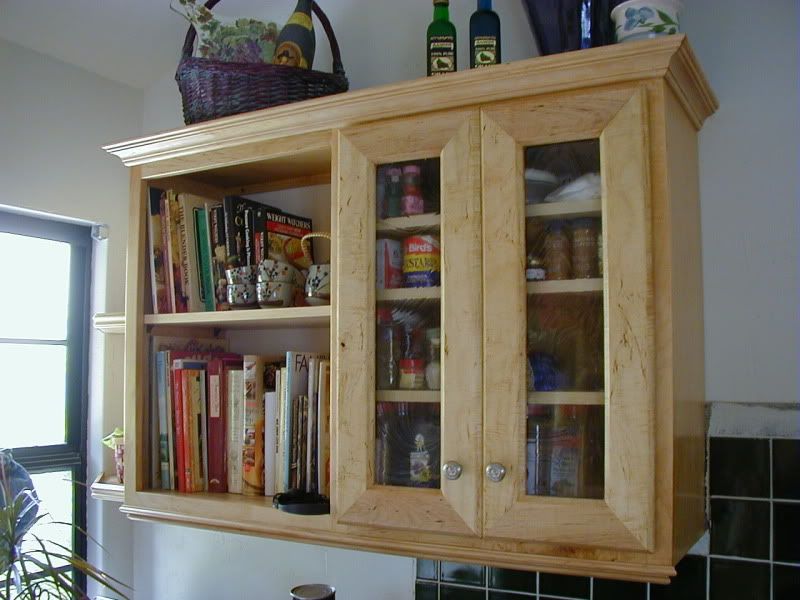
Here is one of the kitchen cabinets I built using plywood and solid maple...
And one of the upper cabinets I built in the garage using gray melamine.
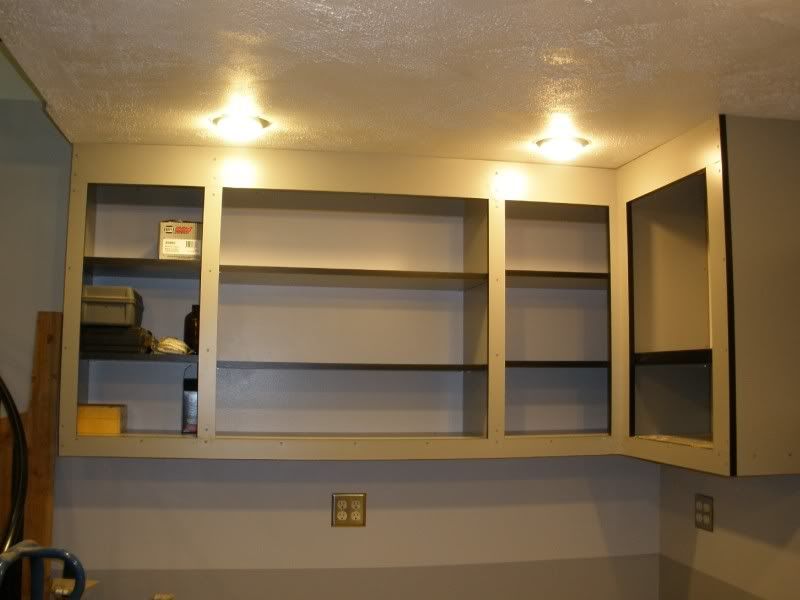
The melamine is over twice as heavy....but needs no paint or finishing....
It is very rigid....but you have to attach it properly....shelves will sag if they are long enough...but I solve that by attaching 16g strip of SS across the front and back edges....in the back I make it 3" tall....no sag.
You can see more of my cabinets in the garage build link in my sig.
Here is one of the kitchen cabinets I built using plywood and solid maple...
And one of the upper cabinets I built in the garage using gray melamine.
The melamine is over twice as heavy....but needs no paint or finishing....
It is very rigid....but you have to attach it properly....shelves will sag if they are long enough...but I solve that by attaching 16g strip of SS across the front and back edges....in the back I make it 3" tall....no sag.
You can see more of my cabinets in the garage build link in my sig.
Daniel Dudley
Well-known member
- Joined
- Sep 4, 2009
- Messages
- 3,546
I personally despise particle boards of any type, but they are OK as long as you don't get them wet.
I recently built a set of top cabinets out of #2 pine. Oddly, it came out cheaper than birch veneer plywood, because there was absolutely no waste. Very easy to handle, and with a 1x12'' there is no ripping for the cabinet, and only one rip to make the shelves. Soft wood though. I did not put a back on these cabinets, only a top and bottom cleat. They were for the garage.
For clients I usually use birch veneer for the boxes, and poplar for the faces, if I am painting them, or cherry/cherry , mahogany/mahogany, etc. .
Composition board is OK. However, I would never use it for a bottom cabinet, or anywhere it might get wet. I have replaced a few water damaged cabinets over the years, so I have an aversion to the stuff. It also makes one of the finest, nastiest dusts you will ever be exposed to, and even with a respirator, I find the stuff highly irritating to my sinuses. It gets on your clothes and everywhere. Plywood is a pleasure in comparison.
Someone just posted some beautiful pictures of some upper cabinets he just made, showing the cut diagrams, the pieces, and the finished product. It was posted as part of his garage build, but it was a perfect example of how to make a cabinet. I put adjustable shelves in mine, set up for L clips that fit in 1/4'' holes. I make a predrilled story board for the holes, and use it for a drilling jig for all the cabinets.
I recently built a set of top cabinets out of #2 pine. Oddly, it came out cheaper than birch veneer plywood, because there was absolutely no waste. Very easy to handle, and with a 1x12'' there is no ripping for the cabinet, and only one rip to make the shelves. Soft wood though. I did not put a back on these cabinets, only a top and bottom cleat. They were for the garage.
For clients I usually use birch veneer for the boxes, and poplar for the faces, if I am painting them, or cherry/cherry , mahogany/mahogany, etc. .
Composition board is OK. However, I would never use it for a bottom cabinet, or anywhere it might get wet. I have replaced a few water damaged cabinets over the years, so I have an aversion to the stuff. It also makes one of the finest, nastiest dusts you will ever be exposed to, and even with a respirator, I find the stuff highly irritating to my sinuses. It gets on your clothes and everywhere. Plywood is a pleasure in comparison.
Someone just posted some beautiful pictures of some upper cabinets he just made, showing the cut diagrams, the pieces, and the finished product. It was posted as part of his garage build, but it was a perfect example of how to make a cabinet. I put adjustable shelves in mine, set up for L clips that fit in 1/4'' holes. I make a predrilled story board for the holes, and use it for a drilling jig for all the cabinets.
irishtom
Well-known member
I'd suggest plywood. Considering the difference in environmental conditions between IL/KY and SoCal, ply will hold up better than MDF over the long run.
anythingfastxxx
Well-known member
That pretty much sums it up....
Here is one of the kitchen cabinets I built using plywood and solid maple...
And one of the upper cabinets I built in the garage using gray melamine.
The melamine is over twice as heavy....but needs no paint or finishing....
It is very rigid....but you have to attach it properly....shelves will sag if they are long enough...but I solve that by attaching 16g strip of SS across the front and back edges....in the back I make it 3" tall....no sag.
You can see more of my cabinets in the garage build link in my sig.
That maple cab looks awesome. Maple is definitely my favorite. Are you eventually planning on finishing that lower trim on the right hand side and capping off the end?
Those cabinets look fantastic! Thanks for the input guys.
That pretty much sums it up....
Here is one of the kitchen cabinets I built using plywood and solid maple...
And one of the upper cabinets I built in the garage using gray melamine.
The melamine is over twice as heavy....but needs no paint or finishing....
It is very rigid....but you have to attach it properly....shelves will sag if they are long enough...but I solve that by attaching 16g strip of SS across the front and back edges....in the back I make it 3" tall....no sag.
You can see more of my cabinets in the garage build link in my sig.
csp
Well-known member
So along these same lines I'm getting ready to build some cabinets in my garage. The plan is to use 3/4" plywood, but I noticed that I have two full sheets of OSB subfloor (also 3/4") sitting in my basement. Do I dare use these for my cabinet backs which will save me a bit of cash? The cabinets will be screwed/bolted to the walls and not sitting on the garage floor.
buening
Well-known member
I am in the middle of making my cabinets. The local Menards had 3/4" Oak plywood (grade B, sanded) on sale for $28/sheet. It is normally about $39/sheet. The 3/4" MDF is $32/sheet locally, so it only made sense to use the Oak. MDF doesn't hold screws very well, so you will need well glued joints and use Confirmat screws (which are pricey IMO). MDF shelves will sag over time just with their own weight, so I'd recommend against using MDF for the shelves. The carcasses can be MDF as long as you get them primed to prevent moisture soaking in.
I personally wouldn't use OSB, it's fairly weak stuff in my opinion. Are you doing face-frame or frameless style cabinets?
I personally wouldn't use OSB, it's fairly weak stuff in my opinion. Are you doing face-frame or frameless style cabinets?
csp
Well-known member
Face frame. The doors will be fairly lightweight panel type doors using tempered hardboard inside a pine frame.
Assembly will be glue and pocket screws.
Assembly will be glue and pocket screws.
I'm lazy and cheap. I've accepted that about myself.
That said, I try to work around my shortcomings. So the cabinets in my garage are nice down where they're getting a lot of use (the steel level), and merely functional for the stuff that's in longer-term storage (the soffit level).
But back to the cheap and lazy part. I used whatever I had on hand, pretty much, when I built them. So the upper cabinets are framed with 2x4 and 1x2s, the sliding doors are hardboard-type MDF, and the doors slide in 2x4s that I've grooved with a table saw. The shelves inside (when there are shelves) are either plywood or OSB, depending on what I had that was the right size.
Most of this has worked great. Some of it has come back to bite me in the ****. The wood cabinets above the inch-thick-steel bench have shifted with the buidling, so now my to-do list includes going up and re-configuring the slides for them. The stupid thing I did when I made most of the sliding doors was to only cut the grooves deep enough to hold the doors in place. What I should have done was to make the upper grooves 2x as deep as the lower ones so that I could lift the sliding doors up in order to remove them. I finally got this right on the doors I made for above the sink area. Live and learn.
Here's the latest set I did. I've gotten so that I can bang these out pretty quickly. But that's happened just as I reached the end of the road for my garage storage space.

And here is a picture of the last set of sliding guides. As you can see, each is just a 2x4 with grooves cut into it. The deeper ones go on top, so the door can be lifted up to be removed or installed. It's so simple, but I didn't think of it at all on the first two batches of doors I made.

That said, I try to work around my shortcomings. So the cabinets in my garage are nice down where they're getting a lot of use (the steel level), and merely functional for the stuff that's in longer-term storage (the soffit level).
But back to the cheap and lazy part. I used whatever I had on hand, pretty much, when I built them. So the upper cabinets are framed with 2x4 and 1x2s, the sliding doors are hardboard-type MDF, and the doors slide in 2x4s that I've grooved with a table saw. The shelves inside (when there are shelves) are either plywood or OSB, depending on what I had that was the right size.
Most of this has worked great. Some of it has come back to bite me in the ****. The wood cabinets above the inch-thick-steel bench have shifted with the buidling, so now my to-do list includes going up and re-configuring the slides for them. The stupid thing I did when I made most of the sliding doors was to only cut the grooves deep enough to hold the doors in place. What I should have done was to make the upper grooves 2x as deep as the lower ones so that I could lift the sliding doors up in order to remove them. I finally got this right on the doors I made for above the sink area. Live and learn.
Here's the latest set I did. I've gotten so that I can bang these out pretty quickly. But that's happened just as I reached the end of the road for my garage storage space.
And here is a picture of the last set of sliding guides. As you can see, each is just a 2x4 with grooves cut into it. The deeper ones go on top, so the door can be lifted up to be removed or installed. It's so simple, but I didn't think of it at all on the first two batches of doors I made.
Wanna come do my kitchen cabinets?That pretty much sums it up....
Here is one of the kitchen cabinets I built using plywood and solid maple...
And one of the upper cabinets I built in the garage using gray melamine.
The melamine is over twice as heavy....but needs no paint or finishing....
It is very rigid....but you have to attach it properly....shelves will sag if they are long enough...but I solve that by attaching 16g strip of SS across the front and back edges....in the back I make it 3" tall....no sag.
You can see more of my cabinets in the garage build link in my sig.
V-10 Killer
Well-known member
I personally despise particle boards of any type, but they are OK as long as you don't get them wet.
For clients I usually use birch veneer for the boxes, and poplar for the faces, if I am painting them, or cherry/cherry , mahogany/mahogany, etc. .
Someone just posted some beautiful pictures of some upper cabinets he just made, showing the cut diagrams, the pieces, and the finished product. It was posted as part of his garage build, but it was a perfect example of how to make a cabinet. I put adjustable shelves in mine, set up for L clips that fit in 1/4'' holes. I make a predrilled story board for the holes, and use it for a drilling jig for all the cabinets.
If that was my toybox thread you're referring to, thank you for the compliment

And though I'm using pine for the face frame, I'm using poplar for the doors to reduce warping/twisting
Thanks for the great info Jack. I never thought of framing with 2x4s. I have some laying around. I might give that a shot.
I'm lazy and cheap. I've accepted that about myself.
That said, I try to work around my shortcomings. So the cabinets in my garage are nice down where they're getting a lot of use (the steel level), and merely functional for the stuff that's in longer-term storage (the soffit level).
But back to the cheap and lazy part. I used whatever I had on hand, pretty much, when I built them. So the upper cabinets are framed with 2x4 and 1x2s, the sliding doors are hardboard-type MDF, and the doors slide in 2x4s that I've grooved with a table saw. The shelves inside (when there are shelves) are either plywood or OSB, depending on what I had that was the right size.
Most of this has worked great. Some of it has come back to bite me in the ****. The wood cabinets above the inch-thick-steel bench have shifted with the buidling, so now my to-do list includes going up and re-configuring the slides for them. The stupid thing I did when I made most of the sliding doors was to only cut the grooves deep enough to hold the doors in place. What I should have done was to make the upper grooves 2x as deep as the lower ones so that I could lift the sliding doors up in order to remove them. I finally got this right on the doors I made for above the sink area. Live and learn.
Here's the latest set I did. I've gotten so that I can bang these out pretty quickly. But that's happened just as I reached the end of the road for my garage storage space.
And here is a picture of the last set of sliding guides. As you can see, each is just a 2x4 with grooves cut into it. The deeper ones go on top, so the door can be lifted up to be removed or installed. It's so simple, but I didn't think of it at all on the first two batches of doors I made.