To avoid these ads, REGISTER NOW!

Painful Garage Project Inside

To avoid these ads, REGISTER NOW!
OP
G

GearBeer

Well-known member
Joined
Jun 12, 2009
Messages
252
50 points for STORMEASTON!
It's a 1963 Fairlane 2-door sedan.

I'd have to double check exactly how the hinges are mounted, but there are two or three hinges facing the outside. It takes a little effort to get them to clear the bar brackets, but they're not too bad.

They swing out into space and slam back closed because my back yard is windy.
 
OP
G

GearBeer

Well-known member
Joined
Jun 12, 2009
Messages
252
Monday 10/19
Swingin' easy

First, on a totally garage-unrelated note, the north side of my house was dug out to reseal and fix a poor drainage issue.
IMG_3309.JPG

IMG_3322.JPG

It was sealed around the corner but the photo was taken while I was out getting a second 5 gal bucket of tar.

The same company did the rough grading around the workshop and storage garage.
IMG_3400.JPG

IMG_3404.JPG


The other project for the day was the hoist doors. They're built with angular support members for strength because they won't be pulled up from the center. Both sides have R-13 fiberglass and 1" polyisocyanate insulation. The shorter side also has a sheet of 3/4" OSB for a walking surface.
IMG_3421.JPG

IMG_3425.JPG

IMG_3426.JPG

IMG_3427.JPG

IMG_3449.JPG


We also burned one or two sawzall blades making a hole into the attached garage's attic.
IMG_3428.JPG


Also, while my dad worked on the rough carpentry measurements and cuts for the doors I installed the wall insulation. We're getting close to being ready for heat! Another reason to love Menards: the "typical" big box stores (Lowe's and HD) don't sell uncut rolls of insulation. Note the difference in the insulation length between the JM insulation (left, black printing) and the Corning insuation (right, red printing). The JM insulation came in a 39'2" roll and the Corning insulation came in a roll of 5 94" pre-cut lengths. The packages are the same number of linear feet but if your house doesn't have at least 12 duplicates in your subdivision, then you're going to have to do some extra custom cutting.
IMG_3447.JPG
 

rinker1

Well-known member
Joined
Aug 30, 2008
Messages
289
Location
Ohio
I may have missed it earlier in your post but what kind of insulation is that in your ceiling?
 
To avoid these ads, REGISTER NOW!
OP
G

GearBeer

Well-known member
Joined
Jun 12, 2009
Messages
252
It's R-30, I think, unfaced insulation.

It's currently held up by lengths of steel rod that are wedged into the joists. On Etek's suggestion I'm going to replace them with string.
 

Old61

Well-known member
Joined
Nov 12, 2008
Messages
157
Nice project, worth the headaches! On the house sealing part, I used to install 2" foam insulation and backfill with gravel. The gravel allows quick drainage to the permadrain (if used) or at least keeps saturated dirt away from the foundation.
 
OP
G

GearBeer

Well-known member
Joined
Jun 12, 2009
Messages
252
The soil there is pretty sandy. I live in a moraine (sp?) so my yard is relatively sandy and there are TONS of stones. Perhaps I should have put some insulation down. I never thought about that... too late now!

Monday 10/26
E-pox on Both My Garages! (I spilled :eek: )

So the big project this weekend was to get the epoxy down, not pictured here is the 1" gas pipe that we ran from the northeast corner of my house to the southwest corner of my garage (basically as far as physically possible). Why do I need 1" pipe you ask? 2 heaters and homebrewing.

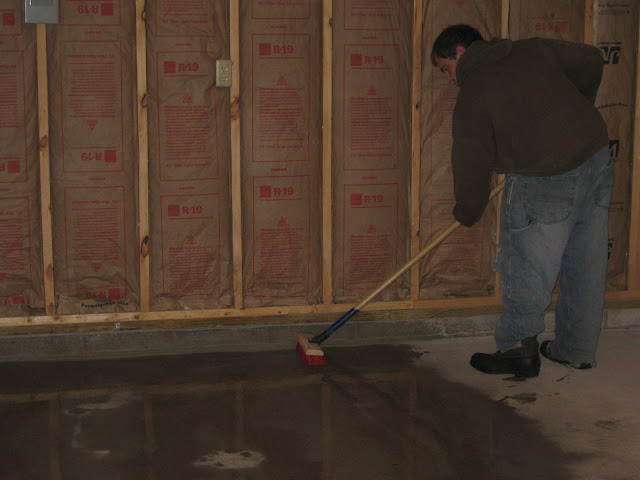
On with the epoxy! We acidized the surface, even though it's probably unnecessary after the diamond grinding. We squeegee'd it out and rinsed the surface 2-3 times then blew it out with a leaf blower to reduce the drying time.
2009_10_23-06.jpg

2009_10_23-09.jpg


The drying time really put us behind. We had four fans to assist with the drying but, as we figured out, we had to dry the 4" blocks COMPLETELY or the water would wick into the concrete pad.
2009_10_23-11.jpg


In order to keep the whole garage enclosed, yet be able to epoxy the lip of the floor we covered the 8' garage door with a plastic sheet, wedged old trim pieces into the J-channel and weighted it down with square pavers.
2009_10_23-12.jpg


We "cut in" the epoxy (gray) with a small brush prior to squeegeeing (sp?) it out. We established a pretty good division of labor. I was cutting in, rollering and flaking and my Dad was mixing, squeegeeing and doing what cutting in I couldn't finish.
I played with a couple different strategies for flaking the floor, I found the best was to take a small amount and throw it up against the ceiling (or insulation, in my case).
2009_10_23-22.jpg

2009_10_23-20.jpg

2009_10_23-17.jpg

2009_10_23-31.jpg


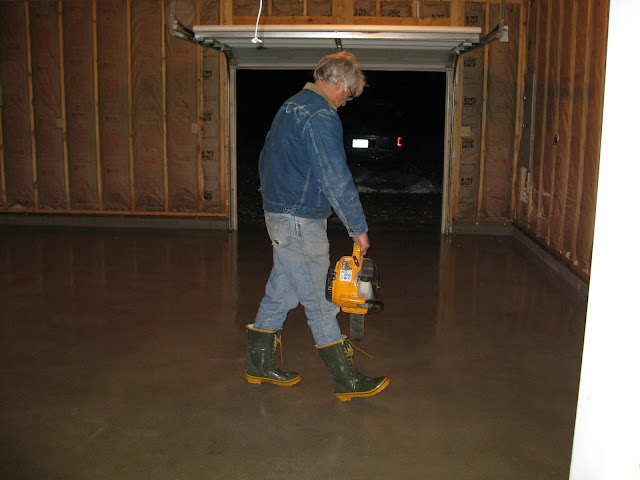
The clear coat didn't get finished until early this morning (woke up at 4 AM for that) and it was really the only disappointment of the job. The disappointment wasn't anything to do with the product, rather with our strategy. Since it was getting pretty cold and on the lower end of the epoxy's curing temperature range we employed a kerosine heater. Unfortunately, we placed it too close to the epoxy floor and the soot that it apparently produces coated a section of the floor. This affected cure time (it was still sticky this morning, yes I left a footprint) and it also caused some discoloration in the clearcoat. In the following picture you can see where the soot has mixed into the clearcoat where it was squeegeed out from the center.
2009_10_23-50.jpg


My current plan is to leave it and see how the affected section of floor holds up. If it starts falling apart I'll fix it, otherwise I'll say "good enough."
 
To avoid these ads, REGISTER NOW!
Top Bottom