1930artdeco
Well-known member
Hi All,
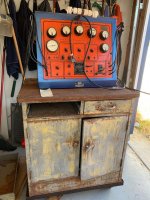
Ok, here is the scoop. I needed a cabinet for my engine analyzer and found this. It was formerly a government electronics cabinet I am guessing, as I found remnants of a cork sheet on the top. So this year I was able to get around to it and use my new Critter siphon gun. Now, this is my first ever use of a spray gun and I wasn't going for glass sides like on a car. I actually want to copy the factory cabinet that it came with originally. So I set about getting the supplies and settled on:
-Rustoleum 'bare metal primer'-which is apparently oil based (found out the hard way) but great stuff!
-Rustoleum exterior grade blue
-Valspar gloss white exterior
-Don't linger too long in one spot
-Orange peel?
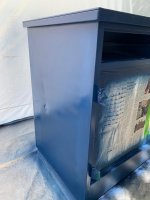
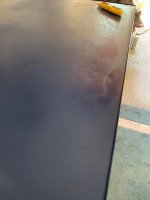
So I had it blasted and then shot it with the primer (2X coats). I sanded the inside with some 600 grit just to smooth it out a bit. Then I shot the blue but left the hinges/handles white for a different touch. This is what I ended up with and I am actually quite pleased with the way it turned out for a first time project. Now here is what I need-guidance. What did I do wrong and how do I fix it. Some of which I already know:
-Slow down the sweep speed
-Maintain the same distance for the whole sweep.
-Maybe add some flotrol to make it siphon better and smoother
-Don't shoot outdoors when it is 80+ degrees out. I think the paint started to dry before it hit the metal, even though I was about 12 inches away at 90 psi (manufacturers recommended pressure). I did shoot in the shade.
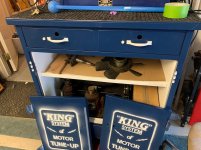
What do you experts say? Keep in mind this is a learning experience for me. The last pic is what I was trying for but I got fed up with trying to paint the stencil on so the doors are going to stay blue.
Thanks,
Mike
Ok, here is the scoop. I needed a cabinet for my engine analyzer and found this. It was formerly a government electronics cabinet I am guessing, as I found remnants of a cork sheet on the top. So this year I was able to get around to it and use my new Critter siphon gun. Now, this is my first ever use of a spray gun and I wasn't going for glass sides like on a car. I actually want to copy the factory cabinet that it came with originally. So I set about getting the supplies and settled on:
-Rustoleum 'bare metal primer'-which is apparently oil based (found out the hard way) but great stuff!
-Rustoleum exterior grade blue
-Valspar gloss white exterior
-Don't linger too long in one spot
-Orange peel?
So I had it blasted and then shot it with the primer (2X coats). I sanded the inside with some 600 grit just to smooth it out a bit. Then I shot the blue but left the hinges/handles white for a different touch. This is what I ended up with and I am actually quite pleased with the way it turned out for a first time project. Now here is what I need-guidance. What did I do wrong and how do I fix it. Some of which I already know:
-Slow down the sweep speed
-Maintain the same distance for the whole sweep.
-Maybe add some flotrol to make it siphon better and smoother
-Don't shoot outdoors when it is 80+ degrees out. I think the paint started to dry before it hit the metal, even though I was about 12 inches away at 90 psi (manufacturers recommended pressure). I did shoot in the shade.
What do you experts say? Keep in mind this is a learning experience for me. The last pic is what I was trying for but I got fed up with trying to paint the stencil on so the doors are going to stay blue.
Thanks,
Mike