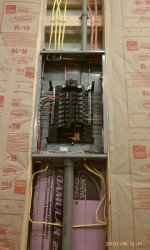
Terminations Load-center's and Pull-boxes
NEC code section.
300.14 Length of Free Conductors at Outlets, Junctions,
and Switch Points. At least 150 mm (6 in.) of free
conductor, measured from the point in the box where it
emerges from its raceway or cable sheath, shall be left at each
outlet, junction, and switch point for splices or the connection
of luminaires or devices. Where the opening to an outlet, junction,
or switch point is less than 200 mm (8 in.) in any dimension,
each conductor shall be long enough to extend at least
75 mm (3 in.) outside the opening.
Exception: Conductors that are not spliced or terminated
at the outlet, junction, or switch point shall not be required
to comply with 300.14.
There is an art to splicing terminations especially in packed boxes and tight locations. When I started in the trade I used to go for the neat trimmed ultra precise look you find here on other posts. After doing some work with a control panel builder I learned there is a better way.
First is to realize that the wires need to lay in the box, not be stuffed, folded and crammed into the space, because then they want to jump back out as soon as you stop pushing on them. Give the box layout some forethought before you grab those strippers. In most cases you will find it is easier to put 12" of wire in the box than 6". Pick a rotation going around the box for all the wires. And decide where your wirenuts will lay after termination. Then lay each individual wire in the envisioned path around the periphery of the box. Once you have all of the wires for a pitucular circuit in place coiled nicely and naturally resting, pull them out just enough to trim and strip for the connection. Tuck the wirenut into position and lay the wires back where you pulled it out from. No more stuffing, folding, cramming the cover on, better yet it's a lot easier to service. Extra wire length, in a coiled fashion, easily pulls out and pops right back in for servicing devices or connections. This can be accomplished for those overstuffed boxes in layers if necessary. Takes a bit more time and practice initially but pays big dividends in servicing the installation later.
Load-centers. When I wire a panel I like to leave a little slack for rearrangement of the circuits as required when equipment changes or if a wire becomes burnt and needs to be trimmed back. But stuffing a panel full of surplus is a bad idea. It makes it hard to see where the wires travel, and can be difficult to get the cover on each time. Not to mention that extra wire is extra resistance and does waste some power.
In most situations, the majority of circuits will be leaving the top of the load-center, the top will eventually become the crowded space. So for this reason I start filling the panel from the bottom first. The bottom would be the most difficult space to add circuits to, when the panel is near full, if you start from the top. So the early circuits, with the longest wires goes to the bottom slots, and fill up from there. A small drip loop in the side gutter is all that is required for minor rearrangement later if necessary.
Example Panel
Here's where the panel became overstuffed but still manageable. This panel has way more circuits pulled into it than it has spaces for, setup for one commercial unit, but temporarily feed four. No problem pulling out individual or groups of circuits and laying them back into place.