To avoid these ads, REGISTER NOW!

Panel Wiring Slack

mobiledynamics

Well-known member
Joined
Mar 14, 2010
Messages
5,077
Location
Gotham City
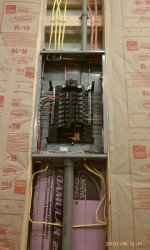
OT...but what school of thought do you fall in.

When finalizing terminations in panels, do you cut it snug and tidy.
Or route it so there is some slack for service.

Finalizing splices in a pull box. Debating whether to give it a *loop* of slack in the box, or not....
 
To avoid these ads, REGISTER NOW!

pattenp

Well-known member
Joined
Jun 4, 2008
Messages
10,175
Location
Virginia - USA
I like some slack in the panel. Wire in a splice box is to have a minimum length that will extend outside the box. You shouldn't cut the wire too short on splices.
 
OP
M

mobiledynamics

Well-known member
Joined
Mar 14, 2010
Messages
5,077
Location
Gotham City
I usually do a loop where it comes into the top down to the breaker.

But, well , I'm sure you know what I'm talking about, with those super tidy panels , all nice and *dressed*.

The Splice Box is nice and large...There will def. have slack to extend past the box.
Just debating how much *slack* I'm leaving in there.

All those pretty panel pics got me -non slack- envy.
 

kd3pc

Well-known member
Joined
Aug 10, 2013
Messages
3,630
Location
Northern Neck
we always left a loop, the length of the panel, when in apprenticeship school.

In splice box, we left at least the diagonal length of the box, did the splice and then layed it in the box following the walls, then the next spice and so on.

Even with the loops, you can keep things very tidy and dressed out properly
 

ishiboo

Well-known member
Joined
Oct 27, 2010
Messages
9,481
Location
Oshkosh, WI
I leave some space... when it comes time to move/change things it comes in handy. Especially when you have to add GFCI/AFCI breakers.

In my little 6/12 panel on my 2nd floor, I found it was best to coil each neutral around a screwdriver handle to make a nice coil and then land on the neutral bar. I've upgraded one to AFCI (technically a few need to be AFCI) and the amount of wire worked out perfectly.
 

89GLH

Well-known member
Joined
Mar 24, 2011
Messages
1,057
Location
Westminster, MD
I leave a loop and slip over a piece of the sheathing. Then write what circuit it goes to so when the panel face is off I don't have to keep opening the door to verify. I can also tell what size circuit it is by the color of the sheathing.
 
To avoid these ads, REGISTER NOW!

Mustang51js

Well-known member
Joined
Jan 24, 2014
Messages
1,734
Location
Haskell nj
If your talking about wire to the main breaker I try to leave a loop if I can, the purpose of this is for water to drip off to the sides and not on the breaker if water happens to get in the service cable or pipe. All the breaker wires I push off to the corners and sides and then into the side of breaker. Splice boxes I leave about 6-8 inches past the outside of the box which is usually the length of my hand with thumb sticking out. It ***** working on things with short wires
 

cdestuck

Well-known member
Joined
Nov 13, 2013
Messages
1,464
Location
Altoona, Pa
I do the loop thing also just to have the extra wire for if I have to move something, but it hard to make things look neat as the tight way looks
 

Charles (in GA)

Well-known member
Joined
Jan 11, 2006
Messages
12,489
Location
50 mi south of Atlanta
I run the wire as far as I can in the panel or box. In a typical 4x4 box, I might take the wires a full 360 around the inside of the box, leaving me extra wire for a later rework. In a panel, I make it nice and neat, but if I enter from the top, I take it all the way to the bottom or as far as possible to a breaker. If I enter from the bottom, it goes to the topmost available breaker. Again, leaves me wire to work with in a rework.

Charles
 

Aceman

Well-known member
Joined
Jan 28, 2007
Messages
2,513
Location
Eastern Oregon
I've cleaned up so many rat nest panels when I do service changes. Half of it comes from the fact people leave such huge loops that don't do anything but take up space.

I wish I took before and after pics, it's night and day!
 

MTW

Well-known member
Joined
Aug 6, 2013
Messages
294
Location
SE Michigan
Terminations Load-center's and Pull-boxes

NEC code section.

300.14 Length of Free Conductors at Outlets, Junctions,
and Switch Points. At least 150 mm (6 in.) of free
conductor, measured from the point in the box where it
emerges from its raceway or cable sheath, shall be left at each
outlet, junction, and switch point for splices or the connection
of luminaires or devices. Where the opening to an outlet, junction,
or switch point is less than 200 mm (8 in.) in any dimension,
each conductor shall be long enough to extend at least
75 mm (3 in.) outside the opening.
Exception: Conductors that are not spliced or terminated
at the outlet, junction, or switch point shall not be required
to comply with 300.14.

There is an art to splicing terminations especially in packed boxes and tight locations. When I started in the trade I used to go for the neat trimmed ultra precise look you find here on other posts. After doing some work with a control panel builder I learned there is a better way.

First is to realize that the wires need to lay in the box, not be stuffed, folded and crammed into the space, because then they want to jump back out as soon as you stop pushing on them. Give the box layout some forethought before you grab those strippers. In most cases you will find it is easier to put 12" of wire in the box than 6". Pick a rotation going around the box for all the wires. And decide where your wirenuts will lay after termination. Then lay each individual wire in the envisioned path around the periphery of the box. Once you have all of the wires for a pitucular circuit in place coiled nicely and naturally resting, pull them out just enough to trim and strip for the connection. Tuck the wirenut into position and lay the wires back where you pulled it out from. No more stuffing, folding, cramming the cover on, better yet it's a lot easier to service. Extra wire length, in a coiled fashion, easily pulls out and pops right back in for servicing devices or connections. This can be accomplished for those overstuffed boxes in layers if necessary. Takes a bit more time and practice initially but pays big dividends in servicing the installation later.

Load-centers. When I wire a panel I like to leave a little slack for rearrangement of the circuits as required when equipment changes or if a wire becomes burnt and needs to be trimmed back. But stuffing a panel full of surplus is a bad idea. It makes it hard to see where the wires travel, and can be difficult to get the cover on each time. Not to mention that extra wire is extra resistance and does waste some power.

In most situations, the majority of circuits will be leaving the top of the load-center, the top will eventually become the crowded space. So for this reason I start filling the panel from the bottom first. The bottom would be the most difficult space to add circuits to, when the panel is near full, if you start from the top. So the early circuits, with the longest wires goes to the bottom slots, and fill up from there. A small drip loop in the side gutter is all that is required for minor rearrangement later if necessary.
Example Panel
IMG_3719.jpg

IMG_3720.jpg


Here's where the panel became overstuffed but still manageable. This panel has way more circuits pulled into it than it has spaces for, setup for one commercial unit, but temporarily feed four. No problem pulling out individual or groups of circuits and laying them back into place.
IMG_6596.jpg
 

Highbeam

Well-known member
Joined
Feb 15, 2011
Messages
2,292
Location
Mt Rainier foothills, WA
Great idea on starting from the bottom MTW. Like you I bring the service in on the bottom and up and over to the top. I've been teased that I could have just flipped the panel so the main was on the bottom and saved a few feet of service wire but I like the slack.

I always leave enough in the panel for at least one repair. Remember, you can use wirenuts in the panel if you need to add length so don't get too crazy with slack.
 

Attachments

  • IMAG0834.jpg
    IMAG0834.jpg
    104.4 KB · Views: 59
To avoid these ads, REGISTER NOW!
Top Bottom