To avoid these ads, REGISTER NOW!

Parting tool sharpening

383 240z

Well-known member
Joined
Dec 4, 2006
Messages
4,295
Location
Findley Twp. Allegheny Co.
Anybody know of a good video showing this? Or have a pic of a properly sharpened one? I am done pulling my hair out over this. I've been looking for a Mr Pete 222 vid on this but can only find the ones on sharpening turning and facing tools not parting tools. Keith
 
To avoid these ads, REGISTER NOW!

A_Pmech

Well-known member
Joined
May 8, 2007
Messages
8,002
Location
IL
There are several ways to grind a parting tool, it all depends on what you're doing with it.

What's going wrong?
 

bobadame

Well-known member
Joined
Dec 26, 2007
Messages
1,124
Didn't watch it but it is important to consider the type of metal you intend to cut as this determines the top rake. For example brass likes zero top rake, steel and stainless need about 16 degrees and aluminum about 35 degrees. The top rake is the most important angle when parting metal.
 
OP
3

383 240z

Well-known member
Joined
Dec 4, 2006
Messages
4,295
Location
Findley Twp. Allegheny Co.
I'm parting 1" CR steel. I'm using a 3/16" blade with an Aloris type holder (the one that angles the blade up about 15*. Using dark sulfer cutting oil and power feed.

The tool cuts great for about .200" then seems to stop, the pressure builds up, then it cuts real hard and fast for another .200" or so, then stalls again. Not a smooth steady cut. I'm afraid to cut like this as I fear I will damage the machine.

Also the cutter is dead on center. I've tried raising and lowering the tool a few thou. No change Keith
 

OccupantRJ

Well-known member
Joined
May 15, 2009
Messages
10,975
Location
Eastern North Carolina
I run my cutoff with an angle on the end, but I also run a compound angle on top to provide some rake and bias cut. Today I made 48 cutoffs on one engine lathe job alone, but thankfully the material was aluminum. Just kept it wet with WD40.
 

OccupantRJ

Well-known member
Joined
May 15, 2009
Messages
10,975
Location
Eastern North Carolina
I'm parting 1" CR steel. I'm using a 3/16" blade with an Aloris type holder (the one that angles the blade up about 15*. Using dark sulfer cutting oil and power feed.

The tool cuts great for about .200" then seems to stop, the pressure builds up, then it cuts real hard and fast for another .200" or so, then stalls again. Not a smooth steady cut. I'm afraid to cut like this as I fear I will damage the machine.

Also the cutter is dead on center. I've tried raising and lowering the tool a few thou. No change Keith

You might want to get a narrower cutoff blade.
 

bobadame

Well-known member
Joined
Dec 26, 2007
Messages
1,124
Try some top rake on the tool. Too much will cause the tool to dive in. Not enough rake will cause the chip to make too abrupt a direction change over the top of the cutter causing extra heat. Try about 16 degrees top rake and keep the cutter wet.
 
OP
3

383 240z

Well-known member
Joined
Dec 4, 2006
Messages
4,295
Location
Findley Twp. Allegheny Co.
Now that I'm thinking about it, It MAY be HR steel. The video says not to part that, but to use the bandsaw instead. Any way to check if its Hot Roll or Cold Roll? Keith
 

kazlx

Well-known member
Joined
Oct 30, 2012
Messages
2,851
Location
Tustin, CA
Hot rolled and cold rolled look different. CR will be smooth. HR looks almost as if it has a coating or crust on it. This is the mill scale from the manufacturing process. CR should have minimal runout on a lathe.

hotvscold.jpg
 
OP
3

383 240z

Well-known member
Joined
Dec 4, 2006
Messages
4,295
Location
Findley Twp. Allegheny Co.
I think I found it. I got home late tonight and had to figure it out. Turns out EVERY part of my cross slide needed attention. Yes I was not taking good care of the machine.

the bolts that go thru the cross slide and attatch it to the lead screw were loose. the gib was loose, the lead screw was bent, one of the bolts that attatch the compound to the cross slide had worn out, I could tighten it up, but it would come loose very quick from vibration. Tonight, I could not even get it to snug up.

So I tore every thing apart, scubbed everything up, lubed up everything. Pulled the lead screw and got it straight. put it all back together except for the compound. Need to make new bolts for that. WOW what a difference!!! I would say I removed 7/8's of the backlash, the cross slide no longer has play on the lead screw. I'm SURE this has to have helped.

Now I'm thinking that I should tear it down even farther to see what else is loose. I really don't want another project right now, but I know I have to. Oh well. It really needed a good cleaning any way. Keith
 

Ign

Well-known member
Joined
Jul 7, 2006
Messages
12,769
Location
Butte Peak ND
Eh, look at the bright side: when HSS parting tools shatter, it's REALLY impressive, provided you don't get hurt.
 
To avoid these ads, REGISTER NOW!

bullnerd

Well-known member
Joined
Sep 17, 2012
Messages
5,690
Location
Jersey
Vibration? If the spindle bearings are worn it will give you fits also.

New or old machine?
 

laser3kw

Well-known member
Joined
Nov 17, 2012
Messages
7,276
Location
northen IL
I treat part off like peak drilling. I occasionaly back out slightly to break the chip and allow the tool to cool briefly. Of course, you have to be aware of the change in SFM as you get closer to the center.
 

Kevin54

MEMBER EMERITUS
Joined
Jan 12, 2005
Messages
29,341
Location
Urbana, Ohio
Eh, look at the bright side: when HSS parting tools shatter, it's REALLY impressive, provided you don't get hurt.

I treat part off like peak drilling. I occasionaly back out slightly to break the chip and allow the tool to cool briefly. Of course, you have to be aware of the change in SFM as you get closer to the center.

Yep, if the tools not tight or you get "chip bind" in the groove, that HSS tool will give very little warning other than a very loud snap.

Myself, I always back the tool out and move over a few thou to widen the slot just a tad more than the tool width, then move it back and go a little deeper. I parted off probably 40 pieces of 1/2" CRS the other day with a 1/8" parting tool with no problems at all. I always grind the end of my cutoff tool straight across the front and angled down.

I don't know where you are getting your CRS from, but I picked some up at TSC last week or so. One aisle had aluminum and HRS. I walked down another aisle and tucked back in the corner was all of their CRS, so one has to keep an eye out. I avoid HRS if at all possible. It doesn't machine worth a ****, I don't think, plus it is not uniform in size, and it has the scale on it. I prefer either CRS or tool steel to machine from.
 
Last edited:
OP
3

383 240z

Well-known member
Joined
Dec 4, 2006
Messages
4,295
Location
Findley Twp. Allegheny Co.
Thanks for the tips guys. I really think the problem was the compound moving because it was only tight on one side due to the worn out hold down bolt. When I was really watching the tool, I could see it drop below center, twisting away from the loose bolt. Thats when it would stop cutting, then the pressure would build and it would cut again.

BTW its a 13x40 Enco lathe the machine was bought used and put right into service, I should have known better, and gone over it before I used. I have NO real training in machining, just what I learned thru trial and error, reading online, and you tube videos.

Here is a quick pic from when I moved it to it's new home.
 

Attachments

  • lathe.jpg
    lathe.jpg
    126.5 KB · Views: 66

MoonRise

Well-known member
Joined
Nov 5, 2010
Messages
4,028
Location
NJ
re: hot-rolled vs cold-rolled.

As mentioned, hot-rolled steel has that 'crust' of mill scale on it. Cold-rolled steel doesn't.

Another difference between them is that because of the cold-rolling process, the cold-rolled steel has some 'work hardening' (not too much on low carbon steel, but a tiny bit) and a bunch of residual stresses in the metal from the rolling process. And sometimes those residual stresses can give you mucho grief when you machine (or weld) some CRS (Insta-warp Grrrr. :willy_nil ). Just an FYI.

Glad you got it figured out.
 
OP
3

383 240z

Well-known member
Joined
Dec 4, 2006
Messages
4,295
Location
Findley Twp. Allegheny Co.
Well I tore it down to the apron. I really want to take the apron off, but I have NO idea how to take it off. The carriage, and power feeds and split nut are all working fine, I'm worried that chips and dirt are in there and will ruin the gears and bearings.

The **** I found inside the cross slide and compound is scary, grit, chips, dried oil and grease. It's all sitting in my parts washer soaking. I'll scrub it up till its engine assembly clean. lube and re assemble it. The compound hold downs will be replaced with ones I made from the heads of the old ones and some 3/8" sized grade 8 bolts I had. I also plan on milling reliefs on the body, so I can get proper purchase on the nuts with my wrench. Oh what fun!! Keith
 

Metalcat

Active member
Joined
Jun 19, 2010
Messages
25
The lathe will be a sooo much nicer machine to use when you're done. As stated already rigidity is key when parting, this bit of freshening up the apron and compound will make a huge difference.
I forget if it's been mentioned already but when parting I lock any axis that I'm not using for the parting process and tighten gibs that don't have to move. Every little bit helps, rigidity is key.

While I use the smallest thickness parting blades that I can get away, mostly with good results, I also use a Iscar Do-Grip carbide insert type with an insert width of .118". That thing is simply unbelievable! Absolutely no comparison to the cheap HSS blades. Even though it is a tad wider than what I'd like, it is my go-to blade when I anticipate an issue.

As far as milling a relief on the body in order to facilitate being able to get a wrench on it. I had a similar issue on my lathe's compound. Instead of taking metal off of the compound clamp or the compound itself, I just modified a wrench to fit and always leave it near the lathe.
I'm not sure if this is an option for you though.
 
OP
3

383 240z

Well-known member
Joined
Dec 4, 2006
Messages
4,295
Location
Findley Twp. Allegheny Co.
Spent an hour tonight scrubbing and scraping the parts. I got the bearings pressed back on the lead screw, have it installed in the carriage dressed and installed the traveler for the crossfeed.

l blasted the gears in the apron with brake clean, and lubed them with gear oil. ran the carriage up and down the lead screw and oiled them.

The lead screw for the cross feed feels 100x better than before. Keith
 

rodknocker

Well-known member
Joined
Feb 29, 2008
Messages
281
Location
Rochester,NY
Have you by chance seen the video of the guy who makes them out of old circular saw blades, I haven't tried it yet but it seem like a cheap smart idea.
 
OP
3

383 240z

Well-known member
Joined
Dec 4, 2006
Messages
4,295
Location
Findley Twp. Allegheny Co.
Got it all back together today after I got home from the swap meet. It took me awhile to get the gibs adjusted. Since I have no idea how to set them, I set them so the hand wheels were stiff, but not so stiff that is was hard turn smoothly. I made the bolts that lock down the compound, and used some 3/8" grade 8 nuts, that are 9/16" across the flats. They are a PERFECT fit as I can use a 9/16" box wrench to lock it down. Did not have to mill the compound for clearance!!!

I then pulled all my tool holders and made sure they were dead on center.

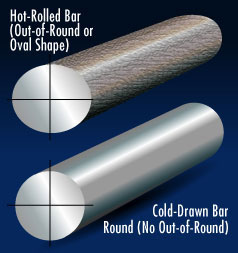
I made a few test cuts and things seem pretty good. I chucked some 1" round CR and put a HSS tool bit on the QCTP. I cleaned up the steel and that went well. I then turned the tool and faced the steel off, and again it went well.

Then I chucked up the knurling tool, put some pressure on it, engaged the carriage feed and it turned out perfect!!! I then center drilled the steel, then ran a 1/2" bit in about 1", installed a boring bar, and opened it up to about 3/4" I wasn't very happy with the surface finish, but that was a feed/speed issue not the lathes fault.

Now I install the tool that started all of this. I squared up the cut off tool, set it about 1/2" behind the hole I just bored. Locked the carriage, put some cutting oil on the work and engaged the feed. SAME DAMN THING!!!!! Cuts a bit, stalls, pressure builds then it plunges. GRRRRR!!!!!!! However the tool post never moved, I had a dial indicator on it.

So I pulled the parting tool, resharpened it, re-set it for center. This time I fed it in by hand, faster than I was before and it worked great. So I move it down 1/4" and up the feed rate, engaged the feed, and she cut like a pro. I'm real happy now. Made a few more cuts with it, both with and with out cutting oil. They all went great. The tune up was well worth the time it took.

While I had it apart, I stoned the gibs and ways to knock any high spots down, I found a few, hope that was the right thing to do. Also I lubed everything with Vectra Way oil except the rotating part of the compound, that got high pressure grease. I got to thinking that maybe I should have used HP grease, what says the collective knowledge of the GJ??? Keith
 

bullnerd

Well-known member
Joined
Sep 17, 2012
Messages
5,690
Location
Jersey
The only other thing that I can think was happening is the tool was loading up so bad it wouldnt cut (what you call stall) then when enough pressure builds it breaks the chip off and feeds rapidly until it starts all over again. Parting is tricky with the power feed, you dont have the feel like with your hand to tell when pressure is building. If you dont have flood coolant I would part-off by hand. A couple of good weld-ups will get your attention.

Glad its working better now but be carefull.
 
OP
3

383 240z

Well-known member
Joined
Dec 4, 2006
Messages
4,295
Location
Findley Twp. Allegheny Co.
When I sharpened my parting tool, I did grind the chip breaker off of the top of the tool. At least I think it was a chip breaker. The top edge of the tool had a ^ shape to it, I ground it flat, letting the angle that the tool holder has built into it act as the back rake.

Before I was getting very small chips, now I'm getting very tight coils, think clock springs.

I also ground a few HSS bits, and while taking a spring cut with a very slow feed rate, I'm getting a mirror finish. The machine is running soooo much smoother now. Keith
 
To avoid these ads, REGISTER NOW!
Top Bottom