To avoid these ads, REGISTER NOW!

peterbilt project

OP
T

thejudges69

Well-known member
Joined
Jun 1, 2012
Messages
4,454
Location
youngstown, ohio
Are you going to paint the sleeper?

not right now, the frame paint was the next part of the build. I have a cab that has to be partially reskinned and built then swapped with this cab, I also am looking to build a newer engine since this one is original built in 1991 at 1,320,000 miles, overhauled at 882,000. Since I work this truck daily I have to build this in steps, next I will build the engine and get the cab ready on the ground and then do the install which will be the same time I paint the rest of it.
 
To avoid these ads, REGISTER NOW!
OP
T

thejudges69

Well-known member
Joined
Jun 1, 2012
Messages
4,454
Location
youngstown, ohio
Nuthin small about this build. I've been friends, moreso brothers, with Don for the last several years, and everything he does is big. I give him a lot of credit, as nothing he does is half assed, in the slightest. This'll def be a cool thread to follow. I know what he started with, and the major changes that have already taken place, as well as the others he has planned. Y'all enjoy, I'ma be here watching the show too! **reaches for popcorn**

Thanks man, always got each others back, thats what family does, I appreciate everything you've done in the build as well, not to mention another huge thanks for hauling it to Pa, to start the paint process.
 
OP
T

thejudges69

Well-known member
Joined
Jun 1, 2012
Messages
4,454
Location
youngstown, ohio
Today was not a big day for production. I spent all day fitting this rear crossmember. The factory member was aluminum and was corroded some when I removed it. I had a new member bent out of 1/4" stainless and had to fit and drill it. I must have bolted and unbolted this member 20 times today. Tomorrow I have to finish countersinking 1 bolt in the bottom and then drop it at the weld shop to have the ends capped. I did get the rear fender brackets hung and they all fit good. There is a lot of paint in some places and makes the bolts a little tough to get in some places.

Tomorrow I'm shooting to get the truck back under power and get the batteries back in the truck and the stainless wraps on the air tanks to finish that part. This build is far from done but really not far at all. Once all this little piddly **** is done then the rest will be easy.

2012-09-30_17-35-42_602_zpsf9f496f0.jpg
 

Nighttrain

Well-known member
Joined
Aug 6, 2009
Messages
2,682
Location
Dripping Springs, Tx
Here you are adding metal to your Peterbilt and I am down here cutting metal off my Peterbilt 340. I got weighed on the road and was over. Knew I probably was so I guess I had it coming to me. It was good to see my front axel was at 12K lbs just the back was pushing too much. I removed all the side boxes and spare fuel tank and dropped the weight down 1600lbs. That and a over weight tag and I can go to 34K now. Looking at a tag axle but have never seen one on a single rear axle. Don't see why I can't. There is plenty of room and I have the air for it (spare tanks). Your build is making me look at a 379 to convert to a tanker. I haul water and want to go to a 5000 gallon truck. (my garage build has a couple of pictures of my truck)
 

J_G

Well-known member
Joined
Sep 16, 2012
Messages
74
That rear crossmember is gonna look really good with the ends capped! Glad they finally got it finished...
 

kyles974

Well-known member
Joined
Aug 22, 2010
Messages
881
Location
Florida/Alabama
Thanks for sharing, awsome:rocker:


also, love your stool. I need one for my shop and you just gave me the idea
in what to do with my old tractor seat;)
 
OP
T

thejudges69

Well-known member
Joined
Jun 1, 2012
Messages
4,454
Location
youngstown, ohio
well, today is not over, but has been a productive day. I will post pics when I get home. Today, I got all the plumbing finished in the rear half of the truck, got the wheels and tires on the back and I have the rear fenders setting on the mounts but have to mount them yet tonight or at least drill the holes in the mounts. I'm also trying to get the air cleaners on tonight and maybe the pipes but it is gettin late so I don't think that will all happen. pics to come later.
 
OP
T

thejudges69

Well-known member
Joined
Jun 1, 2012
Messages
4,454
Location
youngstown, ohio
That rear crossmember is gonna look really good with the ends capped! Glad they finally got it finished...

crossmember came out awesome, Randy (my welding guy) tig welded the ends on and I decided not to put bolts in the end to give it a smoother look.
 

J_G

Well-known member
Joined
Sep 16, 2012
Messages
74
crossmember came out awesome, Randy (my welding guy) tig welded the ends on and I decided not to put bolts in the end to give it a smoother look.

Awesome! I'll wave a hand as I pass by tmrw afternoon, wish I could stop and help! Can't wait to see you back out here man! SVBR!
 
OP
T

thejudges69

Well-known member
Joined
Jun 1, 2012
Messages
4,454
Location
youngstown, ohio
12 wide DE to OH, 12 wide OH to IN, 10 wide IL to NY, home this wknd!

sweet, hope to set the bunk wednesday once thats done it pretty easy from there. I'm not pulling the rad right now, I will pull it later and put some paint on it then. Right now I need to get back to work.
 

petefixer

Well-known member
Joined
Apr 5, 2009
Messages
469
I once added air ride to the cab of a early 80's 359 pete and also added a unibilt sleeper to it. What a pain! Just got done restoring a 1988 pete 379. It was my dads first truck! After you get it all done, you will grease it and the U-Joints are going to throw grease all over your fine work! Check these out! http://beldenuniversal.com/cm/Universal-Joints/Universal-Joint-Boot-Covers.html We built our own but they worked great!

Unless of course you have life liner u-joints then there is no grease involved.
Have fun and cant wait to see it done!
 
Last edited:

J_G

Well-known member
Joined
Sep 16, 2012
Messages
74
The mess from u-joints in a big truck is terrible, no matter how much you try to clean up after lubing. There's another site that thejudges69 and I both follow and there's been talk on there of several different ideas, and different styles of covers. My last truck had the Spicer EL driveline that was greaseless...was by far the cleanest truck I've had underneath. So, do you have any ideas for covers of some kind before you're finished with this stage?
 

jlsanzaro

Member
Joined
Sep 23, 2012
Messages
19
the truck looks great. i just walked threw a sleeper like this last week and it was amazing. keep up the good work, good luck with her
 
OP
T

thejudges69

Well-known member
Joined
Jun 1, 2012
Messages
4,454
Location
youngstown, ohio
yesterday was a pretty good day. I got all the plumbing finished towards the rear of the frame from the sleeper air ride back, including the sleeper air ride. I had to make a fitting with a hanger to hold up the T where the sleeper air lines split to feed the outside air bags. The manufacturer just put together a couple unions and put them into a loom clamp and smashed the end of the clamp til it was tight enough and then put a couple zip ties around it to hold it, I always thought it looked like hell, well I'm much happier now. I was able to find a stainless coupler and the rest is brass and plastic.
2012-10-01_14-08-19_95_zps4520a1fb.jpg

2012-10-01_14-08-32_217_zps45829e76.jpg

2012-10-01_14-08-52_17_zps7503be9a.jpg


Buffed the wheels a couple weeks ago while the truck was at paint, I got the installed yesterday, I rotated the tires as well since they already have 50,000 miles on them and should have been done once.
2012-10-01_19-10-26_340_zps7529166a.jpg


Finished the rear crossmember also, had the weld shop tig the end caps and it fit perfect, I had to use a rubber mallot to tap it on but that was the fit I was looking for.
2012-10-01_19-10-46_328_zpse3a80757.jpg

2012-10-01_19-10-37_683_zps1ad84e95.jpg


These are the rear fenders, I was able to get them mounted and fit as well, notice no bolts holding them? These fenders are built with hidden mounts inside, I was really concerned about whether the mounts would hold up to me bolting to them but they took a lot of abuse when I was ratcheting them down. I'm going to get them painted this week while the rest of the truck is finished.
2012-10-01_20-53-05_945_zps1b604315.jpg
 

J_G

Well-known member
Joined
Sep 16, 2012
Messages
74
I hope you got some **** done today, cause I'ma need some reading material when I wake up in the mid of the night again!
 
To avoid these ads, REGISTER NOW!
OP
T

thejudges69

Well-known member
Joined
Jun 1, 2012
Messages
4,454
Location
youngstown, ohio
Actually it was not a good day at all, I spent all day making brackets and mounting the taillight bar. Tomorrow is going to be a better day, air tank wraps showed up from roadsknz so tomorrow I should have the battery boxes on and hopefully the truck running again.
 

J_G

Well-known member
Joined
Sep 16, 2012
Messages
74
I figured that was gonna be a little time-consuming, but it's gonna look killer! Met up with Beth in AZ last week, and she got all her stainless on from Steve...air tank wraps, straps, complete battery and tool box skins...look really good. Can't wait to see yours with those new monster boxes!
 
OP
T

thejudges69

Well-known member
Joined
Jun 1, 2012
Messages
4,454
Location
youngstown, ohio
Tomorrow I'm going to drill and mount my 4 betts back up lights. The backup light bar from brunners is about 5 inches off the ground when inflated so I eliminated it and I'm going to put a big flap across the center to fill the space, I will have more pics tomorrow.
 
OP
T

thejudges69

Well-known member
Joined
Jun 1, 2012
Messages
4,454
Location
youngstown, ohio
no real update for today, the betts lights went good until I ran into problems drilling the 1 1/8 hole in the stainless. Tomorrow though will be good. The lightbar is ready to mount and the air tank wraps are fit so I'm going to start on one side of the truck, hang the pipe, air cleaner, air tank wrap, then step and move to the other side. Should be a good day.

I pulled the rear fenders also today to get them painted but after talking to the paint shop and gettin the price I decided to wait. The fifth wheel is not as high as I would want it to be above the fenders so I'm going to run the truck with them unpainted a couple months and see what happens. If I scratch them up or tear the up then I know something has to be done or the fenders have to go. I will rebolt them in the morning so they are done.

I'm also going to the bone yard tomorrow and find me a weatherpack plug that I can make work in my tail light bar wiring harness. I will need to go to a GM dealer or whoevers plug it is and get the new end connectors so that I don't have to splice everything together, If I get the proper crimp on ends it will make for a super clean job.
 
OP
T

thejudges69

Well-known member
Joined
Jun 1, 2012
Messages
4,454
Location
youngstown, ohio
Well, it seems that me being unable to half *** this job, It has taken me a lot of time to complete this rear lightbar and get it fully wired and complete. Today, I bolted the fenders back on since I had them off to take to the painter, but since I decided not to paint them all I did was bolt them back on in gelcoat. I got the lightbar fully fit last night and wanted to do a couple more things this morning before I bolted it on. I had to fabricate the mounting brackets. Thanks to my local weld shop I was able to make some and they will work until I get the polished stainless ones in the mail. All the weld shop did was bend the stainless I drilled the holes and made it all fit. They came out really good. Also, I went ahead and bolted the lightbar to the bottom of the rear crossmember. You can't see the bolts because of the small lip on the opening in the center of the member. Brunners, the makers of the lightbar, they rely on 4 1/4" inch stainless bolts and the thin mounting brackets to support this bar. I built my supports a little different, this bar will withstand anything it is put through.

2012-10-02_14-07-52_116_zpsc1cddc29.jpg


2012-10-04_23-53-33_696_zps5058c885.jpg


2012-10-04_21-05-14_275_zpsf339ed9a.jpg


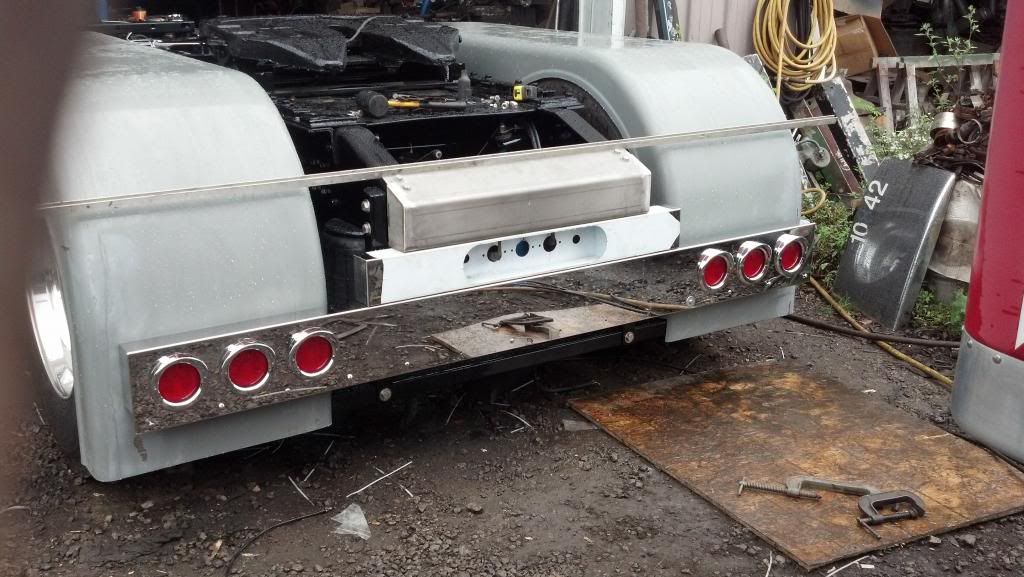
I had these brackets bent and I was not paying attention and we bent them backwards and there was come type of industrial paint on the stainless and the only way to remove it was to sand it off, if we would have bent them the right way it would have been a simple polish and go. I also got some insight from my brother and we decided to slot the holes that hold it on, this way the bar can be slid off without removing bolts. I used the rear fender bracket bolts to support the bar. I also took a little time and tapered the top so it matched the taper of the bracket. It is a little wider then the fender bracket, but being that I'm getting new stainless ones, I was not all that concerned about them being a little wider.

2012-10-04_22-36-44_836_zps587d9a05.jpg


I went to the truck junk yard today and found a 5 wire weather pack plug that was exactly what the doctor ordered. I then went to the international dealer down the road and bought all new male and female plugs for the weatherpack and built what you see. I wants my wiring to be 100% sealed and also able to be unplugged if the bar needs to come off for some reason. This made it extremely simple and extremely clean.

2012-10-04_22-36-20_692_zps495a32e6.jpg


Tomorrow I have to install my center ground plug, I did get both of the 7 way plugs wired and installed, the one on the left is for the standard plug, the one on the far right has hot wires for lift axles, strobe lights, load lights and so on. Not all of the wires in that 7 way are in use right now.

2012-10-04_23-53-50_175_zps9bfaf0a4.jpg
 

EvilWelder

Well-known member
Joined
Jun 5, 2012
Messages
331
Location
New England
Looks good, glad to see an O/O that actually gives 2 shits about his rig. You are obviously a maintenance guy, not a fox it when it breaks guy.
 
OP
T

thejudges69

Well-known member
Joined
Jun 1, 2012
Messages
4,454
Location
youngstown, ohio
NAPA can get you a complete weatherpac connector kit with the tool for under 75 bucks.

I have the tool, there was no splicing, I built the entire harness with all new connections, The problem I run into is that there is like a gazillion different plugs and connectors and **** out there, i never know where to start. I knew this plug would be the standard on most trucks of today so it was a good starting point.
 

Heavy Metal Doctor

Well-known member
Joined
May 26, 2010
Messages
5,417
Location
Mason Dixon Line
Judge - Great work! Interesting project to watch unfold - too bad a bunch of the pictures don't seem to be working (at least not for me??).

One picky little thing, though - maybe you're already aware and it's temporary -- those white wire ties I see in the frame - not UV stable and will be brittle / breaking in a year or so....last thing you need is to drop a bundle of wires / air lines outta the frame to rub / get pinched and put you down -- 'cause you know that'll happen in the pouring rain or a blizzard.

Much of our equipment ships in on step-deck by Landstar -- Mybe we'll meet someday.
 
Last edited:
OP
T

thejudges69

Well-known member
Joined
Jun 1, 2012
Messages
4,454
Location
youngstown, ohio
according to the manufacturer of the ties they are UV protected, I have never had any issues with them in the past. I may go along though and swap all the white ones out for black ones, I'm kinda catching slack from people about that.
 
OP
T

thejudges69

Well-known member
Joined
Jun 1, 2012
Messages
4,454
Location
youngstown, ohio
also, peterbilt is using new frame clamps for wiring, no more metal loom clamps, so all my wiring and stuff is tied together with the zip ties and then every so often the wiring is held into place with one of these clamps, there is a 1/2 wide zip tie that goes around this clamp and around the wiring and air lines and holds it up. This is a much much cleaner job then the old way.

0059_lg_zpsab3118c3.jpg
 

Heavy Metal Doctor

Well-known member
Joined
May 26, 2010
Messages
5,417
Location
Mason Dixon Line
Good. Glad you got it covered. I have seen the the plastic frame clips. I wish we could get some our body Mfr's to quit with the metal clamps (or use better ones) that either break from flexing or wear into the stuff they hold --- but it lasts long enough to be outta their warranty period...... Sorry if I sounded like presumptuous, I wasn't aware anyone was doing UV stable in white...maybe I just never asked 'cause everything we get from the Mfr's is the black version and that's what our shop supply guy sells us....And I know my boss would just want them black so they don't stand out on bundles of hose / harness'.
 
OP
T

thejudges69

Well-known member
Joined
Jun 1, 2012
Messages
4,454
Location
youngstown, ohio
Naw, your fine, I understand what your saying, These are made by Velvac. I thought the same thing half way through the project and was like oh F-ck haha. but the package said uv protected and they were white. I've had good luck with all of velvacs products. I do think that I'm going to swap them for black though, but on the other hand all this will be covered and you will never see any of it.

What exactly is it that you make or do?

Also, I figured that the white would help break away the harness a little, at least thats a good excuse as to why I didn't use black haha.
 

Heavy Metal Doctor

Well-known member
Joined
May 26, 2010
Messages
5,417
Location
Mason Dixon Line
Naw, your fine, I understand what your saying, These are made by Velvac. I thought the same thing half way through the project and was like oh F-ck haha. but the package said uv protected and they were white. I've had good luck with all of velvacs products. I do think that I'm going to swap them for black though, but on the other hand all this will be covered and you will never see any of it.

What exactly is it that you make or do?

Also, I figured that the white would help break away the harness a little, at least thats a good excuse as to why I didn't use black haha.


Me? I'm the lead tech / service mgr for a dealer selling specialty equipment for streets / roads / underground utilities. 75% of it is built on commercial truck chassis. Paint to fab work to hydraulics to electrical - you name it...of course most of our customers have their own shops / mechanics, so half my time is spent babysitting / giving advice.
 

J_G

Well-known member
Joined
Sep 16, 2012
Messages
74
... so half my time is spent babysitting / giving advice.
Sounds like what we do...seems nobody can do their job anymore, yet expects 150% out of you.

I like those clamps that Pete is using now...clean, simple, and functional.
 

Heavy Metal Doctor

Well-known member
Joined
May 26, 2010
Messages
5,417
Location
Mason Dixon Line
Sounds like what we do...seems nobody can do their job anymore, yet expects 150% out of you.

17 years of it -- I could write volumes on the craziness I've seen and the hoops they expect us to jump through.....I joke about telling the tales on the web / blog or whatever, but I'm afraid I'd be too tempted to name names and end up getting sued.....
 
To avoid these ads, REGISTER NOW!
Top Bottom