To avoid these ads, REGISTER NOW!

peterbilt project

OP
T

thejudges69

Well-known member
Joined
Jun 1, 2012
Messages
4,454
Location
youngstown, ohio
Today I would call a pretty good day, I got alot accomplished, I think I'm more at the bolting everything on point then I am at the fabricating part. I did exactly what I wanted, I started on one side and went from the fuel tank forward and just started installing.

new flex pipe from the y pipe on both side to the elbows. I got them all siliconed up in the pic and ready for install on one side. I don't know if anyone else does this but we have been siliconing our exhaust for about 5 years now and have not had to cut a pipe apart since, at least I haven't, except when its time to replace, Then I don't care I just cut it all out and get on down the road.

2012-10-05_16-33-22_451_zps1d917b05.jpg


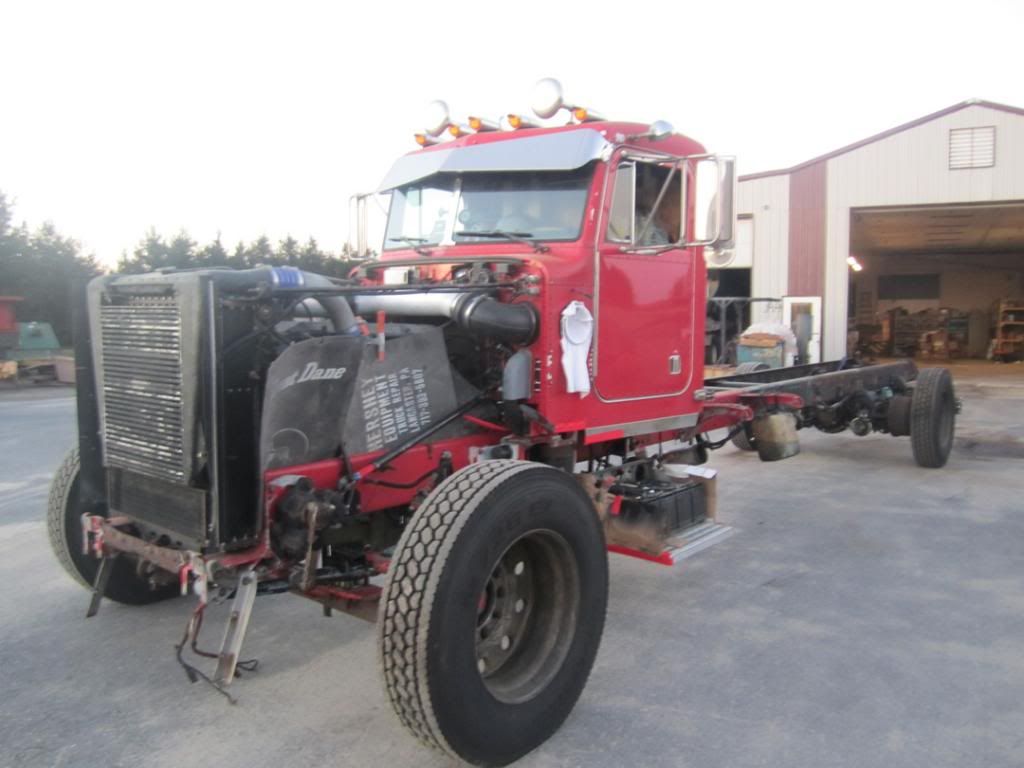
got the air cleaner and lightbars installed. I may take the front cleaner bars back apart just for new bulbs, all depends on the job when its done. I also got both pipes hanging and in place. both air cleaners are on and all the air tank wraps are on and the tanks are installed and plumbed.

2012-10-05_17-32-38_807_zps1799a593.jpg

2012-10-05_17-33-00_394_zps9b360d64.jpg

2012-10-05_17-33-15_447_zps625ebefa.jpg


got the drivers side almost finished, I did the air cleaner which I already said, but I had to lift the bonnet off for a minor wiring issue. I'm going to look into the weathpac from Napa, I'd really like to do something different with the wiring behind the air cleaner that feeds these 2 lightbars. Its hidden and never seen but at least once a winter season I have a problem from the Green monster, this is about the only wiring problem I ever have. I also had to replace the 7 wire cable from the firewall back the driver side frame rail. Apparently before the truck went to paint there was a problem stirring and I didn't know it. One of the U-Bolts for the drivers side air tank had been rubbing on the wiring harness for the trailer for some time, when I first saw it I thought the frame painter did it by mistake but there was black paint in the rub mark so he couldn't have done it. While I replaced that I went ahead and unplugged all the wiring to the firewall and inspected the plugs, filled them with di-electric grease and reinstalled them. The 7 wire harness I put in was from a wrecked truck, A new one was 3-4 days out but the one from the wreck was in beautiful shape and I felt confident about it, besides I ohm'd out every wire before I installed to check for broken wires. Once this was all done I installed a new wiring box cover, seen in this pic on the bottom right corner of the firewall. this was a major ***** to get in and fit, there is a foam gasket on the back of it that was giving me a fit and it has to be spread apart to go around the harness which is roughly 2.5-3 inches in diameter, it makes for a touchy situation being that the cover is plastic and can break but luckily it didn't.

2012-10-05_22-30-51_15_zps3415e3e0.jpg


new flex and new clamps, both sides of the exhaust, I also installed new polyurethane bushings in the exhaust brackets on the cab, I am a dealer for energy suspension products and also Atro bushings but these exhaust isolators are made by Stemco Gaff, I'm trying them to see if they hold up to the heat, the biggest problem with energy and atro is the steel sleeve that they use, I always rusts and the siezes to the bolt and causes problem.

2012-10-05_22-31-06_306_zps99a9c7ae.jpg


Tomorrow I have to run and warranty my steering shocks so I can install them. I took them off and inspected them and they seemed to be in good shape for being only a year old, well tonight before install I inspected again and I do believe that they are no good or on the verge of going bad.

I also got the passenger side battery box installed but for some reason I forgot to take a picture of that. I will upload tomorrow. The plan is to have fire in the cylinders tomorrow. If I get to it I'm going to install the passenger side fuel tank and install the shut offs on both tanks and the crossover line. I have some water line work to do on the fuel tanks as well so that will all be done at the same time. I'm kind of gettin anxious. I want to see the truck back on the road pretty quick.

Well thats about the extent of everything for today, I have to plumb the 2 fittings in the rear of the truck yet, but can't do that until the truck runs and I have air pressure. so maybe I'll finish that tomorrow too. We will see and time will tell.

Also, incase anyone is wondering why this is taking so long, I should mention that I am working alone, I have my dad and brother that help when I need it, but I don't rely on them. My wife just entered her 17th week of pregnancy so she is really not much help at all, she was my big helper when we stretched the truck, but this go around shes more of a spectator on the side lines. The fact also is that I have not cut any corners on this build, it may have cost me time and money but when it rolls out on the highway I will know its ok and ready for the long haul.

Til tomorrow!!!!!
 
To avoid these ads, REGISTER NOW!

J_G

Well-known member
Joined
Sep 16, 2012
Messages
74
Better hurry, LOL, fuel just jumped $0.15 in the last 8 hours... SMH :(
 

Heavy Metal Doctor

Well-known member
Joined
May 26, 2010
Messages
5,417
Location
Mason Dixon Line
Also, incase anyone is wondering why this is taking so long

Slow? Maybe if you said this was your full time job, I'd say your slow....I was actually thinking you must be on a light work schedule to get this much done on a personal project....your doing fine!:thumbup:

I had popped apart flex pipe in the past and though it looked like silicone in it and wondered what that was for. Now I know!
 
OP
T

thejudges69

Well-known member
Joined
Jun 1, 2012
Messages
4,454
Location
youngstown, ohio
Slow? Maybe if you said this was your full time job, I'd say your slow....I was actually thinking you must be on a light work schedule to get this much done on a personal project....your doing fine!:thumbup:

I had popped apart flex pipe in the past and though it looked like silicone in it and wondered what that was for. Now I know!

this project is my work schedule, i havent worked on almost 2 months because this truck is down, it really needs to be done soon.
 
OP
T

thejudges69

Well-known member
Joined
Jun 1, 2012
Messages
4,454
Location
youngstown, ohio
yesterday was a short day but got a little bit done. I was able to get the battery box mounted and the batteries back in it and got to hear her run. She's been sitting for 2 weeks with no batteries so it was a nice sounds last night. Today I'm on my way to replace 1 air line that is to short and put the fuel tank on them were going to put the sleeper on this afternoon since we have enough help to do it.

The battery box came out really good, I changed the back side of it a little. see the factory mounts the air tank to the back of the OEM battery box, the mount it flush and put no space between it. Well, that is a huge dirt collector and over time **** lays in there and eventually eats the box away. I has come stainless piece of c channel that I had bent probably 10 years ago. they spaced the air tank out from the box about a 1/2" so that there is an open area between the tank and battery box so **** won't lay in there anymore. Drilled the 3 holes inside for the hold downs (almost busted my thumb doing that lol) and we bent 3 piece of stainless rod and tapped them for hold downs. All in all it came out good.

2012-10-06_20-28-47_706_zps05be268a.jpg

2012-10-06_20-29-00_244_zps1b747991.jpg
 

J_G

Well-known member
Joined
Sep 16, 2012
Messages
74
I think those are the nicest boxes out now. Have you decided what you're doing for step pads? I don't remember if we talked about it, haha. I didn't get home til around 2:30 ystrdy, and leaving around noon here today. Looks like we'll be trucking together in another week here!
 
OP
T

thejudges69

Well-known member
Joined
Jun 1, 2012
Messages
4,454
Location
youngstown, ohio
It has to stick on whatever I do, the boxes are like a step on top of a step so to drill it and mount a step plate would be difficult unless I mount the plate the drill holes in the inside for the bolts to drop through. Steve at roadsknz has a new style step that sticks on but its like 140.00 a piece. I maybe doing grip tape for now.
 

zjrog

Well-known member
Joined
Mar 25, 2007
Messages
555
Location
Tooele, Ut
I'm not even a driver but am loving this build. A hotrod is a hotrod, no matter the size...
 

chickenhauler

Well-known member
Joined
May 31, 2011
Messages
473
Location
Pennsylvania
It has to stick on whatever I do, the boxes are like a step on top of a step so to drill it and mount a step plate would be difficult unless I mount the plate the drill holes in the inside for the bolts to drop through. Steve at roadsknz has a new style step that sticks on but its like 140.00 a piece. I maybe doing grip tape for now.

Or polish and wax them and just be really careful... Lot lizards will slide right off lol.
 
OP
T

thejudges69

Well-known member
Joined
Jun 1, 2012
Messages
4,454
Location
youngstown, ohio
Well it has been a few days since an update, I've been getting down to the wire and I'm kind of running out of things to do. 2 days ago my brother and I got the passenger fuel tank on, finally got the truck sitting level again apparently 4 batteries and 40 gallons of fuel will make it seriously lean to the left haha. I'm going to call a company today and buy some fuel tank T bolt repair kits. I have 2 studs that look like they been welded and one that the threads are pretty shot on. new straps are $170 a piece and these t bolts are 35 a piece so the new T bolts are a better option.

2012-10-07_17-36-49_242_zps5bb435fa.jpg

2012-10-07_17-37-00_183_zpsb58d285e.jpg


I did some small stuff yesterday, I got both front air bags mounted and hooked up with air in them, I also went around the truck with a squirt bottle and checked for air leaks, I found about 5 small ones and was able to stop them all up. I have not been under the suspension yet to check for leaks there. I also put in my new fuel shut offs yesterday which consisted of a small bath in diesel fuel and only loosing about a gallon in the process which was pretty good.

2012-10-08_20-03-00_139_zps5a433b13.jpg

2012-10-08_20-03-11_73_zps62f510e0.jpg

2012-10-08_20-03-29_536_zps5e35e104.jpg

2012-10-08_20-03-39_908_zpsa516479b.jpg


I got both fuel tanks plumbed and finished, I was going to set my sleeper on yesterday but apparently my brute strength and a 1/4 inch ratchet and I screwed up one of my fuel tank sending units, I got it replaced only to find out that I have the wrong sending units in each tank, the dealership only had 1 so the other one will be here today. I will get it put in just in time to set the sleeper on.

2012-10-08_20-03-53_641_zps4629cac5.jpg

2012-10-08_20-03-19_638_zpsa406e475.jpg


This last one is a bad picture, actually these are all bad, I had the truck running minutes before and the garage was full of diesel fumes so this one isn't the best but I will get a better one when the door is open today. I got my flush mount deckplate fit and ready to be drilled. I will do that today while I'm waiting on my sending unit to show up. I will also shorten and install my crossover line from tank to tank while I'm waiting as well.

2012-10-08_20-03-19_638_zpsa406e475.jpg
 
OP
T

thejudges69

Well-known member
Joined
Jun 1, 2012
Messages
4,454
Location
youngstown, ohio
well, yesterday was the day, I waited til the afternoon for my fuel tank sender to show up to install it before I put the sleeper on. I got the fuel tanker sender installed and went ahead and mounted my deck plate the rest of the way permanently, I made it easily removable with 2 7/16 wrenches it will lift off in about 2 minutes and you will have access to the inside of the frame from there.

the nail biting part is the sleeper. We have to lift it up with 2 forklift on each side and then pull the trailer out from under it and back my truck under at the same time. I don't like doing this part but it worked out very well and the 2 lifts picked up the bunk as even as anyone could have asked for. We had to set it down twice on blocks and back the forklifts out a few inches. See with the lifts under the bunk and a 4x4 block on the forks it comes very close to the fittings in the tops of the fuel tanks so you have to make sure to miss them. So I just blocked up the mounts on the frame and set it down a couple times to reposition. We got it all the way down and she slid right over the line up studs and right into place. It is currently bolted down and ready for connections. Today I have to replace the 2 outlet boxes under the bunk, they are used for shore power and outside 110 outlets, the boxes were full of corrosion and luckily the screws holding them came loose so I don't have to redrill the holes. I'm going to try and find plastic ones today so that I won't have to deal with corrosion in the future.

2012-10-09_17-22-28_950_zpsed4abcc8.jpg

2012-10-09_18-43-29_340_zps7be0a231.jpg

2012-10-09_19-17-19_850_zps175c1238.jpg
 
OP
T

thejudges69

Well-known member
Joined
Jun 1, 2012
Messages
4,454
Location
youngstown, ohio
Oh ya, I forgot to mention, apparently a 60 series will cycle about 35 gallons of fuel from 1 tank to the other in just aboug 20 minutes, I tried to do this job without the crossover line installed and it ran completely out of fuel. My truck is a single feed, single return fuel system, it feeds out of the left tank and returns to the right tank, then there is a 1 inch crossover lines coming out of the bottoms of the tanks.

We have a fuel bottle that we use that has air and fuel in it to prime an engine when it runs out and even with my FASS system pumping, it would not **** the fuel from the tank to the engine. I have to prime it with our fuel bottle. This engine NEVER EVER sees ether. If it don't start on diesel it don't start at all.
 
OP
T

thejudges69

Well-known member
Joined
Jun 1, 2012
Messages
4,454
Location
youngstown, ohio
Why did you not paint the sleeper to match the truck whilst you had the sleepr off ?

It was not in the plans right now, the rest of the truck won't be painted for a while. I have another cab that has to be built along with another engine and all that has to be done before it goes to paint the body. The frame being painted was the next step in the build
 

20V'er

Well-known member
Joined
Jan 2, 2006
Messages
150
Location
Minneapolis, MN
Can you snap a few photos of the inside of the sleeper. Just wondering about layout.

By the way thanks for posting this, it is always fun to see a build on something I know nothing about.
 
To avoid these ads, REGISTER NOW!
OP
T

thejudges69

Well-known member
Joined
Jun 1, 2012
Messages
4,454
Location
youngstown, ohio
Can you snap a few photos of the inside of the sleeper. Just wondering about layout.

By the way thanks for posting this, it is always fun to see a build on something I know nothing about.

I will do that when the job is done, currently the fridge is sitting in the opening so I can't get good shots. But I will.

I just received photos from the gentleman that did the sandblasting, after seeing these pics I have a completely different outlook on the job, He did a phenomenal job and for anyone that is wanting to get work done give him a call, his name is Merv Weaver his company is Mervs painting in Litiz, Pa
http://www.mervspainting.com/

his website.

Now for the pics that he did then my update for today to follow.

4051_zpsb56e3a67.jpg

4052_zpsec6339bf.jpg

4054_zps8d19441b.jpg

4067_zpsa4ab1820.jpg

4070_zps607d47ba.jpg

4071_zpsa161ed42.jpg
 
OP
T

thejudges69

Well-known member
Joined
Jun 1, 2012
Messages
4,454
Location
youngstown, ohio
4086_zps28c04297.jpg

4100_zps0d8799b8.jpg

4102_zps80e5a8ab.jpg

4109_zps78d80b24.jpg

4111_zpscf435761.jpg

4112_zps180a9730.jpg


This is everything he sent me, I'm severly impressed with what they did, I now understand why it took so long to do this job. VERY VERY happy with the job.
 
OP
T

thejudges69

Well-known member
Joined
Jun 1, 2012
Messages
4,454
Location
youngstown, ohio
Today went kind of as planned but for the most part no, I wanted to run the overhead on the generator before I installed it. It isn't the simplest task to do in the truck. It can be done but figured why not do it now. Anyways, I called Martin Diesel and they faxed me the info on the valve settings and I asked if there was anything else I should be while I have it out and they suggested that since it has 5000 hours on it that I should consider changing the bearing in the end of the gen head. Well, in order to do that you have to remove the generator from the box it rides in. There is a brace right smack in the middle of the bearing opening and you can't get the cover off to get to the bearing. So, I commenced to lifting the generator out of the box and going to work. I was able to find the bearing jsut before 5 and get that back in tonight. I have to pick up the valve cover gasket in the morning and run the overhead real quick and it is ready for install. I have to get to the weld shop tomorrow to install my headache rack and fix a broken front bracket on the truck for the bumper mount.

2012-10-11_16-11-18_28_zps27e42cbb.jpg

2012-10-11_16-11-28_532_zps7ce66ecd.jpg

2012-10-11_16-32-55_357_zps8a02f83e.jpg


I also got all the wiring done for the lights on the sleeper and clamped back up into place. were all golden on that. This way all that is left major work is the generator and the front fenders on the hood which should all be done this weekend. I will have the fenders fit and dropped off for paint sometime this weekend. I still have to finish greasing the truck from the first carrier bearing forward and also have to change the oil and all the filters. I was due for a change when the truck was torn down just didn't want to do it before it went to paint, I love new filters they look so clean.

2012-10-11_22-37-18_524_zps14895b7f.jpg

2012-10-11_22-37-38_412_zps82265c0c.jpg


Also I had 2 air leaks, 1 in the sleeper air ride that I fixed and the other, well wouldn't ya know it was the only fitting on the suspension that I didn't mess with. When it was painted they ahd all the air bags out and it took about 1/2 a turn on the wrench and it stopped leaking, we will know for sure in the morning depending on how much air pressure it has. I know before paint it held air pretty good, so lets hope for the best.
 

J_G

Well-known member
Joined
Sep 16, 2012
Messages
74
I'm real impressed with Merv's work. After we talked this morning, I really need to see about getting in the book for spring. That's about the most thorough job I've ever seen done!
 
OP
T

thejudges69

Well-known member
Joined
Jun 1, 2012
Messages
4,454
Location
youngstown, ohio
Well, no new pics, I forgot to take them last night, I got the generator hanging back on the frame and going to wire it up today. But, just as I think I'm making good progress and gonna hit the road in a few days. BAM!!! a puddle of oil under the front of the engine and some spray on the ground. everything appeared to be dry but a closer inspection shows that the front main seal is just ******* oil out. I didn't have a choice, it wouldn't have made it to chicago leaking like that, so lat night I tore the front of the engine apart and got the seal out, being today is sunday I may not be able to locate a seal installer. So I will work on some other stuff in the meantime.
 
OP
T

thejudges69

Well-known member
Joined
Jun 1, 2012
Messages
4,454
Location
youngstown, ohio
I can assure you thats one mistake I won't be making again, I'm just glad I found it haha, that would have been an annoying as ring a ding for a long *** time.
 

J_G

Well-known member
Joined
Sep 16, 2012
Messages
74
LOLOL...I deserved that GFY, but I couldn't resist!

I was thinking about something ystrdy (imagine that, me thinking)...I know how technical and **** you are about things, so I was wondering if you have any concerns on the rear suspension, based on having the hangers all removed and remounted? I wouldn't guess there'd be any issues, but was curious what your thoughts were...
 
To avoid these ads, REGISTER NOW!
Top Bottom