You are using an out of date browser. It may not display this or other websites correctly.
You should upgrade or use an alternative browser.
You should upgrade or use an alternative browser.
Phase III
- Thread starter fnieto
- Start date


Rookie2
Well-known member
I didn't think it rained in Az.
Rookie2
Well-known member
maybe we should start a garage time share !
upndown
Well-known member
 Can't wait to see the rest of the build..


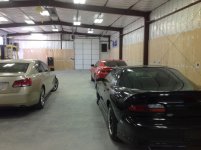
Update! All skins are now on and will be starting the detail work on the inside. I see a lot of copper in our near future. Garage doors are on order and so the weather (winter rain) will not hinder our progress any further. Big shout out to Hariy66 and the other fellas who helped with the roof section.
Attachments


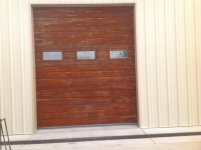
How does it feel to have power in the BODEGA???? You need to show off those beautiful garage doors. Only southwesterner's love the rust!!!!!
It feels GREAT! Thanks for all you have done to help me get there.
I plan on posting some photos after the final ridge trim is up:thumb up:
I'm struggling with walking away for the next 15 days but looking forward to seeing my son.
Jared, you are a true friend
 The doors are Janus product and operators are lift master jack shaft style 8500 models.
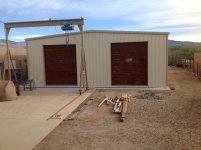
1/2 Cup
Member Emeritus
Nice build, I like an all metal garage. Keep the pics coming,,
I like an all metal garage. Keep the pics coming,,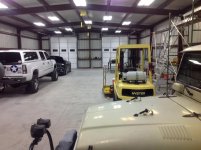

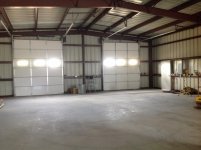
10" R-30 all the way around, followed up with Skrim sheet wired 16"O.C.
Made a huge difference in sound and temp.
Next up, 3/4" CB plywood around perimeter (first 8' only). Tape,texture then paint.
I'm thinking of medium grey for the first 4' followed by a 8" black horizontal stripe (all the way around) broken by a 2" white stripe and lastly a 4" blue stripe (miller blue).
I would love to get some input from you folks on paint.
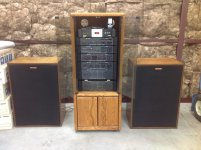
And for you audiophiles, check this shop system out. Vintage klipsch Cornwalls (restored) and SAE 02 sires rack system with two A-502 amps mono-bridged producing 600W/ch.
Made a huge difference in sound and temp.
Next up, 3/4" CB plywood around perimeter (first 8' only). Tape,texture then paint.
I'm thinking of medium grey for the first 4' followed by a 8" black horizontal stripe (all the way around) broken by a 2" white stripe and lastly a 4" blue stripe (miller blue).
I would love to get some input from you folks on paint.
And for you audiophiles, check this shop system out. Vintage klipsch Cornwalls (restored) and SAE 02 sires rack system with two A-502 amps mono-bridged producing 600W/ch.
Attachments


1/2 Cup
Member Emeritus
Thanks for the update, looking great.
I am guessing that hearing protection would nearly be needed with that amount of punch.
I am guessing that hearing protection would nearly be needed with that amount of punch.
theoldwizard1
Well-known member
Got any pics of installing the insulation and skrim ?
j p smith
Well-known member
Looking like project is coming along nicely and will sound good also. Interested in the process on the speakers. I have a pair of Scott speakers and have been wondering about what to do to them as far as keeping them in good working order.
Got any pics of installing the insulation and skrim ?
Sorry, no pictures of the actual install but its straight forward.
1 hammer on clips to red iron (16" O.C.)
2 pull and loop wire
3 install 10" batts
4 precut skrim sheets and roll up (tight)
5 start at one end and roll skrim sheet out keeping it under the wire and adjusting to keep centered.
6 go back and tuck ends/sides of skrim.
The skrim is actually pretty durable and allows for pulling adjusting etc.
Looking like project is coming along nicely and will sound good also. Interested in the process on the speakers. I have a pair of Scott speakers and have been wondering about what to do to them as far as keeping them in good working order.
Hi JP,
not sure on Scott speakers but I found plenty of information on Klipsch to down load. I was able to finish the cabinets (better than new) and check the horns and woofers. Replaced the capacitors on the cross overs and recovered the grills. I even found one of the missing badges on ebay.
I have made mounts for them 8' up on opposite ends of the east end of the shop (36' apart). I'm sure you can find info on your speakers tho. check AudioKarma.com