To avoid these ads, REGISTER NOW!

Planning a floor makeover - newbie questions (with pics)

blackthursday

Member
Joined
May 30, 2021
Messages
6
Hey all,

I've lurked for awhile off and on and have taken quite a few notes on the different flooring options available, prep methods, etc. I'm getting to the point where I want to finalize plans and figured it'd be a good idea to make a post with some questions.

How I want to use my garage (~600 sqft):
  • 1/3 Gym (squat rack, treadmill, cable machine, rower) - I will likely be buying more horse stall mats so much of this area will actually be covered
  • 1/3 Woodworking
  • 1/3 whatever
  • NO vehicles/lifts/etc. (unless I need to pull a car in for maintenance)
Current plan based on my research is to grind the floor and put down some kind of polyurea kit. Open to other suggestions.

Questions:
  • Concrete has some gouges, how should I deal with these? There is one crack in the pics as well - adjacent to the wall. Same question.
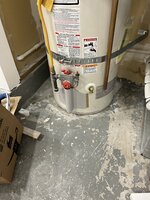
  • What the heck do I do with my water heater? It's ~17 years old so I was debating ripping it out to do the floor and replacing w/ new.
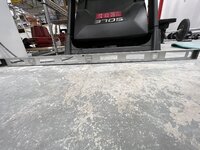
  • The floor seems pretty level except near the two columns (see pic, column is on left side) - is this a concern?
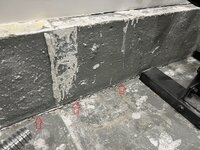
  • How do I deal with the little "walls" that run the perimeter - do I coat them as well or just paint them? Grind down the big boogers (see pic)?
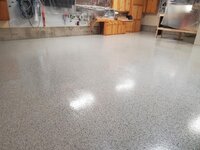
  • My wife is concerned about the flakes looking "too busy" - any suggestions? Can I go lighter? Scrap the idea and do Racedeck diamond tiles or similar?
Thanks in advance!

  • IMG-0444.jpgIMG-0446.jpg
  • IMG-0448.jpgIMG-0449.jpgIMG-0447.jpg
 

Attachments

  • IMG-0447.jpg
    IMG-0447.jpg
    1.1 MB · Views: 11
To avoid these ads, REGISTER NOW!

benwah

Well-known member
Joined
May 21, 2014
Messages
985
Location
Lakewood, Colorado
If going epoxy, Gouges should be cleaned out, wire brushed, vacuumed, primed with a thinned down epoxy, and filled with your epoxy joint filler wet on wet. Meaning prime them with a light coat, then joint fill immediately and let it all cure together.

You can coat around the water heater, or pull it and re-install later. The latter is the better option for sure but that's up to your ability/budget.

There will be some variations in the levelness of your slab.

The drywall mud is easy to clean off your stem walls. First scrape with a rigid putty knife then clean with water. Or just grind it all off, but that will help keep the dust down.

I think coating the stem walls with flake really makes them pop and looks nice.

You should not weld the slab to the stem walls with joint filler, you can, but it may crack. I would clean up that line with a 4.5" angle grinder with a masonry bit, then fill with a sealant afterwards if it were me.
 

FJ4FUN

Well-known member
Joined
Jul 28, 2014
Messages
628
Location
NorCal
Beyond what Benwah has already noted I would add a couple of comments:

Re: water heater, now would be a good time to go out back and grab some additional money off your money tree and go for a tankless water heater... ;)

If you choose to flake the stem walls, you may find that opening up the joint crack and filling with a compatible flexible joint filler before coating to be a bit easier and cleaner. The coating may crack in the future but given the age of the slab I think it would be safe to assume that it is fully stabilized by now and any future potential movement would be minimal. Getting a clean fill on a joint line after applying a full flake coating system can be tough to do.
 
Last edited:

FJ4FUN

Well-known member
Joined
Jul 28, 2014
Messages
628
Location
NorCal
  • My wife is concerned about the flakes looking "too busy" - any suggestions? Can I go lighter? Scrap the idea and do Racedeck diamond tiles or similar?
And...Yes, on a high-build epoxy system, such as those we offer, you can go with less than full rejection flake distribution.

1681149536649.png
 

benwah

Well-known member
Joined
May 21, 2014
Messages
985
Location
Lakewood, Colorado
I agree with FJ4FUN, at this point it probably *won’t* crack, but I always like to give a warning. Here are a cpl pics with them coated and uncoated
 

Attachments

  • 128D8C5E-8CEA-409C-9AFD-747C39C703EF.jpeg
    128D8C5E-8CEA-409C-9AFD-747C39C703EF.jpeg
    16.5 KB · Views: 30
  • FA2E95F0-C7CC-4C88-B6D2-46375D9BD935.jpeg
    FA2E95F0-C7CC-4C88-B6D2-46375D9BD935.jpeg
    149.5 KB · Views: 32
  • 0EDD4BCC-C5CE-4411-8914-2E05D7731B84.jpeg
    0EDD4BCC-C5CE-4411-8914-2E05D7731B84.jpeg
    134.7 KB · Views: 29
  • 58B51A64-3C0F-44BB-A892-FAF56FA98A47.jpeg
    58B51A64-3C0F-44BB-A892-FAF56FA98A47.jpeg
    16.5 KB · Views: 31
  • 6A7CDA2A-FECA-4CD7-9A7C-20BFDB1B2C91.jpeg
    6A7CDA2A-FECA-4CD7-9A7C-20BFDB1B2C91.jpeg
    20 KB · Views: 32
  • 82470EA1-BCC6-41A5-A29B-0D994354E57E.jpeg
    82470EA1-BCC6-41A5-A29B-0D994354E57E.jpeg
    399.7 KB · Views: 30
  • 3A68B0B7-175A-41E8-96AE-FEB5BF170D36.jpeg
    3A68B0B7-175A-41E8-96AE-FEB5BF170D36.jpeg
    988.9 KB · Views: 29
OP
B

blackthursday

Member
Joined
May 30, 2021
Messages
6
If going epoxy, Gouges should be cleaned out, wire brushed, vacuumed, primed with a thinned down epoxy, and filled with your epoxy joint filler wet on wet. Meaning prime them with a light coat, then joint fill immediately and let it all cure together.

You can coat around the water heater, or pull it and re-install later. The latter is the better option for sure but that's up to your ability/budget.

There will be some variations in the levelness of your slab.

The drywall mud is easy to clean off your stem walls. First scrape with a rigid putty knife then clean with water. Or just grind it all off, but that will help keep the dust down.

I think coating the stem walls with flake really makes them pop and looks nice.

You should not weld the slab to the stem walls with joint filler, you can, but it may crack. I would clean up that line with a 4.5" angle grinder with a masonry bit, then fill with a sealant afterwards if it were me.
Would it be the same method for polyurea instead of epoxy for filling the gouges? The method you describe makes sense, I think...

I was wondering what those walls were called... thanks for adding that to my vocab. The drywall mud goobers I'm not worried about though, it's the big step in the concrete - looks like the forms weren't parallel or something? I was thinking I would just grind it out to be smooth. Was probably a dumb question but wasn't sure if there was something I wasn't considering.

I was thinking I would coat the stem walls as well. But now in the last 24 hours my mind has wandered back to Racedeck, etc. as I groan thinking about how much work this will be... :)

Beyond what Benwah has already noted I would add a couple of comments:

Re: water heater, now would be a good time to go out back and grab some additional money off your money tree and go for a tankless water heater... ;)

If you choose to flake the stem walls, you may find that opening up the joint crack and filling with a compatible flexible joint filler before coating to be a bit easier and cleaner. The coating may crack in the future but given the age of the slab I think it would be safe to assume that it is fully stabilized by now and any future potential movement would be minimal. Getting a clean fill on a joint line after applying a full flake coating system can be tough to do.

I've thought about tankless... been awhile since I've researched them but I seem to recall complaints about minimum flow rates and such needed to trigger the heater? Cost isn't a huge concern, but space isn't really either at this point, hence my reluctance.

I haven't done any research on joint filler yet. Does it matter what I use?

Also maybe another dumb question - how do you control the flakes? Like what if I screw up and dump too many in a spot or don't distribute them evenly? I know I've seen videos for full flake where they just go ham and then come back after and chip up the excess, but it doesn't seem like you have that luxury if not doing full flake.

Thanks again!
 
To avoid these ads, REGISTER NOW!

FJ4FUN

Well-known member
Joined
Jul 28, 2014
Messages
628
Location
NorCal
Would it be the same method for polyurea instead of epoxy for filling the gouges? The method you describe makes sense, I think...

I was wondering what those walls were called... thanks for adding that to my vocab. The drywall mud goobers I'm not worried about though, it's the big step in the concrete - looks like the forms weren't parallel or something? I was thinking I would just grind it out to be smooth. Was probably a dumb question but wasn't sure if there was something I wasn't considering.

I was thinking I would coat the stem walls as well. But now in the last 24 hours my mind has wandered back to Racedeck, etc. as I groan thinking about how much work this will be... :)


I've thought about tankless... been awhile since I've researched them but I seem to recall complaints about minimum flow rates and such needed to trigger the heater? Cost isn't a huge concern, but space isn't really either at this point, hence my reluctance.

I haven't done any research on joint filler yet. Does it matter what I use?

Also maybe another dumb question - how do you control the flakes? Like what if I screw up and dump too many in a spot or don't distribute them evenly? I know I've seen videos for full flake where they just go ham and then come back after and chip up the excess, but it doesn't seem like you have that luxury if not doing full flake.

Thanks again!
Repairing dings & dents is the same for polyurea or high-build epoxy systems.

For joint filler you'll want it to remain flexible and that it be compatible with the coating system you intend to use. The best way to do this is to pick a single manufacturer's product line. We offer Wolverine Coatings' IntegraFlex 1921.

Getting an even flake distribution is easy to master. Start with very small qty of flake, literally like a tablespoon, in the palm of your hand and give it a toss straight up in front of you, gauge the density and the pattern, and adjust the qty accordingly. Start in the middle of the floor and get confidence in repeating the pattern via consistent toss and qty of flake. Starting with small amounts is key, you can always toss down more but you can't pick'em up. The only other thing is be careful as you approach walls/vertical surfaces, if you toss a bunch against the wall they'll hit the wall, slide down, and pile up at the floor/wall transition.
 
Last edited:

mogandave

Well-known member
Joined
Nov 4, 2021
Messages
3,052
Location
Bangkok
If the water heater is on an exterior wall not facing the street I would just move it outside.
 

Armorpoxy

Well-known member
Joined
Aug 18, 2013
Messages
3,735
Location
NJ
A hand grinder with a diamond cup whell will work wonders hear cleaning up the sides and irregularities. Our most popular system for projects like this is our www.armorcladepoxy.com 100% solids systems. We also sell them in full broadcast versions (more expensive) if you like that look.
 

Swisstrax_Official

Active member
Joined
Jan 20, 2023
Messages
44
If you're considering using garage floor tiles, reach out to our design team and we'll get a quote for you. FWIW, our floor tiles are easy to install and are used in home garage gyms and workshops.


kngelv

Well-known member
Joined
May 25, 2011
Messages
2,254
Location
Detroit, MI
Find somebody with a RaceDeck type floor and check it out. Epoxy is a lot of work and a lot of things can go wrong. Do not use plastic tiles for a gym unless your just doing cardio. They are great for wood shops and garages but will get damaged if you drop heavy weights on them.

James
 

P0234

Well-known member
Joined
Aug 6, 2012
Messages
3,241
Location
NoVA
Water heaters are pretty light when empty. If it has shut off valves, I'd empty it and see if the pipes have enough give to dangle it 6" above the floor.
 
To avoid these ads, REGISTER NOW!
Top Bottom