To avoid these ads, REGISTER NOW!

Plasma Table Build

f150skidoo

Well-known member
Joined
Dec 29, 2012
Messages
1,206
Location
Ontario, Canada
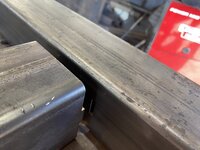
I was planning on updating my current plasma table with all new electronics, motors, and Z axis. But I changed my mind after ordering all the components and went with building a new table and selling my old one instead. Once changing directions I spent many hours designing the new table in CAD, I designed all the tubing to be laser cut so it would be all tab and slotted together to be as square and accurate as I could get it. I ordered all the electronics from Spark Robotics and opted for 5:1 planetary gear reduction, proximity sensors for the travel limits, and their Z axis with collision detection mount. Last week I picked up the pallet of parts from the laser cutter so I was able to start building the table over this past weekend.
 

Attachments

  • IMG_1620.jpg
    IMG_1620.jpg
    957.7 KB · Views: 294
  • IMG_1624.jpg
    IMG_1624.jpg
    1.1 MB · Views: 241
  • IMG_1625.jpg
    IMG_1625.jpg
    781.3 KB · Views: 176
  • IMG_1626.jpg
    IMG_1626.jpg
    690.9 KB · Views: 175
  • Plasma Table Model v93.jpg
    Plasma Table Model v93.jpg
    78.7 KB · Views: 183
To avoid these ads, REGISTER NOW!
OP
F

f150skidoo

Well-known member
Joined
Dec 29, 2012
Messages
1,206
Location
Ontario, Canada
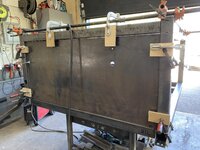
First thing to build was the top of the frame that supports the water pan. After squaring it up I put a few small welds to keep distortion to a minimum but not fall apart when I flipped it over to work on the bottom. Once flipped upside down I assembled the legs, cross members and fork pockets. I'm using 10 gauge end plates to add rigidity and to also serve as mounting service for the control box and plasma cutter shelf. Since my shop is tight on space I designed the table to have built in material storage with multiple shelf's to organize material by thickness.
 

Attachments

  • IMG_1632.jpg
    IMG_1632.jpg
    821 KB · Views: 176
  • IMG_1629.jpg
    IMG_1629.jpg
    796.6 KB · Views: 157
  • IMG_1628.jpg
    IMG_1628.jpg
    1,006.7 KB · Views: 147
  • IMG_1627.jpg
    IMG_1627.jpg
    1.1 MB · Views: 173
OP
F

f150skidoo

Well-known member
Joined
Dec 29, 2012
Messages
1,206
Location
Ontario, Canada
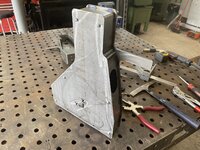
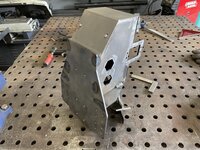
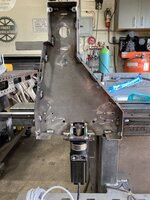
On this project there will be roughly 250 holes that needed to be threaded, luckily I found a used tapping head off of FB Marketplace to make quick work of the threading. Next parts to fabricate is the X axis carriage with motor dust cover, along with the shelf that will hold my Hypertherm 45XP. The gantry riser side plates were next to build which consist of a 3/16" main plate, 1/4" bottom motor mount, and 2" tall 14 gauge stiffiners welded to the main riser plate and a bolt on cover plate so I can access the wiring that will run inside the riser.
 

Attachments

  • IMG_1645.jpg
    IMG_1645.jpg
    775.4 KB · Views: 106
  • IMG_1644.jpg
    IMG_1644.jpg
    1.1 MB · Views: 103
  • IMG_1637.jpg
    IMG_1637.jpg
    893.1 KB · Views: 100
  • IMG_1636.jpg
    IMG_1636.jpg
    845.6 KB · Views: 98
  • IMG_1635.jpg
    IMG_1635.jpg
    1,008.1 KB · Views: 97
  • IMG_1633.jpg
    IMG_1633.jpg
    859.8 KB · Views: 124

fordkid88

Well-known member
Joined
Nov 10, 2013
Messages
680
On this project there will be roughly 250 holes that needed to be threaded, luckily I found a used tapping head off of FB Marketplace to make quick work of the threading. Next parts to fabricate is the X axis carriage with motor dust cover, along with the shelf that will hold my Hypertherm 45XP. The gantry riser side plates were next to build which consist of a 3/16" main plate, 1/4" bottom motor mount, and 2" tall 14 gauge stiffiners welded to the main riser plate and a bolt on cover plate so I can access the wiring that will run inside the riser.
We'll get to tapping because I cant wait for the next progress update. Seriously great work, I'm going to borrow some design elements from you, especially the laser tab idea, wish I would have thought about that.

Which software route are you going?
 
OP
F

f150skidoo

Well-known member
Joined
Dec 29, 2012
Messages
1,206
Location
Ontario, Canada
We'll get to tapping because I cant wait for the next progress update. Seriously great work, I'm going to borrow some design elements from you, especially the laser tab idea, wish I would have thought about that.

Which software route are you going?
Assuming your talking about control software? which is myplasma.
 
OP
F

f150skidoo

Well-known member
Joined
Dec 29, 2012
Messages
1,206
Location
Ontario, Canada
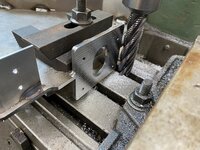
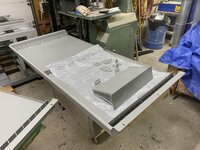
With the welding of the motor mounts on the gantry risers I had some warping and wasn't happy with how the motor wouldn't sit flat. So I ordered a extra long 1" roughing end mill to square up the motor mount. Next component to work on was the water pan, I welded up the corners, added 1/2" NPT bungs for the drain, and welded in the slat holders. The water pan had to be made in two pieces due to the size of the unfolded flat pattern. I was originally going to splurge and have the water pan made from 304 SS but would've been significantly more expensive than the mild steel that I went with. But I'm planning on sending the pans out for zinc electroplating. The following step was to thread all the holes in the side rails and weld the gear rack on.
 

Attachments

  • IMG_1650.jpg
    IMG_1650.jpg
    1 MB · Views: 102
  • IMG_1651.jpg
    IMG_1651.jpg
    978.1 KB · Views: 93
  • IMG_1652.jpg
    IMG_1652.jpg
    969.8 KB · Views: 95
  • IMG_1653.jpg
    IMG_1653.jpg
    1 MB · Views: 94
OP
F

f150skidoo

Well-known member
Joined
Dec 29, 2012
Messages
1,206
Location
Ontario, Canada
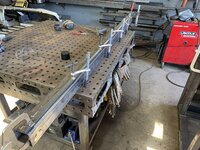
The next step was to bolt the side rails on to the frame and mount the 15MM HIWIN linear rails. I then attached the risers to the linear rail bearing blocks and test fit the motor. After threading all the holes on the gantry tube I was first able to do a test fit then once happy tack the gantry tube to the risers along with the drag chain carrier.
 

Attachments

  • IMG_1658.jpg
    IMG_1658.jpg
    977.3 KB · Views: 109
  • IMG_1656.jpg
    IMG_1656.jpg
    956.3 KB · Views: 99
  • IMG_1655.jpg
    IMG_1655.jpg
    704.3 KB · Views: 96
  • IMG_1654.jpg
    IMG_1654.jpg
    770.8 KB · Views: 124

fordkid88

Well-known member
Joined
Nov 10, 2013
Messages
680
Just out of curiosity how much did it cost to have your box tubing laser cut? I'm planning a build really similar to yours and just trying get a rough idea for pricing
 
OP
F

f150skidoo

Well-known member
Joined
Dec 29, 2012
Messages
1,206
Location
Ontario, Canada
Just out of curiosity how much did it cost to have your box tubing laser cut? I'm planning a build really similar to yours and just trying get a rough idea for pricing
It was $1295 with them supplying the tube, I figured having the tube laser cut it was roughly double the cost of me buying the raw material myself.
 

fordkid88

Well-known member
Joined
Nov 10, 2013
Messages
680
It was $1295 with them supplying the tube, I figured having the tube laser cut it was roughly double the cost of me buying the raw material myself.
I was afraid you were gonna say something north of a $1000. I'm torn between doing it with a laser or slipping one of the machinist at work 100 bucks and having them drill and tap everything on one of the haas.
 
To avoid these ads, REGISTER NOW!
OP
F

f150skidoo

Well-known member
Joined
Dec 29, 2012
Messages
1,206
Location
Ontario, Canada
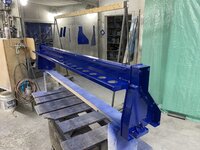
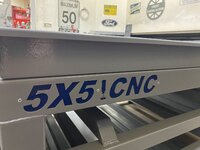
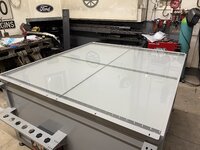
Last thing to fabricate was the gantry motor covers. Next step was to paint everything, I ended up just painting the water pans instead of sending it out for plating. Hopefully I'll have the table assembled and operating in a weeks time.
 

Attachments

  • IMG_1660.jpg
    IMG_1660.jpg
    929.7 KB · Views: 88
  • IMG_1662.jpg
    IMG_1662.jpg
    851.6 KB · Views: 79
  • IMG_1665.jpg
    IMG_1665.jpg
    962.2 KB · Views: 75
  • IMG_1666.jpg
    IMG_1666.jpg
    890.2 KB · Views: 79

Monza Harry

Well-known member
Joined
Dec 29, 2018
Messages
1,433
Location
Windsor ON
@f150skidoo really nice approach and execution with the integrated sheet storage solution! Convenience and excellent use of space all in one footprint! The added ballast doesn't hurt either. 👍 Harry
 
OP
F

f150skidoo

Well-known member
Joined
Dec 29, 2012
Messages
1,206
Location
Ontario, Canada
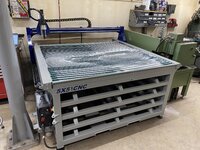
One of the first jobs of assembly was to seal and bolt the two piece water table together, Once the sealant was dried I filled the table full and left it for a night for a leak test. After passing the test I proceeded to attach the control box and side rails with bearings. Next was to attach the gantry with the X axis to the lower frame and also place the slats in the water table. After completing assembling the main components I then started attaching the motors.
 

Attachments

  • IMG_1674.jpg
    IMG_1674.jpg
    663.2 KB · Views: 51
  • IMG_1673.jpg
    IMG_1673.jpg
    927.4 KB · Views: 54
  • IMG_1672.jpg
    IMG_1672.jpg
    907.1 KB · Views: 54
  • IMG_1669.jpg
    IMG_1669.jpg
    624.7 KB · Views: 50
  • IMG_1668.jpg
    IMG_1668.jpg
    774.1 KB · Views: 65
OP
F

f150skidoo

Well-known member
Joined
Dec 29, 2012
Messages
1,206
Location
Ontario, Canada
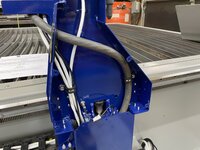
After mounting the motors and Z axis I then began wiring up the proximity sensors and routing the wires and plasma torch through the gantry and cable drag chains. All the cables that were provided with the control package had 10 feet extra wire so I cut them all down to be routed as cleanly as possible to the control box. Tomorrow I plan on putting the table in its home and do some test cuts.
 

Attachments

  • IMG_1684.jpg
    IMG_1684.jpg
    1,001 KB · Views: 77
  • IMG_1683.jpg
    IMG_1683.jpg
    792.6 KB · Views: 72
  • IMG_1682.jpg
    IMG_1682.jpg
    1 MB · Views: 70
  • IMG_1681.jpg
    IMG_1681.jpg
    926 KB · Views: 70
  • IMG_1680.jpg
    IMG_1680.jpg
    672.9 KB · Views: 90

fordkid88

Well-known member
Joined
Nov 10, 2013
Messages
680
Thanks, I always strive to make anything I build look factory made.
This table is absolutely inspiring. I'm blaming you for the hundreds of dollars that have left my wallet recently as I've decided to do a similar build.
If you don't mind sharing, what do you have into this build. Ive been bouncing ideas off of our resident mechanical super genius at work and he asked why go through all of this, couldn't I buy one? I'm estimating $3,000, 4,300 with a different plasma cutter.
 

mike93lx

ALLIANCE MEMBER
Joined
Dec 9, 2013
Messages
37,837
Location
Richmond, VA
After mounting the motors and Z axis I then began wiring up the proximity sensors and routing the wires and plasma torch through the gantry and cable drag chains. All the cables that were provided with the control package had 10 feet extra wire so I cut them all down to be routed as cleanly as possible to the control box. Tomorrow I plan on putting the table in its home and do some test cuts.
Wow
 
OP
F

f150skidoo

Well-known member
Joined
Dec 29, 2012
Messages
1,206
Location
Ontario, Canada
This table is absolutely inspiring. I'm blaming you for the hundreds of dollars that have left my wallet recently as I've decided to do a similar build.

If you don't mind sharing, what do you have into this build. Ive been bouncing ideas off of our resident mechanical super genius at work and he asked why go through all of this, couldn't I buy one? I'm estimating $3,000, 4,300 with a different plasma cutter.
I haven't actually added everything up but I would guess I'm in the range of $10-11K Canadian. I'm also using my Hypertherm 45XP and machine torch that was on my old table. The turnkey tables that I was looking at would've been close to $18k+ by the time I shipped them over the border.
 

fordkid88

Well-known member
Joined
Nov 10, 2013
Messages
680
I'm budget building mine, so import linear rails, avid cnc gear racks and drives. I'm going to do some machining to make my import steppers work. I get a discount on waterjet time and material from the shop I work at. I'm also going to rob all of my electronics from my little table. Otherwise I'd imagine I'm closer to 6-7000.
 

Monza Harry

Well-known member
Joined
Dec 29, 2018
Messages
1,433
Location
Windsor ON
I will jump on the wow band wagon! That is a truly impressive level of finish there. I'm capable of that but it seems that only happens at work where it has to. My own projects seem to stop at it works, well mostly, now I'm done. So that is a monumental level of persistence with the skill to back it up. 👏 Harry
 
OP
F

f150skidoo

Well-known member
Joined
Dec 29, 2012
Messages
1,206
Location
Ontario, Canada
Got the table in its home, leveled, the plasma cutter hooked up, and the table grounded. I used some scrap to make some test cuts to get the machines parameters all set. Once I was happy with settings and I somewhat figured out the new control software it was time to cut some real parts in 1/4" plate. I was extremely impressed with the edge quality, the part in the picture was straight off the table with almost no dross on the back
 

Attachments

  • IMG_1688.jpg
    IMG_1688.jpg
    923 KB · Views: 62
  • IMG_1687.jpg
    IMG_1687.jpg
    858.4 KB · Views: 65
  • IMG_1691.jpg
    IMG_1691.jpg
    1.2 MB · Views: 66
  • IMG_1692.jpg
    IMG_1692.jpg
    828.3 KB · Views: 70

fordkid88

Well-known member
Joined
Nov 10, 2013
Messages
680
Those cuts turned out awesome. I don't know how I missed it but I love how you did your Y axis rails as slotted bolt ons. I take you did that to eliminate any twist and warping from welding
 
OP
F

f150skidoo

Well-known member
Joined
Dec 29, 2012
Messages
1,206
Location
Ontario, Canada
Those cuts turned out awesome. I don't know how I missed it but I love how you did your Y axis rails as slotted bolt ons. I take you did that to eliminate any twist and warping from welding
Thanks, If you cant make something perfect it better be adjustable. I was toying with the idea of a fully welded Y axis rails and sending the entire table out and have the rails machined parallel but decided it wasn't worth the added time and expense. I figured the adjustable laser cut rails was my best option.
 

tarbellb

Well-known member
Joined
Apr 17, 2011
Messages
5,767
Location
Oregon
Thanks, If you cant make something perfect it better be adjustable. I was toying with the idea of a fully welded Y axis rails and sending the entire table out and have the rails machined parallel but decided it wasn't worth the added time and expense. I figured the adjustable laser cut rails was my best option.
This is so true, I implement this into many of my projects and try to extend this knowledge to others.

Table turned out badass, congrats.

And the best part.... just means we get to see even more projects coming out of your shop.
 
To avoid these ads, REGISTER NOW!
Top Bottom