To avoid these ads, REGISTER NOW!

Above 1200 Sq/FT Plugger Workshop

Wokspaces above 1200 squarefeet.
OP
P

Prospecter

Well-known member
Joined
May 16, 2015
Messages
2,401
Location
Maine
unnamed.jpgunnamed-1.jpgunnamed-2.jpgunnamed-3.jpgunnamed-4.jpgunnamed-5.jpgunnamed-6.jpgunnamed-7.jpgunnamed-8.jpgunnamed-9.jpg

Everyone is back to work, and we are enjoying not being back to work. I'm the last one in line to catch some sort of bug. Tests say not Covid or flu, so just achy and lazy.

Our temps are running single digits at night and teens to twenties during the day, which is unseasonably warm for us. The woodstoves are supplementing the heat pump, which leaves a few more solar KWH for the shop.

We finished taking down the Christmas Tree and wreaths today, so not much left. We'll probably finish up tomorrow.

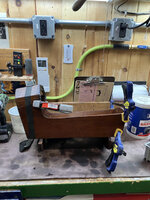
We pulled the boat out of the workshop to move to its designated spot in the Boathouse. We also moved the mast from overhead in the workshop to the wall alongside the boat. It fit with about 8" to spare.

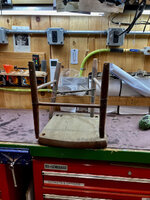
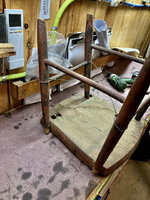
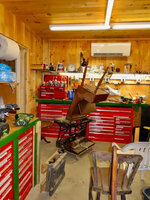
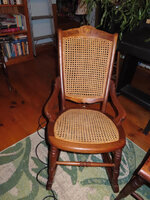
We also brought down an oak dining room table, misc. chairs, and a mirror from the workshop attic. Some of this stuff we've had waiting for more than 40 years waiting for me to have time to work on. Many bits carefully saved for someday. Well someday arrived. I set up sawhorse tables in the shop, and started in. I glue and clamp a chair, and move on to a table leg. Glue and clamp the table leg, and move on to next leg. When I get to the end of the line of tables, I return to the beginning where the glue is dry and start down the line again. If an opening in the line up appears, I slip another piece into the line up.
 
To avoid these ads, REGISTER NOW!
OP
P

Prospecter

Well-known member
Joined
May 16, 2015
Messages
2,401
Location
Maine
unnamed-10.jpgunnamed-11.jpgunnamed-12.jpgunnamed-13.jpgunnamed-14.jpgunnamed-15.jpgunnamed-16.jpgunnamed-17.jpgunnamed-18.jpgunnamed-19.jpg

Many of the pieces are white oak. Not my favorite wood to work with. Pieces tend to split off over time, leaving rough edges. I will do what I can to make the repairs. The legs were turned from glued up blanks. The glue was likely hide glue that has failed over the years. Tape holds some of the pieces. I am also working my clamp collection hard.

The mirror has a bead detail that came off due to glue failure. These pieces have been assembled from machine turned pieces assembled mostly with dowels and slotted wood screws. Nice cabinet screwdrivers make working with those screws much more pleasant. I have some very nice Proto screwdrivers for this work.

The curvy chair with the carved bunch of grapes is a little different and quite nice. It's made of cherry, and well finished. I have matched the stain, and am using lacquer thinner to thin out the varnish. Necessary due to sanding need to make the break disappear. It looks like the left side of the chair back was repaired previously for the exact same failure as the one I am repairing. The chair is otherwise sturdy, but not especially comfortable. Again, dowel and glue joints, and slotted wood screws, so probably 100ish years old.
 
OP
P

Prospecter

Well-known member
Joined
May 16, 2015
Messages
2,401
Location
Maine
Kay, You are right of course. I feel like the dowels and slotted wood screws mean probably newer than 1860ish. I should have mentioned that I also have some clues from various family members from whom these were acquired.
 
OP
P

Prospecter

Well-known member
Joined
May 16, 2015
Messages
2,401
Location
Maine
Thanks Jon. Not so very different from work I see you do on your vehicles. Finding and assembling parts, Matching the color. Sanding. The tricky part for me is figuring out what finish was used. The shift to VOC compliant finishes adds to the challenge of finding finishes that work together.
 
OP
P

Prospecter

Well-known member
Joined
May 16, 2015
Messages
2,401
Location
Maine
A brief update.

Of course I could not resist breaking up the sheets of ice.

Christmas tree chopped up and in the driveway. It's now on the compost pile in the gulley. We prune the tree inside, which makes it easier to get out the door, and also allows close inspection for missed ornaments. None missed this year, though most years we find one or two.


unnamed-1.jpgunnamed-2.jpgunnamed-3.jpgunnamed.jpg
 
OP
P

Prospecter

Well-known member
Joined
May 16, 2015
Messages
2,401
Location
Maine
unnamed-3.jpgunnamed-4.jpgunnamed-5.jpgunnamed.jpgHaven't posted much because I haven't done much due to flu. Arrrgh!

Sunny blue sky day in the low 30s today. With no wind and the reflection off the snow, it is a glorious day!

I am boxing up duplicate tools and stuff I set aside for a new homeowner. I have two flat rate boxes filled, and am starting a third. I have yet to decide what to do with the flooring nailer.

This was a nice process when I've done it before. I sent along some good stuff, and got to upgrade some of my stuff. I am looking forward to another round of upgrades.

We have not had much snow this year. In fact, I learned a new term. . . "Winter Drought." We finally have some snow on the ground, and it's walkable, so I hope to get out today.

While I was out in the shop, I was also sorting some other stuff. (Needed to be done, and did not require much energy.) I was able to send along a handle for a metal rake that I fixed up as a walking stick. The stick saw service before a friend's joint surgeries. It is now seeing service as a plant pole inside.

The Christmas Houses were the last of the decorations to be packed up and put away.
 
OP
P

Prospecter

Well-known member
Joined
May 16, 2015
Messages
2,401
Location
Maine
unnamed.jpgunnamed-1.jpgunnamed-2.jpgunnamed-3.jpgunnamed-4.jpgunnamed-5.jpgunnamed-6.jpgunnamed-7.jpgunnamed-8.jpgunnamed-9.jpg

I usually figure if I have half my wood left on January 20th, I am set until Spring. About 55% left!

Dropped off some stuff at the ReStore, then went to work on the Workshop attic. Wouldn't you know I shoulda done the attic first!

Sorting, tossing, donating, cleaning in the Workshop and Boathouse continues. There is now an aisle in the attic, shelf room in the Workshop, and room to move around in the Boathouse.

Primroses are blooming. These are the first of our indoor flowers. No forced bulbs yet.

The oak mirror is done. I used super glue and a band clamp glue the frame together. There is a manufactured bead detail that separated out. I had most, but not all, of the bead pieces and used super glue to reattach them. Then cut a strip of white oak to fill in the last bit. Stained and filed it in place. Not an exact match, but close enough to suggest continuity and fool a quick glance.

Remnants of an oak dining room chair seat. Newspapers to pad the seat suggest the chair was repaired in the 70s in Illinois, and again in the 80s in Prospect, ME.
 
OP
P

Prospecter

Well-known member
Joined
May 16, 2015
Messages
2,401
Location
Maine
Another newspaper seat picture.
Before, during, and after pictures of the dining room table project. After the top is finished, I will turn it over to do the edge.

Mia approves of wood fires in January.

The rocking chair mid tung oil application. The caning and joint repairs from the 80s are holding, so this one only needed a broken arm glued back together and oiling.

unnamed-10.jpgunnamed-11.jpgunnamed-12.jpgunnamed-13.jpgunnamed-14.jpgunnamed-15.jpgunnamed-16.jpgunnamed-17.jpgunnamed-19.jpg
 
OP
P

Prospecter

Well-known member
Joined
May 16, 2015
Messages
2,401
Location
Maine
unnamed-20.jpgunnamed-24.jpgAnother chair. This one is made of cherry and has an embroidered seat. A section of back on the right was glued back on. Seems to be a weak spot, since the same section on the left had previously been repaired. Some joints also needed to be re-glued. The joints were dowelled together. Just dried out glue, rather than the broken dowels that I sometimes encounter.

First coat of Epifanes varnish on the boat shelves.
 
OP
P

Prospecter

Well-known member
Joined
May 16, 2015
Messages
2,401
Location
Maine
I took some donations to the ReStore, so of course I looked around while there. A never used circular saw blade, and some practically new files. Some welding magnets, garden tools, a box of screws, and a package strapping tool and supplies.

Made a phone holder out of an old handle.

We also took another stab at the Workshop Attic. Brought down as much furniture as the shop could absorb. That's helpful to the process, because in some cases, I need to match parts for reassembly. It also allows to finish one step, like gluing a piece on a chair, and then move on to something else while the glue dries.

So just puttering along, making slow progress.

unnamed-3.jpgunnamed-6.jpgunnamed-7.jpgunnamed-8.jpg
 

Attachments

  • unnamed-5.jpg
    unnamed-5.jpg
    54.9 KB · Views: 26
OP
P

Prospecter

Well-known member
Joined
May 16, 2015
Messages
2,401
Location
Maine
unnamed-0.jpgunnamed-1.jpgunnamed-3.jpgunnamed-4.jpgunnamed-5.jpgunnamed-6.jpgunnamed-7.jpgunnamed-8.jpgunnamed-9.jpg

Up first is a knick knack shelf. These are delicate, and break easily. I mostly got this one together, but there is a little piece I still will need to glue in place.

This table was easy, but interesting. The screws didn't hold on the top. There were witness marks on both parts, so I just matched the X's and lined up the holes after applying glue. I used more glue than usual because the wood was so dry and I was afraid it would draw the moisture out of the glue so that I did not get a good bond.
 

Attachments

  • unnamed-2.jpg
    unnamed-2.jpg
    72.9 KB · Views: 27
OP
P

Prospecter

Well-known member
Joined
May 16, 2015
Messages
2,401
Location
Maine
The finished table inside.
The chair has turned legs that are standardized, which I suspect means manufactured by machine. The rungs are also standardized, but that could just mean they have been replaced. The ends of one rung were whittled down to fit. The baling wire is a farmer fix to strengthen the legs. The seat seams to have been hand carved and hand planed on the top. The finish is a dull red undercoat, with a black finish coat, and gold detail. I just left the old finish and oiled over it.

The little desk is not especially old. It looks like it probably held a radio or record player at one time. There are air holes in the bottom and back. It was used as a child's play desk following its original purpose. The legs and back had come off, so it just needed some repair and cleaning up. This one will go to the ReStore.

The rocker and needle point chair are now inside.
 

Attachments

  • unnamed-10.jpg
    unnamed-10.jpg
    65.8 KB · Views: 22
  • unnamed-11.jpg
    unnamed-11.jpg
    61.2 KB · Views: 22
  • unnamed-12.jpg
    unnamed-12.jpg
    60 KB · Views: 21
  • unnamed-13.jpg
    unnamed-13.jpg
    76.2 KB · Views: 21
  • unnamed-14.jpg
    unnamed-14.jpg
    71.3 KB · Views: 23
  • unnamed-15.jpg
    unnamed-15.jpg
    58.6 KB · Views: 24
  • unnamed-16.jpg
    unnamed-16.jpg
    66.1 KB · Views: 24
  • unnamed-17.jpg
    unnamed-17.jpg
    49.3 KB · Views: 26
OP
P

Prospecter

Well-known member
Joined
May 16, 2015
Messages
2,401
Location
Maine
Attic-1.jpg

Cradle-2.jpgCrib-1.jpgCrib-2.jpgLight-1.jpgShop-1.jpgShop-3.jpgShop-5.jpg

Minor preparations for snow and cold. Not really such a big deal, except we've had such a mild winter that it took a little remembering about what we do in real winter weather. Empty the wood stoves. Fill the wood bins. Stage the snow shovels.

The day, however, was sunny and still in the 40s, so a good day to open up the attic. The motivation was to search for missing furniture parts. We also brought down some more furniture, trash, and books. Swept up the mouse "rice" and managed a nice aisle down the center. Small steps.

I got a doll cradle cleaned up and repaired. We brought down the crib. A little research showed that new design standards were issued in 2008. The crib does not meet those, so it was deconstructed. I salvaged some metal, and some wood. Dismantled some T12 lights for recycling.

The shop is crowded. I can get around, and keep making room as I finish projects.
 

Attachments

  • Cradle-1.jpg
    Cradle-1.jpg
    58.4 KB · Views: 23
OP
P

Prospecter

Well-known member
Joined
May 16, 2015
Messages
2,401
Location
Maine
unnamed-1.jpgunnamed-4.jpgunnamed-5.jpgunnamed-6.jpgunnamed-7.jpgunnamed-8.jpgunnamed-9.jpg

A few random pictures of snow and cold. I do like clearing snow, and this snow was powdery / light. It's luxurious to be able to wait for cold, clear, sunny, still weather. The furniture repair goes on. Many of these chairs are of sentimental value from one branch of the family or another. Quite a few of the legs are braced with baling wire. Notice the groove in the seat of one where a split was smoothed out. I found another with the bottom third of a leg replaced and smoothed to match. There are also three knick knack shelves to repair. These are challenging because the wood is thin, brittle, and often warped. gluing one part breaks another. There is strong motivation to get it right, since knick knacks are often fragile and I don't want the shelves to fail under load.
The Quaker State oil drum is a recent acquisition, and works quite well since it takes up less space than a trash can.
Note: Pics 1,3,&4 did not load full size for some reason. Sorry 'bout that.
 

Attachments

  • unnamed-3.jpg
    unnamed-3.jpg
    82.7 KB · Views: 20
  • unnamed-2.jpg
    unnamed-2.jpg
    74.7 KB · Views: 22
  • unnamed-0.jpg
    unnamed-0.jpg
    44.5 KB · Views: 25
To avoid these ads, REGISTER NOW!
OP
P

Prospecter

Well-known member
Joined
May 16, 2015
Messages
2,401
Location
Maine
unnamed-0.jpgunnamed-1.jpgunnamed-2.jpgunnamed-3.jpgunnamed-4.jpgunnamed-5.jpgunnamed-6.jpgunnamed-7.jpgunnamed-8.jpgunnamed-9.jpgProbably some of these pictures will be a little repetitious.
The first chair is an oldie, repaired many times. Now I've glued it back together one more time. Note the baling wire reapplied to the legs. The black rocker is a family child's rocker. A caned chair from a family farm in western NY, and a mirror frame from another family home.

Amaryllis (not sure of the plural) starting to show their stalks.

The long lost kit to remove roof racks from the RAV4. I knew it was in a "safe place." Turns out it was in a box packed away while we built the Boathouse.

I also misplaced my keys and borrowed Mrs. P's, only to discover that mine were on my hip all along!
 
OP
P

Prospecter

Well-known member
Joined
May 16, 2015
Messages
2,401
Location
Maine
unnamed-10.jpgunnamed-11.jpgunnamed-12.jpgunnamed-13.jpgunnamed-14.jpgunnamed-15.jpgunnamed-16.jpgunnamed-17.jpgunnamed-18.jpgunnamed-19.jpg

I specially like the stripes in this maple. I brush the Tung Oil on, and let it soak in before I wipe off the excess. Such an easy way to refinish furniture.
The boat shelves are as finished as they are going to get. That marine varnish is a skill I have yet to master.
The Workshop at night.
The child's table in the last picture, among others, is from my own childhood. Vintage, not antique, but I like the design.
 
OP
P

Prospecter

Well-known member
Joined
May 16, 2015
Messages
2,401
Location
Maine
Nice job on all the furniture repairs/refinishing! Are these all going into the house, or are you supplying an antique store?
Thanks, Jeff. We've been sorting out the attic, which has been collecting family furniture for decades. We keep some, especially with memories. Supply children with some. Some family have expressed interest in a few pieces. So far the pieces that have gone to the ReStore are not particularly valuable. The children's desk, from a console radio of some sort. A formica dining table. We'll just need to see how it goes. I am at the stage that I worry about stuff I really care about finding a home.
 
OP
P

Prospecter

Well-known member
Joined
May 16, 2015
Messages
2,401
Location
Maine
Nice job on all the furniture repairs/refinishing! Are these all going into the house, or are you supplying an antique store?
No pictures today, but I have been thinking about this question. Mostly these pieces are not about age or value, but about memories.

My grandparents did not have a lot starting out in the 1920s, and then no one had much money in the 30s. My grandmother would find used furniture and refinish it as best she could. Sometimes that was finishing nails, or a sander that left low spots and divots.

My grandmother also had a rope bed her father had brought from Ireland after the Civil War. She adapted it to accept a box spring and mattress. She was only a little over 5', and the bed is quite high, but she managed. The marks from her curlers are still in the headboard.

Some of the pieces are from a family farm. Those pieces are hand me downs that were repaired with materials at hand.

So there's a lot of family history in the furniture.
 

Jeff Ivers

Well-known member
Joined
Apr 9, 2010
Messages
2,555
Location
Oklahoma
unnamed-10.jpgunnamed-11.jpgunnamed-12.jpgunnamed-13.jpgunnamed-14.jpgunnamed-15.jpgunnamed-16.jpgunnamed-17.jpgunnamed-18.jpgunnamed-19.jpg

I specially like the stripes in this maple. I brush the Tung Oil on, and let it soak in before I wipe off the excess. Such an easy way to refinish furniture.
The boat shelves are as finished as they are going to get. That marine varnish is a skill I have yet to master.
The Workshop at night.
The child's table in the last picture, among others, is from my own childhood. Vintage, not antique, but I like the design.

No pictures today, but I have been thinking about this question. Mostly these pieces are not about age or value, but about memories.

My grandparents did not have a lot starting out in the 1920s, and then no one had much money in the 30s. My grandmother would find used furniture and refinish it as best she could. Sometimes that was finishing nails, or a sander that left low spots and divots.

My grandmother also had a rope bed her father had brought from Ireland after the Civil War. She adapted it to accept a box spring and mattress. She was only a little over 5', and the bed is quite high, but she managed. The marks from her curlers are still in the headboard.

Some of the pieces are from a family farm. Those pieces are hand me downs that were repaired with materials at hand.

So there's a lot of family history in the furniture.
I get where you are coming from. You are lucky if you have family members that are willing to continue preserving the family history. My observation is that all too many younger people have no interest in older things. When I was helping my mom downsize to assisted living years ago, many of the family members were simply not interested in preserving the items she had cherished. For me, I am just concerned with trying to reduce the number of items I own so that I don't leave a big mess for someone else to sort thru. One of the items I have is an old ice box owned by my maternal grandparents that had sat in a basement so long the rear legs rotted off. Years ago, I grafted in some repair pieces on the legs and then stained the ice box with dark stain to cover the white wash remnants that would not strip off - fortunately one of my kids is interested in preserving that.
 
OP
P

Prospecter

Well-known member
Joined
May 16, 2015
Messages
2,401
Location
Maine
I get where you are coming from. You are lucky if you have family members that are willing to continue preserving the family history. My observation is that all too many younger people have no interest in older things. When I was helping my mom downsize to assisted living years ago, many of the family members were simply not interested in preserving the items she had cherished. For me, I am just concerned with trying to reduce the number of items I own so that I don't leave a big mess for someone else to sort thru. One of the items I have is an old ice box owned by my maternal grandparents that had sat in a basement so long the rear legs rotted off. Years ago, I grafted in some repair pieces on the legs and then stained the ice box with dark stain to cover the white wash remnants that would not strip off - fortunately one of my kids is interested in preserving that.
So true on all counts. That ice box sounds super cool.

Lack of interest is a problem. So is smaller housing starting out, moving a few times for work, and couples who start independent and then combine households so double the furnishings.
 
OP
P

Prospecter

Well-known member
Joined
May 16, 2015
Messages
2,401
Location
Maine
First two pictures are of a rocker with both arms snapped off. Super glue worked well for this repair, because the excess wipes off without leaving evidence behind as long as I do not leave it too long.

Pictures 3-6 are of a three legged table that resembles a pie crust. The crust came off in a few places, and there was a previously repaired foot that needed fixing. The "crust" was hard to clamp because of the shape. I used a C clamp on the foot because it was the only way to get enough pressure on the break. I don't like using C clamps on furniture, because it is easy to damage the wood, but this one worked out ok.

The half round table is finally finished. A satisfying effort. The finish spiffed up nicely, and the legs are nice and solid.

The last chair has an intricate baling wire repair. The repair will make it challenging to weave a new cane seat. I think I will back burner this one for a while.

This is how my time goes. I do a little on one piece and set it aside for glue or finish to dry, and move on to the next one. Eventually I circle back when I can.

0-1.jpg0-2.jpg0-3.jpg0-4.jpg0-5.jpg0-6.jpg0-7.jpg0-8.jpg
 
OP
P

Prospecter

Well-known member
Joined
May 16, 2015
Messages
2,401
Location
Maine
Another shot of the baling wire repair.

The C clamp on the foot of the pie crust table.

I finally found the last pieces of this shelf. The pictures make the finish look better than it is. The jigsaw work practically breaks from looking at it, so I am not sure this will be a keeper.

I found a nifty sanding block for intricate detail sanding. The rolls of sand paper and the block are velcro. Works really well.

I got back to the pie crust table. I brushed on lacquer thinner to soften the varnish, and wiped it off. That allows me to remove the dark old varnish, while also covering scratches. It leaves a clean surface without roughing up the wood, or loosening any glue or veneer. 0-9.jpg0-10.jpg0-11.jpg0-12.jpg0-13.jpg0-14.jpg0.jpg
 
OP
P

Prospecter

Well-known member
Joined
May 16, 2015
Messages
2,401
Location
Maine
unnamed-0.jpgunnamed-1.jpgunnamed-4.jpgunnamed-5.jpgunnamed-6.jpgunnamed-7.jpgunnamed-8.jpgI've cleaned food disposal bits from this trap one too many times. I set out to replace the drum trap and put in a better clean out arrangement. Not obvious in the picture is the wire bracing to the ceiling. It seemed to be unnecessary until I realized the pipe joints had never seen solvent. Back together now, with solvent.

I needed some bins to make better use of my shelf space. Cardboard bins are inexpensive, and make efficient use of space. I hot glued the tabs in place, and managed to break a vintage glue gun in the process. The heating element gave out.

The shop is still crowded. The maple chairs are soon off to the ReStore. Everyone in the family who wants one already has a dining room set, so these chairs and the table will be donated. The chairs would need much gluing and refinishing, so I don't mind seeing them go to a good cause.

The oak desk is in pieces. This also needs much gluing and refinishing. The oak is splintery, the veneer is lifting and either needs re-gluing, or there is filler in its place that I need to do something about.

These shelves will be rebuilt to accommodate the cardboard bins.
 

Attachments

  • unnamed-2.jpg
    unnamed-2.jpg
    51 KB · Views: 11
OP
P

Prospecter

Well-known member
Joined
May 16, 2015
Messages
2,401
Location
Maine
unnamed-11.jpgunnamed-12.jpgunnamed-13.jpgunnamed-14.jpgunnamed-15.jpgunnamed-16.jpgunnamed-17.jpgunnamed-18.jpgunnamed-19.jpg

The rebuilt shelves for bin storage.

This mirror frame is done, and ready to reinstall the mirror. There is a wedge to position the bottom of the glass. I've been waiting for this nail setter tool to arrive. It pushes the nails that hold the mirror into the frame. Much less chance of breaking the mirror. It even has a small magnet to hold the nail.
 
OP
P

Prospecter

Well-known member
Joined
May 16, 2015
Messages
2,401
Location
Maine
unnamed-40.jpgunnamed-41.jpgunnamed-2.jpgunnamed-3.jpgunnamed-4.jpgunnamed-5.jpgThe workshop attic is slowly getting emptied. This is a nice time of year to do it. We wait for a not so cold day. (Not today. . . -6 f. this morning.) It's quite comfortable rummaging around up there and going up/down stairs. 25 years ago, I made those stairs for "Old People." I'm not ready to claim the title, but the stairs are comfortable to negotiate.

It's not all furniture up there. There are lots of books, storage bins, and "STUFF." Everything is in front of everything else, so it's akin to untangling power cords. Several broken chairs downstairs are waiting while we search for parts upstairs.

Yesterday was a different sort of day. Off to the hardware store to find compression fittings to transition from 1/2" pex shutoff to 1/4" ice maker tubing. (Success.) Then to get the tractor started. Lots of failure there, but some Diesel 911 "Red Bottle" finally resolved the issue. My guess is probably some slightly gelled fuel. It should have been winterized at the pump, and I pretreat anyway, but apparently not enough. I guess I will switch to the Diesel 911 "White Bottle" pretreatment going forward.

Some more pictures. . .

A small shelf that was completely in pieces. It was designed for easy mass production, so not too difficult to figure out how to assemble it. The manufacturer's glue did not hold well, so the joints were all clean breaks.

As a diversion, I have also been doing a few boat projects. These are grab bars from the marine salvage yard. Mostly teak, but I am not sure yet about the 3-post ones.

Some more shelves for my bins. The brackets are from the ReStore for small $$. I take stuff in to donate, then shop and usually donate a little more! Fortunately, the stuff I bring home is usually much smaller than what I take in, so the trips are a net gain.
 

Attachments

  • unnamed-1.jpg
    unnamed-1.jpg
    39.1 KB · Views: 17

kaymccampbell

Well-known member
Joined
Feb 27, 2015
Messages
29,478
Location
Upstate New York
As a diversion, I have also been doing a few boat projects. These are grab bars from the marine salvage yard. Mostly teak, but I am not sure yet about the 3-post ones.
They're all boat grab rails. Back in the day, many of the identical ones on my old boat had cracked, rotted, and were useless. I replaced them with stainless. Oh what a gawdawful project that was. They were an overrun of an exotic from a custom order from the mill. Buck a 20' length. Effing things were abrasion, weld, drill, and saw resistant, as well as taking stupid pressure to bend on a hydraulic pipe bender.
 
OP
P

Prospecter

Well-known member
Joined
May 16, 2015
Messages
2,401
Location
Maine
They're all boat grab rails. Back in the day, many of the identical ones on my old boat had cracked, rotted, and were useless. I replaced them with stainless. Oh what a gawdawful project that was. They were an overrun of an exotic from a custom order from the mill. Buck a 20' length. Effing things were abrasion, weld, drill, and saw resistant, as well as taking stupid pressure to bend on a hydraulic pipe bender.
Stainless is the smart way to go, and I also have struggled working stainless boat tubing. But I'm not claiming to be smart and I do like the wood. At least on a 19' boat there are limits to how much one can do.

And in a nod to your example, today I cleaned, swept, dusted, sorted, put away, and flung. :rocker:
 
OP
P

Prospecter

Well-known member
Joined
May 16, 2015
Messages
2,401
Location
Maine
I spent most of yesterday picking up and cleaning the shop. I did repair the seat on my long suffering creeper seat. The pad is a trimmed down Harbor Freight kneeling pad. I'd just buy a new one, but I haven't seen one I like for a price I am willing to pay. I also started on this chair. The finish is thicker on this one, so I'll resort to paint remover when we come home.

Sorry about the thumbnail photo. Sometimes I can't get a photo to fully load if it's full size.


unnamed-1.jpgunnamed.jpg
 
OP
P

Prospecter

Well-known member
Joined
May 16, 2015
Messages
2,401
Location
Maine
We've been on the road quite a bit the past couple weeks back and forth between the coast and the county. Finished a few small projects.

I replaced the seat on my creeper seat by bolting and trimming a kneeling pad onto the wood seat.

I also started stripping another chair. This one has a finish that is not responding well to lacquer thinner. I think I will need to break out the stripper and take all the finish off.

Fixing the ice maker line up north has been an ongoing frustration. Fixing it was mostly about me being able to cross it off the list. Finally found the right combination of fittings to get from the supply to the ice maker tubing.

Finished up a little white shelf. This one was easy. Glued together easily. Two coats of paint. Done.

Lots of snow plowing and blowing time, both up north and on the coast. Mostly when it was sunny and in the twenties. Just the way I like it.

Looks like we will have room for another wood order up north. The rolling bin holds about a day's worth of wood for the Fisher stove. Two toboggan loads or 1 tractor bucket load.

The shoe molding was the last step in the sun room. I cut the molding outside to limit cleanup. Since the floor is polished concrete, I glued it in place with construction adhesive. I learned the hard way that the adhesive has a shelf life. It worked well, but was difficult to squeeze out of the caulking gun.unnamed-0.jpgunnamed-1.jpgunnamed-2.jpgunnamed-3.jpgunnamed-4.jpgunnamed-5.jpgunnamed-6.jpgunnamed-7.jpgunnamed-8.jpgunnamed-9.jpg
 
OP
P

Prospecter

Well-known member
Joined
May 16, 2015
Messages
2,401
Location
Maine
Another picture of the shoe molding.

I also finished trimming out the inside of the front door. I still need to touch up the finish, and finish the trim on the outside.

China cabinet is done. The last step was to paint the inside. Something else off the list.

Snowy Mt. Katahdin. Snow piles in Benedicta. The drifts were big enough to bring in a front loader to clear the road and push the banks back. . . . And more snow to clear on the coast.

Mia does appreciate the fire.

A roll of synthetic rush seating. It is actually made of twisted brown paper (like paper bags) and is quite strong.unnamed-10.jpgunnamed-11.jpgunnamed-12.jpgunnamed-13.jpgunnamed-14.jpgunnamed-15.jpgunnamed-16.jpgunnamed-17.jpgunnamed-18.jpgunnamed-19.jpg
 
OP
P

Prospecter

Well-known member
Joined
May 16, 2015
Messages
2,401
Location
Maine
A very old repair made with cut nails.

This rocker needs a rush seat, which is what that spool of synthetic rush is for. Spoilers. . . all the weaving you see has been torn out. I didn't get the weave quite right, and will need to start over. I am actually kinda glad. I didn't like using the tacks to attach the rush, and want to try a different technique.

The Windsor rocker is finished and inside. I sure hope I can find some homes with family for some of this stuff.

The forced daffodils are blooming. We have another 4 pots that are just starting.

I had a couple oil changes that needed to be done, so I needed to rearrange the shop to make room. That warm shop is nice! Sadly, I backed over my old wooden creeper, so I will need to watch Craigslist and FB Marketplace for a new one.unnamed-20.jpgunnamed-21.jpgunnamed-23.jpgunnamed-24.jpgunnamed-25.jpgunnamed-26.jpgunnamed-27.jpgunnamed-29.jpgunnamed-30.jpg
 

Attachments

  • unnamed-22.jpg
    unnamed-22.jpg
    40.7 KB · Views: 9
To avoid these ads, REGISTER NOW!
Top Bottom