seanstrx276
Member
- Joined
- Dec 27, 2011
- Messages
- 7
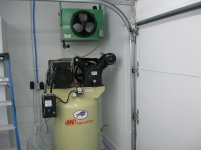
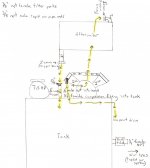
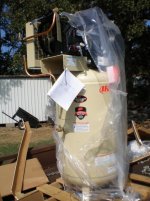
I know nothing about pipe fitting so any advice is appreciated. This setup will be used primarily for sand blasting and potentially painting down the road. I purchased an aftercooler from a local warehouse and need some advice plumbing it in. Please see attached pictures and diagram for further clarification. My plan is to come out of the 2nd stage cylinder and pipe into the top of the after cooler. Then out of the bottom of the after cooler pipe to an auto drain air filter before enter into the tank. I am also putting an auto drain valve at the bottom of the air compressor tank. Before the air enters the lines to the shop it will pass through a manual drain air fiter. My hope is there will be no water/condensate beyond this point.
Note: I could easily add more air filters at the point of use if needed.
Questions-
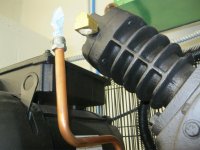
1. The fitting in the second stage head is a ½” male npt that 90’s into what I believe is a 5/8” female compression fitting. Can I get a T that has 5/8” male compression fitting to two 3/8” female npt? one female port will be the inlet to the aftercooler and the second would be a low point drain to prevent any moisture from entering the second stage cylinder.
2. Should I use NPT pipe and fittings to plumb the system or go with copper tubing and compression fittings? At some point I have to connect to the aftercooler that has 1” unions.
3. The 1” unions on the after cooler have a copper lining (where the end of the unions meet one another) Can I connect a steel union to the pre existing copper lined union?
4. Can NPT threads be cut into pipe? If using pipe to connect everything I would have to cut the pipe to length then have the threads cut.
5. Installing the auto drain for the tank, do I need any special plumbing? I have heard people speaking of special valves (strainer) that prevent debris coming from the tank from blocking the auto drain valve.
Thank you,
Sean
Note: I could easily add more air filters at the point of use if needed.
Questions-
1. The fitting in the second stage head is a ½” male npt that 90’s into what I believe is a 5/8” female compression fitting. Can I get a T that has 5/8” male compression fitting to two 3/8” female npt? one female port will be the inlet to the aftercooler and the second would be a low point drain to prevent any moisture from entering the second stage cylinder.
2. Should I use NPT pipe and fittings to plumb the system or go with copper tubing and compression fittings? At some point I have to connect to the aftercooler that has 1” unions.
3. The 1” unions on the after cooler have a copper lining (where the end of the unions meet one another) Can I connect a steel union to the pre existing copper lined union?
4. Can NPT threads be cut into pipe? If using pipe to connect everything I would have to cut the pipe to length then have the threads cut.
5. Installing the auto drain for the tank, do I need any special plumbing? I have heard people speaking of special valves (strainer) that prevent debris coming from the tank from blocking the auto drain valve.
Thank you,
Sean