To avoid these ads, REGISTER NOW!

Pole building insulation option for you

joek99

Member
Joined
Dec 13, 2013
Messages
20
Location
Northeast, PA
I searched for a cost effective option for insulating my 40'x56' pole building... looked into spray foam, framing then using standard batts... nope.
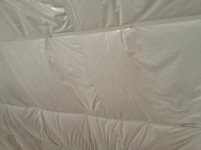
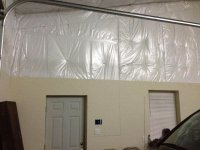
Here's what i came up with. Vinyl faced batts, R21 for the walls, R30 for the ceiling. The insulation is custom ordered AND precut to fit your space. The facing can have pre-applied tape on the tabs if you would like.
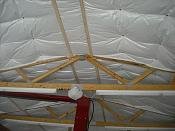
The ceiling was wrapped and stapled to the ceiling truss on one side, then stapled on the other side and seam taped to the previous run. Then steel banding gets installed perpendicular to the runs 3' O.C. and screwed to the bottom of the trusses to prevent sagging over time.
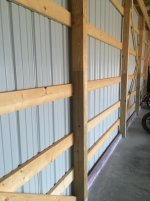
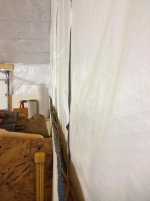
The walls were hung with two full-length batts from ceiling to floor. The widest batts they can provide is 48". The poles are spaced 8' O.C. (Forgive my #'s, they are from memory here) The actual distance between poles is 7'6" so they provide one batt at 48" and the second at 42", and they are seam taped down the middle for an airtight vapor barrier. The dimentions are for the insualtion, the facing extends about 4" on each side. Pole building nails with nylon washers arre used to hold the walls giving it the quilted look.
I installed the walls myself, hired someone to do the ceiling. I dont do heights!
It turned out amazing!!!!:rocker:
I am splitting the building in half for right now, auto hobby shop w/lift on one side, storage for toys on the other. The actual size of the half i insulated is 30'x40'. Heres the cost so far... $2300. Not too shabby, the building is one tight envelope!
Here's pics! I wasnt sure if i could mention the company name in the forum, so i left that out on this one... They are from Colorado and specialize in ... steelbuildinginsulation..., but offer products for all types of buildings.:thumbup:
I will be happy to answer any questions!!!
 

Attachments

  • photo1 - Copy.jpg
    photo1 - Copy.jpg
    59.7 KB · Views: 470
  • image2 - Copy.jpg
    image2 - Copy.jpg
    14.6 KB · Views: 477
  • photo2 - Copy.JPG
    photo2 - Copy.JPG
    137.7 KB · Views: 401
  • image1 - Copy.jpg
    image1 - Copy.jpg
    11.1 KB · Views: 524
  • photo3 - Copy.jpg
    photo3 - Copy.jpg
    65.1 KB · Views: 429
  • image3 - Copy.jpg
    image3 - Copy.jpg
    11.2 KB · Views: 535
To avoid these ads, REGISTER NOW!

bsg

Well-known member
Joined
Feb 10, 2009
Messages
329
Location
Imlay City, MI
I looked at the same insulation package as well.
I will be doing something different in the walls, but I'm still considering this type for the ceiling.
My barn is 50' x 72', getting a finished ceiling with the insulation plus vapor barrier all in one is definitely a time and money saver.

Kevin
 
Last edited:

fnieto

Well-known member
Joined
Aug 27, 2013
Messages
1,401
Location
Tucson,Arizona
I did something similar to my steel 40'X80'. R-30 ceiling and walls wired in using clips and faced with skrim sheeting. I covered the walls 8' up from the base with 3/4" plywood and taped and textured. very tight and comfortable. The wires are 16" o.c. You might consider putting another band between your 36" centers as time will sag your insulation (possibly). BTW, your shop looks great.
 

Attachments

  • IMG_0386.jpg
    IMG_0386.jpg
    140.9 KB · Views: 291
  • IMG_0402.jpg
    IMG_0402.jpg
    139.6 KB · Views: 349
  • 20140407_164952.jpg
    20140407_164952.jpg
    150.2 KB · Views: 353

jomobco

Well-known member
Joined
Nov 12, 2010
Messages
436
Location
Denver, CO
That looks good. Is it one giant batt between your poles? Or divided into pieces you overlap slightly?
 
OP
J

joek99

Member
Joined
Dec 13, 2013
Messages
20
Location
Northeast, PA
Thank you guys for the feedback! I do plan on adding horizontal purlins to span the poles, then sheathing the walls with 1/2" or 3/4" OSB only 8' high. It will be super easy to figure out all the placement for equipment, then drop wires behind and cut in receps.
I plan on leaving the upper half of the walls and ceiling as-is, so it will reflect light better.
->John, the walls are two pieces with the pre-taped tab to seal between. Fits very snug.
->Fnieto, I am curious myself on how the ceiling will look over time. Not to forget, I will be installing rows of lights same direction as banding which will also help.

I did forget to mention also, I installed foam closure strips on top and bottom of the steel panels to seal the outside shell against moisture, insects, air infiltration...
I pulled the corner caps and seam taped the panels at the corners.
Currently in the process of building the interior partition wall...
 
OP
J

joek99

Member
Joined
Dec 13, 2013
Messages
20
Location
Northeast, PA
I apologize... the wall insulation is R-19, not R-21. I just checked my invoice.

Toyoguy81 requested more pics of the ceiling banding...
 

Attachments

  • ceilingcloseresize2.jpg
    ceilingcloseresize2.jpg
    11.5 KB · Views: 235
  • ceilingcloseresize1.jpg
    ceilingcloseresize1.jpg
    39.9 KB · Views: 254
OP
J

joek99

Member
Joined
Dec 13, 2013
Messages
20
Location
Northeast, PA
Yep, that's it... I'm new to the group, wasn't sure about the forum rules on promoting a specific business. Great company to deal with!
 

bsg

Well-known member
Joined
Feb 10, 2009
Messages
329
Location
Imlay City, MI
Yep, that's it... I'm new to the group, wasn't sure about the forum rules on promoting a specific business. Great company to deal with!

I think as long as your not spamming your fine.

Posting your dealings with a business helps everyone that may be looking for similar info, after all I think that's why were here in the first place, I know I am.

Kevin
 

stangkid14

Well-known member
Joined
Dec 23, 2007
Messages
152
Location
Allentown,PA
is the $2400 including paying the person to install it? how much in materials. I am looking to do a 60x80x16 and this looks appealing. where in pa are you?
 
OP
J

joek99

Member
Joined
Dec 13, 2013
Messages
20
Location
Northeast, PA
The cost of materials was approx $2400 including shipping. In addition to the material from "Building Outlet Corp", I had to get some nickel and dime supplies from Lowes... T50 staples, 6" pole building nails for the nylon washers on the walls, etc.
In my situation, I was blessed with no labor cost for installation of the ceiling.
The contractor that installed the ceiling insulation for me is actually the same one that built the pole building.
We went with 'Narvon Builders' out of Narvon, PA (Lancaster area). It is a group of Amish guys that do EXCELLENT work, and are priced very reasonable.
I am in Schuylkill County.
 
OP
J

joek99

Member
Joined
Dec 13, 2013
Messages
20
Location
Northeast, PA
That's a hard question for me to answer... I never really got to the final number to compare apples to apples. All companies that i looked into were very comparable. These days competition drives price. In my case, i customized the building quite a bit. The pics you're seeing in this thread is only showing half of the building.
Half of the building is scissor trusses w/12 ft walls, the other half that is not pictured is attic trusses w/ 10ft walls. I wanted a sheathed roof with shingles to match the house and other outbuildings, including a one-foot overhang on three sides, and 2ft overhang over the garage doors.
I blueprinted the building i wanted using Punch Home Design software, then contacted Narvon. I don't have a clue what i paid for the building at this point, it was done in '08. I would have to dig up the paperwork, and i guess that would be a thread of a different subject.
I went with Narvon mainly for quality of work. The best thing i can suggest is to figurre out what you want in a building, then check out the pre-priced packages that the local pole building companies offer, Pioneer and Kistler are the two i can think of. Then add your options and get a quote from them.
Narvon does anything and everything so they really don't have any packages put together, but pole buildings are childs-play for them. Contact them with your idea, and they'll give you their best price.
The short answer is... They must have been resonably priced because after all of the customization, the cost was right in line with what i could afford to spend.
I'm thinking i should start another thread with my building progress from the start. It's been a fun journey.
 
To avoid these ads, REGISTER NOW!
OP
J

joek99

Member
Joined
Dec 13, 2013
Messages
20
Location
Northeast, PA
So far, so good! Everything is staying in place just perfectly. I did finish the inside of the walls, 8' up with hoizontal purlins and 1/2 sheathing. I left a 6" trough at the top to run wires and plumbing so it's hidden. It is super easy to set up all of the workbenches and power tools, then cut in receps at the needed locations and drop wires down from the top and use old-work boxes.
There currently no heat in that half, but i can already tell a huge difference. When i run a propane heater for a short time, it retains the heat for quite a while. No drafts.
Was well worth the money spent!!!
 

Repsolracer22

Well-known member
Joined
Jan 4, 2012
Messages
238
Location
central MD
This is EXACTLY what im doing right now. my 40x60 is getting framed this weekend. To save money/time we decided to frame it horizontally and spaced 4'. I have been looking at some of these sites that sell the vinyl back insulation. I need 4' wide pieces and it looks like its around $2000-$2500 shipped for all that I need.

What Style vinyl did you get? They explained to me that the vinyl can be 'regualr' or wp50, or even more rigid which they call "gym wall" .... the price differences between each of them is not much, so i felt like id just go with the more rigid stuff to have a better air barrier and prevent any possible sagging etc etc
 

bmxdad

Well-known member
Joined
Feb 18, 2014
Messages
2,539
Location
Puyallup, WA
Anymore images of the walls? I'm going to be buying 900 sqft of 4" fiberglass insulation with white heavy WMP-50 facing with 2-3" tabs. (1) tab taped inside , for $750 shipped. My batt's are 6' wide too.

I have a 24'x36'x9' ... so with windows and doors subtracted that should be enough. Roof is already done.

How did you attach the middle of the batts to keep it from sagging?
 

Repsolracer22

Well-known member
Joined
Jan 4, 2012
Messages
238
Location
central MD
JOEK99: Thanks for this recommendation man. I just talked to Danny over there and he was very helpful and informative. He also told me many different ways to install what im trying to install ..

the pic below is what my wall looks like now. I was under the impression that my builder had to make a frame out before I could install insulation. But your guy told me that's pointless. He said just install it now as is. He said hang the insulation pieces like a long curtain. and it will press right up against the metal. He said touching the metal is the way to go, and to NOT have an air gap. I thought an airgap made sense but I guess not.

He quoted me $1584 for 6" thick R19 for 2200sq ft. That's the upgraded WMP50 with the better vinyl backing on it. They even have 8" thick R25 that would only be $1790. This place seems legit and very helpful. He's sending me samples today of three different types so I can see the differences. Im happy today. Seems like Im at the end of my research stage
 

Attachments

  • ImageUploadedByTapatalk1415990920.789767 (1).jpg
    ImageUploadedByTapatalk1415990920.789767 (1).jpg
    100.9 KB · Views: 68
  • ImageUploadedByTapatalk1415990913.190839.jpg
    ImageUploadedByTapatalk1415990913.190839.jpg
    80.7 KB · Views: 61

Repsolracer22

Well-known member
Joined
Jan 4, 2012
Messages
238
Location
central MD
also here's a site i found: http://www.bayindustries.com/metal-building/products

they are in PA and quoted me $1203 for 2200 sqft of 6" tich R19 vinyl backed WMP50 blankets. cut any way you want. seems like an even better deal.

i wonder if these vinyl backed fiberglass blankets/batts are junk chinese stuff or something. I dont want to go for the "better deal" only to find out its cheap china ****
 
Last edited:
OP
J

joek99

Member
Joined
Dec 13, 2013
Messages
20
Location
Northeast, PA
It looks like you guys have found the answers you were looking for before i could get back to you.
-I went withthe VR-R vinyl facing. (the thin stuff). Worked out just fine because i hadn't planned on leaving it exposed in places where it could be in contact with anything.
-I used the plastic washers & 6" pole building nails to fasten the walls.
-Don't skimp on the ceiling banding every 3'. The stuff is heavy and i'm sure it would sag with anything less.
-I'm sure by now you guys found the pics on this thread, and on the links provided. I can take more if you need me to.

I actually went with the 7/16" seathing from Lowes for the walls. It is turning out killer!! Of course, my garage project is always lowest on the priority list, so it's a slow go.

I haven't heard anything about the supplier from PA or i would've checked that out more to help on shipping cost.

:beer:
 
OP
J

joek99

Member
Joined
Dec 13, 2013
Messages
20
Location
Northeast, PA
BMXDAD... I'm not sure what middle you mean... If you're talking about where the two batts meet in the middle (vertical seam), the fiberglass gets bumped together and the taped tab overlays the one next to it and makes a perfectly tight seal. When you're cutting and hanging, always keep the taped tab on the same side that you started. You can go all the way around the building with the tab sealing to the previous run and have a perfectly tight envelope all the way around.
Hope that helps.
 
OP
J

joek99

Member
Joined
Dec 13, 2013
Messages
20
Location
Northeast, PA
Here are some more pics...
The description of the nails from Lowes... "Pole Barn Nails" item#117835.

http://www.lowes.com/pd_117835-1278...l=1&currentURL=?Ntt=pole+barn+nail&facetInfo=

http://www.steelbuildinginsulation.com/plasticwasher.html

I don't have any left, but here's a pic installed with the washers. The nylon washers are 2" in diameter, and the nails are 6" long. You must be careful when driving the nails in so they are deep enough to hold, but don't go through the purlin and poke through the outside metal siding. If I said I didn't do that once or twice, I would be lying.

Here is a pic of the walls in-progress and the loft being built.

I also have pictures of the finished wall, and the wires laying in the trough at the top of the wall. The 2x4s are fastened 2' on-center, horizontally between the poles, except the top one is 6" lower than the top of the wall sheating. That created the 6"x1.5" trough to hide wire runs. When I'm finished wiring, I will likely go through and zip tie them into a nice, neat bundle.
 

Attachments

  • washer.jpg
    washer.jpg
    152 KB · Views: 83
  • wall.jpg
    wall.jpg
    146.9 KB · Views: 95
  • trough.jpg
    trough.jpg
    151.5 KB · Views: 92
  • IMG_2567.jpg
    IMG_2567.jpg
    138.1 KB · Views: 114

toyoguy81

Well-known member
Joined
Dec 16, 2013
Messages
229
Location
Missouri
Here are pics of mine, thanks to this post originally, and with joeks help I did my pole barn similar to his but secured mine with 2x4's spanning between posts... secured mine to purlins using roofing nails with caps..
 

Attachments

  • DSCN0035.jpg
    DSCN0035.jpg
    134.7 KB · Views: 108
  • DSCN0037.jpg
    DSCN0037.jpg
    5.4 KB · Views: 285

08racing

New member
Joined
Feb 18, 2011
Messages
4
Bringing this post back as I am currently installing insulation in my pole building, same material as joek99 and toyoguy81 show in their pictures. My question is... How did you finish the corners to seal the white liner for vapor protection, then install the interior girts? Do you have any closeup pictures of how you finished the inside corners? I am hanging the insulation vertically with white liner attached.

Thank You
 
OP
J

joek99

Member
Joined
Dec 13, 2013
Messages
20
Location
Northeast, PA
When you're hanging the batts, be sure to always keep the taped tap to the same side so the next run always tapes to the previous one. The tab is pretty long 8" maybe? When you get to the corners, the tab will be long enough to tape to the adjacent wall. Leave a little slack in the tab to give you some room for the next step. To attach the interior girts, i just cut a slit in the vapor barrier and slid the 2x4 in to fasten to the 6x6 support post. Then went in and fluffed the insulation around the 2x4 and added any scrap fiberglass to fill in the voids. Add tape to repair any excessive cuts in the vapor barrier. Then i slid a 1x in along the corner vertically, drilled & screwed that in plumb, then fastened the adjacent interior girts to meet the other corner and drilled, countersunk and screwed them to the previous wall. That kept from splitting the end of the girt and the screws weren't sticking up when i fastened the sheathing.
I sorry i don't have any closeup pics of that, and its covered now.
If you zoom a bit and look closely at the corner picture that was posted, you might get a better idea after reading the explanation.
I will go out tonight and see if there is a spot i can get more pics.
Hope that helps!
 
OP
J

joek99

Member
Joined
Dec 13, 2013
Messages
20
Location
Northeast, PA
Looks like Toyoguy did his slightly different than i did. Also looks like a REALLY nice job, and i'm sure equally as effective. I chose to mount girts on the surface of the posts so i didnt have to make all those cuts, but in doing that, i lost 1 1/2" inside the building which didn't matter to me.
Hopefully he'll reply with his technique, and it will give you some ideas to choose from on which way works best for you..
 

CNGsaves

Well-known member
Joined
Sep 26, 2012
Messages
13,233
Location
KS and OK
OP . . . . . any updates on progress of pole barn ??

Don't see any lighting or electrical . . . . how will you use the barn ??
 
To avoid these ads, REGISTER NOW!
Top Bottom