To avoid these ads, REGISTER NOW!

Polished Concrete Flooring

ebr

Member
Joined
Feb 11, 2013
Messages
21
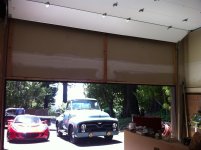
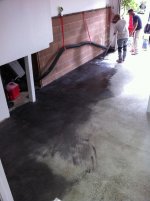
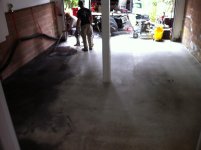
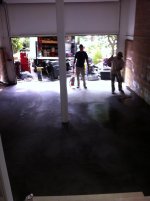
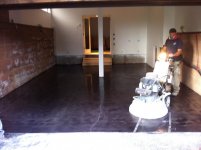
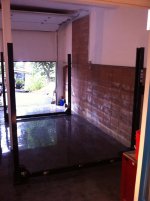
So I just had the floors in the concrete floors polished and I must say I'm so glad I went this direction above all the others. It has a real textured look that adds patina to the garage, and makes it feel clean but also vintage.

This process of picking the right direction was not quick, I really looked into all the different directions. But when you break the cost and maintaining the floor over the years, it just made sense to me.

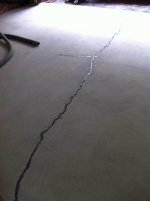
When I first started looking I was sure that I wanted an epoxy floor and I looked into both the Home Depot special, and also having a pro come and do it. After reading some not so nice stories about the Home Depot specials I made the call that it just was a risk and in the future when and if it pulled up off the floor I would be hating the day. So I called in a pro to take a look and man was I glad I did. I found out that my house even in the SF area was holding all kinds of moisture in the ground, and if I had done the home depot way it would have pulled up in a matter of days.
The pro checked the moisture level and found that even with there coating and all the steps to prep is they could not be sure it would stick. Looks like my house is built on a mountain, and at all times there is ground water that will seep.
Next up was the race type floors, but I just could not get past the bright or plastic feel of those. I wanted my garage to feel more vintage and have a patina about it (when you see the final picture of the process and the garage done you will understand).

So what are the advantages I've learned about the polished concrete floors:

1. It's my floor, nothing to add.
2. It only needs minimal cleaning and maintenance.
3. Will stay the polished look for years.
4. I can run any wheeled toolbox over it.
5. Tools that fall don't break anything.
6. I can weld all I want over it.
7. $$$ It cost me $1000.00 for everything and it was done in a day, driving and working on it. :)

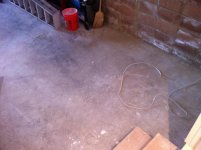
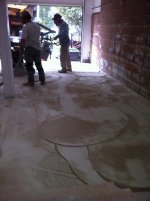
Will post the entire process soon. It's a ton of hard work, but its amazing to watch the process!
 

Attachments

  • garage2.jpg
    garage2.jpg
    70.6 KB · Views: 473
  • garage3.jpg
    garage3.jpg
    61.9 KB · Views: 409
To avoid these ads, REGISTER NOW!

hemibee69

Well-known member
Joined
Jan 15, 2011
Messages
92
Location
VA
It is great looking! Also considering it for my new garage.

One question....is it slippery when wet?

Thanks!

Btw...cool rides
 
OP
E

ebr

Member
Joined
Feb 11, 2013
Messages
21
Hemibee69
I know this sounds nuts, but you have the same traction. That was another selling point for me. To clean the garage you can just wet it down and use a big squeeze to get the water out. Even though the floor is super polished it's still just porus enough to hold traction on your feet. Best way to think about it is like a boat shoe...most of them are flat on the bottom except for little slits cut in. This small amount hold a ton of traction.
 
OP
E

ebr

Member
Joined
Feb 11, 2013
Messages
21
Wangstang
There is a sealer (kinda) on it. I wanted a dark black stain, so in the process they grind down the floor and then when the floor is at 3500 grit with a pump sprayer add the stain. This soaks into the concrete and then instead of grinding more they add the resin pads and burnish the stain. This seals it.
Another thing I forgot to say about the process is it's the most eco friendly of the bunch. Nothing was used that would harm the environment.
 
OP
E

ebr

Member
Joined
Feb 11, 2013
Messages
21
Here are some pictures of the process from start to finish.

Step 1.
The polishers show up with this huge machine and start from the most aggressive pad all the way up to 3500 grit.

Step 2.
To get the edges and areas close to stairs they have to do this by hand, so that means on you knees to get every area.

Step 3.
As they take off the layers, about 3cm total, the stones in the concrete start to show and look very cool. Kinda like Granite looks...even though it looks rough because of all the rocks its actually smooth.

Step 04.
Using a pump sprayer they spay the black stain all over the floor and let it soak in then they come back with three more passes.

Step 05.
The polisher switch the pads from grinding pads to resin pads to heat the surface and polish the concrete.

Step 06.
And the best part...use the garage like normal that day :))

Total time for the entire floor was 10 hours, and it's really hard work. I would say I would not do this myself and I'm a pretty handy Mr. Fixer that loves projects. If your in the Bay Area call JC Concrete polishing for the same results I have...they are really good.

This is what I started with the first day of the garage remodel.
 
OP
E

ebr

Member
Joined
Feb 11, 2013
Messages
21
Day one...
What the floor looked like after 40 years of no love!
 

Attachments

  • IMG_8250.jpg
    IMG_8250.jpg
    140.9 KB · Views: 267
  • IMG_8255.jpg
    IMG_8255.jpg
    154.8 KB · Views: 254
  • IMG_8269.jpg
    IMG_8269.jpg
    142.3 KB · Views: 265
  • IMG_8271.jpg
    IMG_8271.jpg
    147.2 KB · Views: 236
OP
E

ebr

Member
Joined
Feb 11, 2013
Messages
21
Cutting the concrete with a huge polisher and diamond pads...
Notice the change in the concrete, this also leveled it out a bunch, so the floors pitch was corrected a bit. Also now is when there are two guys trading off doing the edges.
 

Attachments

  • IMG_8276.jpg
    IMG_8276.jpg
    155.7 KB · Views: 207
  • IMG_8275.jpg
    IMG_8275.jpg
    140.4 KB · Views: 194
  • IMG_8273.jpg
    IMG_8273.jpg
    143 KB · Views: 204
  • IMG_8272.jpg
    IMG_8272.jpg
    142.9 KB · Views: 185
OP
E

ebr

Member
Joined
Feb 11, 2013
Messages
21
Cutting and Grinding the concrete.
 

Attachments

  • IMG_8280.jpg
    IMG_8280.jpg
    143.6 KB · Views: 158
  • IMG_8281.jpg
    IMG_8281.jpg
    139.6 KB · Views: 162
OP
E

ebr

Member
Joined
Feb 11, 2013
Messages
21
After we had most of the floor ground down to about 1000 we opened up the crack in the floor more to make sure we got all the loose concrete out. Then we filled it with an epoxy glue to fill and level it out.
 

Attachments

  • IMG_8287.jpg
    IMG_8287.jpg
    156.1 KB · Views: 150
  • IMG_8288.jpg
    IMG_8288.jpg
    160.7 KB · Views: 153
OP
E

ebr

Member
Joined
Feb 11, 2013
Messages
21
Time to wash down the surface to get the dust down...this process makes a ton of dust. At the end of the day I had a 75 to 100 pound bag of dust.
 

Attachments

  • IMG_8293.jpg
    IMG_8293.jpg
    144.1 KB · Views: 136
  • IMG_8292.jpg
    IMG_8292.jpg
    140.8 KB · Views: 145
  • IMG_8291.jpg
    IMG_8291.jpg
    140.3 KB · Views: 142
OP
E

ebr

Member
Joined
Feb 11, 2013
Messages
21
Ok and now its stain time. This is just a black stain that will be more like a dark grey in the end.
If you want to do more yellows and browns you have more options to do different stains to get a tuscan look. One of the interesting things about the process is every floor is different, and because of the lime deposits in the concrete and the rock you never fully know how it will look.

Don't forget this is not epoxy and its not all uniformed, it has a more textured look that feels like it has patina. If you want the glossy one color look, stained and polished concrete is not for you.
 

Attachments

  • IMG_8301.jpg
    IMG_8301.jpg
    145.7 KB · Views: 191
  • IMG_8302.jpg
    IMG_8302.jpg
    135.3 KB · Views: 177
OP
E

ebr

Member
Joined
Feb 11, 2013
Messages
21
Now for the fun part of the project...
With the diamond pads replaced with Resin pads to add friction and heat, it's time to burnish the stain into the floor. Using the same process as grinding the resin pads start to add a nice shine and luster to the floor. Notice that even thought the floor is much flatter then it was its not board flat, so you will see some ripples in the gloss.
Not know the process I asked for more black to be added to the floor, to make it more even...what I found out is this does not really do much. Fact is the concrete and limestone will only hold so much stain, over doing it will kill the resin pads and leave streaks on the floor from to much material. Kinda like polishing a car with a machine.
 

Attachments

  • IMG_8303.jpg
    IMG_8303.jpg
    136.4 KB · Views: 171
  • IMG_8306.jpg
    IMG_8306.jpg
    142.9 KB · Views: 169
  • IMG_8308.jpg
    IMG_8308.jpg
    140.5 KB · Views: 269
OP
E

ebr

Member
Joined
Feb 11, 2013
Messages
21
Here are two photos when its almost done...will add more tonight but I gotta get to work now. Enjoy!
 

Attachments

  • IMG_8310.jpg
    IMG_8310.jpg
    142.9 KB · Views: 229
  • IMG_8333.jpg
    IMG_8333.jpg
    145.2 KB · Views: 240
To avoid these ads, REGISTER NOW!

brassmoney

Member
Joined
Nov 10, 2006
Messages
22
This is the way to go in my opinion? My buddy bought a house with epoxy that's about 6 years old on the garage floor and its came up in a few spots. You have to be very carefull with hot tires aswell. I also like to weld and grind stuff and I think the sparks might do damage aswell. My garage is a working garage and not a showroom so this is the best route I think! I will be doing this soon.
 
OP
E

ebr

Member
Joined
Feb 11, 2013
Messages
21
Location is in Okland Ca. So in general it's a pricy area. The SF is about 600 or so, because I took everything of the floor and its was easy t get to everything the pice was pretty fair. It was 500 bucks cheaper then the epoxy guy wanted, and about average for racedeck tiles per SF.
 
OP
E

ebr

Member
Joined
Feb 11, 2013
Messages
21
brassmoney
If your a welder like me I think this is the best option from what I have found. Don't need to worry about welding poop, or slag. Plus I dont have to lift the tiles to clean, just use a swifter.
 

skyking

Well-known member
Joined
Jun 26, 2012
Messages
1,856
Location
Dallas & Tulsa
Location is in Okland Ca. So in general it's a pricy area. The SF is about 600 or so, because I took everything of the floor and its was easy t get to everything the pice was pretty fair. It was 500 bucks cheaper then the epoxy guy wanted, and about average for racedeck tiles per SF.

Thankx for the info .Welcome to GJ .
 
OP
E

ebr

Member
Joined
Feb 11, 2013
Messages
21
Wangstang...have not had it in long enough to test that. I'm a pretty neat guy, i clean up after myself and my rides don't leak oil like that. If they did I fix them.
Polished concrete is not for everyone, there are other ways to get what you want. You just need to find what works best for you and your needs..if oil is a major problem them maybe epoxy is better for people with those issues.
 

Wangstang

Well-known member
Joined
May 25, 2006
Messages
405
Location
Triangle Area, NC, USA
Wangstang...have not had it in long enough to test that. I'm a pretty neat guy, i clean up after myself and my rides don't leak oil like that. If they did I fix them.
Polished concrete is not for everyone, there are other ways to get what you want. You just need to find what works best for you and your needs..if oil is a major problem them maybe epoxy is better for people with those issues.

I'm an organized and clean worker myself, but I've accidentally dropped a quart of oil before and I've come out to my shop to find a "surprise" leak that I didn't catch for a few days so I'm curious to know what I should expect if I go this route. Will the concrete **** the oil up just like poured and 'unfinished' concrete or will the stain and polish/burnish process some how seal the surface and prevent absorption?

Wes
 
OP
E

ebr

Member
Joined
Feb 11, 2013
Messages
21
wangstang,
put some oil in the corner to see what happens. so far no seeping into the concrete. will leave it there a few days.
 

Wangstang

Well-known member
Joined
May 25, 2006
Messages
405
Location
Triangle Area, NC, USA
wangstang,
put some oil in the corner to see what happens. so far no seeping into the concrete. will leave it there a few days.

Thanks for testing.

A local store, that's a national distributor, recently had several thousand sq ft(Like 1.5 Sams club stores) polished, stained with a red clay stain and then burnished. It looked great with the aggregate exposed but I was concerend that the finish wouldn't prevent oil stains. I'm a big fan of lighter colored floors because they reflect natural light and brighten a shop up easily.

If the burnishing will cause the stain/sealer to esentially close the concrete up enough to prevent staining, I'll be calling around local shops to see what they would quote me for my shop.

Thanks again,
Wes
 

LegacyIndustrial

ALLIANCE MEMBER
Joined
Jun 7, 2010
Messages
7,994
Location
deerfield, IL
These floors are great. However, they get killed by road salt. The combination of the grit and the salt hammers the finish. Of course the sunbelt doesn't have this issue.

If you are in a snow state you may want to look at a protective mat in the winter.


Sent from my iPad using Tapatalk HD
 

soapii

Well-known member
Joined
Nov 29, 2011
Messages
342
Location
SE Michigan
Step 3.
As they take off the layers, about 3cm total

Do you mean 3mm? 3cm is over an inch.

The cream on top of finished concrete is not an inch thick, where you would need to take off that much to reveal the aggregate.

--Joe
 
OP
E

ebr

Member
Joined
Feb 11, 2013
Messages
21
Joe,
Your right 3mm...sorry I work in cm at work and just go there all the time.

Legacy Industrial...didn't know that, live in SF so we don't even think of those things. Thanks for the knowledge!

Wangstang,
So nothing yet...I think you are good! Good luck finding someone to do the floors.
 
OP
E

ebr

Member
Joined
Feb 11, 2013
Messages
21
Here are some pictures of the f100. The roadster is on another computer I restored that car a bunch of years ago.

Story on the f100 is I'm the third owner, it was a water district truck here in Oakland. Stripped it to metal, found no rust. Mixed the color like 10 times to get the shade I liked (got a bit of OCD). Motor is a 292 out of a 59 bird with a flatomatic C6 conversion. I love this truck...little bit of Hotrod little bit of farm truck, and subtle!
 

Attachments

  • IMG_7591.jpg
    IMG_7591.jpg
    144.8 KB · Views: 60
  • IMG_7585.jpg
    IMG_7585.jpg
    145.6 KB · Views: 43
  • IMG_6967.jpg
    IMG_6967.jpg
    141.1 KB · Views: 43
  • IMG_7595.jpg
    IMG_7595.jpg
    144.3 KB · Views: 43
OP
E

ebr

Member
Joined
Feb 11, 2013
Messages
21
oh yea here is another pick, put the 4 post lift in to store both. Kinda weird to have a lift in a house but it's my new toy box for christmas :))
 

Attachments

  • IMG_8343.jpg
    IMG_8343.jpg
    149.2 KB · Views: 108
  • IMG_8344.jpg
    IMG_8344.jpg
    146.3 KB · Views: 126

calgasser

Member
Joined
Nov 27, 2013
Messages
6
Location
Ventura county
Thanks for all your input and findings. I'm going to be building a good sized shop and was wondering how to address the floor situation - but now I know!
 

calgasser

Member
Joined
Nov 27, 2013
Messages
6
Location
Ventura county
Oops, forgot to ask how light a color choice are available as I like light floors to help brighten the inside plus easier to find little things when you drop them. Thanks again for sharing!
 

THR1LL3R

Well-known member
Joined
Feb 24, 2012
Messages
116
Location
St. Louis City
oh yea here is another pick, put the 4 post lift in to store both. Kinda weird to have a lift in a house but it's my new toy box for christmas :))

Wow, that roaster is great! Im building a 31 roadster and my buddys building a 27.. love to see more pics...the lift is rad too! :thumbup:
 
To avoid these ads, REGISTER NOW!
Top Bottom