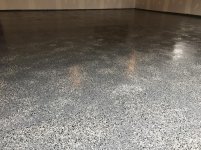
No more ugly dirty garage slab for me, this system is pretty sweet, thought I'd share some real world experience
Step 1: get your neighbor to store your gas powered equipment and find a spot for the rest of your stuff
Step 2: rent the HD Diamabrush.. I have nothing to compare it to in fairness but this thing is super easy, not aggressive at all, I could see if u had a really hard slab it would just spin on it, but it worked great for me, took about 5 hours to do 910 square feet, had to use a turbo cup wheel on an area where I had spalling where snowblower melt water had thawed and froze over and over again, I basically feathered a snowblower footprint out to get rid of anything near the spalling.
Step 3: Prime, honestly this was my least favorite part only because of how quickly it sets up, pot life for me was like 20 minutes per gallon I mixed, I hauled *** and made it work, in retrospect I'm glad i got i did it. A tip, once your primer sets up, use the remainder to cut edges/etc with a brush, once it starts to set you cannot roll it as the roller pulls the primer off, but it is still easily brushed
Step 4: polyurea Nohr!!! By this time I was pretty beat, but when I started laying this stuff down i was elated, it's like a gooey oozy substance that glides real nice with a brush or roller and excellent self level properties. My flake broadcast was pretty uneven but I like the look, I got 10 extra lbs of metallic flaked from Home Depot and mixed them in with the flaked legacy sent me. The metallic flakes make it look like a granite countertop. Tip, have some acetone on hand or you will be sanding your hands for an hour when your done like me
Step 5: clear polyurea Nohr, it was 55 at 1130 last night when I finished the tinted coat, and it was 40 degrees when I woke up at 5 am, and it was just barely ready to recoat. I lightly hit the flakes with a pole sander and Leafblew out loose flakes. the directions say to roll your roller dry to make sure you don't miss a spot, this is good advice.
Conclusion, this system is overall easy, and easily done by one person. I rented the grinder Saturday morning and was rolling my last coat 36 hours later, would have been faster but it's still a little chilly here in Wisconsin. Loved that i could do my project in a weekend and apply it in 45/50 degree weather!! It was 65 when I rolled the primer yesterday around noon. That took 8 hours before it was ready to recoat. NO more ugly dirty garage floor
Step 1: get your neighbor to store your gas powered equipment and find a spot for the rest of your stuff
Step 2: rent the HD Diamabrush.. I have nothing to compare it to in fairness but this thing is super easy, not aggressive at all, I could see if u had a really hard slab it would just spin on it, but it worked great for me, took about 5 hours to do 910 square feet, had to use a turbo cup wheel on an area where I had spalling where snowblower melt water had thawed and froze over and over again, I basically feathered a snowblower footprint out to get rid of anything near the spalling.
Step 3: Prime, honestly this was my least favorite part only because of how quickly it sets up, pot life for me was like 20 minutes per gallon I mixed, I hauled *** and made it work, in retrospect I'm glad i got i did it. A tip, once your primer sets up, use the remainder to cut edges/etc with a brush, once it starts to set you cannot roll it as the roller pulls the primer off, but it is still easily brushed
Step 4: polyurea Nohr!!! By this time I was pretty beat, but when I started laying this stuff down i was elated, it's like a gooey oozy substance that glides real nice with a brush or roller and excellent self level properties. My flake broadcast was pretty uneven but I like the look, I got 10 extra lbs of metallic flaked from Home Depot and mixed them in with the flaked legacy sent me. The metallic flakes make it look like a granite countertop. Tip, have some acetone on hand or you will be sanding your hands for an hour when your done like me
Step 5: clear polyurea Nohr, it was 55 at 1130 last night when I finished the tinted coat, and it was 40 degrees when I woke up at 5 am, and it was just barely ready to recoat. I lightly hit the flakes with a pole sander and Leafblew out loose flakes. the directions say to roll your roller dry to make sure you don't miss a spot, this is good advice.
Conclusion, this system is overall easy, and easily done by one person. I rented the grinder Saturday morning and was rolling my last coat 36 hours later, would have been faster but it's still a little chilly here in Wisconsin. Loved that i could do my project in a weekend and apply it in 45/50 degree weather!! It was 65 when I rolled the primer yesterday around noon. That took 8 hours before it was ready to recoat. NO more ugly dirty garage floor