To avoid these ads, REGISTER NOW!

Poor man's DIY polished concrete

alexb2000

Well-known member
Joined
Feb 7, 2010
Messages
664
Location
Fort Worth, TX
I just bought an aircraft hangar. The building is a 2017, but it had a renter in it that got oil stains all over the floor, lots of tire marks, scrapes, scuffs, rust stains, etc. That and the concrete work is just OK, plenty of small ups and downs, some minor cracking, some places that were not well troweled, etc.

Anyway, I got some quotes which ranged from $2-4 a foot. The building is ~9,000 sq. ft. so $18-36K to polish. I didn't really care about getting a show quality floor rather just a clean non-dusting, light reflecting, well sealed floor, that would work well in a shop. I was shooting for a Home Depot quality floor. Keep in mind the process I'm doing is not apples to apples with a ground floor. I'm not getting down into the aggregate or deep enough to remove every stain or blemish, just opening up the troweled surface, densifying it, polishing, and sealing.

Anyway, I had a floor cleaner and some basic tools, I bought a ride on burnisher for $3K. My materials cost is about $2500 including diamond pads, burnishing pads, densifyer and sealer. I am using Convergent chemical products and Gorila Diamond Pads.

https://www.concretetreatments.com/United-States/EN/

http://www.etcpads.com/products/diamond-pads/

So the process that I went through..

1. Steam cleaned, used Chomp on the oil stains, Whink rust remover, degreased and steam cleaned again.

2. Started with 200 and then 400 grit pads I wet ground the floor. I kept it wet because I didn't have a vacuum system and the dust would have been terrible.

3. Cleaned it using the floor machine, more pressure washing, etc. Lots of nasty concrete dust. The slurry was about 1/4" deep after each step.

4. Densified using pump sprayer and micro-fiber mop

5. Then dry burnished with 800,1500,3000 grit diamond pads.

6. Between steps I blew out all the dust with a gas yard blower and cleaned it using the floor machine. The dust in the higher grits isn't nearly as bad as the lower grits.

7. Then I put 3 coats of sealer on. I like the Convergent sealer because it doesn't build up on the surface, never has to be stripped, etc. So maintenance should be easy.

8. I went over the floor with a boar hair burnishing pad between each coat of sealer.

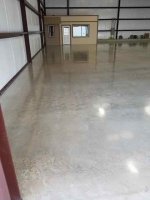
Anyway, enough typing, here are the before and after pictures.

BTW- In a smaller space this could be done very reasonably IMO with a $500 walk behind burnisher, which you can use to keep it maintained later.
 

Attachments

  • Hangar before small 1.jpg
    Hangar before small 1.jpg
    21.1 KB · Views: 889
  • Hangar before small 3.jpg
    Hangar before small 3.jpg
    21.1 KB · Views: 809
  • Hangar before small 2.jpg
    Hangar before small 2.jpg
    19.9 KB · Views: 803
  • Hangar after small 1.jpg
    Hangar after small 1.jpg
    22.8 KB · Views: 975
  • Hangar after small 2.jpg
    Hangar after small 2.jpg
    22.3 KB · Views: 973
  • Hangar after small 3.jpg
    Hangar after small 3.jpg
    22.4 KB · Views: 922
  • Hangar after small 4.jpg
    Hangar after small 4.jpg
    23.7 KB · Views: 1,008
To avoid these ads, REGISTER NOW!
OP
A

alexb2000

Well-known member
Joined
Feb 7, 2010
Messages
664
Location
Fort Worth, TX
Thanks guys. I'm happy with it for what I spent. Working on a project like this is kind of therapeutic like mowing the lawn, headphones on, then back and forth, back and forth.

i couldn't do this professionally though.
 

steve308

Well-known member
Joined
Nov 20, 2011
Messages
2,074
On my budget I'm barely able to afford a coat hanger! Your hard work shows with the excellent results.
 

stm317

Well-known member
Joined
Aug 8, 2017
Messages
1,339
Nice work! What kind of time investment did you have here?
 
OP
A

alexb2000

Well-known member
Joined
Feb 7, 2010
Messages
664
Location
Fort Worth, TX
Nice work! What kind of time investment did you have here?

It took about 30-40 hours. Part of it was being the first time and I didn't work straight through, I worked 3-4 hours here and there as I had time. Like most of my projects as soon as I finished I'm saying to myself, "Man the next time I could knock this out a lot quicker". I'm sure that happens with you guys too.
 

OzarkMan

Well-known member
Joined
Dec 3, 2014
Messages
556
Location
Ozark Missouri
I usually say, "Man, next time I'm hiring this **** out!"


Very nice work. Looks professional and something to be truly proud of.
 

hbus1300

Active member
Joined
Nov 1, 2013
Messages
34
Location
St.Charles, MO
Looks really nice. I want to do something similar, fortunately I only have 800 sq ft.

Two questions.

1. Would you do anything differently looking back?
2. Why the choice of Convergent sealer vs one of the popular ones often discussed here? (ghostshield)
 
OP
A

alexb2000

Well-known member
Joined
Feb 7, 2010
Messages
664
Location
Fort Worth, TX
Looks really nice. I want to do something similar, fortunately I only have 800 sq ft.

Two questions.

1. Would you do anything differently looking back?
2. Why the choice of Convergent sealer vs one of the popular ones often discussed here? (ghostshield)

1. I would have been more careful about making sure the previous grit scratch marks were completely removed by the grit I was using before moving on to finer grits. I wasted some time making a lot more passes with finer grits trying to remove courser scratches that I missed earlier.

When applying chemicals, densifiers and sealers, I would pay less attention to how many coats were recommended and focus on how the concrete was reacting. When I was applying sealer I was told 1 coat or 2 tops would do it. The first coat absorbed so fast I could hardly move the mop. The second was better, but it actually required three thin coats. I could have made it quicker by just putting down two coats one right after another vs. letting it sit a day between each coat.

2. I really am not experienced enough to compare and contrast sealers. I am very happy with the Convergent sealer and I chose it in part because a lot of local contractors are using it even though it is expensive. I figured they wouldn't be buying it if it wasn't worth it. I'd be really interested if anyone else could shed some light on this.

Again, thanks to everybody for the positive comments. One thing I would say is that anyone can do this if they want to, it's nothing but a little work and some attention to process and detail (qualities most people here have in spades).
 

C2tuck

Well-known member
Joined
Apr 22, 2015
Messages
663
Location
North Texas
I like the “poor man”...


“I bought an aircraft hanger”

Lol. Looks awesome. I want one!


Sent from my iPhone using Tapatalk
 
To avoid these ads, REGISTER NOW!
OP
A

alexb2000

Well-known member
Joined
Feb 7, 2010
Messages
664
Location
Fort Worth, TX
Looks good. How does this method typically hold up to stains?

I tested it by accident. I had the bi-fold door open and I was working in the building when some guy pulls up in his old diesel right into the building to ask me about the floor, if I was a contractor, etc. I told him next time to not pull into the building and he says, "Well it's a hangar isn't it?". So he leaves and there is a nice pool of hot diesel oil on the floor. It wiped right up, but severly tested my restraint. Reminds me of the time I had an owner of a concrete plant drive his pickup truck right across our just freshly finished concrete floor because he didn't want to walk that far to talk to me.

Anyway, time will tell, but in my experience nothing is worse on bare concrete than hot diesel oil and the above "test" didn't leave any trace.
 
OP
A

alexb2000

Well-known member
Joined
Feb 7, 2010
Messages
664
Location
Fort Worth, TX
Do you think a walk behind burnisher would have enough power to cut using the 220 pads?

Yes if it is a heavier duty version. I got the idea because the Concrete Polishing place in Florida that does all the Youtube videos sells a walk behind for this exact purpose.
 

bradn

Member
Joined
Mar 8, 2008
Messages
16
Been thinking about trying this, What rpm burnisher did you use. I saw the place you were talking about, looked like a walk behind 27" propane burnisher they were using. anything special other than that?
 

Roothawg

Well-known member
Joined
Mar 22, 2006
Messages
129
Location
Mustang,OK
Well that answers one of my questions. I was pondering doing this on a future building we are planning. It's gonna be 5-6K sf. I was thinking I might rent a burnisher and try it. 40 hours is a lot of rental time.
 

bradn

Member
Joined
Mar 8, 2008
Messages
16
Well that answers one of my questions. I was pondering doing this on a future building we are planning. It's gonna be 5-6K sf. I was thinking I might rent a burnisher and try it. 40 hours is a lot of rental time.
I was looking on fb marketplace and looks like you can pick up burnishers pretty reasonable used, but I dont know what I am looking at.
 

walrus

Well-known member
Joined
Nov 12, 2008
Messages
11,679
Location
Maine
Where is the airplane? We need pics, the floor is great but its just a floor
 

gb99

Well-known member
Joined
Jun 26, 2013
Messages
65
Location
Boston MA
@alexb2000

How is the polished floor holding up over the last few years? Does it get slippery when wet?

What RPMs does the burnisher need to run at to accomplish this job? I see some cheap floor polishers on Craigslist but don’t know if they will cut it - no pun intended.

I’m simply looking to spruce up my garage slab, and would like to either polish it or lay down porcelain tiles.
 

Armorpoxy

Well-known member
Joined
Aug 18, 2013
Messages
3,735
Location
NJ
Hi
For a polished concrete look that gives much more resistance and requires no mechanical prep and are easy to install take a look at our Ballisitix Floor Coating kits or a single coat of our SPGX clear one part Polyurea.
 

Armorpoxy

Well-known member
Joined
Aug 18, 2013
Messages
3,735
Location
NJ
Epoxy or other types of 'topical' coatings are much better solutions where there are spills, chemicals, oils, etc. The reason for this is that polished concrete is not a non-porous surface, even when used with a stain blocker, they can still easily stain. This is why polished concrete is not normally used in a garage or auto shop type environment.

Newer solutions such as Ballistix and Coval which we carry can be applied to polished concrete to make them virtually impervious, but these products can also be applied to non-polished concrete and get a similar 'look'.

True polished concrete is a labor and machine-intensive process and frequently overkill for residential applications.
 

dcg9381

Well-known member
Joined
Jun 20, 2018
Messages
11,766
Location
Austin, TX
Man, that looks amazing. Where is that in Ft. Worth? Many places hard to own the dirt unless it's a private airport / development.
I've got a few buddies who easily cover their hanger mortgages by renting to airplanes, going rate around here seems to be about $500/plane. Heck of an improvement for the price. Lot of labor though.

For stains, agree with the vendor... You have to coat it. Polyurea is what I've been using, which works out to about $2.50/foot (off the top of my head) for two coats. Our drive is coated in a plastic HD-6600, which is even less expensive, but it's held up not so well being outside under constant UV and weather.
 
To avoid these ads, REGISTER NOW!
Top Bottom