Adrian (Prometheus) – Thank you for the clarification. I’m still on the fence about what I’m going to use on the mill. It is between the Industrial Enamel and the Polane B. The dry time doesn’t really worry me at all. I’ve been working on this project for a month now and I can’t imagine the additional dry-time “slowing” me up. The lack of isocyanides is a huge plus. I’m guessing I’ll make the decision just before heading out to order the paint. – Thanks again for all the additional info.
Clean, polish and repeat (plus order a few replacement bearings).
This weekend my wife and I worked outside in the yard (loose term, “yard” not “work”- plenty of that to go around) so not a lot got done on the mill. This seems to be a forming trend, unfortunately. I have managed to sneak a few hours here and there. Most of the time was spent cleaning and polishing up steel shafts on the power-feed and getting the knee handle finished. Here are a few of the detail shots.
Power feed shaft before and after…


This goes to the quill power-feed… (Check out the grease on that gear

)

I used the shaft as an arbor so I could clean up the pulley…

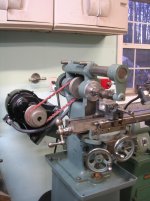
Tore into the intermediate pulley set-up by the motor…

Ugh? Are bearing supposed to make that grinding noise?

(Ordered a few new SKF’s. This time we are going with some of the sealed variety.)


Some of the “fruits” of the last couple of nights…

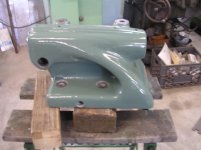
The completed table as it sits now. (Who would have thought a machine to cut metal took so many parts?
)

I guess I’m making progress. The completed table did look like this not too long ago.

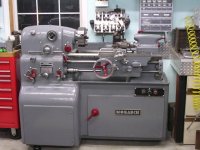
For everyone who is getting tired of seeing, as I am of doing, the never ending “Cleaning and polishing of mill parts” posts, relief is on the way. I ordered the filler and the epoxy primer so the real exciting part is yet to come.
What promises to be the never ending and intellectually riveting..
Wait for it…
Wait for it…
“Body filler and sanding” posts!” I know that I’m excited.

Side Note- If you are really tired of reading the "Cleaning and polishing mill parts" posts PM me and you can come over and help finish up the last of them. Just kidding. I think.

You know when a project has gone on a little too long when you are pining for the good old days of wire wheeling and grinding an old Land Cruiser frame.
 Whatever. It beats sanding drywall!
Thanks, as always, for reading the ramblings.
Cheers,
Chris


 .
.  .
. 


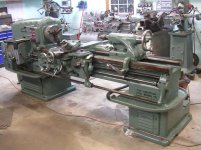
 Any more detailed shots of the machines?
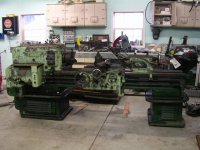
 From the quick late night search I did, the folks on PracticalMachinist seem to have had good luck with both. The guys on PM aren't known for pulling punches on anything or anyone so it sounds like either will work out well. I do want to shoot it if possible due to the afore mentioned brushing disability. In any event, I still have a ton of prep to do before I even think about putting down the primer. There is a bunch of quality time in my future consisting of Evercoat Rage Gold and sanding blocks to smooth out the castings. How smooth I get them may well determine if I have to worry about a few small brush strokes.


