To avoid these ads, REGISTER NOW!

Post your diy jigs and clamps for welding

FishingMan

Well-known member
Joined
Feb 18, 2015
Messages
272
Location
PA
Looking for some ideas on diy welding jigs and clamps to make fab jobs go smooth. Thanks guys
 
To avoid these ads, REGISTER NOW!

sberry

Banned
Joined
Jun 18, 2005
Messages
35,747
Location
Brethren, Michigan
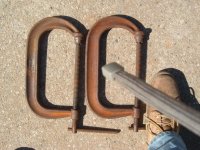
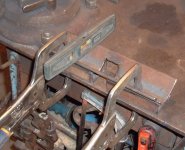
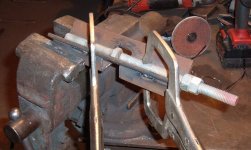
I like common clamps as simple and as universal as I can get. 11r, some 6 and a selection of screw clamps, work bench and vise.
Some pieces of steel on the rare occasion the basics dont work.
 

Attachments

  • C clamps.JPG
    C clamps.JPG
    53.5 KB · Views: 382
  • CClamp.jpg
    CClamp.jpg
    156.1 KB · Views: 328
  • clamp plow.jpg
    clamp plow.jpg
    147.3 KB · Views: 333
  • clamps plow.jpg
    clamps plow.jpg
    148.8 KB · Views: 306
  • bench welder 4.jpg
    bench welder 4.jpg
    148.8 KB · Views: 302
  • bolt splice jig 1.JPG
    bolt splice jig 1.JPG
    89.1 KB · Views: 301
  • bolt spice jig.JPG
    bolt spice jig.JPG
    103.3 KB · Views: 300
Last edited:

crugg65

Well-known member
Joined
Jan 5, 2018
Messages
57
The first picture is one I use in my large pipe vise for miscellaneous pipe welding work. The larger pipe is a 2 1/2” with a 5/8-11 lock/hold down welded on to lock schedule 40 2” pipe. The 2” pipe has a piece of 2”x3/8” stock welded on for certain flanges I use. The second picture is my “V” block jig I use in conjunction with my drill press to drill holes into round stock or pipes.2d1342770e5fc10e98938c95f86f595f.jpg5a84cb3d66f02ec3d7ebdc4b34312a02.jpg


Sent from my iPhone using Tapatalk
 

Attachments

  • 2d1342770e5fc10e98938c95f86f595f.jpg
    2d1342770e5fc10e98938c95f86f595f.jpg
    234.5 KB · Views: 120
  • 5a84cb3d66f02ec3d7ebdc4b34312a02.jpg
    5a84cb3d66f02ec3d7ebdc4b34312a02.jpg
    245.4 KB · Views: 105
OP
F

FishingMan

Well-known member
Joined
Feb 18, 2015
Messages
272
Location
PA
Crug nice job on the V block. I need to make one for my drill press. Keep em coming guys
 

HenryAZ

MEMBER EMERITUS
Joined
Sep 18, 2012
Messages
1,054
Location
South Congress AZ
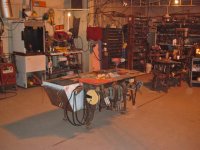
My table is set up using milling clamps..

My table the same way. I use the same holes to bolt down a drill press vise occasionally. Do you use anything to plug the holes while they are not it use, to protect the holes and threads? I've tried hex head set screws, but they usually get vibrated over time and fall out the bottom.
 
Last edited:

lilredex

Well-known member
Joined
Apr 29, 2006
Messages
5,956
Location
Toronto
A couple of my helpers.
 

Attachments

  • Drill Press Hold Downs.jpg
    Drill Press Hold Downs.jpg
    147.1 KB · Views: 282
  • Drill Press +V+ Blocks.jpg
    Drill Press +V+ Blocks.jpg
    61.1 KB · Views: 263

racingtadpole

Well-known member
Joined
Dec 3, 2011
Messages
2,029
Location
The far side of crazy.. but sometimes Australia
My table the same way. I use the same holes to bolt down a drill press vise occasionally. Do you use anything to plug the holes while they are not it use, to protect the holes and threads? I've tried hex head set screws, but they usually get vibrated over time and fall out the bottom.

I have internal hex drive grub screws in mine also. I’ve not had any issue with them falling through but I have had issues with spatter from the mig clogging the hex or sticking them in place. I try and avoid mig welding on that surface where possible.
 

stsmytherie

Well-known member
Joined
Dec 16, 2005
Messages
176
Location
VT
I cut the ends off some cheap import clamps and welded on 5/8 bolts to fit the holes in my table.

 
OP
F

FishingMan

Well-known member
Joined
Feb 18, 2015
Messages
272
Location
PA
I made a few of these. T
full
hey work awesome!

Is it a copy of a fireball jig. Can you show a pic of the other side. Thanks for all the cool ideas guys
 

strength_and_power

Well-known member
Joined
Apr 26, 2015
Messages
1,426
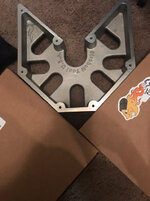
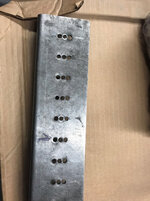
The Fireball Tools Square and Magic Square are worth the money, very versatile. Check out Genuine Metalworks on Instagram for his version of a square made from 1/4” P&O steel, laser cut and CNC formed. Considerably cheaper than Fireball, not quite as versatile but they both have good uses. 1-2-3 blocks are good to have and can be found pretty cheap. The most handy jig I have is a piece I had my local fan shop laser cut and form. The jig is 24” long, formed at a right angle, 3-3/16” holes in a row offset from the corner to put me center of 2”, 2.5” and 3” square tubing. Each set of holes is spaced 1” apart down the 24” length. Over time the holes may wallow out a bit, I used mine daily for 7 years and only a few of the holes I ended using often were starting to wallow. So much faster than a combo square and center punch.2a91649656c64478a551b7afb30a6444.jpgd854c38eb85258da1148d84a94744d90.jpg8223e8426a46d69a3802fdaf8600d7f5.jpg4f1e9a181ee8c7d53d5656699c0b2429.jpgh
If there was enough interest, I could have my fab shop make up more of the hole templates.


Sent from my iPhone using Tapatalk
 

Attachments

  • 4f1e9a181ee8c7d53d5656699c0b2429.jpg
    4f1e9a181ee8c7d53d5656699c0b2429.jpg
    140.4 KB · Views: 86
  • 8223e8426a46d69a3802fdaf8600d7f5.jpg
    8223e8426a46d69a3802fdaf8600d7f5.jpg
    661.7 KB · Views: 72
  • d854c38eb85258da1148d84a94744d90.jpg
    d854c38eb85258da1148d84a94744d90.jpg
    711.3 KB · Views: 71
  • 2a91649656c64478a551b7afb30a6444.jpg
    2a91649656c64478a551b7afb30a6444.jpg
    602.4 KB · Views: 83

HenryAZ

MEMBER EMERITUS
Joined
Sep 18, 2012
Messages
1,054
Location
South Congress AZ
I have internal hex drive grub screws in mine also. I’ve not had any issue with them falling through but I have had issues with spatter from the mig clogging the hex or sticking them in place. I try and avoid mig welding on that surface where possible.
I didn't have much of issue until my wife started using the work bench to build rabbit hutches. Lots of hammering to bend over each strand of hardware cloth. Also hammering to finish setting staples, as she was using a hand squeeze type stapler. I bought her a pneumatic stapler and that eliminated all of that pounding on the staples. :)
 

ndnchf

Well-known member
Joined
Jan 9, 2012
Messages
1,556
Location
Fredericksburg, Virginia
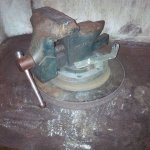
Not really a jig or clamp, but a vise. Its bolted to a heavy brake rotor disc and sits on my welding table. It can be positioned however its needed to hold things. I added a bar to clamp the ground cable too when its not convenient to clamp the piece directly. The jaws were cleaned to bright for good contact.
 

Attachments

  • Discvise.jpg
    Discvise.jpg
    81.7 KB · Views: 241

Ch3No2

Well-known member
Joined
Nov 27, 2009
Messages
356
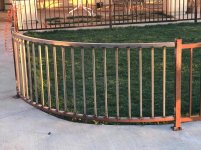
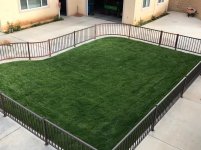
Before and After
 

Attachments

  • Fence Radius 6.jpg
    Fence Radius 6.jpg
    158.8 KB · Views: 318
  • Fence Radius 3.jpg
    Fence Radius 3.jpg
    152.2 KB · Views: 335
To avoid these ads, REGISTER NOW!

bad_idea

Well-known member
Joined
Jun 11, 2011
Messages
4,335
Location
Pasquotank, NC
The most handy jig I have is a piece I had my local fan shop laser cut and form. The jig is 24” long, formed at a right angle, 3-3/16” holes in a row offset from the corner to put me center of 2”, 2.5” and 3” square tubing. Each set of holes is spaced 1” apart down the 24” length. Over time the holes may wallow out a bit, I used mine daily for 7 years and only a few of the holes I ended using often were starting to wallow. So much faster than a combo square and center punch.2a91649656c64478a551b7afb30a6444.jpg

So, what is that jig for? I'm gathering from my context clues it is for center punching holes in square tube. But what are you doing that you need to center punch square tube all the time?

Talking about jigs to layout square tube - I routinely have to cut square tube to length with a grinder. The rolled edges makes it hard to mark with a combo square. I cut off a short piece of angle iron square and use that to mark the line on the square tube. Mark length on square tube, lay angle on tube, mark two sides, rotate tube, lay angle on tube, line up with line on other side, mark, repeat.
 

Attachments

  • 2a91649656c64478a551b7afb30a6444.jpg
    2a91649656c64478a551b7afb30a6444.jpg
    81.4 KB · Views: 117

Ch3No2

Well-known member
Joined
Nov 27, 2009
Messages
356
Nice radius'd fence.

How come it doesn't match the adjacent sections? Your top and bottom rails are in different positions.

Good catch...The posts were installed plumb first and then the squared up rail sections were fit to the posts. This makes the top rail perfectly level and since the concrete has slight fall they don't meet the post at the same height.
 

Attachments

  • Fence Radius 16.jpg
    Fence Radius 16.jpg
    153 KB · Views: 217
  • Fence Radius 13.jpg
    Fence Radius 13.jpg
    154.6 KB · Views: 207

Ch3No2

Well-known member
Joined
Nov 27, 2009
Messages
356
For the future, you should shoot the elevations and add those into your bench layout.

Thanks but since the fall is not drastic I preferred the level top rail.
And your sign off is "the easy way"...lol
 

larry4406

Well-known member
Joined
Jan 27, 2006
Messages
19,581
Location
Northern Virginia
Good catch...The posts were installed plumb first and then the squared up rail sections were fit to the posts. This makes the top rail perfectly level and since the concrete has slight fall they don't meet the post at the same height.

I think many will see but few will notice.

I hope you have a gate to get in there to mow.
 

Ch3No2

Well-known member
Joined
Nov 27, 2009
Messages
356
I think many will see but few will notice.

I hope you have a gate to get in there to mow.

I agree that few will notice or care....besides it's my fence and my yard and I did it my way......yes there is a gate on the far end as evidenced by the mower tracks fresh on the grass by the gardener in the 2nd pic
 

strength_and_power

Well-known member
Joined
Apr 26, 2015
Messages
1,426
So, what is that jig for? I'm gathering from my context clues it is for center punching holes in square tube. But what are you doing that you need to center punch square tube all the time?


Talking about jigs to layout square tube - I routinely have to cut square tube to length with a grinder. The rolled edges makes it hard to mark with a combo square. I cut off a short piece of angle iron square and use that to mark the line on the square tube. Mark length on square tube, lay angle on tube, mark two sides, rotate tube, lay angle on tube, line up with line on other side, mark, repeat.

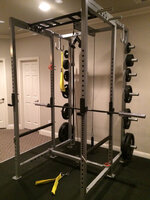

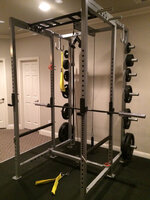
I used to build gym equipment and the initial jig was 7’ long with 40 holes for power racks. The jig pictured evolved from that and was a real time saver. I would clamp the jig on and use my drill press. I’d have friends offer to help and I could set them up at the drill press and with 5 minutes of instruction, they were off and running.fdf339940c54bf5fd5a9a3a7d66f7506.jpg64c4e5bcc968ca382863ec9f65752953.jpg


Sent from my iPhone using Tapatalk
 

Attachments

  • fdf339940c54bf5fd5a9a3a7d66f7506.jpg
    fdf339940c54bf5fd5a9a3a7d66f7506.jpg
    833.3 KB · Views: 136
  • 64c4e5bcc968ca382863ec9f65752953.jpg
    64c4e5bcc968ca382863ec9f65752953.jpg
    757.6 KB · Views: 104

Bigblue&Goldie

Well-known member
Joined
Mar 12, 2009
Messages
10,733
Location
AZ
What tooling were you using to drill all those holes and how many holes did you get per tool before they were dull?
 

strength_and_power

Well-known member
Joined
Apr 26, 2015
Messages
1,426
What tooling were you using to drill all those holes and how many holes did you get per tool before they were dull?


I piloted with a Norseman black and gold 3/16 bit at 980rpm with cutting oil every 3rd or 4th hole. For the finished size (3/4”) I used a Roto Kut Ultra from Kimball Midwest, basically a carbide tipped hole saw that had very little deflection. Cost around $100. Ran it around 450rpm with oil every hole. Did the math on one order where I started with a fresh cutter. That order alone had 12,000 holes and I used the cutter for 6-8 months after that. Cost per hole was fractions of a cent. I tried Norsemans version which was identical in looks, about 2/3s the price but it didn’t last near as long. You can find Chinese cutters on Amazon in metric for cheap but they don’t last. Quickest way to ruin any of the cutters was to spin them too fast or in a hand drill where the pressure isn’t even.


Sent from my iPhone using Tapatalk
 

Bigblue&Goldie

Well-known member
Joined
Mar 12, 2009
Messages
10,733
Location
AZ
I piloted with a Norseman black and gold 3/16 bit at 980rpm with cutting oil every 3rd or 4th hole. For the finished size (3/4”) I used a Roto Kut Ultra from Kimball Midwest, basically a carbide tipped hole saw that had very little deflection. Cost around $100. Ran it around 450rpm with oil every hole. Did the math on one order where I started with a fresh cutter. That order alone had 12,000 holes and I used the cutter for 6-8 months after that. Cost per hole was fractions of a cent. I tried Norsemans version which was identical in looks, about 2/3s the price but it didn’t last near as long. You can find Chinese cutters on Amazon in metric for cheap but they don’t last. Quickest way to ruin any of the cutters was to spin them too fast or in a hand drill where the pressure isn’t even.


Sent from my iPhone using Tapatalk

That's incredible tool life!
 

strength_and_power

Well-known member
Joined
Apr 26, 2015
Messages
1,426
That's incredible tool life!


Yeah, I found Kimball Midwest totally by accident. Bought a 1” roto kut off of EBay from a private seller and it had the Kimball Midwest name on it. Their website was a PITA but I could email the sales rep who usually responded within the hour and my orders would ship the same day. Another nice benefit of them is that their size increments are 1/16”. 3/4” sch40 pipe fit perfectly in a 1-1/6” hole and 1.5” sch40 fit in a 1-15/16” hole.


Sent from my iPhone using Tapatalk
 

ShuhornGarage

Active member
Joined
Mar 22, 2016
Messages
41

Attachments

  • 20200330_180603_HDR.jpg
    20200330_180603_HDR.jpg
    344.6 KB · Views: 150
  • 20200424_164706.jpg
    20200424_164706.jpg
    351.2 KB · Views: 149
  • 20200509_120920.jpg
    20200509_120920.jpg
    360.5 KB · Views: 147
  • 20200617_155700_HDR.jpg
    20200617_155700_HDR.jpg
    382.9 KB · Views: 148
  • 20210519_191930.jpg
    20210519_191930.jpg
    438.6 KB · Views: 149
  • sheet metal welding clamp-jig.jpg
    sheet metal welding clamp-jig.jpg
    198.6 KB · Views: 151
  • 20200420_194332.jpg
    20200420_194332.jpg
    296.2 KB · Views: 188

mike528

Well-known member
Joined
Dec 20, 2014
Messages
503
Location
Shelby county Ohio
Yeah, I found Kimball Midwest totally by accident. Bought a 1” roto kut off of EBay from a private seller and it had the Kimball Midwest name on it. Their website was a PITA but I could email the sales rep who usually responded within the hour and my orders would ship the same day. Another nice benefit of them is that their size increments are 1/16”. 3/4” sch40 pipe fit perfectly in a 1-1/6” hole and 1.5” sch40 fit in a 1-15/16” hole.


Sent from my iPhone using Tapatalk
do you have to have a "company" to set up an account or can an individual set up an account with them?
 

ShuhornGarage

Active member
Joined
Mar 22, 2016
Messages
41
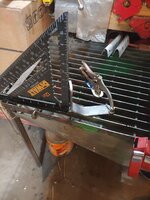
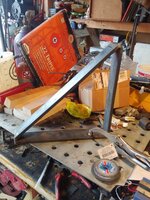
Just came across your post for jigs & not sure if you're looking for more but here's a few if you're interested & don't already have something similar, I hope you find them useful
Cheers
Norm
 

Attachments

  • 20200529_165548_HDR.jpg
    20200529_165548_HDR.jpg
    730.9 KB · Views: 103
  • 20200604_192636.jpg
    20200604_192636.jpg
    622.6 KB · Views: 101
  • 20200420_194351.jpg
    20200420_194351.jpg
    546.6 KB · Views: 99
  • 20200420_194332.jpg
    20200420_194332.jpg
    627.3 KB · Views: 96
  • 20200424_164706.jpg
    20200424_164706.jpg
    677.9 KB · Views: 133

Cap'n Coldeye

Well-known member
Joined
May 23, 2016
Messages
46
Location
Western Washington
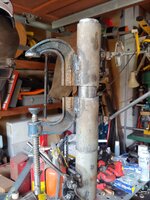
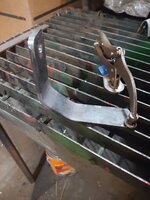
Right on. Great ideas. Here is one I made when I first started welding. I roughed up the smooth ball bearings and got it to hold 8 lbs. I thought about letting the bearings rust for more fiction, but it worked good enough with the sand paper treatment. Eventually I traded the center bolts out with some T bolts.

Cheers
 

Attachments

  • 20170618_232927.jpg
    20170618_232927.jpg
    1.6 MB · Views: 88
  • 20170618_232937.jpg
    20170618_232937.jpg
    651.3 KB · Views: 85
  • 20170618_233007.jpg
    20170618_233007.jpg
    804.9 KB · Views: 81
  • 20170618_233012.jpg
    20170618_233012.jpg
    1.6 MB · Views: 76
  • 20170618_233022.jpg
    20170618_233022.jpg
    1.4 MB · Views: 85
Last edited:
To avoid these ads, REGISTER NOW!
Top Bottom