To avoid these ads, REGISTER NOW!

Post your "Re-purpose" suggestions here!

ChristopherLutz

Well-known member
Joined
Jun 17, 2010
Messages
270
Location
Flower Mound, TX (DFW)
After seeing some great pics of clever ideas...and recently inspired by "Budget Bench Build" - I thought I'd start a thread to collect great "re-purpose" ideas.

Hopefully, the ideas will inspire others. Sadly, I have nothing to start us off. I'm not a saver...and, a 2 year old has more patience than I do...though, after seeing some of the wonderful transformations, I'm starting to take a deep breath and challenge myself!

PS: Happy 4th - and thanks to all the service men and women who continue to make this the greatest country ever.
 
To avoid these ads, REGISTER NOW!

brats.n.harleys

Well-known member
Joined
Nov 10, 2009
Messages
316
Location
Portage, IN
you mean something like this.

airfilter.jpg


Was a small 2 gallon air compressor, now is a desicant dryer for my 60 gallon compressor, turned it sideways, welded the feet on the bottom, welded a bung on the top, has 25 lbs of dessicant in it for bone dry air.

Not sure if this applies either but off a 40's +- sewing machine, now the backrest in my sissy bar.

Picture129.jpg


not sure if thats even what you mean, prob have better examples at home but im at work.
 

rsanter

Well-known member
Joined
Dec 22, 2007
Messages
18,493
Location
visalia ca
turned a used refrigerant tank into a pressure pot sand blaster for the blast cabinet.
the 16ga sheetmetal for the cabinet was scrap from a place I used to work.
the lexan window was scrap from the same place I used to work
the window screen used to keep the sand off the lexan was a curbside pickup

bob

View media item 2675
 
OP
C

ChristopherLutz

Well-known member
Joined
Jun 17, 2010
Messages
270
Location
Flower Mound, TX (DFW)
EXACTLY the kind of thing I'm referring to.

Now, next time I run across a small air tank....I'll have an idea! That singer sissy is really cool.

RSanter - did you have to buy all the blaster components?...that sure is a nice sized cabinet. I could have used that (still can) - I'm hot rodding a 65 chevy truck from the frame. first time build....some lessons are expensive :(
 

brats.n.harleys

Well-known member
Joined
Nov 10, 2009
Messages
316
Location
Portage, IN
Made my blaster pot too, 30 gallon tank. Took about 50 dollars and tons of trial and error to get it to blast right with the right mixture of air/media.

sandblaster4.jpg


sandblaster3.jpg


sandblaster2.jpg
 

Boyd Who

Well-known member
Joined
Oct 15, 2007
Messages
1,080
Location
Manitoba
Take one worn-out, non working dishwasher...
8357.JPG


Gut the insides and install a fixed shelf at the bottom and a pull-out shelf where the top rack would go...
8358.JPG


And you have a cool, portable small workbench with storage!
This wasn't my idea, I bought it at an auction. :)
 

jabberwoki

Well-known member
Joined
May 1, 2009
Messages
6,459
Location
puyallup wa usa
my contrubutions

Great thread! here is my first entry. My welding table made from a professional kitchen dish kart it already and a protective rubber strip aroung the top edge and 4 swivel casters so it can turn in it`s own space and is very sturdy. So i added a top steel plate made some internal sturctures to hold every thing in place and used the diamond plate of a damaged truck tool box and used velcro and canvas sides for easy access.Then topped it off with an old chrsyler firedome v8 emblem for the finishing touch!
 

Attachments

  • tblfront.jpg
    tblfront.jpg
    85.7 KB · Views: 181
  • tblrear.jpg
    tblrear.jpg
    41.1 KB · Views: 171
  • tblside.jpg
    tblside.jpg
    69.7 KB · Views: 149
  • tbl1.jpg
    tbl1.jpg
    74 KB · Views: 145
  • tbl.jpg
    tbl.jpg
    10.8 KB · Views: 129
Last edited:

jabberwoki

Well-known member
Joined
May 1, 2009
Messages
6,459
Location
puyallup wa usa
next entry

My (bondo bench) made from a sleeping bunk out of a semi truck. Has a nice sturdy aluminium frame and folds up when not in use.
 

Attachments

  • bench.jpg
    bench.jpg
    87.2 KB · Views: 289
  • bench1.jpg
    bench1.jpg
    75.5 KB · Views: 264

rieferman

Well-known member
Joined
May 18, 2009
Messages
2,586
Location
Collegeville PA (30 min west of Philly)
Just finished this the other day.. The "re-purpose" in this case is fairly obvious, but I was happy with the budget side of it. 2 misordered solid core, oak wrapped doors... normally $100 each.. my cost = $10 total.. and now I have a nice table surrounding the table saw.
 

Attachments

  • table saw outfeed front.jpg
    table saw outfeed front.jpg
    56.4 KB · Views: 387

z28toz06

Well-known member
Joined
Nov 30, 2005
Messages
1,012
Location
Connecticut
Take one worn-out, non working dishwasher...
8357.JPG


Gut the insides and install a fixed shelf at the bottom and a pull-out shelf where the top rack would go...
8358.JPG


And you have a cool, portable small workbench with storage!
This wasn't my idea, I bought it at an auction. :)


Red Green, The king of repurposing!!!

 
Last edited:

daveroy

Well-known member
Joined
Sep 4, 2009
Messages
735
Location
Omaha NE
I don't have any pictures (yet), but our last gas grill bit the dust when replacing rusted out burners and reflectors cost more than a new grill. So I pulled the 'grill' off and removed the side burner (etc). Basically took it down to the rolling frame. Cleaned it up with some simple green and some water. cut a piece of scrap 1/2" Ply for the top and 1/4" ply for the bottom, and now its a light weight roll around work surface.
 

y20dth

Well-known member
Joined
Feb 20, 2010
Messages
698
Location
Antwerp, Belgium
Was a small 2 gallon air compressor, now is a desicant dryer for my 60 gallon compressor, turned it sideways, welded the feet on the bottom, welded a bung on the top, has 25 lbs of dessicant in it for bone dry air.


not sure if thats even what you mean, prob have better examples at home but im at work.

What kind of dessicant did you put in ?
 

Tylerb43

Well-known member
Joined
Mar 10, 2006
Messages
122
Location
Union, MO
Cool thread idea guys!

I helped a friend move and he was gonna toss a lamp table. Well I saved the metal legs (cool design) and made a welding cart. The "tank dish" is an air-brake canister top from a tractor-trailer, and the casters were left over from a roll-around that I bolted to the wall. Still have to make the cord holders, but it'll get there :)
 

Attachments

  • IMG_6133.jpg
    IMG_6133.jpg
    135.8 KB · Views: 231
  • IMG_6114.jpg
    IMG_6114.jpg
    132.2 KB · Views: 220

Cryptic1911

Well-known member
Joined
May 24, 2008
Messages
2,884
Location
Willimantic, CT
We ended up with a broken old black & decker shop vac that had wheels and a metal canister.. I took the top plastic piece off and tossed it, and used the metal canister w/ wheels to hold a 5gal bucket full of speedy dry. Works great, just roll it over to the mess and start scooping!.

don't have a great pic, but you can see part of it in this pic.. I had stuck the plastic speedy dry bag over the top because it was piled a little too high and I didn't want to blow it off the top

web.jpg
 
To avoid these ads, REGISTER NOW!

Jack Olsen

Super Moderator
Staff member
Joined
Mar 22, 2009
Messages
6,678
Location
Los Angeles
I've got one thing that I keep re-purposing.

Maybe 15 years ago, before I owned a welder, I took a catalog page with some bookshelves down to Mexico for a shop to reproduce. The work was very inexpensive, but I had to haul all the pieces back stacked on top of my Jeep and I had to put together the wood shelves (distressing, staining, varnishing) by myself. Still, it was a huge amount of furniture for very little money and the stuff served me well for a long time.

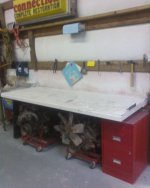
Three years ago I cleaned up my garage. By then, the old bookcases were part of the clutter sitting where I was supposed to park my car. I painted over the stain on two of them and used them to hold stuff in the garage. The long and low one got a piece of plywood put on top of it. The top piece was hinged so it could function as either a desk or a kind of drafting table.

Olsen_GarageCLR.jpg


07+Drafting1204948651.jpg


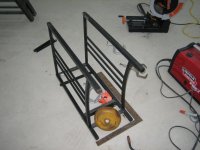
Then I replaced both of them with other kinds of storage (thanks to this board, of course), and the low and long shelving unit got stuck back behind the garage. But I also had a lot of leftover steel in the same place, so I flipped the steel skeleton of the shelving unit upside-down and cut off the face section, curling up the 'arms' I'd created with a pipe wrench.

repurposedshelves.jpg


Then I duplicated those pieces with what was left of the face. Here it is in the vise.

visehold.jpg


The center section stands on its own, but I welded a T-shaped foot to the pieces I made out of the face. They would function as the rack pieces I could position out on either side. I used those leftover ends you see on the floor there. They were from the canopy shade cover I made from the patio last month.

Here's my poor man's welding positioner.

poormanspositioner.jpg


And here's the rack in position. It leans back against the house. You can see I also added some little gussets for strength.

rackinplace.jpg


I'm going to put some rubber caps on the ends soon -- probably just as soon as I cut my leg open while walking past it. :wtf:

But wait -- there's more:

The pieces I didn't use for the rack (basically 14" steel dowel rods) ended up becoming useful for moving heavy things in and out of the bed of my Jeep.

THIS VIDEO shows how easy they make it to move a 500-pound engine in a crate.

<object style="height: 390px; width: 640px"><param name="movie" value="http://www.youtube.com/v/rVrOFeE3cr8?version=3"><param name="allowFullScreen" value="true"><param name="allowScriptAccess" value="always"><embed src="http://www.youtube.com/v/rVrOFeE3cr8?version=3" type="application/x-shockwave-flash" allowfullscreen="true" allowScriptAccess="always" width="640" height="390"></object>
 

Holedgr

Well-known member
Joined
Jun 21, 2006
Messages
358
Jack....you have just convinced my to buy one of those elevating tables with that video...Outstanding work....I keep laughing when the crate started to roll back a few times...


-T
 

Jack Olsen

Super Moderator
Staff member
Joined
Mar 22, 2009
Messages
6,678
Location
Los Angeles
Yeah, the clanging and dropping bars wouldn't have filled me with confidence if I'd hired movers for the box. But I knew they would drop out at the end of the table and at the gap between the gate and the rest of the Jeep.

The motor was what finally pushed me over the edge on buying the table. I've already used it more than I thought I would. Without it, the engine move would have involved a lot of 2" increments with a jack, then a 2x4 slid into place, then another 2" -- and so on and so on.

I built a wood ramp (like you used to jump your bike or skateboard off of when you were a kid) to slide stuff up to the 11" level that the table lowers to. From there, you can put things up on a bench or into the truck.
 

JC23

Well-known member
Joined
Dec 31, 2009
Messages
11,718
Location
Northcoast
tyztoys,

That welding cart is really clever. Now you don't have to reach over the welder to open and close the valve on the clyinder. Smart!
 

Ray-CA

Well-known member
Joined
Jan 6, 2007
Messages
3,451
Location
San Diego CA
Not quite as inventive as all of you , but here is mine. A friend was going to toss out an old wall mount cabinet so I rescued it and turned it into this:

Ray
 

Attachments

  • 100_2030.jpg
    100_2030.jpg
    137.3 KB · Views: 272
  • 100_2031.jpg
    100_2031.jpg
    121.7 KB · Views: 466
  • 100_2032.jpg
    100_2032.jpg
    135.5 KB · Views: 510

sberry

Banned
Joined
Jun 18, 2005
Messages
35,747
Location
Brethren, Michigan
This is about an every day deal here.
 

Attachments

  • septic.JPG
    septic.JPG
    76.8 KB · Views: 438
  • Hobart cart.JPG
    Hobart cart.JPG
    52.6 KB · Views: 1,986
  • Grill cart.JPG
    Grill cart.JPG
    45.5 KB · Views: 1,187
  • weld booth 3.JPG
    weld booth 3.JPG
    57.2 KB · Views: 446
  • chop bench1.JPG
    chop bench1.JPG
    31.2 KB · Views: 476

R6 Racer

Well-known member
Joined
Feb 21, 2010
Messages
1,632
Location
Northern Ontario Canada
Hey Brats n Harleys is there only one opening in the tank you used for your decent drier?


airfilter.jpg


I have an old "Scott" air tank that I would like to do the same thing with.
Any type of a more detailed description would be great!
You can pm me if thats better.

Thanks
Steve
 

Torque1st

MEMBER EMERITUS
Joined
Sep 14, 2008
Messages
5,668
Location
KC Metro, Kansas
Hey Brats n Harleys is there only one opening in the tank you used for your decent drier?


I have an old "Scott" air tank that I would like to do the same thing with.
Any type of a more detailed description would be great!
You can pm me if thats better.

Thanks
Steve

It would need two openings so the air can flow through the desiccant in order to work.
 

bobadame

Well-known member
Joined
Dec 26, 2007
Messages
1,124
I bought this winch for my small tilt bed trailer. There is no free spooling mechanism with this winch so I decided to use another type for the trailer. However this worm geared type winch would make a cheap low clearance hoist. The ball bearings were salvaged from Harbor freight lower English wheel anvils.
 

Attachments

  • PA140059.jpg
    PA140059.jpg
    139 KB · Views: 173
Last edited:

krooser

Well-known member
Joined
Jun 3, 2005
Messages
2,377
Location
Waupaca, Wisconsin
Just who the heck came up with this new word 're-purposed'?

Kinda wondering what happened to recycled or reused... damn near everything in my shop has been recycled from some other purpose...
 
To avoid these ads, REGISTER NOW!
Top Bottom