To avoid these ads, REGISTER NOW!

Powder Coating Help

Mziggy16

Active member
Joined
Nov 26, 2015
Messages
33
Location
St. Louis, MO
Hey All -

For those with any powder coating experience, I have some questions. First a quick background...

I'm restoring 3 1980's metal Tonka trucks for my kids. Last winter I did the front loader and rattle canned it - it turned out great, but I wanted a more durable finish on these 3 and decided to teach myself to powder coat.

All of the vehicles were sandblasted last week. To prep for powder I blew them off with compressed air and wiped down each piece with Denatured Alcohol - following the guide on powdercoatguide.com

Following the cleaning I hang the piece, ground it and spray (HF gun / Eastwood Powder) and then transfer it to a toaster oven and cook at ~450 until it flows and then 400 for 20 minutes.

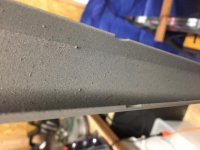
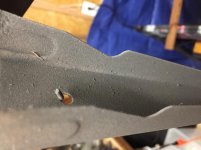
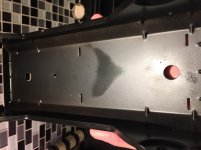
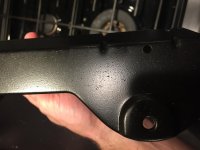
I've done a handful of pieces, all black, and each has turned out with issues. Fortunately these are mostly hidden pieces (chassis) so it's not a huge deal and I can sand out some imperfections. However, I need to get a consistent finish for the next pieces and especially once I spray yellow.

Issues (see images) - Semi-gloss finish is a mix of semi gloss and matte. Also, these are tons of sandpaper-like rough bumps in the finish.

Any advice is greatly appreciated.

-Mike
 

Attachments

  • IMG-0316.jpg
    IMG-0316.jpg
    144.1 KB · Views: 127
  • IMG-0317.jpg
    IMG-0317.jpg
    145.8 KB · Views: 137
  • IMG-0318.jpg
    IMG-0318.jpg
    139.6 KB · Views: 121
  • IMG-0319.jpg
    IMG-0319.jpg
    138.7 KB · Views: 130
To avoid these ads, REGISTER NOW!

ovrrdrive

Well-known member
Joined
Sep 13, 2015
Messages
642
Location
Central Florida
Looks like contamination to me honestly... Maybe oil or water in the air, or maybe the part isn't clean enough or degreased. Most of what I do is on new cold rolled steel so I don't usually blast, but I grind, degrease, wipe with DA, torch, outgas, cool then coat. I have a copper manifold on the output of the compressor, then hf refrigerated dryer, then to the gun. My Eastwood gun also has a little inline filter on the input but I didn't bother with that on the hypersmooth.

Clean dry air, cleaned and dried again, clean part, make sure to outgas. I like to torch them too to get all the paper towel lint and burn off any leftover oil too.

What does your air look like?

It could also be a bad batch of powder. Lately people are telling to stay away from the eastwood stuff.
 
OP
M

Mziggy16

Active member
Joined
Nov 26, 2015
Messages
33
Location
St. Louis, MO
Thank you for the comment.

Air is coming directly via a Craftsman pancake compressor to the HF gun.

I haven't been outgassing or torching prior.

Maybe I will swap out the black for yellow and see if the yellow finish looks any different.

One note - When I spray it seems like its kind of hard to get the powder to adhere to the part (again, I'm new at this, so it may be normal), but I'm doing several passes at a slow pace to get coverage. The first few thin coats look normal but once the powder builds up a little bit I can kind of see what looks to be static-looking pieces of powder coming off the piece. Hard to describe, but may indicative of something.

Thanks again for the help.
 

pepi

Well-known member
Joined
Mar 27, 2013
Messages
2,883
Location
Woodstock, GA
Aw so you went with the power .... going to fun fixing that..... Rust-Oleum, easy to use, easy to repair your mistakes..
 

Stadger

Well-known member
Joined
Nov 19, 2016
Messages
483
The parts should be baked before applying powder. This helps burn off any contaminates or moisture in the pores of the metal. Let cool, apply powder and final bake.
 

tarbellb

Well-known member
Joined
Apr 17, 2011
Messages
5,734
Location
Oregon
Running straight from the compressor to the gun.... likely have moisture in the lines/tank.

Grab a cheap inline filter at minimum. Also sand, wipe, and prebake those pieces.
 

Steelerz1

Member
Joined
Jan 2, 2015
Messages
14
Hey I am a powder coating rookie too. My guess is water in your air as well. My parts came out really nice but I am currently using a Craftsman electric gun that I bought on Ebay. They don't make them anymore but it has worked well for me. I didn't have a good compressor and wanted to try powder coating without spending a lot of money. I would second the comments about outgassing/pre-baking parts first.
One other suggestion I would offer is to try a wrinkle finish powder on parts that don't need to be glossy and perfect as it came out really well for me and helps hide any imperfections in the piece. Here is a pic of one of mine. Good luck!

Tim

powdercoat1.jpg


http://www.powdercoatguide.com/p/craftsman.html
 
OP
M

Mziggy16

Active member
Joined
Nov 26, 2015
Messages
33
Location
St. Louis, MO
Thanks Tim!

Does location in the oven make a difference? Most of my parts sit higher up in the oven, which is probably hotter than the center. Would higher temps cause any of these issues?
 

Steelerz1

Member
Joined
Jan 2, 2015
Messages
14
I actually lucked up and a friend of mine was getting rid of a full sized built in oven. I use it and just use hanger to suspend the parts as close to the middle as possible. One thing that might help is to pick up a cheap infared thermometer /scanner from harbor freight....pretty cheap with a coupon and they give you an accurate reading of the part temp. When I did my first couple parts I just pre-heated oven and then threw them in when it reached proper temp.. However you are supposed to bake the part at the required temp for the required time. I was just throwing a cold part in and leaving for the specified time which was wrong. Now I shoot the part and when it has reached proper temp, then start my timer. You may already be doing that.
Not sure about the higher temps causing issue but I would want to keep them as close to reqs as possible? One other thing...I pulled the parts out immediately when the timer was off and then would hang them up to cool. One time I dropped a part and dented it /damaged the powder coat when removing from oven. I was griping to a friend about it and he was like "why not turn the oven off and let it cool in the oven before removing?" I was like duh! lol So now I just open the door on the oven and turn it off when time is up. After 20-30 min or so you can pull out the part and not worry about touching it against sides or what not.

One other thing about the powder not adhering well to the part....make absolutely sure your ground is good or the powder will not stick well. Make sure your hangers and the rod are clean from powder residue etc.
 
Last edited:

gordo9742000

Well-known member
Joined
Mar 3, 2010
Messages
548
Location
Mass
I'm using an Eastwood gun. I always prebake my parts at a higher temperature than what the powder needs to flow out for usually 30 minutes. Then pull them out and spray when hot. Powder sticks so much better when hot. I'm just an amateur doing tractor parts but it works for me. No problems yet.
 

MBfreak

MEMBER EMERITUS
Joined
Dec 10, 2010
Messages
2,301
Location
Linkoping , Sweden
We have a real pro on this board.
Cuda Chick is doing absolutely top of the line work.
Totally impressive. I have seen some of her work IRL. Wow!!
Send her a PM, and she will most probably help you out .

Ola
 

bushmechanic

Well-known member
Joined
Mar 17, 2014
Messages
4,820
1: Degrease and prep (you'll learn quickly that apparently everything in the universe is covered in grease :lol: )

2: Blast (using finest/gentlest media you have, because it does remove material)

3: Bake (careful putting thin, complex shapes in the oven. Heat it slow)

4: Repeat steps if required; often a phosphate wash is used

5: Coat

They're right about the contamination. It doesn't take much at all to ruin a whole panel when powder coating. Everything from the powder to the air has to be dry and contaminant-free.

If it's not, you'll get flaking, peeling, dusting, fish eyes, or just what you're seeing in those pictures.

Powder can be a harsh mistress. It's kind of like an on/off switch, or alfredo sauce. Either it's great, or it's terrible. There's rarely any room between them.
 

handymancanfixit

Well-known member
Joined
Aug 25, 2014
Messages
57
Location
Winston Salem, NC
Definitely sounds like contamination on the part or oil/moisture in the air. Harbor Freight sells cheap inline desiccant filters. Pre-baking the parts at 500°F will remove nearly any contaminates except silicone based stuff. After your parts are cleaned and/or baked, don't touch them with bare hands or anything that has been washed dried with fabric softener. Fabric softener leaves a lubricant in fabric that can rub off on your parts, some softeners even use silicone based compounds.

As with any other type of coating process, proper cleaning and part prep are the keys to success. That and a clean application process, no oil or water in your air.

Experiment with something that doesn't matter like a piece of old sheet metal.
 
OP
M

Mziggy16

Active member
Joined
Nov 26, 2015
Messages
33
Location
St. Louis, MO
UPDATE:

I had a chance to make the changes discussed earlier in the thread:

- Added an inline moisture filter
- Pre-baked at 450 for 30 minutes
- Used clean, powder-free gloves to handle the metal
- Emptied the compressor of any water (there was not any)

The results are the same (see the last image).

Of interest though - the metal was clean before powder, but the first 3 attached images (grey-ish looking) are of the metal AFTER powder was applied. Notice the clear imperfections in the powder. Then the last picture shows the after when everything bakes in the finish.

HELP!!!
 

Attachments

  • IMG-0328.jpg
    IMG-0328.jpg
    141 KB · Views: 80
  • IMG-0327.jpg
    IMG-0327.jpg
    138.6 KB · Views: 71
  • IMG-0326.jpg
    IMG-0326.jpg
    139.9 KB · Views: 68
  • IMG-0325.jpg
    IMG-0325.jpg
    143.5 KB · Views: 78
Last edited:
To avoid these ads, REGISTER NOW!

gordo9742000

Well-known member
Joined
Mar 3, 2010
Messages
548
Location
Mass
What are all the sticks and twigs in the powder? It should look like velvet after spraying and before baking.
 

Steelerz1

Member
Joined
Jan 2, 2015
Messages
14
I agree with Gordo...my powder looks like a nice velvet coating before I bake. Not sure what that gunk is that's spraying out of your gun? :dunno:
 
OP
M

Mziggy16

Active member
Joined
Nov 26, 2015
Messages
33
Location
St. Louis, MO
What are all the sticks and twigs in the powder? It should look like velvet after spraying and before baking.

That's what I can't figure out!

The metal is clean when I hang it. Then I start spraying and those twig-looking things accumulate. They aren't in the raw powder. Could static be attracting sawdust from inside the shed?

The weird thing is that I can see those things forming as I'm layering on the powder.
 

kkroger

Well-known member
Joined
Apr 21, 2013
Messages
1,143
Did you wipe with a rag or paper toweling before powder? I usually burn all the edges with a torch before I powder to keep the **** to a minimum. Blow it off, with Clean Dry Air, then play a torch across it to burn off the fuzzies then blow it again and spray.
 

Chicken

Well-known member
Joined
Jan 3, 2015
Messages
129
Location
NC
maybe shoot some powder as a 'test sample', onto a piece of cardboard or paper. Does it come out smooth? I know it wont properly stick but maybe the gun is not dispersing it evenly? Those pics really do look like there is foreign debris in the powder.

I too am a rookie with HF kit and a toaster oven. I only use it for smalls bits [obviously with oven size] but they look like velvet as others are describing.
 
OP
M

Mziggy16

Active member
Joined
Nov 26, 2015
Messages
33
Location
St. Louis, MO
*UPDATE*

CudaChick1968 aka Leanna saved my tail!

First off - if I ever have anything of actual value (IE: A visible or important car part), it's going to Leanna at Phoenix Specialty Coatings and I recommend that you check it out and give her your business. She's a true pro and I'm grateful for her expertise and willingness to share her craft with a rookie. :bowdown:

The bottom line in all of this is - make SURE the parts are 100% clean and contaminant free before spraying powder. Don't trust all the advice you read online - there is plenty of misinformation on this topic. The pros know it best. Don't skimp on the prep.

Good luck to all, and when in doubt, just send your parts to Phoenix Specialty Coatings
 

Attachments

  • unnamed-1.jpg
    unnamed-1.jpg
    134.2 KB · Views: 68
Last edited:

gordo9742000

Well-known member
Joined
Mar 3, 2010
Messages
548
Location
Mass
So what was the twig debris? Was it clumping powder or was it cleaning material left over or something else? I'm curious.
 
OP
M

Mziggy16

Active member
Joined
Nov 26, 2015
Messages
33
Location
St. Louis, MO
So what was the twig debris? Was it clumping powder or was it cleaning material left over or something else? I'm curious.

Those were tiny little fibers (not visible pre-powder) left on the substrate from the cotton/shop towels I was using to wipe on the denatured alcohol. Then, when coated with powder, they were visible and looked like fuzzy little twigs. Now that the towels are out of the process the finishes are nice and smooth.

Also, on the pieces that needed lots of refinishing, I sanded, cleaned, heated the pieces and hit them hot with another layer of powder and baked that on to fix the blemishes. Not 100% perfect, but significantly better finish than before.
 

kkroger

Well-known member
Joined
Apr 21, 2013
Messages
1,143
Those were tiny little fibers (not visible pre-powder) left on the substrate from the cotton/shop towels I was using to wipe on the denatured alcohol. Then, when coated with powder, they were visible and looked like fuzzy little twigs. Now that the towels are out of the process the finishes are nice and smooth.

Also, on the pieces that needed lots of refinishing, I sanded, cleaned, heated the pieces and hit them hot with another layer of powder and baked that on to fix the blemishes. Not 100% perfect, but significantly better finish than before.

Called it... By the way the procedure is OK but can't be used on everything, I have to clear coat bare steel a lot and if I followed that procedure on it there would be ALL KINDS of issues.
 

CudaChick1968

Member Emeritus
Joined
Jul 1, 2011
Messages
1,800
Location
Northwest Tennessee (38230)
Wow, that made a HUGE difference! I see you still have a little orange peel but that's more likely your toaster oven than any "outside" influences. If the powder coating fire is ignited in you now like I suspect it may be, you might consider getting a dedicated shop oven for future projects -- you can pick up one on Craig's List for under $50 -- and it'll help with that.

Thank you most sincerely for the kind words! I admit it, I can't devote a ton of time to helping everyone or I wouldn't get my own work finished. But I'm truly happy that we had a chance to talk, investigate the cause of your issues and apparently get them solved. Between the rag-wiping and microscopic airborne contaminants, you had some serious nastiness going there but it seems to have worked out for the best. Just like I tell my customers, if YOU'RE happy that's all that really matters in the end.
 
To avoid these ads, REGISTER NOW!
Top Bottom