To avoid these ads, REGISTER NOW!

Power dory build

VictorBravo

Well-known member
Joined
Jul 13, 2014
Messages
321
Location
Asotin County, Washington
Last boat I built was around 15 years ago when we lived on Vashon Island, WA. It was my "scrap wood dory" that I pieced together roughly based on the Phil Bolger's Windsprint, but with more rocker and a transom. I still have it, but she is showing her age.

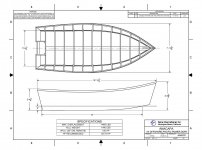
So now we live in far southeastern Washington near the Snake River. After spending half a year doing a total remodel, and the next few years getting on my feet with a solo law practice, I finally started noticing the beautiful water we have around here. I decided I needed to build another boat. After a month or so of research, I've settled on the Spira Anacapa.

http://spirainternational.com/hp_anac.php

I'll probably want to put a small cabin on it for winter (and shade in the summer), so I decided against the lower-sheered Albion. I may want to go upriver on the Snake. The dory looked pretty suitable for that.

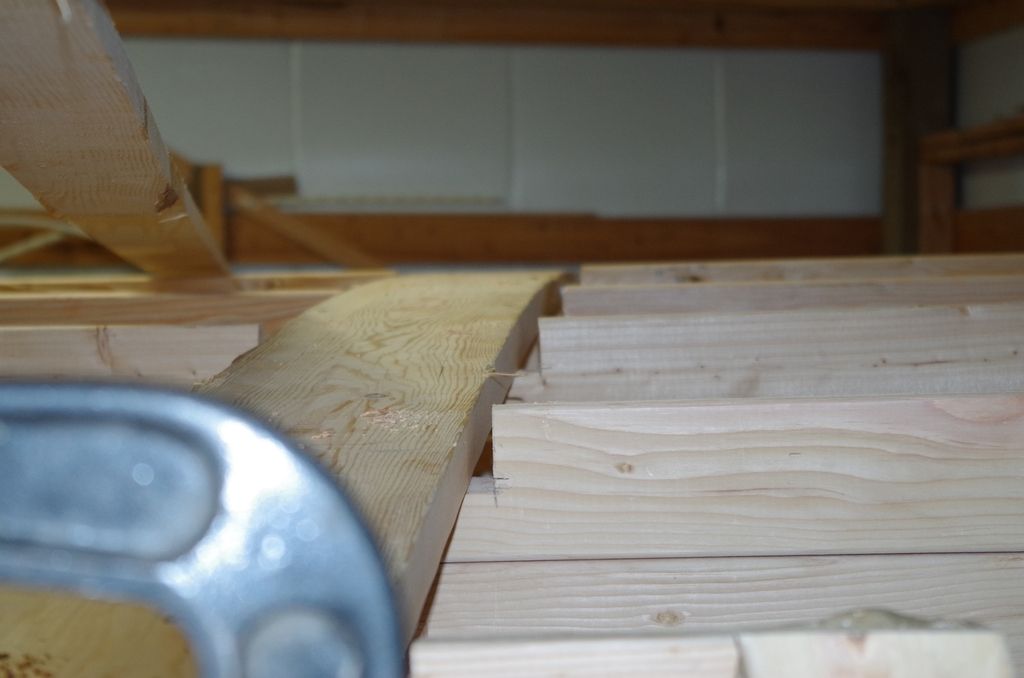
I started by scarfing some 2X8s for the keelson. I needed around 20+ feet. I tried using a router and a jig, but my router just wasn't cooperating. I found that there were embedded staples in the wood--ouch. I was wondering why the router bit was jumping all over.

So I screwed a piece of plywood on a circular saw base and ran cuts along a sloped jig to cut out the staples. Once I made enough cuts to establish the proper scarf angle, I power planed the rest.

saw%20with%20jig_zpsahgdkojz.jpg


powerplane_zpssdfve9lq.jpg


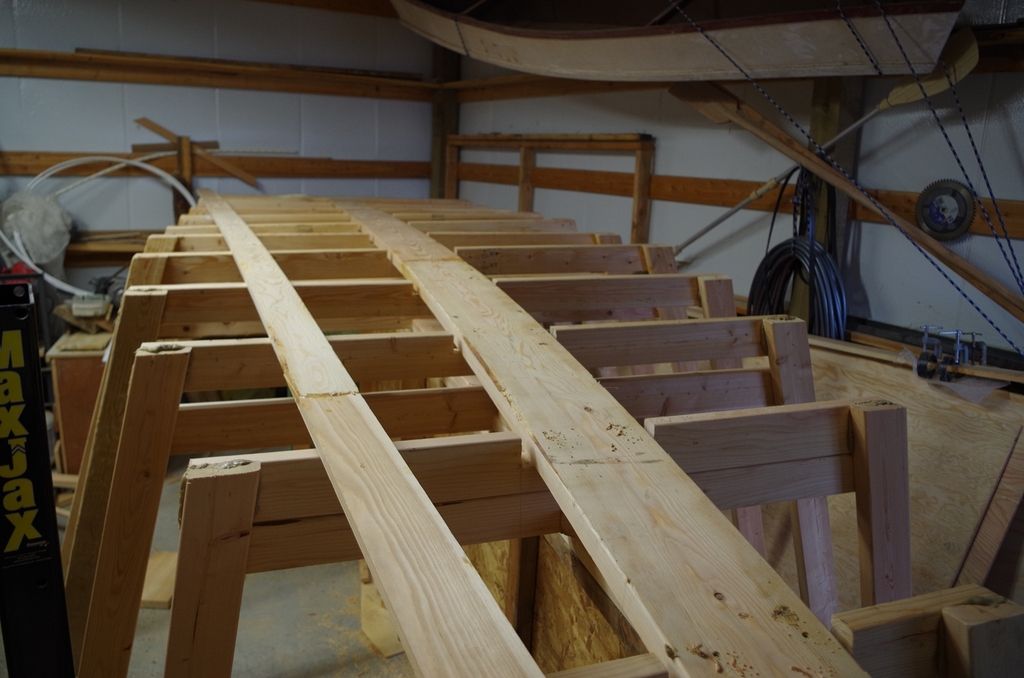
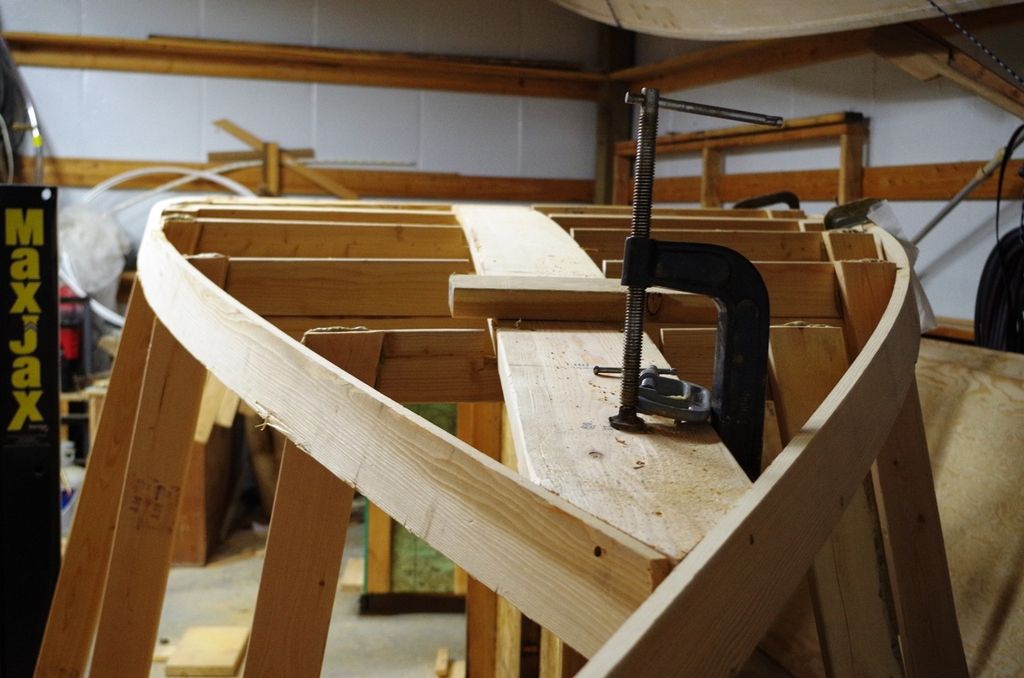
I glued the 2X8s using the strongback I built earlier.


scarf_zpsbld9chlt.jpg


strongback%20and%20scarfing_zps4qt9rigs.jpg


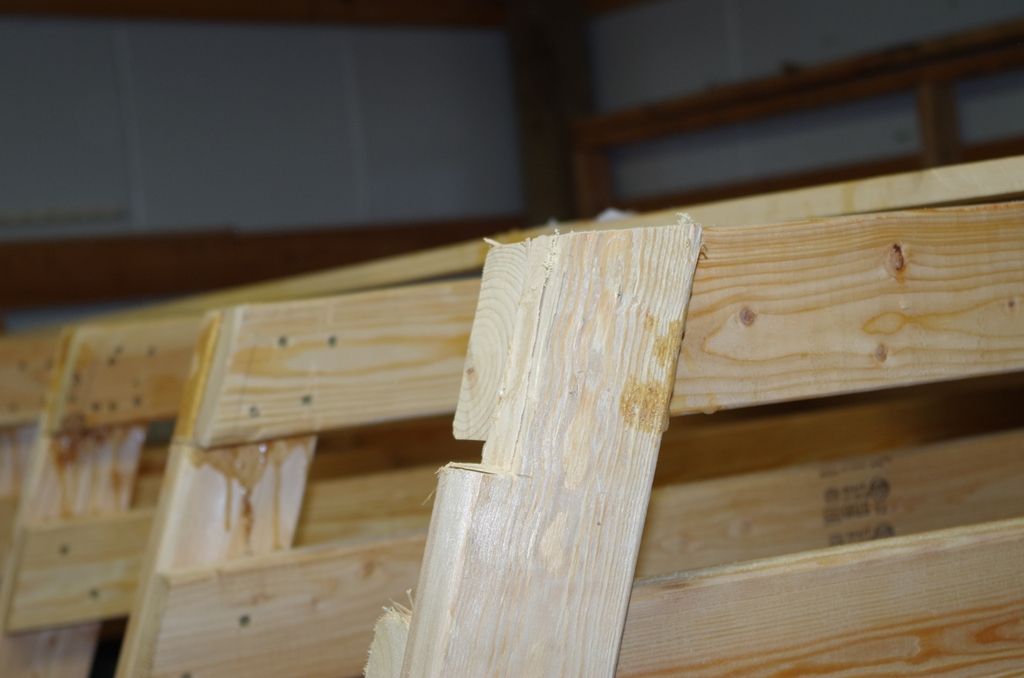
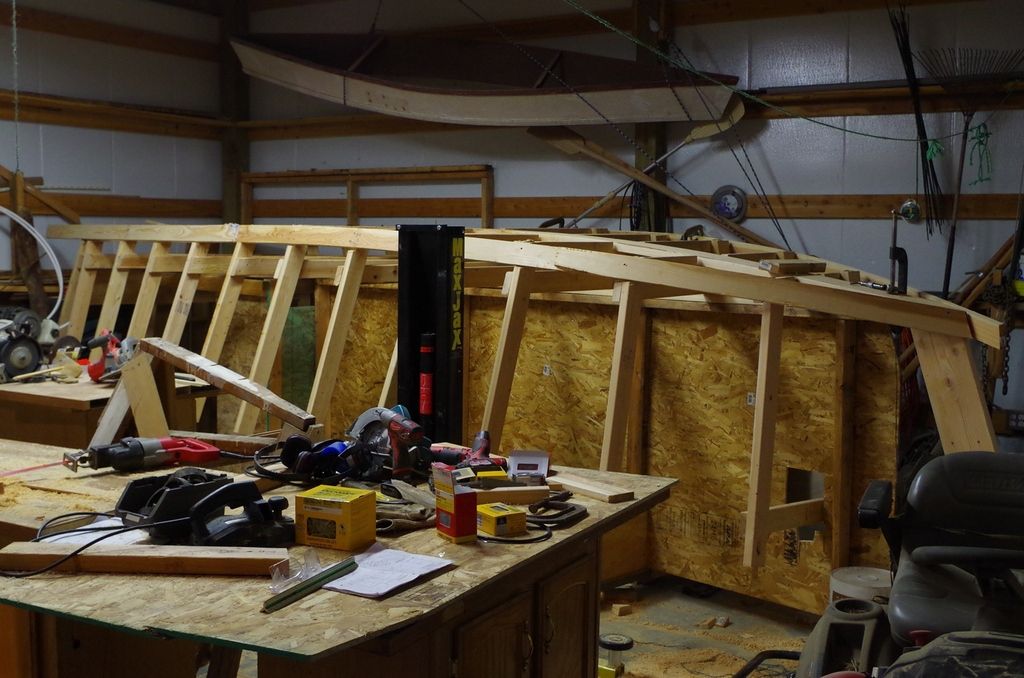
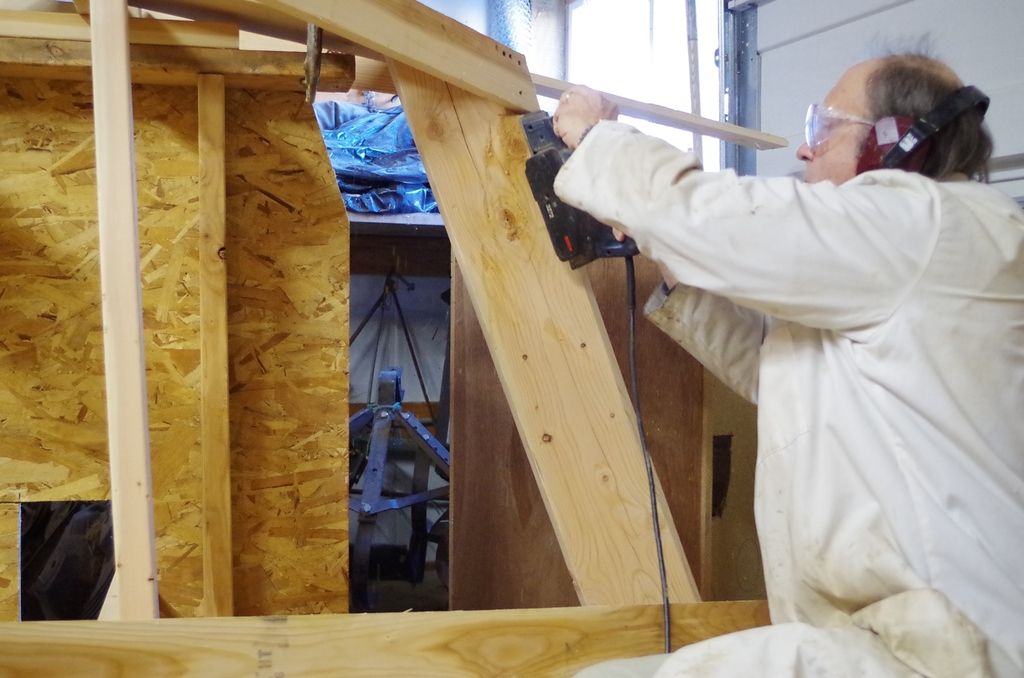
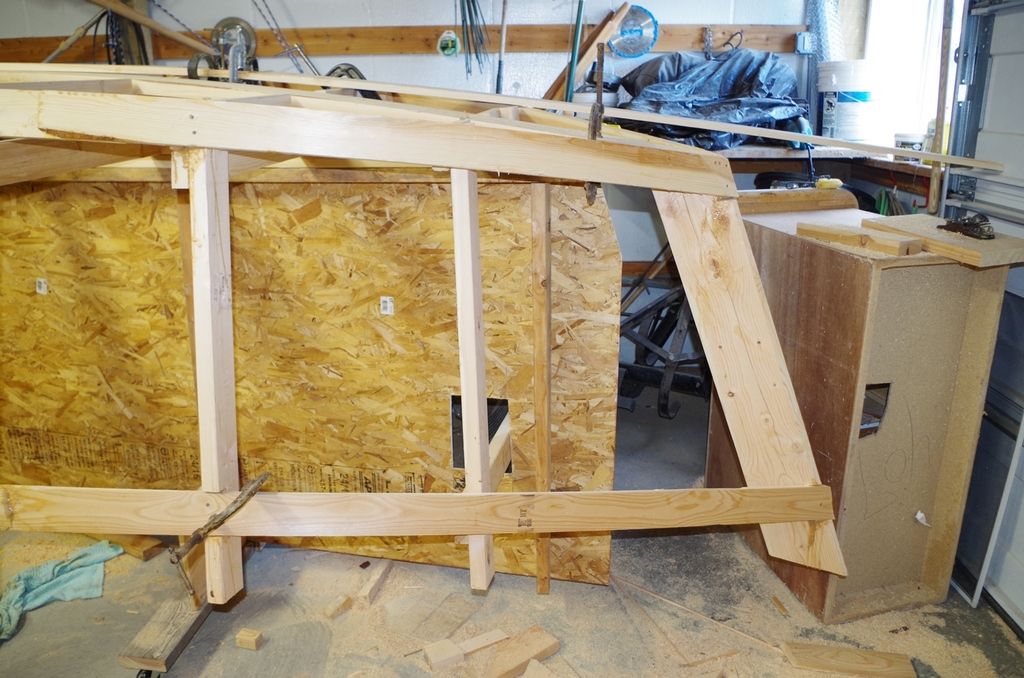
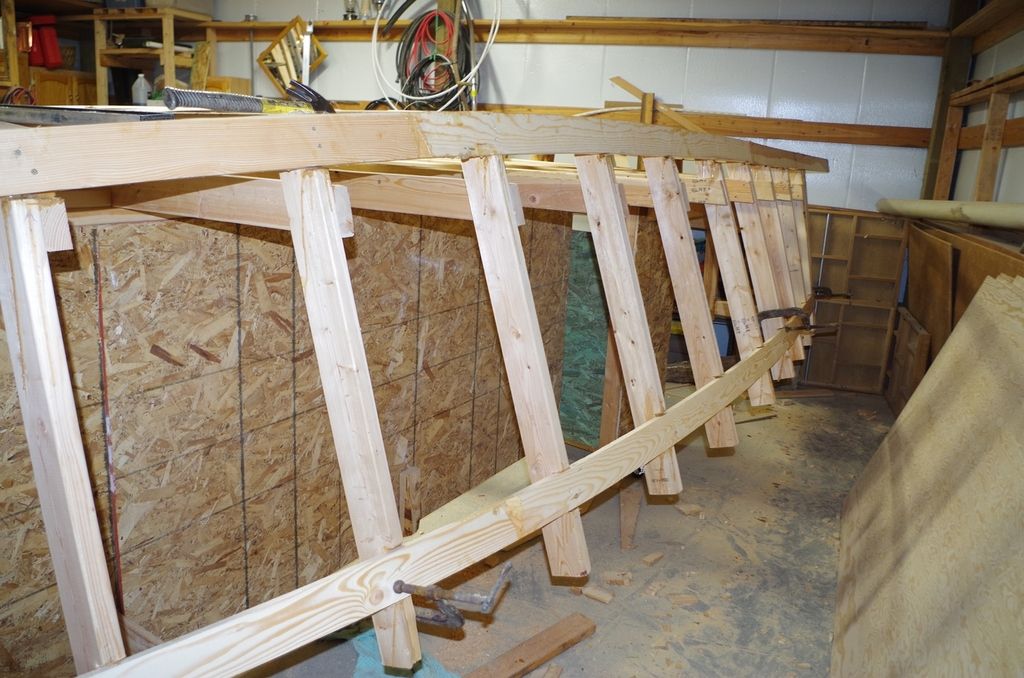
And then I started making frames. Here is the transom laid out.

a1%20transom%20layout_zpsrstcetpz.jpg


Marking out frame locations and cutting members.

a3%20frame%20layout_zpset1o01qr.jpg


a4%20frame%20layout_zps3j7y5fwi.jpg


Mounted transom frame to get it out of the way.

a5%20transome%20mount_zpsyn3s2xqm.jpg


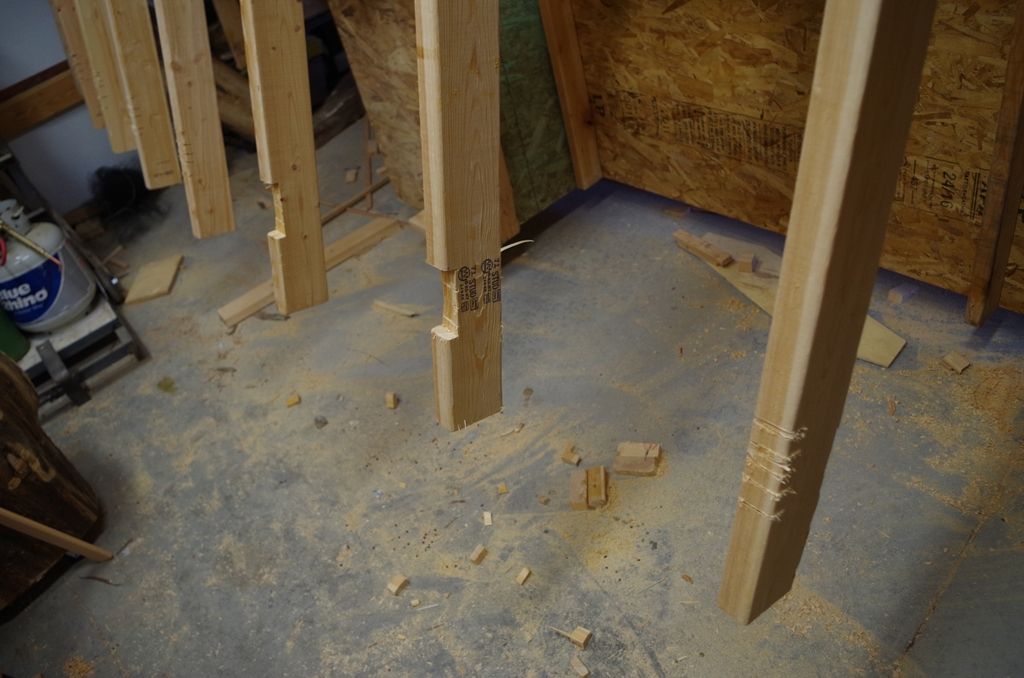
My shop is pretty much occupied by the project at this point.

a7%20how%20I%20left%20the%20shop_zpsd5zlz6f1.jpg
 
To avoid these ads, REGISTER NOW!
OP
V

VictorBravo

Well-known member
Joined
Jul 13, 2014
Messages
321
Location
Asotin County, Washington
All of the above was over the last 10 days or so. I managed to get a bit more done today when I had a block of time.

Scarfed some 1X4s to get the needed 21 feet of material for longitudinal frame members

02scarf%20mark_zpsm2vcp5oc.jpg


04%20sawing_zpspaboyerv.jpg


07%20full%20length_zpsaqjag7qs.jpg


And finished up the 11 frames.

stacked%20frames%20finished_zpsayjr8uve.jpg


Here they are in their rough positions.

frames%20set%20up_zpskqhdlyus.jpg


I'll be ordering some marine plywood shortly, after bracing up the frames and cutting notches for the chines and sheer.
 

RickP

Well-known member
Joined
Jan 15, 2013
Messages
1,547
Location
Annapolis, MD
Very good progress so far -- and you're right about it filling up your shop! I'm surprised by using standard dimensional lumber for a boat -- I'm sure it will work, but I just never thought of that before. Do you paint the outside of the frames before attaching the plywood?
 
OP
V

VictorBravo

Well-known member
Joined
Jul 13, 2014
Messages
321
Location
Asotin County, Washington
Very good progress so far -- and you're right about it filling up your shop! I'm surprised by using standard dimensional lumber for a boat -- I'm sure it will work, but I just never thought of that before. Do you paint the outside of the frames before attaching the plywood?

The Pacific City dories have long been made of lumberyard materials. I will be using marine ply on the hull and bottom, but many have been made with standard ACX.

Here's a link to an old-time dory builder in Oregon: http://www.learnedsboats.com/photos.htm

Epoxy and fiberglass sheathing on the outside will protect the wood and give it stiffness.

As for the frames, they will be coated with epoxy adhesive before the plywood sides are installed. There will be mechanical fasteners too, but that is actually overkill with the epoxy adhesive.
 

hbabler

Well-known member
Joined
Jun 17, 2014
Messages
144
Location
North Texas
Wow that is a neat boat, I didn't realize they are that easy to build. I have just wasted my afternoon researching building one. It looks likening would be the perfect size for my little family of 5.
 

madoc1

Well-known member
Joined
Dec 11, 2012
Messages
1,242
Location
spicewood, tx
this should be interesting. I have a 14' blunt nosed version of what you are building and a long time subscriber to WoodenBoat. have you checked out duckworks? fun easy to build boats. good luck and will be following.

jim
 
OP
V

VictorBravo

Well-known member
Joined
Jul 13, 2014
Messages
321
Location
Asotin County, Washington
So what made you choose this model over the offshore or Carolina dorie?

Lots of factors went into it.

First there was the shop size. Pretty much restricted to 20 foot maximum (as you can tell from the photos).

I could have gone a little bigger and built it diagonally, but that would have meant putting stuff outside that I didn't want to.

The hull form is better suited than the Carolina dory to moderate whitewater. Besides, I probably will be taking it to the coast on occasion and I like launching through the surf. The Carolina dory is designed for more choppy waves on the east coast, but I think the flatter bow would catch on waves when being pushed from behind.

This version is the offshore version of the 19 foot dory. It's got a self bailing sole designed into it, but I'm not sure I'll keep it.

The other factor was simply that my wife wanted "big sides" to intimidate the jet skiers on the Snake. We've been out in my other boat, which only has an 16" sheer line in the middle. Some of the summer jet skiers get a little too close.
 

RickP

Well-known member
Joined
Jan 15, 2013
Messages
1,547
Location
Annapolis, MD
The Pacific City dories have long been made of lumberyard materials. I will be using marine ply on the hull and bottom, but many have been made with standard ACX.

Here's a link to an old-time dory builder in Oregon: http://www.learnedsboats.com/photos.htm

Epoxy and fiberglass sheathing on the outside will protect the wood and give it stiffness.

As for the frames, they will be coated with epoxy adhesive before the plywood sides are installed. There will be mechanical fasteners too, but that is actually overkill with the epoxy adhesive.

Wow, I really like this construction method -- thanks for the additional explanation. I've seen home-built boats before, but I had no idea it could be done so easily with dimensional lumber. You're right about the epoxy adhesive for attaching the plywood to the frames -- that will definitely form a strong waterproof bond.

Are you using stitch-and-glue, or do the mechanical fasteners make that step unnecessary?
 
OP
V

VictorBravo

Well-known member
Joined
Jul 13, 2014
Messages
321
Location
Asotin County, Washington
Wow, I really like this construction method -- thanks for the additional explanation. I've seen home-built boats before, but I had no idea it could be done so easily with dimensional lumber. You're right about the epoxy adhesive for attaching the plywood to the frames -- that will definitely form a strong waterproof bond.

Are you using stitch-and-glue, or do the mechanical fasteners make that step unnecessary?

No stitch and glue. That method doesn't use frames. Instead it uses forms around which to bend the plywood--the plywood edges are "stitched" or fastened together temporarily until epoxy fillets and tape are run along the edges to hold them together. Then the forms are removed. Usually bulkheads are added after that.

The method I'm using is more traditional for work boats: you build and fair up frames and fasten the planking (in this case, plywood) to the frames. The frames stay with the boat.

As for progress, no pictures yet. Just had an hour this evening, and I took all the frames off so I could install them one at a time square and braced. In the process, things got so cluttered that I had to rearrange the shop. Not much to show for all it yet.
 
OP
V

VictorBravo

Well-known member
Joined
Jul 13, 2014
Messages
321
Location
Asotin County, Washington
After some down time, a bit of Christmas progress.

Got the keelson fitted.

01%20keelson%20in%20place_zpsmoizh2bd.jpg


04%20keelson%20in%20notches_zpssk1bwwdn.jpg


And I clamped up a chine to mark where notches go.

06%20chine%20mark_zpslpxuqdf5.jpg


Cut out notches in the frames.

08%20notch_zpsgvrxmlj9.jpg


Set the port side chine in place and temporarily screwed it down.

09%20Chine%20in%20place_zpsum5vqxyh.jpg


10%20front%20view_zpsa0e2w6sd.jpg


Starting to look like a boat.

11%20shape_zps6a0eqgin.jpg


I've got around 33 hours into the project so far--mostly from stolen free time. It'd go faster if I could get a few straight 5 or 6 hour days, but it's going fast enough.
 

Engine

Well-known member
Joined
Jan 9, 2014
Messages
646
Location
Kentucky
Thanks for posting all the pics of your build. It looks very interesting so far and I'm looking forward to seeing it as you progress.
 
OP
V

VictorBravo

Well-known member
Joined
Jul 13, 2014
Messages
321
Location
Asotin County, Washington
Finally got some time to get back to it. Today was sheer day. (Sheer is the upper line of the hull).

First I went back and cleaned up the bevel on the bow post.

01%20bevel_zpsj2cqlk8y.jpg


Then I cut notches in the frames to accept the 1X4 sheer member. I used a skilsaw set to the proper depth to make a lot of cuts, and then whacked pieces out with a chisel.

02%20notch_zpsb5ousnjk.jpg


Test fit, and then epoxy and screw in place.

03%20port%20sheer_zpstvhpiq5h.jpg


04%20port%20sheer_zpsjctezh7a.jpg


05%20port%20sheer_zps3j2aqe6m.jpg


And then did the same thing on the starboard side.

06%20strbd%20sheer_zpsps8t8t6t.jpg


08%20bow_zpsyxzymzij.jpg


Now we are at the point of having to fair everything up, smooth the intersections, and then the marine plywood sides go on.

So far I'm at 39 hours into it.
 

madoc1

Well-known member
Joined
Dec 11, 2012
Messages
1,242
Location
spicewood, tx
looking nice. seems like getting the stem bevel correct would be the hardest part so far. what brand epoxy are you using?

jim
 
To avoid these ads, REGISTER NOW!

jz2delta

Active member
Joined
Feb 23, 2015
Messages
33
Location
Los Angeles area
Interesting thread. Subscribed. My dad built some canoes and a sailboat as his retirement project. Unfortunately for me, he's on the opposite coast, so I have not had the chance to work with him on them. If I might ask, what is the kayak-y type craft hanging above the Dory?
 
OP
V

VictorBravo

Well-known member
Joined
Jul 13, 2014
Messages
321
Location
Asotin County, Washington
If I might ask, what is the kayak-y type craft hanging above the Dory?

That's my scrap-wood pirouge. I built it in 1994 out of left over materials from some project. It turned out to be quite the successful little boat. It weighs around 25 pounds. It's 12 feet long and I can carry it with one hand and throw it into a pickup.

It's been all over the place: Puget Sound, mountain lakes, irrigation ditches.
 
OP
V

VictorBravo

Well-known member
Joined
Jul 13, 2014
Messages
321
Location
Asotin County, Washington
Got another few hours in today, and I'm happy with some progress.

First, it was 12 degrees F this morning, so my electric heater was working hard, but I did manage to get the shop to 50 degrees, which is plenty fine for fast curing epoxy.

Finished fairing up the frames.

00filler_zps0qq7at3y.jpg


And then took the plunge and started the plywood planking. This is 1/2 inch Douglas Fir marine plywood, which is pretty stiff. I laid it out on the starboard bow and bent roughly into place to mark where to cut it. This and the port side are the hardest bends.

01%20Ply%20meas_zpsowxi7wuf.jpg


02%20ply%20bent_zpsnhuizqrp.jpg


Once it was in place (and held up with jack stands), I drilled holes from the inside along the chine and sheer, and bow, to mark where to cut the plywood. Then I cut it in place with a skilsaw with a rough bevel set so I won't have to plane so much later.

03%20ply%20cut_zpsyyi5orcv.jpg


Hanging plywood planks by yourself requires some creativity. I put a locator screw roughly in the middle of the plank to hang it. Once the screw was located, I removed the clamps holding the plywood in place so I could put epoxy on the frames and also where the frames meet the ply.

04%20ply%20hanging_zpsrgg9v2us.jpg


05%20ply%20hang2_zps6mbfjdq5.jpg


I got all excited gluing and rehanging, so I didn't take any pictures. Here the first plank is up and screwed in place.

07%20ply%20screwed_zpszudf01w4.jpg


So that's it for today, but now I sense things will go quickly, if only I can find time. I probably won't get to work on it for several days.
 
Last edited:
OP
V

VictorBravo

Well-known member
Joined
Jul 13, 2014
Messages
321
Location
Asotin County, Washington
A bit more progress today, after doing a bunch of other chores and necessary entropy-reversals.

Got the other bow side up.

portbow_zpsopdj799g.jpg


Those front panels are the hardest bends, but they weren't too bad.

Then I managed to get up two panels, one on each side.

03strbd%20side_zpsau6wjz2p.jpg


Fitting the mid-ship port panel.

2016.01.09%20port%20sides_zpsdvaomv5o.jpg


Ready for gluing.

01port%20side_zps5ithbnom.jpg


The sheer line (the top of the hull) will be trimmed later. Right now I'm just trying to get the sides on to stiffen things up.

Now into the project around 45 hours.
 
OP
V

VictorBravo

Well-known member
Joined
Jul 13, 2014
Messages
321
Location
Asotin County, Washington
Well, a week went by without me getting to the shop. Things are really busy in my other life: I'm a public defender with a high profile murder trial coming up.

But I managed to put that aside for a few hours today and got the last of the sides up.

01.16%20Port_zpso0w2pfs5.jpg


01.16%20strbd_zpsxbqver6c.jpg


This Monday is a court holiday, so maybe I'll get some time to fair up the bottom frames and install the 3/4 marine plywood on the bottom.
 

bulletpruf

Well-known member
Joined
Nov 28, 2013
Messages
10,911
Location
San Antonio
Are there plans for that pirogue. It looks like it would be fun to fly fish from.

Grew up in Louisiana - we use pirogues a lot for duck hunting. I don't think I would use one for flyfishing -- the ones I'm familiar with have low freeboard and aren't very stable or easy to maneuver. We would usually get as close as we could to the duck blind in a flat bottomed boat (johnboat for you Northerners!) and then paddle the pirogue the rest of the way. With two people, a Labrador, a few guns and a few dozen decoys, you had to be very careful or you were going to end up in the water.
 

bulletpruf

Well-known member
Joined
Nov 28, 2013
Messages
10,911
Location
San Antonio
Well, a week went by without me getting to the shop. Things are really busy in my other life: I'm a public defender with a high profile murder trial coming up.

This Monday is a court holiday, so maybe I'll get some time to fair up the bottom frames and install the 3/4 marine plywood on the bottom.

Been there before doing murder trials. I don't miss those days of high pressure, high stakes litigation.
 

jz2delta

Active member
Joined
Feb 23, 2015
Messages
33
Location
Los Angeles area
My dad made me a 13' cedar strip that he modified from plans for a 17' canoe. It turned out very tippy, too tippy to fish from. I thought the pirogue might be an alternative. There are lakes in Mammoth Lakes, CA perfect for small paddle craft fly fishing. The pirogue looks like it would be convenient to car top. Seems simple enough to build, so maybe build it and see how practical it is for my potential use. Sorry Victor Bravo, I don't mean to hijack your build thread. The whole idea of common materials for boat building is fascinating.
 
OP
V

VictorBravo

Well-known member
Joined
Jul 13, 2014
Messages
321
Location
Asotin County, Washington
victorbravo
how do you like that portable lift. any pro's or cons that you have discovered with its use.

I like it a lot. It does everything I want, and I was able to move it easily for the boat project.

I don't feel it is limited for my uses. I have a caster office chair I lowered a little, and it lets me roll under my rigs in comfort. Working on the Audi suspension, for example, was a lot easier with a lift.

06%2009.26.2015%20audi%20lift3_zpsygqvrvpu.jpg
 
OP
V

VictorBravo

Well-known member
Joined
Jul 13, 2014
Messages
321
Location
Asotin County, Washington
My dad made me a 13' cedar strip that he modified from plans for a 17' canoe. It turned out very tippy, too tippy to fish from. I thought the pirogue might be an alternative. There are lakes in Mammoth Lakes, CA perfect for small paddle craft fly fishing. The pirogue looks like it would be convenient to car top. Seems simple enough to build, so maybe build it and see how practical it is for my potential use. Sorry Victor Bravo, I don't mean to hijack your build thread. The whole idea of common materials for boat building is fascinating.

It's alright. I like talking about boats.

The plywood pirouge hanging from the ceiling is actually pretty stable if you sit right on the bottom. I use one of those stadium seats with a little foam in the bottom and a backrest held by straps.

I've had it out in whitecaps on Puget Sound. Your hips get used to rocking with the waves. I tried it broadside to some heavy chop and it rose over them fine.

Paddling into chop will get you some spray in your lap, but that was part of the fun. I kept a small bailing bucket and sponge and never worried too much. Of course, YMMV. It doesn't have flotation chambers and if she gets swamped, you will be swimming.
 
OP
V

VictorBravo

Well-known member
Joined
Jul 13, 2014
Messages
321
Location
Asotin County, Washington
Got a few more hours in. First thing I did as I started to plane down frames was break the power plane:

powerplanebelt_zpszps2439t.jpg


Sure, it's 20 years old and never had a belt replacement. I couldn't get a replacement locally, so it was time to go old school:

old%20block_zps4qgxmack.jpg


I found it in an antique shop 12 years ago and I think I paid $5 for it. Sharpened the blade and it went to work.

bottomframe2_zpsm97axrhk.jpg


I slid up one sheet of 3/4 ply to see how it rested. Looks pretty fair at this point. But then we had a distraction--impromtu road trip down the Snake River toward the Grande Ronde River.

Snake%20near%20Heller_zpsqwlyvgwn.jpg


Elk%20looking_zpsdqzto5rq.jpg


So only about 3 more hours, minus an hour trying to deal with the power plane and then sharpening the block plane. But still, nice day.
 
OP
V

VictorBravo

Well-known member
Joined
Jul 13, 2014
Messages
321
Location
Asotin County, Washington
More slow progress. Seems like I only have Saturday mornings available for the time being.

I laid out and cut a couple sheets of 3/4 marine ply to start the bottom:

01%20bottom%20ply%20cutting_zpseihjd4ou.jpg


Then I did a bit more close trimming and planing to get the ply to lay flat.

02%20looking%20front_zpsiri4pzpt.jpg


Then epoxy-glued and screwed down:

06%20bottom_zpsr31qyvkk.jpg


04%20bottom%20in%20place_zpsw6h7rg3m.jpg


It took about three hours to get to this point. I'm tight on room and getting the full 3/4 plys up on top (of the bottom) required some juggling. Then there was marking the glue areas, flipping plywood over to apply glue. Gluing the frames. Mixing thickener for low spots, etc.

Plus, I don't have scaffolding, but I do have a stump on wheels:

028b31e6-5e2f-4b04-92c0-91b64fca80c1_zpseoqnmbxm.jpg


Now around 59 hours into it. I can see it being closed up in a week or two, maybe.
 
Last edited:

Jazz1

Well-known member
Joined
Jan 3, 2016
Messages
4,184
Location
Thunder Bay On.
I have not seen many boat threads but you are moving along very fast. Very nice boat. You are doing a great job.
 
To avoid these ads, REGISTER NOW!
Top Bottom