To avoid these ads, REGISTER NOW!

Prepping for [EPOXY] how bad does this stain look?

GunMoto

Well-known member
Joined
Oct 5, 2007
Messages
83
Location
Orange County, CA
Hi everyone - I'm currently debating between laying epoxy v. modular tiles on the garage floor. I understand the prep-work involved before laying on the epoxy is critical for adhesion to the cement.

How bad does this oil stain look? (This was left from the previous owner of the home.)

24" level in pic
102307-006.jpg
 
To avoid these ads, REGISTER NOW!

Itzkwik

Well-known member
Joined
Mar 19, 2006
Messages
539
Location
Montpelier, VA
How bad does this oil stain look? (This was left from the previous owner of the home.)
If you haven't done anything to it yet, it doesn't look too bad. If you've been trying for days to make it better, you have a problem. If you haven't done anything yet, try some Simple Green or similar product and a stiff brush. Might also try a pressure washer if you have one. Most of it should come up. After scrubbing, if water still beads up on it, you'll need to do another round of cleaning.
 

bmwpower

Super Moderator
Staff member
Joined
Apr 24, 2005
Messages
12,578
Location
NJ
IF all else fails, pull out the belt sander or grinder. Get some heavy duty degreaser and pour it straight on the stain...let sit. Power wash.
 
OP
G

GunMoto

Well-known member
Joined
Oct 5, 2007
Messages
83
Location
Orange County, CA
Thanks for the suggestions and advice guys... :thumbup:

This oil stain hasn't been touched! :lol_hitti I am more or less seeing whether this stain looked like something that wasn't worth trying to remove based on your guys' previous experience (before I start putting some elbow grease into this).
 

katit

Well-known member
Joined
May 5, 2006
Messages
862
Location
St. Louis, MO
I rented concrete grinder with grinding stones. Then did acid etching and then washed with something else to restore ph balance.

I had much worse stains and my paint holds good almost 2 years now. Think about it this way, this spot is not where wheels will be. Little less adhesion will not hurt as much.
 
OP
G

GunMoto

Well-known member
Joined
Oct 5, 2007
Messages
83
Location
Orange County, CA
Anybody feel like making suggestions or changes to my plan of attack?

FYI, I plan on applying the epoxy in my garage in two separate stages, one side at a time. Unfortunately, I have no alternative location to temporarily store my garage contents.

*The expansion joint in the middle makes separating the two sides simple.

Stage 1: RIGHT SIDE OF PIC
Stage 2: LEFT SIDE OF PIC
102307-017.jpg


Here we go...

Preparation:
1st DAY OF ACTUAL WORK
  1. Move all contents to RIGHT side of garage floor
  2. Begin prep on LEFT side
    [*]Mask exposed areas of wall about 4 feet up (is that enough?)
    [*]Sweep up dirt, and scrape off any paint or other material stuck on the floor
    [*]Remove oil stains with degreaser, brush and a lot of elbow grease
    [*]Etch the concrete with 1 part muriatic acid and 4 to 5 parts water
    [*]Spot etch with a stronger solution, if necessary
    [*]Hose down floor at least 3 times using a squeegee between each rinse
    [*]Let dry for as many days required to pass the "plastic sheet taped to the floor test"

    2nd DAY OF ACTUAL WORK
  3. Move all contents to LEFT side of the garage floor
  4. Begin prep on RIGHT side
    [*]Mask exposed areas of wall about 4 feet up (is that enough?)
    [*]Sweep up dirt, and scrape off any paint or other material stuck on the floor
    [*]Remove oil stains with degreaser, brush and a lot of elbow grease
    [*]Etch the concrete with 1 part muriatic acid and 4 to 5 parts water
    [*]Spot etch with a stronger solution, if necessary
    [*]Hose down floor at least 3 times using a squeegee between each rinse
    [*]Let dry for as many days required to pass the "plastic sheet taped to the floor test"
  5. Epoxy RIGHT side of garage floor
    3rd DAY OF ACTUAL WORK (when epoxy on right side is foot-traffic ready)​
  6. Move all contents to RIGHT side of garage floor
  7. Broom and rinse LEFT side of garage floor (do I need to etch the floor surface again here?)
  8. Epoxy LEFT side of garage floor
    SOME DAYS LATER (when epoxy on right side is foot-traffic ready)​
  9. Return all contents to original respective locations
  10. Park the cars!
  11. Post pics on GarageJournal
EDIT: Sorry if these seems redundant guys...I just don't want to have to "think of what to do next" after actually beginning the project. :lol_hitti
 
Last edited:

thegarageguy

Well-known member
Joined
Oct 24, 2007
Messages
1,489
Location
NJ
Let me help you out real quick. Pour laquer on it, let it sit for a minute, then pat it dry. You'll notice the oil coming up easily. For real, real oily spots, try a welder torch. Heat it up and the oil wil pull up. Do yourself a favor and scratch the acid etch prep. Rent a grinder with diamond inserts and go to town. Grinding stones will not profile it enough. Proper prep is the most important part. Good luck.
 
To avoid these ads, REGISTER NOW!
OP
G

GunMoto

Well-known member
Joined
Oct 5, 2007
Messages
83
Location
Orange County, CA
Do yourself a favor and scratch the acid etch prep. Rent a grinder with diamond inserts and go to town.
What sort of technique am I going with using the grinder? Would I be aiming to roughen up the surface layer of the concrete akin to using a sander to smoothen a flat wooden surface?

Also, how bad is the dust? Should I be selective with finding a grinder that has dust extraction?

Thanks! :thumbup: :bowdown:
 

thegarageguy

Well-known member
Joined
Oct 24, 2007
Messages
1,489
Location
NJ
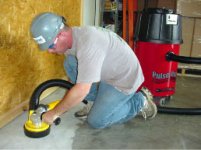
I dont want to get technical but the best way to know that you grinded enough for epoxy is by grinding it until it looks like a white residue. If there is a seal down, you need to break the seal until you get into a white residue look. It should have a sand paper grit feel. A little rough. Your basically exposing the pores of the concrete and giving your primer the best chance to penetrate and adhere. You can find this type of walk behind grinder at some rental centers or some hardware stores. Stay way from edco 110 volt machines. It'll take you forever to prep. If edco is all they have, get the highest poer one. Use diamond inserts. Not stones. You need to edge with a hand grinder. I dont think to many rental centers will have the proper vac for them but you can use a shop vac meant for sanding spackle or buy the right bag attachment for it. Good luck
 

Attachments

  • edging.jpg
    edging.jpg
    15 KB · Views: 38
Last edited:

thegarageguy

Well-known member
Joined
Oct 24, 2007
Messages
1,489
Location
NJ
This is the walk behind with the vac attachment
 

Attachments

  • 1b.jpg
    1b.jpg
    61.6 KB · Views: 38
OP
G

GunMoto

Well-known member
Joined
Oct 5, 2007
Messages
83
Location
Orange County, CA
Got a quote of $265 to rent a dual disc concrete (walk-behind) floor grinder with upgraded diamond inserts for a weekend (pickup Friday afternoon and charged for Saturday, no charge on Sunday since the rental shop is closed, return Monday morning). Renting the concrete floor grinder exceeds my alloted budget. :(

More importantly: Will using a concrete floor grinder be safe and not negatively impact the post tension slab?

110207-003.jpg


110207-006.jpg
 

thegarageguy

Well-known member
Joined
Oct 24, 2007
Messages
1,489
Location
NJ
keep looking. A good walk behind with diamond inserts should only cost you $95 per day. You just need it for a day. Don't worry about the warning labels. Your not cutting or coring. Just grinding about 1/16th of, if that. Let me get in touch with my distributer of the grinders and see if there is anyone in your area that rents them. Give me until the beginning of next week.
 
OP
G

GunMoto

Well-known member
Joined
Oct 5, 2007
Messages
83
Location
Orange County, CA
The charge was broken down like this:
  1. $87.00 rental fee (supposed to be $97 per day, not sure if the rep gave me a $10 discount)
  2. 124.00 diamond inserts
  3. 6.50 environmental
  4. 29.54 damage waiver
  5. 16.85 CA sales tax
  6. $263.89 TOTAL
This is for a 110V dual disc 22" working width grinder; not sure if it is an Edco though.
 

mhoffm911

Well-known member
Joined
Sep 3, 2007
Messages
511
The inserts are the catch. Thye make you buy new ones, even though there is probably already a set on the unit from the last rental (that's if they have not removed it already).
 
OP
G

GunMoto

Well-known member
Joined
Oct 5, 2007
Messages
83
Location
Orange County, CA
Good point mhoffm911! Never thought of that...

BTW, opinions WANTED:

I currently have silver gray...should i go with dark gray to match the dark gray wall? Or, should I remain with silver gray, to create a contrast and to keep the cement, well, looking like a "cement floor" (i.e. light gray)?

Silver gray:
ChipESSgsbe.jpg


Dark Gray:
ChipESDgsbe.jpg


Garage:
102307-010.jpg
 
To avoid these ads, REGISTER NOW!
Top Bottom