aka Larry
Well-known member
After living in our new house for a year I got the idea that I wanted to have a unique mail box post setup. Here is what I came up with.
I’m using 4 pieces of 1” square tubing to form a 5” x 5” post. I’m laying out the holes for the cross pieces here:

Using the drill press the holes are done, all 96 of them:

Here I’ve tacked a rod in place to keep the tubes correctly spaced apart before assembly:

I didn’t take pics of this, but I drilled the holes all the way through the tubes so I could plug-weld the solid rods from the opposite side and grind the welds flush for a finished look. Doing a 96 fillet welds around the ends of 3/8” rods just wasn’t an option IMO.
After the assembly of the girder-like verical post, I clamped it to the workbench to get it plumb on both sides before adding the horizontal members. This way I could just use a level to make sure everything was straight. The rod on the left is for a seasonal flag that my wife wants out there. I made the washer on the end (stop so the flag doesn’t fly off) removable for ease of changing out the flags. The tubes to the right of course will support the mailbox itself. I welded nuts into the ends of the tubes so I can use stainless-steel machine screws to hold the box in place. I plan to paint the actual mailbox to match the house before I’m done.


The mailbox itself came all white, but I wanted colors to match the house. The stock paint was very glossy (odd for $15 mailbox I thought) so I scuffed it all with a scotch-brite pad first. I taped it off and painted a portion of it the beige color of the vinyl siding and added a black stripe to match the shutters.
The PVC solar-powered post cap (at least the one I bought) only comes in white so I had to paint that as well. I found a paint similar to the Kyrlon Fusion made by Valspar at Lowes. I disassembled the light and then scuffed the entire thing with a Scotch-brite pad as well. The thing actually has real beveled glass (not plastic) in the lighted portion, which I thought was cool. To keep the light bright, I taped off the inside so it would remain white. I actually used the glass panels to prevent the paint from getting inside by taping over them and re-inserting them into the openings. As it turned out, this particular 'plastic' paint worked VERY well. I used 4 coats and surprisingly the finish is not that off of one you'd expect to see on a car.
I primed the post with two full cans of the Dupli-color self etching primer and then painted it with two full cans of Dupli-color engine enamel. Painting tubes is a huge waste of paint as most of it ends up on the floor via overspray, but it had to be done. It made a HUGE mess in the garage, but I got it cleaned up.
The last remaining step before the erection (LOL!) was to add an attachment for a custom solar-powered, LED edge-lit, laser-etched acrylic address sign.
It had provisons to be staked into the ground, but I want to 'hang' it underneath the mailbox.
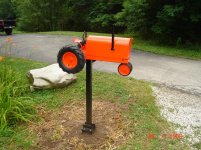
After quite a few hours, and it was done. The address sign lights up at night as does the post cap. I was happy with the end result you see here:

I’m using 4 pieces of 1” square tubing to form a 5” x 5” post. I’m laying out the holes for the cross pieces here:
Using the drill press the holes are done, all 96 of them:
Here I’ve tacked a rod in place to keep the tubes correctly spaced apart before assembly:
I didn’t take pics of this, but I drilled the holes all the way through the tubes so I could plug-weld the solid rods from the opposite side and grind the welds flush for a finished look. Doing a 96 fillet welds around the ends of 3/8” rods just wasn’t an option IMO.
After the assembly of the girder-like verical post, I clamped it to the workbench to get it plumb on both sides before adding the horizontal members. This way I could just use a level to make sure everything was straight. The rod on the left is for a seasonal flag that my wife wants out there. I made the washer on the end (stop so the flag doesn’t fly off) removable for ease of changing out the flags. The tubes to the right of course will support the mailbox itself. I welded nuts into the ends of the tubes so I can use stainless-steel machine screws to hold the box in place. I plan to paint the actual mailbox to match the house before I’m done.
The mailbox itself came all white, but I wanted colors to match the house. The stock paint was very glossy (odd for $15 mailbox I thought) so I scuffed it all with a scotch-brite pad first. I taped it off and painted a portion of it the beige color of the vinyl siding and added a black stripe to match the shutters.
The PVC solar-powered post cap (at least the one I bought) only comes in white so I had to paint that as well. I found a paint similar to the Kyrlon Fusion made by Valspar at Lowes. I disassembled the light and then scuffed the entire thing with a Scotch-brite pad as well. The thing actually has real beveled glass (not plastic) in the lighted portion, which I thought was cool. To keep the light bright, I taped off the inside so it would remain white. I actually used the glass panels to prevent the paint from getting inside by taping over them and re-inserting them into the openings. As it turned out, this particular 'plastic' paint worked VERY well. I used 4 coats and surprisingly the finish is not that off of one you'd expect to see on a car.
I primed the post with two full cans of the Dupli-color self etching primer and then painted it with two full cans of Dupli-color engine enamel. Painting tubes is a huge waste of paint as most of it ends up on the floor via overspray, but it had to be done. It made a HUGE mess in the garage, but I got it cleaned up.
The last remaining step before the erection (LOL!) was to add an attachment for a custom solar-powered, LED edge-lit, laser-etched acrylic address sign.
It had provisons to be staked into the ground, but I want to 'hang' it underneath the mailbox.
After quite a few hours, and it was done. The address sign lights up at night as does the post cap. I was happy with the end result you see here: