
You are using an out of date browser. It may not display this or other websites correctly.
You should upgrade or use an alternative browser.
You should upgrade or use an alternative browser.
Project "Truck Shop" underway
- Thread starter PurdueSD
- Start date

e-tek
Well-known member
Beautiful. See you got lots of stuff inside before finishing! Isn't that the way with us people - so much stuff it get's in the way!!
Bevis
Well-known member
its coming along.
Red'n'WhiteRebel
Well-known member
Great looking shop Purdue. The brick work suits the building and the setting perfectly. The trees were a pain for you but I'd rather have them than not. Looks great.
MSRTom
Well-known member
Looking good there, bud. I like the loft area.
Wouldn't it be neat to have some windows to look down on the large bay?
Wouldn't it be neat to have some windows to look down on the large bay?
Looking at it from here the beam is inbetween the tall door on the right and the middle door. The beam carries the weight of the rafters. This was done so i didnt have to have 12' ceilings through the whole shop. Should keep the heat from all running to the ceiling as bad.

here you go:


here you go:
Conor42
Active member
Definitely one of my favorites so far.. DIY projects are the best!
hardtop
Member
Looks good
Verry Cool. Thats a realy nice looking building. I like how the roof lines break up the size of the structure.
-Thanks, i was worried about it looking like a huge box. I think the gable and different roof heights gave it some character
Definitely one of my favorites so far.. DIY projects are the best!
I agree, Amazing project and you're doing it all yourself.

Looks good
Thanks guys!
ol55
Well-known member
Looks like you can see the light at the end of the tunnel......it's looking good.
Deninately! The last couple weeks it has started to come together. Ive got about 2/3rds of the siding up and a little bit of steel up on the ceiling too. I've got all next week off work so should be getting really close...
Well here is some major progress. I think it is turning out awesome if i do say so myself. Dad and cut/hung the siding ourselves. It really wasnt too difficult, although i must say it was a little intimidating having never done it before. We've still got to go back through and add some screws and put the corners up.


View from the street:

Got a little cieling up...

A little prelude to tomorrows excitement:

View from the street:
Got a little cieling up...
A little prelude to tomorrows excitement:
TejasBimmer
Well-known member
Looks GREAT!!!
Bevis
Well-known member
Looks great...I even like the ceiling material.
Dustoff 35
Well-known member
Glad to see you kept so many trees, looks good. Are you using anything to keep leaves and debris out?
Glad to see you kept so many trees, looks good. Are you using anything to keep leaves and debris out?
Thanks! No, i havent had much luck with gutter guard on the house. I think i am going to leave them open and clean them out regularly. You have any suggestions? I am not looking forward to more gutters to clean.
Uncle Buck
Banned
Wow, your replacement puts the old one to shame doesn't it? Well done!
Dustoff 35
Well-known member
I have ALCOA's Leaf Relief gutter guards on the house. I plan to use them on th gartage too.

Works pretty well, sometimes I have to clear off the top of them where the roof valleys deposit rain & leaves, but I don't have to clean them out. I have an extension pole with a brush on it so I can sweep it off from the ground.
Works pretty well, sometimes I have to clear off the top of them where the roof valleys deposit rain & leaves, but I don't have to clean them out. I have an extension pole with a brush on it so I can sweep it off from the ground.
So things have been progressing along slowly. Ive got the 100A sub panel and electric service in. I also went ahead and ran a seperate conduit with cable and cat5 for phone/ internet. This past weekend I dug the trench for my sink/floor drains and gutter downspouts. Also got the downspouts on. All ive got left to do on the outside is shoot a couple more screws in the siding and put the ridge cap on. The other thing left to do outside is paint the 10x10 overhead and mandoor to match the rest of the overheads.
If I can get some help, we should able to get some more tin up on the interior ceiling and layout electrical circuits this weekend. Ive got access to a scissor lift which will be nice when it comes time to mount my lights.
Just a tip for you guys getting ready to build, Thjink about doing this...I went ahead a put in a trap/drain where my compressor will sit before my floor was poored. This should really be nice with one of the auto-drains.
autoist
MEMBER EMERITUS
I'd love to see some more photos of that ceiling - I'm thinking about doing the same thing in my 12' high area.
dipper
Well-known member
Excellent job on the build Purdue!
What material is the "brick wainscot" you used?
regular brick's or something different?
I'd like to do something like that on my garage but I don't have any type of
brick ledge that bricks would typically sit on for installs like that.
What material is the "brick wainscot" you used?
regular brick's or something different?
I'd like to do something like that on my garage but I don't have any type of
brick ledge that bricks would typically sit on for installs like that.
Last edited:
boiler7904
Well-known member
Excellent job on the build Purdue!
What material is the "brick wainscot" you used?
regular brick's or something different?
I'd like to do something like that on my garage but I don't have any type of
brick ledge that bricks would typically sit on for installs like that.
You can always bolt a steel shelf angle to the foundation to support brick.
One of the cultured stone or thin brick products also works if it is properly installed. The subdivision I live in has 272 homes with Cultured Stone on the front of each garage. The material that was applied to the foundation has failed (read fallen off of the building) on at least 63 homes so far. The scary thing is that there isn't a house more than 5 years old in the entire subdivision. It comes down to properly preparing the substrate and following the directions.
dipper
Well-known member
You can always bolt a steel shelf angle to the foundation to support brick.
Yeah that would work too. A good coat of paint might make it look a little better too after pricing out some of the brick.
I'd love to see some more photos of that ceiling - I'm thinking about doing the same thing in my 12' high area.
I'll try to snap some more for you. Unfortunately there isnt that much to see yet. Hopefully that will change this weekend.
The wainscot brick is regular brick. We built a traditional brick ledge out of block when we layed the stub walls. One other option on the brick ledge is to start laying using the footer as a ledge. That all depends upon whether you have footers or not though. Looking at your picture it looks like you have a floating slab, but hard to tell.
Thanks to everyone for the compliments!
69charged
Well-known member
man that is awesome. now that is a man space that i could really get into. the wife is going to have to see this one.
clarence
clarence
PushStick
Member
What a great looking shop. You lucky dog you! I'd love to have that kind of space...maybe someday.
Got some more ceiling up, some T-8s up, almost have the entire shop wired and have the compressor mocked into place...

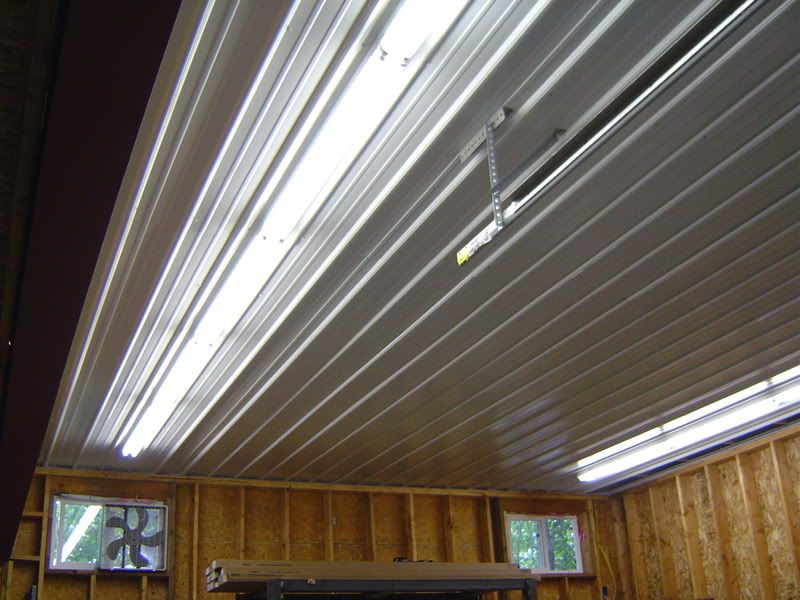
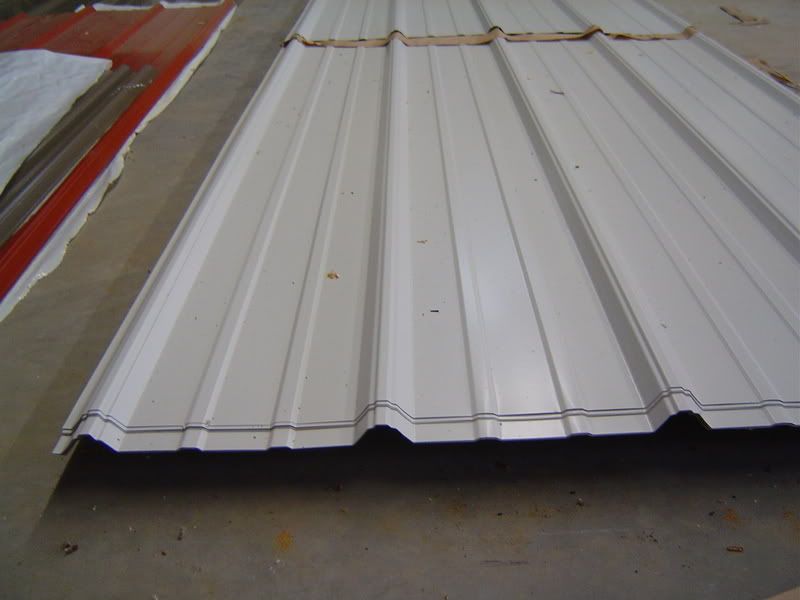
I have had alot of questions about the cieling material. It is your basic pole barn style steel ribbed siding 3' wide. I asked for #2 grade on the paint because it was cheaper and will be indoors anyways.
I am going to hide this little guy in a closet under the stairs....


Nothing real exciting here, just some of the four gang outlets i ran up at 50"

I have had alot of questions about the cieling material. It is your basic pole barn style steel ribbed siding 3' wide. I asked for #2 grade on the paint because it was cheaper and will be indoors anyways.
I am going to hide this little guy in a closet under the stairs....
Nothing real exciting here, just some of the four gang outlets i ran up at 50"
autoist
MEMBER EMERITUS
You just sold me on the ceiling material for my addition!
rsanter
Well-known member
didnt know it was 'historical' at 25 years old?
bob
bob
gsport
Well-known member
how have i missed this thread??? i just read it from start to finish, what a great place you have there.. .... looking forward to the grand finale'
.... looking forward to the grand finale'tdkkart
Well-known member
I have had alot of questions about the cieling material. It is your basic pole barn style steel ribbed siding 3' wide. I asked for #2 grade on the paint because it was cheaper and will be indoors anyways.
Hope you bought that stuff last spring. Just looked at a Menard add this week, what used to be $50-55/square is now $80-85/square. Just when I finally got a place bought that's gonna need some.............

Bevis
Well-known member
I just had some panels (24, 12 footers) made, paid $3.60 a linear foot. Will have to go have some white ones made now....
Red'n'WhiteRebel
Well-known member
What's the plan for venting the comp. room of heat build up and insulating for noise? I was planning to use the space under my shop stairs in the same manner.
ol55
Well-known member
Looking good. What color is that siding?
mmhouse
Well-known member
That's going to be one great shop Purdue...GREAT job!!!