To avoid these ads, REGISTER NOW!

Puget Dude’s creations and fabrications (Random project thread.)

OP
P

PugetDude

ALLIANCE MEMBER
Joined
Mar 13, 2013
Messages
22,434
Location
Superstition Mountains, AZ
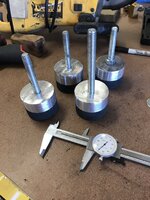
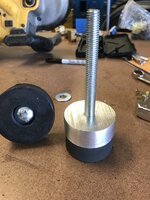
Leveling feet were made from some aluminum bar stock, long 1/2” carriage bolts, and hockey pucks. I turned the OD on bar stock just enough to clean up the mill finish, then bored a 1/2” through hole in them. 6BDAE03D-B7B7-4A38-AD99-62C0FE265A71.jpegThe hockey pucks were drilled and then counterbored with a Forstner bit. Once they were assembled, a quick cut on the lathe cleaned them up. 75FB5045-097E-4771-A012-C884BBECC080.jpegMounted on the mill-these made leveling it a really easy job. 97540F56-D01A-4E50-B440-90B1C98CCC32.jpeg
 

Attachments

  • 8678F35B-3895-47C6-9282-9879300A9A52.jpeg
    8678F35B-3895-47C6-9282-9879300A9A52.jpeg
    383.3 KB · Views: 16
Last edited:
To avoid these ads, REGISTER NOW!
OP
P

PugetDude

ALLIANCE MEMBER
Joined
Mar 13, 2013
Messages
22,434
Location
Superstition Mountains, AZ
Knocked out a quick little welding project this weekend. My wife is crazy about Christmas (8 trees so far plus she’s decorated every horizontal surface in the house…)
I bought her a ~6x8 decorative Santa rug 12 years ago; right before we moved from AZ to WA; we had no where to put it up there, it got stuck in a closet and forgotten. When we moved into this house we got a lot more wall space so I decided to turn it into a wall tapestry.
Out to the shop to root through my steel supply and see what I could come up with. Found the last of the ornamental iron baluster drops; none long enough, so I used a decorative center section and plain pieces for the ends . Welded the center ornament in place so I could cut it flush to sit flat against the wall; it was swaged in when I originally bought them.
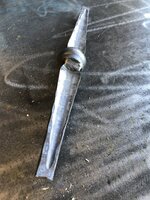
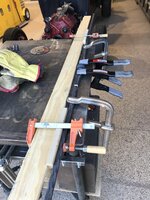
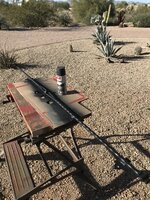
B8744A6E-CBD9-49D0-A42C-2F9E95B012D3.jpegAlso split a trim piece in half for each end. 52614F9C-6A7E-44C5-982C-C62EB3B67EDE.jpeg Ground a bevel on the ends to be welded then jigged all three pieces together on the little weld table. EDF782DA-8DA2-4E3C-B832-740F63FDE9B5.jpegAfter welding and blending the welds with a flap disc, I moved on to the mounting tabs. Again, I had a few of these left over from another project so that is what I used. 5 below the bar to attach the rug and 4 above the bar to hang it on the wall. DD302829-37AB-48DB-950A-D08562F96A5B.jpegWelded these in place and then shot it with a couple of coats of flat black. C3AFA25E-F38F-4E82-9AC5-5355089896AE.jpegTime to mount the rug, needed to punch 5 clean ~5/16” holes. Can’t use a drill ( I have empirical evidence from 10 years ago that proved this is NOT a good idea)
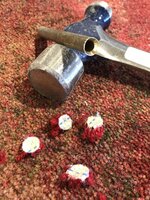
Don’t own a hole punch so I made my own; took all of three minutes with piece of heavy wall brass tube and a countersink bit. It worked really well, no unraveling or tearing. 7E16E342-D84A-41BD-A8A3-067924D88AFD.jpeg53E6A8CB-1CAD-4B3C-A936-7CCF240DD6DA.jpeg1A410E94-715A-4AAF-9BB4-8543993174A8.jpegBolted the rug to the hanger with 5/16” x 3/4” bolts; I turned the heads down to 1/8” thick in the lathe to keep them from chewing up the wall. Used fender washers on the back side and acorn nuts on the front.
Hung it in the arched hallway. Luckily it covers the first four screw-in anchors I installed too low. :D I’ll patch and paint those when I take it down . 97539442-4B10-4630-9383-3945ADE38601.jpegGlad to finally see this hanging up and not just rolled up in the original shipping plastic in the back of a closet.
Here’s the first one I made about 10 years ago; it’s ~3’x5’. Steel letters came out of the close out bin at Hobby Lobby. 92C374EC-B1DE-4031-9F16-D6E279438466.jpeg
 
Last edited:

Bears Fan

Well-known member
Joined
Jan 26, 2012
Messages
3,442
Location
Indiana
75cb4ff4-3c80-4666-8469-32fdabd612dd-jpeg.1561912


I'm seriously jealous of your new mill, I would love to have one that size. I don't need or have room for a full size Bridgeport, that size would be perfect for DaBarn.

The Santa tapestries and rods you made to hold them up turned out awesome :cool: glad my wife is not on The Garage Journal to see those or I'd be out in the barn working on another project :ROFLMAO:🎅
 
OP
P

PugetDude

ALLIANCE MEMBER
Joined
Mar 13, 2013
Messages
22,434
Location
Superstition Mountains, AZ
Rong Fu I believe. (No badge) These 15 x 30 import mills are pretty much all the same, the early Taiwanese made machines were better, but like everything else, production moved to China later. Enco sold a lot of them.
 
Last edited:
OP
P

PugetDude

ALLIANCE MEMBER
Joined
Mar 13, 2013
Messages
22,434
Location
Superstition Mountains, AZ
Full disclosure: I am not a machinist; I don’t pretend to be or represent myself as such/ just a guy who likes to build stuff, machining being just one of the processes I muck around at and enjoy. I’ve got a cheap Taiwanese mill, a little Atlas Lathe, and personal difficulties with 4 decimal place tolerances.

With that being said, lets dive into one of my typical projects that happens to include a little machining..,

I had been wanting a 2x72 belt sander for some time; after watching a few YouTube videos I decided that it wouldn’t be that difficult to make my own.
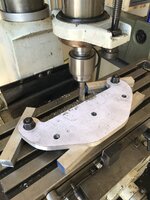
Since I had just acquired the mill, I thought I would start with the carrier for the work rolls. I bandsawed the rough shape out of 1/2” aluminum plate and then detailed it on the mill. 6C5C93BF-D383-4AEF-99E9-EDC462F67B53.jpegHad to figure out how to machine the slot for the angle adjustment, used a bolt as the pivot and then just rotated it by hand. That’s my shop vac nozzle on the left sucking up the stringy aluminum chips)F3AC9104-EC8D-46F9-B1D4-83D5749E8007.jpegFinished product; this was my first real project for the new mill ; I was pretty pleased with how it turned out. 88AA1902-6145-4693-94F2-74D0A16C2D6C.jpegMade the two work rolls on my little Atlas Craftsman lathe, but bought the drive and steering rolls on eBay; these were too big for my little lathe to handle.
With dummy rolls in place I laid out the rest of the basic frame geometry with a 72” piece of ribbon on the bench. 40E2E4A9-5289-4AF5-915F-B01AD9E43375.jpegWith the carrier finished and the frame laid out I moved on to the frame weldment. Didn’t take many pictures of the weld up, but I used 3/8 plate for the c-frame motor mount, 1/8 plate for the base and heavy wall tubing and bar stock for the main frame.DCC300A6-10CF-4CB9-971A-3B35C0104666.jpegAB029293-01B8-4FD4-B9B1-10922607EC4F.jpegThe base plate is sized to fit on a old Craftsman tool stand I had on hand. I wanted it to be mobile, stable, and reasonably rigid. This stand worked out really well. I did have to notch it a bit for clearance on the belt- (skipped the FEA step and it bit me on the ***) -more on that later.
Here’s a shot with the work arm in place. That’s when I realized the belt was a little too close to the base plate. 7A065FB6-0667-4534-9882-F4DFE6683629.jpeg45B04A42-107A-4CD9-902C-97DAE411A630.jpeg
 

Attachments

  • C9FBBCDA-B515-4B92-8DF8-98F0978C2823.jpeg
    C9FBBCDA-B515-4B92-8DF8-98F0978C2823.jpeg
    254.3 KB · Views: 35
Last edited:
OP
P

PugetDude

ALLIANCE MEMBER
Joined
Mar 13, 2013
Messages
22,434
Location
Superstition Mountains, AZ
Started figuring out the adjustable tool rest and the belt backing platen. 3D8567F8-EAAA-48C6-9353-5673DF809644.jpeg I wanted them to be heavy duty and not deflect during use so I used 2-1/2”x2-1/2”x .25” angle for rigidity. Slimmed the table support arm down a bit; it was pretty awkward with just the full size angle.
Once I had it mounted I figured I needed to slot it for adjustment and easy on/off without having to completely remove the two 1/2-13 mounting bolts. Back to the mill for some 1/2” slots. E7EE7716-45B9-48AD-8B18-3E975F124B10.jpegI have never needed to remove it, but the in/outadjustment slots worked out well.6E2A8D7B-5A48-4AC4-A2DA-A1A558EE913F.jpeg
Work table is a piece of aluminum plate, believe it’s 3/16 or 1/4”. It’s screwed into drilled and tapped holes in the support arm with 1/4-20 flat head screws. Wanted it to be easy to replace if it gets chewed up. A74A81FB-A5B9-473D-BEF6-38DEE9045578.jpegThe belt platen is a piece of 1/4” thick angle that was bandsawed to size and then drilled and slotted for the carrier bolt clearance on the mill. I sanded it smooth with my belt sander. It’s adjustable via horizontal slots on the aluminum carrier it’s bolted to. 9FA27921-1BCF-4A59-B403-CC81808422DB.jpeg
 

Attachments

  • 259D21BA-B200-4621-95CA-D2CD2430CF4C.jpeg
    259D21BA-B200-4621-95CA-D2CD2430CF4C.jpeg
    297.5 KB · Views: 15
Last edited:
OP
P

PugetDude

ALLIANCE MEMBER
Joined
Mar 13, 2013
Messages
22,434
Location
Superstition Mountains, AZ
I originally bought a Leeson c-frame 3460rpm 1hp motor and a 4” diameter drive wheel but after reading a little more about belt speeds I decided to drop down to a 1725 rpm motor and a 5” drive wheel. Found a "rebuilt" 3/4hp Baldor motor on eBay for $90 so I grabbed it. It was painted with a half-dozen coats of some semi-intact indestructible industrial enamel, half of them with a brush. I spent way to much time cleaning it up and painting it hammertone gray to match the rest of the grinder. Here’s the enclosure cover, world of difference from where it started as the technicolor dream coat. 191F9FD3-66FE-4BCD-8A1E-43C40F338F42.jpeg
 
Last edited:
OP
P

PugetDude

ALLIANCE MEMBER
Joined
Mar 13, 2013
Messages
22,434
Location
Superstition Mountains, AZ
Ready for wiring! Since Shorty was too far away and busy helping Toolfool with his new garage I had to do it myself…
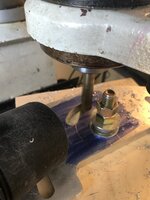
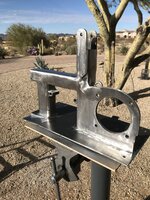
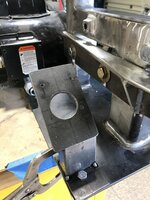
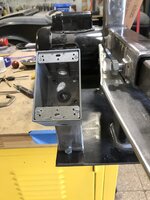
First order of business was to fabricate a mount for the switch box. I wanted this up front with a big stop button. 198ADE19-087A-4585-9695-E651864B0CC4.jpegUtilized one of the base mounting bolts for the front hold down, drilled a through hole for the back side. Test fitted it (FEA) and then welded it up. It’s deliberately offset to allow removal of the work table support arm. There are three drilled and tapped 10-32 holes to secure the switch box, know it looks strange bu I had to drill a clearance hole for the connector with a hole saw so no room for the fourth hole. It’s plenty strong with just the three screws. 97BBF849-6BB4-4B4B-963C-9921A1D953E7.jpegMounted the weather proof single gang box and it was ready to wire up; I used a piece of 1/2” weathertite flex over to the motor box. Power comes into the switch box via a 12/3 SO extension cord I cut the receptacle end off of. Used a strain relief fitting to keep it sealed up; this thing creates a lot of grinding dust. 17CBE8E8-976F-46D1-8FBA-D18BA42A9503.jpeg
 
Last edited:
OP
P

PugetDude

ALLIANCE MEMBER
Joined
Mar 13, 2013
Messages
22,434
Location
Superstition Mountains, AZ
I noticed I didn’t take any detail pictures of the tracking adjustment or belt tensioner so I will save this post to add them later.

Edit

The belt tracking adjuster was an eBay score- I originally built my own with a knurled stainless knob, it worked fine but I liked the old retro style design. Lo and behold, someone was parting out a vintage Rockwell 6x48 belt sander and had an original locking belt tracking knob with locknut. Probably overpaid for it. Had to buy a 1/2-24 tap and make a new mounting pad. I think the tap was ~$3 delivered; not sure what some guy in far western China was doing with a 1/2-24 SAE tap. but that's where it came from. The tracking wheel rides on a 1/2 bolt axle that is threaded into a hinged aluminum block, the Rockwell adjuster just pushes against the bottom of the block to tilt the wheel for tracking. The star knob locks it in place, still had the original fiber washer to prevent vibration in use. 12D4ACBB-A055-42CD-90B6-F3EF94E325F2.jpegB9ACBA73-770E-4D41-9F27-366082F79F21.jpegThe tensioner took a few design iterations to get the proper length arm and spring. I fabbed a big wing nut out of a coupling nut and a 5/8” flat washer to make it easy to tension as necessary- haven’t touched it since.8FF9564C-A108-446E-9679-BB2213264FA7.jpeg
 
Last edited:
OP
P

PugetDude

ALLIANCE MEMBER
Joined
Mar 13, 2013
Messages
22,434
Location
Superstition Mountains, AZ
Here’s a couple of shots of the finished grinder, it’s really performed beyond my expectations. I use it nearly every day, not sure how I got along without it before. It’s a little scary with a 24 grit zirconium belt. I bought a “knife maker’s assortment” on Amazon, it’s a beast with coarser grit belts, the finer grits are great for smoothing and sharpening. 5C6B0FB3-EC44-401B-9E09-8AED96423520.jpeg82FD257A-A32F-41CA-A4C7-FC9AE6EF068D.jpegI debated having it powder coated, but went with hammertone gray instead; started painting most of my fab projects with it.
 
Last edited:
To avoid these ads, REGISTER NOW!

Miss the Pontiacs

Well-known member
Joined
Nov 7, 2016
Messages
16,510
Location
Saskatchewan Canada
PudgesDude. I wondered why I hadn’t noticed your thread before. Well it is hardly a month old and you had some pent up projects you were keeping from us. Well at last you fessed up and it has been worth the wait. Nice shop 👍You must be talented you have Royce’s seal of approval. 😉
Good joke about Sunday summer 😂
 

gmcgeo

Well-known member
Joined
Mar 11, 2019
Messages
3,701
ill even come back to AZ to pick it up! seriously though, you have major skills. Great job
 

royce

Well-known member
Joined
Jun 22, 2014
Messages
3,110
Location
fairbanks ak
Here’s a couple of shots of the finished grinder, it’s really performed beyond my expectations. I use it nearly every day, not sure how I got along without it before. It’s a little scary with a 36 grit zirconium belt. I bought a “knife maker’s assortment” on Amazon, it’s a beast with coarser grit belts, the finer grits are great for smoothing and sharpening. 5C6B0FB3-EC44-401B-9E09-8AED96423520.jpeg82FD257A-A32F-41CA-A4C7-FC9AE6EF068D.jpegI debated having it powder coated, but went with hammertone gray instead; started painting most of my fab projects with it.
Nice job Puget
 

rattle_snake

Well-known member
Joined
Jun 25, 2015
Messages
5,225
Location
Chandler, AZ
Impressive fab on the belt grinder, nice work!
Sounds like with 2 pole motor and 5" wheel you are around 2300 SFM?
I pulley'd mine for 5000 and a fresh 36 grit plows though steel (and fingers so be careful!). Most used tool I have.
 
OP
P

PugetDude

ALLIANCE MEMBER
Joined
Mar 13, 2013
Messages
22,434
Location
Superstition Mountains, AZ
Impressive fab on the belt grinder, nice work!
Sounds like with 2 pole motor and 5" wheel you are around 2300 SFM?
I pulley'd mine for 5000 and a fresh 36 grit plows though steel (and fingers so be careful!). Most used tool I have.
I still have the 3450 RPM 1 Hp motor and 4" pulley (3600SFM) , but I'm not motivated enough to swap them out to try. The 1750 rpm and 5' pulley (2300SFM) removes metal fast enough for me. I'm really amazed at how long the belts last.
Might try to build a bigger one like the 100MPH Fireball Tool design running go-kart wheels with the bigger motor.
 

TimeWarpF100

Well-known member
Joined
Aug 21, 2010
Messages
6,784
Location
not here
Here’s a couple of shots of the finished grinder, it’s really performed beyond my expectations. I use it nearly every day, not sure how I got along without it before. It’s a little scary with a 36 grit zirconium belt. I bought a “knife maker’s assortment” on Amazon, it’s a beast with coarser grit belts, the finer grits are great for smoothing and sharpening. 5C6B0FB3-EC44-401B-9E09-8AED96423520.jpeg82FD257A-A32F-41CA-A4C7-FC9AE6EF068D.jpegI debated having it powder coated, but went with hammertone gray instead; started painting most of my fab projects with it.
You can drop that off at my place any day!
 

Bears Fan

Well-known member
Joined
Jan 26, 2012
Messages
3,442
Location
Indiana
Dang! With the response your receiving on the belt sander maybe you should start mass producing them, then sell them to the Garage Journal members, of course I should get one of the first ones shipped and I want the 15% friend's and family discount too :)
 
OP
P

PugetDude

ALLIANCE MEMBER
Joined
Mar 13, 2013
Messages
22,434
Location
Superstition Mountains, AZ
Dang! With the response your receiving on the belt sander maybe you should start mass producing them, then sell them to the Garage Journal members, of course I should get one of the first ones shipped and I want the 15% friend's and family discount too
If I tried selling these I would be competing for wages with the 9 year old Indonesian kid sewing sneakers.
 
OP
P

PugetDude

ALLIANCE MEMBER
Joined
Mar 13, 2013
Messages
22,434
Location
Superstition Mountains, AZ
Dang! With the response your receiving on the belt sander maybe you should start mass producing them, then sell them to the Garage Journal members, of course I should get one of the first ones shipped and I want the 15% friend's and family discount too :)
Wait for my exciting coupon offer in your mailbox. Dress warm. Might be a bit chilly sitting out there this time of year like you did with the license plates this summer.
 
To avoid these ads, REGISTER NOW!
Top Bottom