To avoid these ads, REGISTER NOW!

Pushing my and my Powermatic 1150 DP’s envelope

HoosierBuddy

Well-known member
Joined
May 9, 2006
Messages
2,935
Location
Southern Indiana
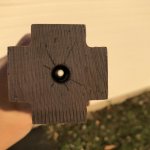
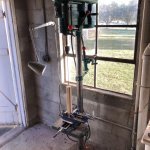
I hadn’t really thought through how I was going to drill 15 inches through this hard maple lamp base piece and end up centered at both ends until I was well into my project. Ended up center punching both ends, drilling a 1/8 pilot hole 2” deep on each end to give the spade bit something to follow, then I dropped my table and jacked up my head and drilled the top about 8” deep with a 3/8 spade bit, moving the head down once as the 1150 only has 6" of quill travel. Then, I flipped the piece end-for-end in the vise and drilled the other way with my fingers crossed.

Worked like a charm! I’m probably more lucky than good on this hole.

Phil
 

Attachments
  • 1EF4D06E-CAFF-4E22-BD11-37F76215FC75.jpg
    1EF4D06E-CAFF-4E22-BD11-37F76215FC75.jpg
    148.7 KB · Views: 100
  • 18543AFF-D0B4-4205-AF9B-0D0FAC522D76.jpg
    18543AFF-D0B4-4205-AF9B-0D0FAC522D76.jpg
    79.2 KB · Views: 70
Last edited:
To avoid these ads, REGISTER NOW!

seber

Well-known member
Joined
May 31, 2016
Messages
4,207
Location
Deep East Tx.
If you ever have to do this again the easier way is to turn the dp into a lathe. Hold the workpiece by the chuck and turn it while the bit is stationary. It always takes some innovation to figure out how to hold the workpiece but the results are guaranteed. In any case, nice job. I know I would not be able to do that well with a drill into a stationary piece.
 

NC Rick

Well-known member
Joined
Oct 26, 2017
Messages
302
Location
Asheville
Keeping in mind that long items in the chuck can bend and become entangled in intestines.

Just something to be mindful of...
 

davethorik

Well-known member
Joined
Sep 14, 2013
Messages
4,992
Location
Norka, Ohio
I'm trying to think of how chucking onto a 14" long, non-round piece of wood and lowering it onto a drill is a good idea, and it just doesn't sound like one.
 

seber

Well-known member
Joined
May 31, 2016
Messages
4,207
Location
Deep East Tx.
Keeping in mind that long items in the chuck can bend and become entangled in intestines.

Just something to be mindful of...
Doing it this way requires a guide to prevent it from getting away. I've been doing it this way for years. Careful setup is required.
 
To avoid these ads, REGISTER NOW!
OP
H

HoosierBuddy

Well-known member
Joined
May 9, 2006
Messages
2,935
Location
Southern Indiana
Well,

I guess I'm a little chagrined to admit I have a lathe (actually have 2 of them) and elected to use the DP instead. To use the lathe, I really would have needed to leave it too long, chuck on the waste portion, drill it, then cut off the waste. By the time I considered that, I'd already formed the corners and cut it to length.

Often doing things in the wrong order really makes things tough.

Phil
 

NC Rick

Well-known member
Joined
Oct 26, 2017
Messages
302
Location
Asheville
It’s always fun solving problems.

Very impressed that you got a centered little hole all the way through that part. Very cool.
 

Voi

Well-known member
Joined
Oct 10, 2010
Messages
5,151
Location
Western South Dakota
I don't have a vise like yours but one thing I have done is make one time use jigs that hang over the side of the table. In your case two pieces of 3/4" plywood screwed 90° to each other & then some pieces perpendicular to that section that clamp to the table.

So the drilling takes place to the side of the table & has lots of clamping surfaces.

Too late for that advice but it looks like you didn't need it anyways. Nice work.
 

NC Rick

Well-known member
Joined
Oct 26, 2017
Messages
302
Location
Asheville
I set up off the side of the mill table using an angle plate. Some drill presses slow rotating the table. Nice point. I like looking at other people’s ideas and hope I can use them at some point.
 
OP
H

HoosierBuddy

Well-known member
Joined
May 9, 2006
Messages
2,935
Location
Southern Indiana
It’s always fun solving problems.

Very impressed that you got a centered little hole all the way through that part. Very cool.

Thanks...My backup plan was to bore the "bottom" side bigger if my holes didn't meet until they did. The top side needed to be 3/16 to match up with the threaded tube the harp and socket mount to. The other end of the hole could have been larger if needed. I just have to run the wires through it.

I definitely like the idea of clamping to the side rather than the bottom like I did.

Although what I really lined up off of was the spade bit itself. I had it down adjacent to the piece, got my piece parallel to it, and then clamped it at that spot....

Phil
 
To avoid these ads, REGISTER NOW!
Top Bottom