To avoid these ads, REGISTER NOW!

Putting in structural support in a wall that's already built?

Vinny

Well-known member
Joined
Jul 14, 2011
Messages
626
Location
Simi Valley, CA
Fellas,
Haven't done this before, and looking for some guidance.
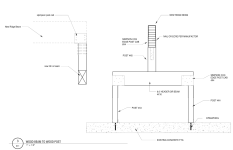
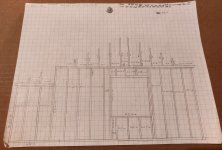
I'm getting rid of all the cross beams in my garage, and went to a structural engineer to figure out how to do so. I need to add a larger beam to the ceiling, which will be held up by the structure in the first picture. That would be easy to do from scratch, but I need to add this structure to an existing wall, and I'm not sure how. See the second picture for a drawing of what the current wall looks like. I've opened up walls before by adding king studs and a bigger beam, but that's making a larger opening. How do I add this structure to a wall that's already framed? Do I cut a section out of the top plates and sandwich the 4x4 beam between them?
 

Attachments

  • Screenshot 2025-11-02 225841.png
    Screenshot 2025-11-02 225841.png
    100 KB · Views: 138
  • 1000002981.jpg
    1000002981.jpg
    587.6 KB · Views: 135
To avoid these ads, REGISTER NOW!

firebirdparts

Well-known member
Joined
Jun 8, 2016
Messages
10,594
Location
Kingsport, TN
If I understood it (questionable) then you really just have a lot of words wrong, ceiling, beam, etc, but I think based on the pictures you want to put a vertical post into an existing wall. This post carries a heavy load. Simple situation.

The easy way, and normal way, is to not do it. Put studs in the wall instead. That's the easy way. Send the load to the ground through studs.

if you cut the top plates in two and put in a 4x4 vertically, from the load to the ground, the lateral stiffness of the wall will be zero, but the 4x4 will try to hold everything in place laterally if it reaches to the roof. I guess in the absence of more info it's about as strong either way.

Is the engineer's drawing of a header intended to accommodate that window that you have? If so, I would really really really really not cut the top plates. You are going to need them to hold the building together.
 
Last edited:

Dig Doug

Well-known member
Joined
Apr 16, 2018
Messages
1,100
I’m trying to interpret What is actually going on w/ the drawings.

I think -
the drawing from the engineer is re framing the window section of the drawing you drew up

Black are your 4x4 posts
blue is the 6x10
green is 4x6
red is new ridge beam

there is a lot going on w/ what you want to do, you have walls and roof structure that needs to be temporary supported and load bearing walls need to be cut out and removed, what about roof structure ( do you have trusses ) how does it tie into the red ridge beam

If you don’t have framing experience ( This Can Become huge problem and a safety issue if not orchestrated correctly) I suggest hiring it out a 2 or 3 man crew can get it knocked out in a day or 2

what you posted is one side of the red ridge beam ( in my detail) I’m guessing that’s an exterior wall due to the window

you haven’t posted anything about the roof structure and whats going to happen on the other end of the red ridge beam, is the window wall you drew up an exterior wall?

to get you an answer you need to post up more details, do you have an actual floor plan ?

For instance the ridge beam doesnt any any dimensions ( looks like a 6inch wide glue lam beam = Heavy ) how long is it? That beam will take some work to fit it tight up against the roof structure then pop in the green 4x6 on top of the blue 6x10

IMG_3434.jpeg
 
Last edited:

Dig Doug

Well-known member
Joined
Apr 16, 2018
Messages
1,100
In 2019 when I remodeled my house I had to something similar

but the details were different - we wanted a one big flat open ceiling like a great room and had to remove a beam that hung down below the ceiling and into the room essentially separating the kitchen and dinning room


are you trying to open up and have a vaulted ceiling?

Im not sure what Cross Beams are

maybe post up some pics if you have everything exposed
 
Last edited:

txvwnut

Well-known member
Joined
Jan 1, 2015
Messages
7,606
Location
Bedford, Texas
Since the scale on the engineered drawing is 1 inch equals 1 foot measure the opening between the beam support columns and see if it is wide enough to surround the existing studs and window header. If it is then just cut the framing members from the window header to the top plate out and place new header and support posts in. The new header will install tight to the top plate. This process all depends on if you have enough open space between the existing window header and top plate to accommodate the height of the new header beam.

If the engineer made the new header the same length as the current window header then you will have to demo the window opening and reframe for the new header and post install.
 

TRWham

Well-known member
Joined
Aug 11, 2017
Messages
1,959
Location
East Cobb County, Georgia
I'm assuming this means you intend to install a ridge beam in place of the existing ridge board to which the rafters are attached, and this is all being done for the purpose of removing the rafter ties to gain clearance. If that's all correct, the challenge here is not installing the post and beam over the window, but rather installing the gluelam ridge beam and reworking the connections to the rafters. Not to mention, it's not clear to me how the other end of the new ridge beam is to be supported.

When we do similar projects, we build temporary walls to support the roof while the ridge board is removed and the rafters are cut back to install the new ridge beam. Installing the post and beam in the gable wall is trivial, but I would probably install the beam under the top plates, but again, that only supports one end of the beam.

Did the engineer say anything about needing footings to carry this load?
 

tarmy

Well-known member
Joined
May 28, 2014
Messages
4,670
Location
Nor Cal
You could move that window and save money and effort. As noted by others, that load needs to be transmitted down the wall to a suitable foundation that can support the point(s) load. Out here, I would shear that whole wall while I was at it.
 
OP
V

Vinny

Well-known member
Joined
Jul 14, 2011
Messages
626
Location
Simi Valley, CA
More info.
Photo shows what the garage is like now. I'm trying to remove the ceiling joists so I can get more usable height. To do this, a new large beam will be installed pressed against the current ridge board going across the garage. It's currently a 2x8 board going across, about 27 feet. To hold this new beam up, the structure in the first post will be built. It will be built in the window wall, and also in the wall opposite which has no window (connects to the house), and the beam will sit on top. There is more to this build, but the first step is building these structures then getting the beam in there. The joists won't be removed until everything else is built related to this. I'll be cutting a hole in the wall and sliding the beam in with the help of a few buddies and a crane.
 

Attachments

  • 20251012_134255.jpg
    20251012_134255.jpg
    704.5 KB · Views: 74
To avoid these ads, REGISTER NOW!

Jeff Ivers

Well-known member
Joined
Apr 9, 2010
Messages
2,555
Location
Oklahoma
I think Dig Doug captured the essence of what needs to be done. I would add that the engineers specs call for a new ridge beam, not an additional one added below.
 

TRWham

Well-known member
Joined
Aug 11, 2017
Messages
1,959
Location
East Cobb County, Georgia
I think Dig Doug captured the essence of what needs to be done. I would add that the engineers specs call for a new ridge beam, not an additional one added below.
I also saw that. We've done it both ways, including one where there were 2 parallel ridges slightly offset from each other, so the new LVL ridge beam was aligned with one, but the other end caught the rafters just on one side. The whole thing was held together by hangers and brackets of various kinds. We were able to bear both ends of that beam on existing foundation walls so there was no issue with footings. In that case, we were not only vaulting the ceiling but also eliminating the center wall between the front and rear rooms of the house.

Photos show the (nearly) finished product, the goofy little hip that caused the offset ridges, and the LVLs in place but before the joists were added to carry the vaulted ceiling.

img_7635.jpg

img_4083.jpg

img_9764.jpg
 

BurtEggley

Well-known member
Joined
Oct 8, 2024
Messages
860
I would contact the engineer who did the drawings to explain what he/she intended. If you are changing things, might run it by them.
 
OP
V

Vinny

Well-known member
Joined
Jul 14, 2011
Messages
626
Location
Simi Valley, CA
Fellas,
There is much more to this plan, and I shared it in another thread if you're interested. I have everything worked out except for putting in this support for the ridge beam, which is why I only presented that piece of it.
Dig Doug's drawing is how I figured it's done, the only part I don't get is where the black beam meets the blue beam. See my attached picture (should've included this in the first place), but do I cut through the two top plates (blue) and put the 4x4 post (red) through them, and then have the 4x10 (also red) on top of it and the top plates? Would I need the additional studs (green) around it to support the now sectioned top plates?
 

Attachments

  • Wall.png
    Wall.png
    15.2 KB · Views: 54

Dig Doug

Well-known member
Joined
Apr 16, 2018
Messages
1,100
Fellas,
There is much more to this plan, and I shared it in another thread if you're interested. I have everything worked out except for putting in this support for the ridge beam, which is why I only presented that piece of it.
Dig Doug's drawing is how I figured it's done, the only part I don't get is where the black beam meets the blue beam. See my attached picture (should've included this in the first place), but do I cut through the two top plates (blue) and put the 4x4 post (red) through them, and then have the 4x10 (also red) on top of it and the top plates? Would I need the additional studs (green) around it to support the now sectioned top plates?

you need to measure everything out to make sure you have enough vertical clearance above the double top plates
hard to tell the vertical height from my recliner

the green 4x6 in my drawing can’t be to short due to the hardware / hanger straps

there are 2 ways I would install that engineered drawing from your original 1st post

This is KEY -
You need to measure out where the top of the blue 4x10 would best situated -

Blue 4x10 to high makes the new red ridge beam & green 4x6’s awkward to install

Blue 4x10 to low might interfere w/ the window framing ( make a bulge due to hardware )


1- on top of the double top plate

install the new (blue ) 4x10 above the double top plates
Run the 4x4’s up thru the double top plates

2- somewhere below the double top plate

leave the window header and studs alone cut out & remove double top plates and cripples above existing window
frame in new Eng detail per drawing

just make sure the blue 4x10 is long enough to span outside of the existing window framing I would attach the black 4x4s to the existing studs (yellow) this would make a great tie in w/ the double top plates and marry everything together new and old become one wall structure

the old king studs ( existing window framing ) would tie into the bottom of the blue 4x10
add new cripples between the bottom of the blue 4x10 and the existing window header
add 2 blocks, each side, between black 4x4 and old king studs at the old header line and the window sill line

also think thru
how your going to temporarily support existing structure and roof joists
temporarily support needs to out far enough away to get up to the ridge & ladder or scaffold move around space and enough space to get red ridge beam positioned so it can be lifted up

everything needs to be removed before that new RED ridge beam gets set in place and then the GREEN 4x6’s get cut and set under the red ridge beam

NOTE : not sure how the red ridge beam gets secured to the existing roof structure = 2x8 and rafters etc I would definitely use a T25 type of wood screw - No Nails - no room to swing a hammer/ maneuver nail gun

Picture of option 2
IMG_3443.jpeg
 

Dig Doug

Well-known member
Joined
Apr 16, 2018
Messages
1,100
Materials

when you start this make sure you have a few extra 2x4’s 4x4’s you have to temporarily support the red ridge beam, roof structure each side of the ridge beam maybe even the garage door wall and rear back wall from pushing out ( ridge can slightly come down pushing the wall out away )

a lot of moving items to be considered


the blue 4x10 says 6’ your probably going to buy that in a 8 ft long beam, so if it turns out to be a little longer ( 6 ft 5inch or 8 inch ) I don’t think it will matter very much

black 4x4posts make sure they are nice square ends and not bowed or twisted

green 4x6 look for something WITHOUT any splits sap pockets - probably only need 2-3 ? ft long - times 2 pieces ( one for each end )

I would screw everything together marry the existing Yellow stud to the black 4x4 post run 6 to 8 screws from the 2x4 to 4x4 screw the top plate to the blue 4x10 or black 4x4’s

Screws will help from splitting your existing wood framing ( nails can split the ends as they are dried out )

you can run a flat strap from double top plate onto the blue 4x10 on each side that will marry the top plate to the beam

distance from the TOP of widow header to the bottom of the blue 4x10 beam needs to have a block cripple ( like what was cut out ) in between them dont make it to close /tight 4 to 6, 8 inch gap is good 👍 to tight, hard to get good screws set and blocks split fall apart

measure everything out temporarily screw up a 2x4 up to the existing ridge and measure DOWN from the top

red ridge beam thickness
hardware thickness
green 4x6 length
hardware thickness
blue 4x10
hardware thickness
black 4x4
post base

the green 4x6 is your cheat it can be a little longer / a little shorter
you can play w/ the black 4x4 posts

Screws
they come in a variety of sizes of lengths and a good 10 gage thickness
IMG_3444.jpeg
 

firebirdparts

Well-known member
Joined
Jun 8, 2016
Messages
10,594
Location
Kingsport, TN
More info.
Photo shows what the garage is like now. I'm trying to remove the ceiling joists so I can get more usable height. To do this, a new large beam will be installed pressed against the current ridge board going across the garage. It's currently a 2x8 board going across, about 27 feet. To hold this new beam up, the structure in the first post will be built. It will be built in the window wall, and also in the wall opposite which has no window (connects to the house), and the beam will sit on top. There is more to this build, but the first step is building these structures then getting the beam in there. The joists won't be removed until everything else is built related to this. I'll be cutting a hole in the wall and sliding the beam in with the help of a few buddies and a crane.
Good, that's exactly what I imagined when I answered.
 

firebirdparts

Well-known member
Joined
Jun 8, 2016
Messages
10,594
Location
Kingsport, TN
Fellas,
There is much more to this plan, and I shared it in another thread if you're interested. I have everything worked out except for putting in this support for the ridge beam, which is why I only presented that piece of it.
Dig Doug's drawing is how I figured it's done, the only part I don't get is where the black beam meets the blue beam. See my attached picture (should've included this in the first place), but do I cut through the two top plates (blue) and put the 4x4 post (red) through them, and then have the 4x10 (also red) on top of it and the top plates? Would I need the additional studs (green) around it to support the now sectioned top plates?
I say DO NOT cut the top plates. The load will transfer to the ground through the top plates.

I had just sort of assumed the header would be under the top plates as is traditional. If you put it above, you'll have to destroy the whole wall above because you're cutting all those studs off at the bottom. You can certainly do that, though, just build a new gable. It hadn't occurred to me.
 
To avoid these ads, REGISTER NOW!
Top Bottom