To avoid these ads, REGISTER NOW!

quadrcr87's garage projects

OP
Q

quadrcr87

Well-known member
Joined
Jul 5, 2013
Messages
1,036
Location
Travelers Rest, SC
"quadrcr87's garage projects

Other than some fence gates I made a few years ago, it is time to build my first door or should I say doors. I have always been fascinated with the simplicity of weld on bullet hinges and this was in my mind the perfect application for them. I started out by heading to McMaster-Carr to find a set that would work. I think I managed to pick out the right size as they fit nicely. I also added some recessed stainless handles and some magnet catches to my cart and got them on the way.
I must say seeing a package arrive on my porch is the highlight of my day during the pandemic.

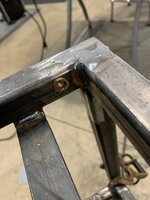
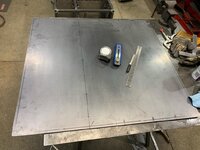
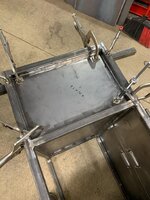
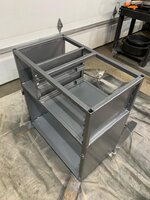
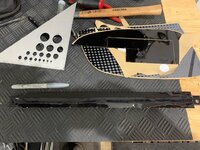
First step was to visualize the doors, take some measurements and layout the cuts on the 1/8” sheet I picked up. I decided to step up the thickness on the doors to add some rigidity without additional bracing.
bd6b5ca45077753b18dc75b9ada6c21b.jpg

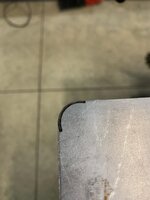
A .5” reveal ended up just right around the perimeter to provide space for the hinges. I wasn’t positive on the orientation of the hinges but it worked out and the doors still lift off.
0cbad980e03558324546941ba5bee011.jpg
794e04638199fcda50d44f0013b8c851.jpg

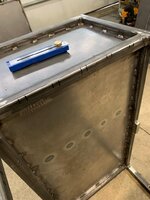
After I tacked everything in place I verified alignment and made some small adjustments to the gap.
4debc218fa55c65a00b54fe78526469d.jpg

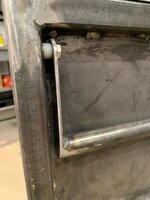
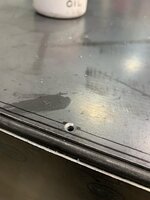
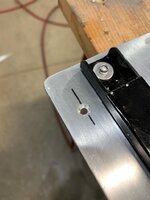
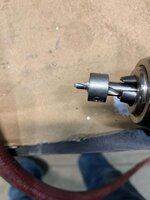
I cut out the relief for the hinges by drilling 1/4 holes in 4 corners and connecting them with a 3” cut off disc.
1868dd8aa1294b707af41c779d7f88a7.jpg

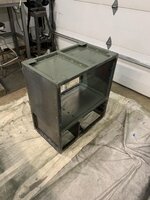
The alignment on the handles turned out spot on and I was able to use the countersunk 3/16 rivets for a flush face.
5f25ae0154ce79be3b11709786ee2d73.jpg

To finish of the doors I attached the magnetic catches with self tapping screws. I almost riveted them on and I’m glad I didn’t. The ability to make fine adjustment is key for a solid close on the doors.
553b9d5c747a58b3f1ebc2e33cee491c.jpg

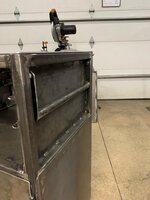
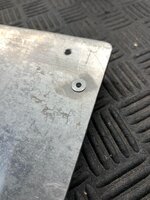
At this point I thought I was home free with an excellent job for my first doors. That is until I installed the shelf.... I managed to align the bottom rivets securing the door right at the shelf height. The measurements I took placing the handles only considered the recessed portion and I forgot about the depth of the rivets!
1e7c2fc1fdcbe88401b09c71809c532e.jpg

I was able to salvage it by grinding down the back of the rivet to ~1/8” and that was just enough to allow the doors to close. Next time I really need to recess the front of the shelf slightly and not go right to the frame face.

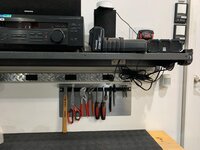
Another lesson learned was on the magnetic catches. They take up quite a bit of usable height that I didn’t consider. My 8.25” shelf spacing to fit my 8” container doesn’t work out well when the catch is encroaching on that space. Other than increasing the spacing, what could I do here? Is there a different style of door catch I should consider that doesn’t take up space? Maybe a magnet inset into the frame somehow?
Edit- I found some magic latches from Fastcap that are very thin. I’ll get them ordered. I almost cut and recessed these old door catches but it would have been a ton of extra work.

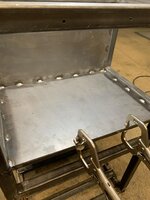
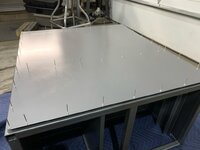
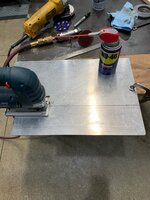
Now that I had the doors functional but flawed I shifted my focus onto the aluminum top. My countersink bit arrived so I started testing it out on the 1/8” aluminum. I was having a difficult time getting a clean countersink with a consistent depth with my cordless drill. I drill press would have helped. I started digging though some misc. hardware bins and found a collar that fit perfect as a stop. Luck was on my side and it just reinforced my bad habit of saving everything!
b6a5cf0e5d934ea7ea801a6f320a6a67.jpg
You can see the first 2 attempts on the right were rough. The stop however did a nice job keeping the bit square and a consistent depth.
eabacebf37f0c9ff4789ff17e8737f14.jpg
With this successful test I’m ready to finish fitting the top and laying out the holes. I’ll wait to rivet it on until after paint and I plan to keep the aluminum bare.
e190d571cb36177b7a964da79b3daf6b.jpg

Taking a pizza break and then I’ll be back to start on the back and side panels.
8f44f8d7a600331775047c3e39277dd9.jpg
e172ded69e61dd4adde3c3f4833b66fa.jpg


Sent from my iPhone using Tapatalk
 

Attachments

  • e172ded69e61dd4adde3c3f4833b66fa.jpg
    e172ded69e61dd4adde3c3f4833b66fa.jpg
    114.5 KB · Views: 0
  • 8f44f8d7a600331775047c3e39277dd9.jpg
    8f44f8d7a600331775047c3e39277dd9.jpg
    159.4 KB · Views: 0
  • e190d571cb36177b7a964da79b3daf6b.jpg
    e190d571cb36177b7a964da79b3daf6b.jpg
    66.1 KB · Views: 0
  • eabacebf37f0c9ff4789ff17e8737f14.jpg
    eabacebf37f0c9ff4789ff17e8737f14.jpg
    69 KB · Views: 0
  • b6a5cf0e5d934ea7ea801a6f320a6a67.jpg
    b6a5cf0e5d934ea7ea801a6f320a6a67.jpg
    57.3 KB · Views: 0
  • bd6b5ca45077753b18dc75b9ada6c21b.jpg
    bd6b5ca45077753b18dc75b9ada6c21b.jpg
    97.1 KB · Views: 1
  • 0cbad980e03558324546941ba5bee011.jpg
    0cbad980e03558324546941ba5bee011.jpg
    45.7 KB · Views: 1
  • 794e04638199fcda50d44f0013b8c851.jpg
    794e04638199fcda50d44f0013b8c851.jpg
    96.1 KB · Views: 1
  • 4debc218fa55c65a00b54fe78526469d.jpg
    4debc218fa55c65a00b54fe78526469d.jpg
    96.5 KB · Views: 0
  • 553b9d5c747a58b3f1ebc2e33cee491c.jpg
    553b9d5c747a58b3f1ebc2e33cee491c.jpg
    68.3 KB · Views: 0
  • 1868dd8aa1294b707af41c779d7f88a7.jpg
    1868dd8aa1294b707af41c779d7f88a7.jpg
    67.2 KB · Views: 0
  • 5f25ae0154ce79be3b11709786ee2d73.jpg
    5f25ae0154ce79be3b11709786ee2d73.jpg
    89.3 KB · Views: 0
  • 1e7c2fc1fdcbe88401b09c71809c532e.jpg
    1e7c2fc1fdcbe88401b09c71809c532e.jpg
    82.5 KB · Views: 0
Last edited:
To avoid these ads, REGISTER NOW!
OP
Q

quadrcr87

Well-known member
Joined
Jul 5, 2013
Messages
1,036
Location
Travelers Rest, SC
Re: "quadrcr87's garage projects

Thanks for the tip Racer-John. I have completed drilling and countersinking the aluminum top. I did find that the lower speed worked well. I did have some issues using the drill stop. 1. It caused the aluminum chips to clog frequently and not clear the flutes 2. If not careful it left an ugly ring around the hole where it contacted the surface. I used some painters tape to protect the surface and that helped but left a stick mess jammed in the flutes after each hole. Not a great process but I got it done.

ad52d36d4bfb6c1261db15cda3503aca.jpg
Since I don’t have clecos, I put in 4 rivets to hold the panel in place. Here you can see how much a standard rivet sits up.
8620b7c54ccbc8b9b25a7dd76b002063.jpg
And here is a countersunk rivet for comparison. This turned out how I had hoped and it will be nice having a smooth top that won’t catch on anything.
347c5c6fb864bcadbc8d032a0f9a27a1.jpg
The whole top is drilled and countersunk. I’ll wait to attach it until after paint.
720696ee0e499ba609a16bc1ea8cc2f8.jpg
The goal for the weekend is to get this cart done. Lots left to do.
 

Attachments

  • 720696ee0e499ba609a16bc1ea8cc2f8.jpg
    720696ee0e499ba609a16bc1ea8cc2f8.jpg
    89.3 KB · Views: 0
  • 347c5c6fb864bcadbc8d032a0f9a27a1.jpg
    347c5c6fb864bcadbc8d032a0f9a27a1.jpg
    49 KB · Views: 0
  • 8620b7c54ccbc8b9b25a7dd76b002063.jpg
    8620b7c54ccbc8b9b25a7dd76b002063.jpg
    64.9 KB · Views: 0
  • ad52d36d4bfb6c1261db15cda3503aca.jpg
    ad52d36d4bfb6c1261db15cda3503aca.jpg
    92.7 KB · Views: 0
OP
Q

quadrcr87

Well-known member
Joined
Jul 5, 2013
Messages
1,036
Location
Travelers Rest, SC
"quadrcr87's garage projects

Getting so close I can smell the paint fumes. I spent a few very productive hours in the garage this weekend and finished the last welding just as my welding gas gauge went to zero!

I cut the last 6 panels out of a sheet of 16 ga. steel with my angle grinder. I feel bad covering the entire garage with a layer of metal dust but the weather has been too hit or miss to do this outside.
08db1c7dcc3b88148eebed6b76caf83e.jpg
I added a cross brace out of 1/2” tube to support the divider between the bin rack and the open compartment
e4030b41ee3e87b18b80c6dbd8759af4.jpg

I had been thinking about adding a side handle but I didn’t want it to interfere when I nest the cart under my bench. I looked around the garage for ideas and found some inspiration from my top Craftsman chest.
ee42b8a43da6f842d41a41c4a52b4b45.jpg

I drilled and installed 1/4-20 rivnuts inset on the right side frame. It was a tight squeeze fitting the tool in there but I was able to get them set.
ca1002c2418e37090a814e40777ad03b.jpg
Then I cut out the arms from a 1/8” plate. Drilled and rounded the end profile. The width was determined by the 1” frame thickness minus the 16ga. panel.
0478ef42eeb0591c3f0c00d3cf844e0d.jpg
b422653bb5b7a784c7c7887e0427792d.jpg

This project is really making a mess of the garage. It deserves a good cleaning when this is done.
3f983ff4558a2b07d7b3904cbc6a9e3f.jpg
I was feeling the flow and didn’t take any photos of the rest of the handle build. I bolted the arms to the frame with a 1/4” plastic spacer and then cut and welded a piece of 7/8” tubing across as the handle.
024113b0d258069410d4f1a75e56234e.jpg
Down and flush with the face of the frame.
d95b6d9dedecacc56a363cf387f5eb0b.jpg
It swings up and contacts the frame at a comfortable height and holds firm with some tension.
84387d44ebb9edcbcb526a769805417a.jpg


Sent from my iPhone using Tapatalk
 

Attachments

  • ca1002c2418e37090a814e40777ad03b.jpg
    ca1002c2418e37090a814e40777ad03b.jpg
    80.6 KB · Views: 0
  • ee42b8a43da6f842d41a41c4a52b4b45.jpg
    ee42b8a43da6f842d41a41c4a52b4b45.jpg
    56.1 KB · Views: 0
  • 0478ef42eeb0591c3f0c00d3cf844e0d.jpg
    0478ef42eeb0591c3f0c00d3cf844e0d.jpg
    99.1 KB · Views: 0
  • b422653bb5b7a784c7c7887e0427792d.jpg
    b422653bb5b7a784c7c7887e0427792d.jpg
    102.6 KB · Views: 0
  • 3f983ff4558a2b07d7b3904cbc6a9e3f.jpg
    3f983ff4558a2b07d7b3904cbc6a9e3f.jpg
    131.1 KB · Views: 0
  • 024113b0d258069410d4f1a75e56234e.jpg
    024113b0d258069410d4f1a75e56234e.jpg
    69.4 KB · Views: 0
  • d95b6d9dedecacc56a363cf387f5eb0b.jpg
    d95b6d9dedecacc56a363cf387f5eb0b.jpg
    75 KB · Views: 0
  • 84387d44ebb9edcbcb526a769805417a.jpg
    84387d44ebb9edcbcb526a769805417a.jpg
    76.3 KB · Views: 0
  • e4030b41ee3e87b18b80c6dbd8759af4.jpg
    e4030b41ee3e87b18b80c6dbd8759af4.jpg
    85.3 KB · Views: 0
  • 08db1c7dcc3b88148eebed6b76caf83e.jpg
    08db1c7dcc3b88148eebed6b76caf83e.jpg
    98.8 KB · Views: 0
Last edited:
OP
Q

quadrcr87

Well-known member
Joined
Jul 5, 2013
Messages
1,036
Location
Travelers Rest, SC
"quadrcr87's garage projects

Other than providing a pocket for the handle, the recessed upper side panels also allow access to the 1” frame for clamping material to the top of the cart. I think this will be useful when I use it as a miter saw stand. I may even make some hold down brackets for the base of the saw.
a2a059f6a1e268c47f1d3b8da9afb2ee.jpg

I welded the lower panels to the outside of the frame to maximize the lower cabinet space. I got the BOSS to help lift the cart onto my welding table. It feels like it’s approaching 100lbs. The table held the weight just fine but it had to overhang to allow access for clamping.
59c7c5e3695cda81e94d00202ecf2b36.jpg
I have been measuring and laying out 1/2 welds to keep it as uniform as possible. I am surprised how well I can see the sharpie while welding. I can see the mark when I get to it.
57a72775564c84e4b8e8b8c1472e3abd.jpg
Getting close to a solid cabinet now.
45a5bdbd32586b1c83d48ab63f01e4ad.jpg
The last panel to attack was the back. I could have just welded it on but I decided to go the hard way.
a271602dc4a7c914e5c901443fb93c45.jpg
A little corner detail. Washers are the best for finding the right radius because I always have so many sizes on hand.
b3fd76e23ba7c2eaa3c886e1b911ea68.jpg
The grinder and my hand have become one on this project. It amazes me how precise a 4-1/2 flapper disk can be when used carefully.
d798099cfcbe031c021096db7d2bb8e4.jpg

For some reason I had it stuck in my head that I wanted this panel to be removable (not easily). This could be helpful if I decide to modify the cart later but the main benefit to me is that it allows me to paint it separately giving me easier access to paint inside the cart.
I had a handful of pan head self-tapping screws ready to go but it just didn’t feel right. I really needed something flush so they wouldn’t catch on everything and hit the workbench frame. I counted up the flush rivets I had bought and I had just enough.
For some reason I find laying out hole patterns oddly satisfying. 4” spacing felt right and it met the look I was after.
46d7a15d239ae779733bdfaf264308b6.jpg
It took a while to center punch, drill and countersink 40 holes but it was gratifying.
b0727621d35567db9f831b97b793853c.jpg
I was surprised to discovered that the countersink worked better on steel than aluminum. Going slow with barely more than the weight of the drill left a clean surface.
71810b3f7de9993ce60402f673b41318.jpg
Exited to put my new rivet gun to work once the paint dries on this thing. Just under 70 rivets between the top and the back panel.
825c2b2cd2c77691c25ac4a249d1d2dc.jpg
This cart has taken about 10 times longer than I originally thought. I do expect this to be with me the rest of my life and that makes it worth it.

***** Any changes or additions I should consider before I start painting tomorrow?

6b3ecf7e318a1b19808988bc0ab6f025.jpg


Sent from my iPhone using Tapatalk
 

Attachments

  • 825c2b2cd2c77691c25ac4a249d1d2dc.jpg
    825c2b2cd2c77691c25ac4a249d1d2dc.jpg
    73.4 KB · Views: 0
  • 71810b3f7de9993ce60402f673b41318.jpg
    71810b3f7de9993ce60402f673b41318.jpg
    65.1 KB · Views: 0
  • b0727621d35567db9f831b97b793853c.jpg
    b0727621d35567db9f831b97b793853c.jpg
    119 KB · Views: 0
  • 46d7a15d239ae779733bdfaf264308b6.jpg
    46d7a15d239ae779733bdfaf264308b6.jpg
    94.7 KB · Views: 0
  • d798099cfcbe031c021096db7d2bb8e4.jpg
    d798099cfcbe031c021096db7d2bb8e4.jpg
    53.8 KB · Views: 0
  • b3fd76e23ba7c2eaa3c886e1b911ea68.jpg
    b3fd76e23ba7c2eaa3c886e1b911ea68.jpg
    74.2 KB · Views: 0
  • a271602dc4a7c914e5c901443fb93c45.jpg
    a271602dc4a7c914e5c901443fb93c45.jpg
    117.9 KB · Views: 0
  • 45a5bdbd32586b1c83d48ab63f01e4ad.jpg
    45a5bdbd32586b1c83d48ab63f01e4ad.jpg
    81.1 KB · Views: 0
  • 57a72775564c84e4b8e8b8c1472e3abd.jpg
    57a72775564c84e4b8e8b8c1472e3abd.jpg
    83.7 KB · Views: 1
  • 6b3ecf7e318a1b19808988bc0ab6f025.jpg
    6b3ecf7e318a1b19808988bc0ab6f025.jpg
    108.9 KB · Views: 1
  • 59c7c5e3695cda81e94d00202ecf2b36.jpg
    59c7c5e3695cda81e94d00202ecf2b36.jpg
    136.9 KB · Views: 1
  • a2a059f6a1e268c47f1d3b8da9afb2ee.jpg
    a2a059f6a1e268c47f1d3b8da9afb2ee.jpg
    112.9 KB · Views: 0
Last edited:
OP
Q

quadrcr87

Well-known member
Joined
Jul 5, 2013
Messages
1,036
Location
Travelers Rest, SC
Re: "quadrcr87's garage projects

XJSuperman- That is a good thought. Currently it hangs on the side of my toolbox but I don't really like it there. I will check if it has clearance to mount to the side and still clear the workbench.
 

Monza Harry

Well-known member
Joined
Dec 29, 2018
Messages
1,433
Location
Windsor ON
Re: "quadrcr87's garage projects

Do you have somewhere to hang a grease gun?

With a drip, catch can that can be removed/drained just to complicate things and keep the detail level up with the rest of the project? Maybe on the inside of one of the doors, becoming one of my fav access points? Harry
 
OP
Q

quadrcr87

Well-known member
Joined
Jul 5, 2013
Messages
1,036
Location
Travelers Rest, SC
"quadrcr87's garage projects

I like the idea but there just was not enough room for the grease gun mount. Without the shelf it would have been possible. I decided to just finishing cleaning it up and sprayed it with primer tonight.
b13b19c60754b4154d26e3bf30989924.jpg
d130fbf0b0ab5722f777a0e47f73f2d1.jpg
 

Attachments

  • d130fbf0b0ab5722f777a0e47f73f2d1.jpg
    d130fbf0b0ab5722f777a0e47f73f2d1.jpg
    98 KB · Views: 0
  • b13b19c60754b4154d26e3bf30989924.jpg
    b13b19c60754b4154d26e3bf30989924.jpg
    118 KB · Views: 0
OP
Q

quadrcr87

Well-known member
Joined
Jul 5, 2013
Messages
1,036
Location
Travelers Rest, SC
Re: "quadrcr87's garage projects

Thanks John. I am going to match it with the bench I made as well as add a little black to tie in with my Gladiator cabinets.
6bea5f80db87555facaf4f861a9e51ef.jpg
I got a little color on last night but will need to finish up today.
ffd06c29a4decc2ecb35422f1c3eb0ed.jpg


Sent from my iPhone using Tapatalk
 

Attachments

  • ffd06c29a4decc2ecb35422f1c3eb0ed.jpg
    ffd06c29a4decc2ecb35422f1c3eb0ed.jpg
    105.3 KB · Views: 0
  • 6bea5f80db87555facaf4f861a9e51ef.jpg
    6bea5f80db87555facaf4f861a9e51ef.jpg
    108.6 KB · Views: 0
OP
Q

quadrcr87

Well-known member
Joined
Jul 5, 2013
Messages
1,036
Location
Travelers Rest, SC
Re: "quadrcr87's garage projects

Finished up the paint tonight but I need to wait until tomorrow for assembly. It’s only 50*F in the garage so it’s drying slow.
1cf9f2ad470a6113da76bc85e3058ba0.jpg
Glad I left the back panel off because it was already hard to paint in the small areas with both sides open.
08da211765610c34561fd4c882e04641.jpg

As I watched the paint dry I cleaned up and greased the old casters.
4a0922731c0b7abcff056096607c0d66.jpg
Unfortunately I found that one of them was bent and varies close to a 1/4” in height as it rotates. It looks like it may have been manufactured that way because the bearing cup is uneven. This explains why sometimes one wheel would spin free like a shopping cart. I had assumed it was the garage floor variance. This just won’t do. Time to go shopping for a new set of 3” wheels.
49ccc8132e70f210a95b850714a07709.jpg
 

Attachments

  • 08da211765610c34561fd4c882e04641.jpg
    08da211765610c34561fd4c882e04641.jpg
    99.7 KB · Views: 0
  • 1cf9f2ad470a6113da76bc85e3058ba0.jpg
    1cf9f2ad470a6113da76bc85e3058ba0.jpg
    117.8 KB · Views: 0
  • 49ccc8132e70f210a95b850714a07709.jpg
    49ccc8132e70f210a95b850714a07709.jpg
    76.2 KB · Views: 0
  • 4a0922731c0b7abcff056096607c0d66.jpg
    4a0922731c0b7abcff056096607c0d66.jpg
    128.6 KB · Views: 0
OP
Q

quadrcr87

Well-known member
Joined
Jul 5, 2013
Messages
1,036
Location
Travelers Rest, SC
Re: "quadrcr87's garage projects

My Christmas present is about 95% complete. After a 24 hr cure period I started assembly and riveted on the back. The hole alignment was just right as every rivet dropped in place with minimal effort. I also temporarily installed the old wheels.

069dbba04f432c05e4e4232fb7812459.jpg
7fbef4fefcd56198e70cf64e3a8fe5c6.jpg
9547380dc5435788ac6964001c064f76.jpg
And then the aluminum top installed with the same process. I added a couple dabs of silicone to the center of each panel before riveting to dampen them a little.
24e7927d7cb8e45c79fc9ea878109329.jpg
It has a bit of an aviation vibe and I dig it.
beb815d95316d95dd15c06b2bccfcd98.jpg34bfba5ddec44645f1f6e277b16a247b.jpg
Installed the handles and doors next after adding a little grease to the hinges.
6b3616c557580fc233e3b07fe5710831.jpg
a4dc257aa2fab2f13829e9bfdddedd1c.jpg
And lastly I installed the side handle. I had considered painting it black but I am glad I went with the color matched grey as it blends in.
c0962189d63c259d7d6b1703f3a958b1.jpg53d254743fb5bac3501e1aa3cf4c7c1e.jpg


Sent from my iPhone using Tapatalk
 

Attachments

  • 53d254743fb5bac3501e1aa3cf4c7c1e.jpg
    53d254743fb5bac3501e1aa3cf4c7c1e.jpg
    63.3 KB · Views: 0
  • c0962189d63c259d7d6b1703f3a958b1.jpg
    c0962189d63c259d7d6b1703f3a958b1.jpg
    58.2 KB · Views: 0
  • a4dc257aa2fab2f13829e9bfdddedd1c.jpg
    a4dc257aa2fab2f13829e9bfdddedd1c.jpg
    102.5 KB · Views: 0
  • 6b3616c557580fc233e3b07fe5710831.jpg
    6b3616c557580fc233e3b07fe5710831.jpg
    63.9 KB · Views: 0
  • 34bfba5ddec44645f1f6e277b16a247b.jpg
    34bfba5ddec44645f1f6e277b16a247b.jpg
    45.6 KB · Views: 0
  • beb815d95316d95dd15c06b2bccfcd98.jpg
    beb815d95316d95dd15c06b2bccfcd98.jpg
    62.2 KB · Views: 0
  • 24e7927d7cb8e45c79fc9ea878109329.jpg
    24e7927d7cb8e45c79fc9ea878109329.jpg
    76.8 KB · Views: 0
  • 9547380dc5435788ac6964001c064f76.jpg
    9547380dc5435788ac6964001c064f76.jpg
    56 KB · Views: 0
  • 7fbef4fefcd56198e70cf64e3a8fe5c6.jpg
    7fbef4fefcd56198e70cf64e3a8fe5c6.jpg
    98.3 KB · Views: 0
  • 069dbba04f432c05e4e4232fb7812459.jpg
    069dbba04f432c05e4e4232fb7812459.jpg
    83.6 KB · Views: 0
OP
Q

quadrcr87

Well-known member
Joined
Jul 5, 2013
Messages
1,036
Location
Travelers Rest, SC
Re: "quadrcr87's garage projects

After attaching the rear panel I am having an issue with shelf fitment. I made the shelf full depth and it is just too tight and makes slight contact with the doors. Unfortunately my only option here is to shorten the shelf which will required a cut, weld and repaint. If this is my only issue I am ok with that.

I temporarily installed one magnetic latch at the top as these will be replaced with flat rare earth magnets when they arrive.
2db670e1b8f51ede5483968ba6bc66d4.jpg
I decided to move the shelf to the top position as it prevents the door handle from hitting the shelf until I get that fixed. The drain pans and funnel box fit well. I also loaded up the hardware bins as well as some assorted hardware kits in the open compartment.
6deb3e05d530cf4a5d49045320c8b9f6.jpg

I think the black doors add a good amount of contrast. And go well with the hardware bins.
37af8a83971497c4d3a10b15356c1c98.jpg

And the most important part, it looks right at home under the workbench. I just need to find a different floor mat as it doesn’t roll very well over the memory foam mat.
9619e705b2b4acb3dcf16ebd8f3723d9.jpgb6fed45395dfe7937fa6baafd4ffd79b.jpg


Sent from my iPhone using Tapatalk
 

Attachments

  • 9619e705b2b4acb3dcf16ebd8f3723d9.jpg
    9619e705b2b4acb3dcf16ebd8f3723d9.jpg
    132.9 KB · Views: 1
  • b6fed45395dfe7937fa6baafd4ffd79b.jpg
    b6fed45395dfe7937fa6baafd4ffd79b.jpg
    96.5 KB · Views: 1
  • 37af8a83971497c4d3a10b15356c1c98.jpg
    37af8a83971497c4d3a10b15356c1c98.jpg
    92 KB · Views: 1
  • 6deb3e05d530cf4a5d49045320c8b9f6.jpg
    6deb3e05d530cf4a5d49045320c8b9f6.jpg
    101.5 KB · Views: 0
  • 2db670e1b8f51ede5483968ba6bc66d4.jpg
    2db670e1b8f51ede5483968ba6bc66d4.jpg
    75.3 KB · Views: 0
OP
Q

quadrcr87

Well-known member
Joined
Jul 5, 2013
Messages
1,036
Location
Travelers Rest, SC
Re: "quadrcr87's garage projects

Does anyone have a good source on Delrin? I want to add a couple pieces to my 2” bench frame to protect the contact points where the cart hits.


Sent from my iPhone using Tapatalk
 

Jeff Ivers

Well-known member
Joined
Apr 9, 2010
Messages
2,555
Location
Oklahoma
Re: "quadrcr87's garage projects

Really nice job on the cart! That is better made than any commercial stuff I've seen.
 

royce

Well-known member
Joined
Jun 22, 2014
Messages
3,103
Location
fairbanks ak
Re: "quadrcr87's garage projects

Quad,
That came out great.
The thought and detail shows nicely.
Well done

Royce
 
To avoid these ads, REGISTER NOW!
OP
Q

quadrcr87

Well-known member
Joined
Jul 5, 2013
Messages
1,036
Location
Travelers Rest, SC
"quadrcr87's garage projects

Really appreciate the kind words. You guys have some serious skills yourself so it means a lot.

Although the cart was a fun build, it felt good to get the garage cleaned back up and ready for some new projects. I am not sure that I have really posted any pictures of the garage layout so I figured I would take a couple after sweeping it out tonight. This is my 4th garage in the past 10 years. Normally the Harley and quad are stored in the center but I was trying to keep them clear of the welding. I’ll do a re org soon to fit a couple cars back in the garage for upcoming snow storms. I maintain an agreement with the BOSS that there is still room for her Jeep when the snow flies.

This side lines up with the 2 bay door and is the primary work area. The water softener takes up some primary real estate in the back corner along with the electrical panel and side access door. The pile in the corner is mostly empty boxes for eBay shipping and material storage.
6233e1a79af2b6242152806a2a123a59.jpg
b7574bed668143a94974f1cc1410489f.jpg
Across the front I have a couple of toolboxes and storage cabinets. Mostly filled with saws, specialty tools and wood working tools. The mechanic tools are all in my main Craftsman box. The Husky box with the wood top is convenient for small projects like electrical and assembly. I also have my HF compressor, manifold and air reel centrally located here.
ba075240f2467bfdd835f08f680c2d0c.jpg
Looking from the front corner to the single door bay. As you can see with all of the toys in the middle it’s pretty tight to get 2 cars in. I used to squeeze a Polaris RZR in here too.
8f454e89e241b8f1f16d256c92a17f8b.jpg
Looking from the single door in.
6c3b9cf4856974f1f55730cff11cd42c.jpg
And finally the gladiator storage wall. I feel like I could do more here with a better arrangement. I may add a lower gear track for cords and small items. The issue is the very tight clearance for car doors as this side has only 12” of offset from the door to the wall. With 10’ ceilings I could also take better advantage of high storage.
900ef62b86060f8f74003b9b480b9c5a.jpg
I am making the 3 car work but I look forward to a detached shop in the future. It won’t happen at our current house so it is more long term. I will say the space limit also limits my junk collecting.


Sent from my iPhone using Tapatalk
 

Attachments

  • 6233e1a79af2b6242152806a2a123a59.jpg
    6233e1a79af2b6242152806a2a123a59.jpg
    117.1 KB · Views: 0
  • b7574bed668143a94974f1cc1410489f.jpg
    b7574bed668143a94974f1cc1410489f.jpg
    123.2 KB · Views: 0
  • ba075240f2467bfdd835f08f680c2d0c.jpg
    ba075240f2467bfdd835f08f680c2d0c.jpg
    134.7 KB · Views: 0
  • 8f454e89e241b8f1f16d256c92a17f8b.jpg
    8f454e89e241b8f1f16d256c92a17f8b.jpg
    138.5 KB · Views: 0
  • 6c3b9cf4856974f1f55730cff11cd42c.jpg
    6c3b9cf4856974f1f55730cff11cd42c.jpg
    142.1 KB · Views: 0
  • 900ef62b86060f8f74003b9b480b9c5a.jpg
    900ef62b86060f8f74003b9b480b9c5a.jpg
    114.2 KB · Views: 0
Last edited:

Bigblue&Goldie

Well-known member
Joined
Mar 12, 2009
Messages
10,671
Location
AZ
Re: "quadrcr87's garage projects

I am making the 3 car work but I look forward to a detached shop in the future. It won’t happen at our current house so it is more long term. I will say the space limit also limits my junk collecting.

The 3 car struggle is real! I remember going from 2 car to 3 car and it was like hitting the lottery. I'm grateful for what I have, but I'm looking at doing a detached shop at my house. The HOA and city might not go for it, but I'm going to give it a whack.
 
OP
Q

quadrcr87

Well-known member
Joined
Jul 5, 2013
Messages
1,036
Location
Travelers Rest, SC
"quadrcr87's garage projects

After taking those pictures of the garage I realized just how bad it needed to be cleaned and organized. So that’s how I spent my Saturday.
Step one was a crisp 40*F bath for the bike and quad to rinse off the layer of metal dust. Luckily I had the Harley covered.
a93723564a79730e3c4e4dcc11a9423d.jpg
Then I swept and mopped the race deck floor. I do love the look of the tiles but I don’t think they work well in a working garage that includes metal fab. In the future I’ll have race deck in an attached garage and bare sealed concrete in the shop.
36334c56d21cedfbbb957c35f0643560.jpg
With the center sectioned cleaned I got the toys parked tight.
e659262b248e76fbcc4a7347c31cffba.jpg
845188741eaa9ed6c7fb3c615e7b785e.jpg
Then I turned my attention to the parking pad in the single bay where I park the Subaru through the winter. The Subaru is my commuter car so it sees the most miles and road slush.
051ae2a3a18846cc3275f8b715ad188e.jpg
With 110k miles it’s due for struts and I have them ready go when I get some motivation
33f67ce0cb1279bef805daadf7d863f6.jpg
The last area I tackled was the mess of material storage by the water softener. I don’t think I have seen the floor here since the summer of 2017. I need to come up with a good way to store a mix of wood and steel cutoffs. I may throw something simple together tomorrow.
09a52209bb1892788df7c30a99abcc65.jpg
My wife’s jeep is due for an oil change and rotation so that on the agenda for Sunday as well.
57d086dfd27d1df54f92be8c115db2e2.jpg
Feels good to have things getting back in order before the holiday. Maybe Santa will come through this year and bring me a 4th garage bay? Oh and if he is feeling extra jolly it would be nice if it was deep enough to fit my truck.
b4b8843a7ec81c25d522c7213d42e6da.jpgf0fab4c77bc25ee420940913649da681.jpg


Sent from my iPhone using Tapatalk
 

Attachments

  • f0fab4c77bc25ee420940913649da681.jpg
    f0fab4c77bc25ee420940913649da681.jpg
    158.1 KB · Views: 0
  • b4b8843a7ec81c25d522c7213d42e6da.jpg
    b4b8843a7ec81c25d522c7213d42e6da.jpg
    148.5 KB · Views: 0
  • 57d086dfd27d1df54f92be8c115db2e2.jpg
    57d086dfd27d1df54f92be8c115db2e2.jpg
    87.9 KB · Views: 0
  • 09a52209bb1892788df7c30a99abcc65.jpg
    09a52209bb1892788df7c30a99abcc65.jpg
    105.4 KB · Views: 0
  • 33f67ce0cb1279bef805daadf7d863f6.jpg
    33f67ce0cb1279bef805daadf7d863f6.jpg
    119.8 KB · Views: 0
  • 051ae2a3a18846cc3275f8b715ad188e.jpg
    051ae2a3a18846cc3275f8b715ad188e.jpg
    175 KB · Views: 0
  • 845188741eaa9ed6c7fb3c615e7b785e.jpg
    845188741eaa9ed6c7fb3c615e7b785e.jpg
    145 KB · Views: 0
  • e659262b248e76fbcc4a7347c31cffba.jpg
    e659262b248e76fbcc4a7347c31cffba.jpg
    154.9 KB · Views: 0
  • 36334c56d21cedfbbb957c35f0643560.jpg
    36334c56d21cedfbbb957c35f0643560.jpg
    156.3 KB · Views: 0
  • a93723564a79730e3c4e4dcc11a9423d.jpg
    a93723564a79730e3c4e4dcc11a9423d.jpg
    149.5 KB · Views: 0
Last edited:

larry4406

Well-known member
Joined
Jan 27, 2006
Messages
19,086
Location
Northern Virginia
Re: "quadrcr87's garage projects

Nice shop space.

What don't you like about the Race Deck flooring in your shop? I have been considering it.
 
OP
Q

quadrcr87

Well-known member
Joined
Jul 5, 2013
Messages
1,036
Location
Travelers Rest, SC
Re: "quadrcr87's garage projects

Nice shop space.

What don't you like about the Race Deck flooring in your shop? I have been considering it.
Overall I do like the floor it just seems better suited for a garage focused more on parking cars. I am sure I could protect the floor with pieces of wood, steel or blankets but realistically I just don’t do it.

I find that it discolors and stains with hard use. I have some rust stains and yellowing that is not easy to clean off (snowblower and gas leaks). I have also burned holes in a couple tiles when a stray weld bb rolls onto the floor. There are also a couple permanent dents from floor jacks and the motorcycle lift table.
 
OP
Q

quadrcr87

Well-known member
Joined
Jul 5, 2013
Messages
1,036
Location
Travelers Rest, SC
Re: "quadrcr87's garage projects

With the garage clean and with room for the cars the focus shifted to vehicle maintenance.
First up was the Jeep. This will be Santa’s sleigh this week so I needed to make sure it was ready for the 6hr present run.
35073d9e53c14f6c02e09cd26790c4e4.jpg
As you can see it’s a tight fit to get the garage door closed.
4ff8efc074926a06f569e3e5093048e4.jpg
After an oil change, fluid and filter check I shifted my focus to the windshield washer system. The BOSS reported that the passenger side wasn’t spraying.
dbbdf63c9c5f39275290c2910a778a1e.jpg
The sprayer nozzles were so brittle they crumbled upon removal. They were definitely plugged as the line sprayed strong into a bottle when tested.
23e2bc56028d067cdaa8638696d053c4.jpg
6860ee82139492081ec552dfa6c26522.jpg
$60 and a trip to the dealer and we have working sprayers. I went OEM because they changed the design and had a supersede on these at some point in the past 9 years and hopefully fixed the problem.
38bc4fbf4a526ce6339fa8659812a02c.jpg
Then I did a quick tire rotation. At the cost of these 32” tires I rotate religiously.
8ca80ce91bc15cb12d52ff834f0de571.jpg
Last step on the Jeep was a quick interior detail and window clean.
8257d31ebeba3ac9d6008afde3594942.jpg


Sent from my iPhone using Tapatalk
 

Attachments

  • 35073d9e53c14f6c02e09cd26790c4e4.jpg
    35073d9e53c14f6c02e09cd26790c4e4.jpg
    124.2 KB · Views: 0
  • 4ff8efc074926a06f569e3e5093048e4.jpg
    4ff8efc074926a06f569e3e5093048e4.jpg
    117.2 KB · Views: 0
  • dbbdf63c9c5f39275290c2910a778a1e.jpg
    dbbdf63c9c5f39275290c2910a778a1e.jpg
    131.8 KB · Views: 0
  • 23e2bc56028d067cdaa8638696d053c4.jpg
    23e2bc56028d067cdaa8638696d053c4.jpg
    117.2 KB · Views: 0
  • 8257d31ebeba3ac9d6008afde3594942.jpg
    8257d31ebeba3ac9d6008afde3594942.jpg
    110.6 KB · Views: 0
  • 8ca80ce91bc15cb12d52ff834f0de571.jpg
    8ca80ce91bc15cb12d52ff834f0de571.jpg
    134.7 KB · Views: 0
  • 38bc4fbf4a526ce6339fa8659812a02c.jpg
    38bc4fbf4a526ce6339fa8659812a02c.jpg
    92.5 KB · Views: 0
  • 6860ee82139492081ec552dfa6c26522.jpg
    6860ee82139492081ec552dfa6c26522.jpg
    87 KB · Views: 0
OP
Q

quadrcr87

Well-known member
Joined
Jul 5, 2013
Messages
1,036
Location
Travelers Rest, SC
Re: "quadrcr87's garage projects

With the Jeep getting all the love the Subaru was getting jealous. It’s a good thing it’s small because it doesn’t get much room over here.
a70561c2f1a7700ae2178cc941b70775.jpg
It’s still 1k away from an oil change but I checked all the fluids and the air filter. Coolant was a little low and I am hoping it isn’t a leak. The battery was the a bigger concern.
67da8ff5db7e1bbcc2a8fe354f556b58.jpg
At just 2 years old there was a lot of corrosion forming on the posts and hold down. I really like this battery cleaner as it neutralizes the acid.
0196c1bee62ceb977f17a2dcd50d50ee.jpg
The battery is ready to go for winter.
349c913d06ca737a8466d6de2cbd1ddb.jpg

This one got a quick interior clean as well. I by no means am a vehicle detailer. I have slowly made the change from Armor-all to Griots and the difference in results is noticeable. I should start waxing and buffing my vehicles at some point because I never have.
161479eab909ae32ad1fee38722f6f63.jpg


Sent from my iPhone using Tapatalk
 

Attachments

  • a70561c2f1a7700ae2178cc941b70775.jpg
    a70561c2f1a7700ae2178cc941b70775.jpg
    151.4 KB · Views: 0
  • 67da8ff5db7e1bbcc2a8fe354f556b58.jpg
    67da8ff5db7e1bbcc2a8fe354f556b58.jpg
    120.9 KB · Views: 0
  • 0196c1bee62ceb977f17a2dcd50d50ee.jpg
    0196c1bee62ceb977f17a2dcd50d50ee.jpg
    92 KB · Views: 0
  • 349c913d06ca737a8466d6de2cbd1ddb.jpg
    349c913d06ca737a8466d6de2cbd1ddb.jpg
    128.6 KB · Views: 0
  • 161479eab909ae32ad1fee38722f6f63.jpg
    161479eab909ae32ad1fee38722f6f63.jpg
    91.1 KB · Views: 0
OP
Q

quadrcr87

Well-known member
Joined
Jul 5, 2013
Messages
1,036
Location
Travelers Rest, SC
Just before I took off in Santa’s sleigh for a gift delivery, a new set of casters arrived for the oil change cart. I am extremely impressed with the quality of these from Service Caster Corporation. They are made in PA and cost $15ea. That’s about what you pay for much lower quality at tractor supply or Home Depot.
a96d7927937a46fe10d25051d8c7ae0a.jpg
Greasable axle and shielded ball bearings at the swivel.
e011537740525de48aff8758197abffe.jpg
The wheel lock mechanism is much stronger with more engagement. The teeth are finer so it is also much easier to lock.
94246db620221b09a693539355d679ba.jpg
I never thought I would be adjusting/leveling caster wheels but here we are. With the through bolt axle the wheel height has a slight adjustment.
ff9e74a00ac6b85bf39b11e0d348dea3.jpg


Sent from my iPhone using Tapatalk
 

Attachments

  • e011537740525de48aff8758197abffe.jpg
    e011537740525de48aff8758197abffe.jpg
    69 KB · Views: 0
  • a96d7927937a46fe10d25051d8c7ae0a.jpg
    a96d7927937a46fe10d25051d8c7ae0a.jpg
    73.3 KB · Views: 0
  • ff9e74a00ac6b85bf39b11e0d348dea3.jpg
    ff9e74a00ac6b85bf39b11e0d348dea3.jpg
    124.7 KB · Views: 0
  • 94246db620221b09a693539355d679ba.jpg
    94246db620221b09a693539355d679ba.jpg
    123.5 KB · Views: 0
Last edited:
OP
Q

quadrcr87

Well-known member
Joined
Jul 5, 2013
Messages
1,036
Location
Travelers Rest, SC
After a short holiday trip for some socially distanced present exchanges with my family, I’m back in the garage. It was a very odd Christmas exchanging gifts spread out in cold garages wearing masks.

Santa was good to me this year with a couple new tools. I’m really excited to up my wood working skills with a new router. After some quick research I can already tell the accessories and bits are going to get expensive.
a355a886e71beb071add33f7e1479519.jpg
The minions were happy to have a new friend as well.
7bdb46ca569dc105d002e57d89eb1427.jpg

Hopeful that the lake will actually freeze this year, I started getting the quad ready for ice racing. I swapped the rear paddles but I will be leaving the front. The Razorback front tires work surprisingly well on the ice and it’s a popular setup in the non studded class.
f3ff07291bc1e8c64c6688ff2e773011.jpg
c926b55df0a9cf140f4a83e2e054f865.jpg

The BOSS also put a trick little carbon fiber exhaust guard under the tree from one of my sponsors.
bd7c506793a2dee20315c09ab14a8a93.jpg
This addresses an issue I have been having burning my pants and boots where the exhaust routes to the muffler.
486bd243207bd56b65d689d928d654ba.jpg
It took a while to get it positioned but I finally found an orientation that cleared the fender and exhaust bend.
5e08529aa800170f95383d8e497cfef1.jpg
3113b8581e6ac11c7759ecd17e527609.jpg

I still have quite a few things left to get ready. I have a 1” shorter rear shock to try that should transfer the weight to the rear tires a little better. I’ll also need to play with the jetting to account for the ~50* temp drop. Fingers crossed that these freezing temps hold for a few weeks.


Sent from my iPhone using Tapatalk
 

Attachments

  • 3113b8581e6ac11c7759ecd17e527609.jpg
    3113b8581e6ac11c7759ecd17e527609.jpg
    125.3 KB · Views: 0
  • 5e08529aa800170f95383d8e497cfef1.jpg
    5e08529aa800170f95383d8e497cfef1.jpg
    125.6 KB · Views: 0
  • 486bd243207bd56b65d689d928d654ba.jpg
    486bd243207bd56b65d689d928d654ba.jpg
    121.5 KB · Views: 0
  • bd7c506793a2dee20315c09ab14a8a93.jpg
    bd7c506793a2dee20315c09ab14a8a93.jpg
    148.5 KB · Views: 0
  • c926b55df0a9cf140f4a83e2e054f865.jpg
    c926b55df0a9cf140f4a83e2e054f865.jpg
    142.1 KB · Views: 0
  • f3ff07291bc1e8c64c6688ff2e773011.jpg
    f3ff07291bc1e8c64c6688ff2e773011.jpg
    134.2 KB · Views: 0
  • 7bdb46ca569dc105d002e57d89eb1427.jpg
    7bdb46ca569dc105d002e57d89eb1427.jpg
    113 KB · Views: 0
  • a355a886e71beb071add33f7e1479519.jpg
    a355a886e71beb071add33f7e1479519.jpg
    118 KB · Views: 0
Last edited:
OP
Q

quadrcr87

Well-known member
Joined
Jul 5, 2013
Messages
1,036
Location
Travelers Rest, SC
Last night I spend some time cleaning up a couple neglected areas. It seems that when I get busy during race season I pile things in cabinets rather than staying organized.
I started the night by cleaning up my oil, filter and parts cabinet. I try my best to keep this cabinet dedicated to Powersports and not mixing in automotive.
0919c35e8107330017cdd4fbd911d6e4.jpg
The next area I tackled was the bench under the radio. Being located adjacent to the door to the house, this bench tends to collect bits and pieces from projects and a pile of receipts.
d043ebf622ea264865bd575e94472f79.jpg
As I was clearing it off I realized I could really make this workstation more efficient with some organization. Currently I have a magnetic rail on the face of the shelf that limits my usable height and access to the bench surface. I always have a pile of cords and lights being charged on the bench surface that get in the way as well.
63dea2df4730153c1ca2b972af290beb.jpg
My plan is to relocate the magnetic rail to the wall below the power strip and add a charging shelf. I have some material left over that should work well and a 4 day weekend to get it done.
67457864da26779abebfef5db7a6ea30.jpg


Sent from my iPhone using Tapatalk
 

Attachments

  • 0919c35e8107330017cdd4fbd911d6e4.jpg
    0919c35e8107330017cdd4fbd911d6e4.jpg
    111.2 KB · Views: 0
  • d043ebf622ea264865bd575e94472f79.jpg
    d043ebf622ea264865bd575e94472f79.jpg
    122.2 KB · Views: 0
  • 63dea2df4730153c1ca2b972af290beb.jpg
    63dea2df4730153c1ca2b972af290beb.jpg
    132.2 KB · Views: 0
  • 67457864da26779abebfef5db7a6ea30.jpg
    67457864da26779abebfef5db7a6ea30.jpg
    126 KB · Views: 0
Last edited:
OP
Q

quadrcr87

Well-known member
Joined
Jul 5, 2013
Messages
1,036
Location
Travelers Rest, SC
I’ve been taking it easy the past couple of days but I did manage to get out to the garage for a few hours.

Before I mounted the mag rail to the wall I needed to make a backsplash. It always bugs me when I leave dirty marks on the white walls. This aluminum plate will prevent that when I go to grab a tool.
fba111ec3fe0865df8efbb1cd81a38f1.jpg
It was a bit of an odd shape but eventually I settled on a 20” x 8.5” plate to fit the 18” mag rail.
e2ac6d158b0b7d15eed359ff7922932c.jpg
The plate was pretty beat up from spending time in the scrap pile. I cleaned it up with some fine grit paper and a scotchbrite pad for a brushed finish.
e6b79d641e62cb23f7e6019da92c8b33.jpg
The HF mag rails come with a very thin sticker on the face that tears easily. To offer a little more protection I cut some vinyl strips from some left over graphics and wrapped it around the edges. It laid down pretty well with the help of the heat gun.
289673b0d32ea22c930b376a5516aeea.jpg
478a0b732ea8ea8af26f9a7bdd0f641a.jpg
For mounting, I drilled and countersunk 2 holes from the rear for flush 3/16 rivets. And then 4 more holes countersunk on the front at 16” spacing.
133ad54a95a6ff2729289598e56953ea.jpg
c2178a530553c068d71bdbd984546bc5.jpg
373d2a062d7a9d733a3dda946db6098b.jpg
09fdfbae1346163399753caaedf79193.jpgd8fbbef1e7dfe72c3cdfb275ff87cbac.jpg
I really should have done this a long time ago. The tools hanging on the front of the shelf were in the way for far too long.

Next up I will finish up this bench with a 16” shelf to the left of the mag rail.


Sent from my iPhone using Tapatalk
 

Attachments

  • fba111ec3fe0865df8efbb1cd81a38f1.jpg
    fba111ec3fe0865df8efbb1cd81a38f1.jpg
    107.2 KB · Views: 0
  • e2ac6d158b0b7d15eed359ff7922932c.jpg
    e2ac6d158b0b7d15eed359ff7922932c.jpg
    116.6 KB · Views: 0
  • e6b79d641e62cb23f7e6019da92c8b33.jpg
    e6b79d641e62cb23f7e6019da92c8b33.jpg
    102.1 KB · Views: 0
  • 289673b0d32ea22c930b376a5516aeea.jpg
    289673b0d32ea22c930b376a5516aeea.jpg
    134.5 KB · Views: 0
  • 478a0b732ea8ea8af26f9a7bdd0f641a.jpg
    478a0b732ea8ea8af26f9a7bdd0f641a.jpg
    111.9 KB · Views: 0
  • 133ad54a95a6ff2729289598e56953ea.jpg
    133ad54a95a6ff2729289598e56953ea.jpg
    69.1 KB · Views: 0
  • c2178a530553c068d71bdbd984546bc5.jpg
    c2178a530553c068d71bdbd984546bc5.jpg
    111.9 KB · Views: 0
  • 373d2a062d7a9d733a3dda946db6098b.jpg
    373d2a062d7a9d733a3dda946db6098b.jpg
    76.8 KB · Views: 0
  • 09fdfbae1346163399753caaedf79193.jpg
    09fdfbae1346163399753caaedf79193.jpg
    99.2 KB · Views: 0
  • d8fbbef1e7dfe72c3cdfb275ff87cbac.jpg
    d8fbbef1e7dfe72c3cdfb275ff87cbac.jpg
    99.4 KB · Views: 0
Last edited:
OP
Q

quadrcr87

Well-known member
Joined
Jul 5, 2013
Messages
1,036
Location
Travelers Rest, SC
I didn’t have enough aluminum sheet left over for the shelf size I wanted so I decided to use up a scrap of pine I’ve had for a while. This also gave me the opportunity to try out the new router I received for Christmas.
For the first time running a router I was extremely impressed with the finished edge. I look forward to picking up more bits to try. I also want to build some sort of MFT tabletop for holding material for routing and cutting.
73069fff4b684405a8ce30cf8c50f255.jpg
Using two pieces of 1x4 yields a 7x16” shelf. Both pieces will be supported by the shelf brackets but I added a few pocket screws to pull the halves together.
bdcfe92d7022b5ccc803c269c8f8c4a2.jpg
For the finish, I wanted to try something new. I pickup up some Ebony stain and wiped on 1 coat.
bcfe41a2c7b49ccaa08500a48c86808f.jpg
After a couple hours I put on a coat of wipe on poly. First time using the stuff and it was very easy and went on even.
70c207ba33b1aad68ed81ea16a98f7a6.jpg
I don’t think I will use this color stain often but I do like the look of it. It’s probably not warm enough to go with anything in the house.

The next step is making the shelf brackets from angle iron. Unfortunately my 10” blade lost a carbide tooth and can’t do it. I was surprised to see the actual blade cracked as well. I’ll have to finish up next week when my Benchmark order comes in.
8987ff72f479433afbca62b27940c58b.jpg


Sent from my iPhone using Garage Journal
 

Attachments

  • 8987ff72f479433afbca62b27940c58b.jpg
    8987ff72f479433afbca62b27940c58b.jpg
    70.6 KB · Views: 0
  • 70c207ba33b1aad68ed81ea16a98f7a6.jpg
    70c207ba33b1aad68ed81ea16a98f7a6.jpg
    92.7 KB · Views: 0
  • bcfe41a2c7b49ccaa08500a48c86808f.jpg
    bcfe41a2c7b49ccaa08500a48c86808f.jpg
    102 KB · Views: 0
  • bdcfe92d7022b5ccc803c269c8f8c4a2.jpg
    bdcfe92d7022b5ccc803c269c8f8c4a2.jpg
    94 KB · Views: 0
  • 73069fff4b684405a8ce30cf8c50f255.jpg
    73069fff4b684405a8ce30cf8c50f255.jpg
    83.1 KB · Views: 0
Last edited:
OP
Q

quadrcr87

Well-known member
Joined
Jul 5, 2013
Messages
1,036
Location
Travelers Rest, SC
I figured while I am waiting for the new metal blade to come I should clean up my mess and bring in the BOSS’ Jeep. The rear brake parts I ordered showed up last week.
c19955c21b3693c5a895a2f951fefd33.jpg
The pads wore pretty even and they weren’t making any noise but they were very near end of life. Living in the rust belt new rotors are pretty much a necessity as well.
322f7b58ae33ad8797898963e3f96715.jpg
ddc5dfa7392212046b0400c7d7aaccc5.jpg

After I cleaned up the calipers and slides, I lubed everything up before assembly. I used to buy those little packets of line at the checkout counter but this tube is much easier and lasts a long while.
fe2c04a75a0d411b86d660fa0acdaafb.jpg
76fafca4092f5864b01a159ac0d6b2ec.jpg
After getting everything torqued to spec I had the BOSS help flush and bleed the system. She just loves it when I ask her to pump the pedal 100 times. I have been looking at vacuum bleeders but I haven’t picked one up yet.
ae94d74d068195277e6f49f8ad442402.jpg
With any luck this will be the last time I do brakes on this vehicle. The plan is to pick up one of the new Broncos in 2-3 years.


Sent from my iPhone using Tapatalk
 

Attachments

  • fe2c04a75a0d411b86d660fa0acdaafb.jpg
    fe2c04a75a0d411b86d660fa0acdaafb.jpg
    90.9 KB · Views: 0
  • ddc5dfa7392212046b0400c7d7aaccc5.jpg
    ddc5dfa7392212046b0400c7d7aaccc5.jpg
    94.5 KB · Views: 0
  • 322f7b58ae33ad8797898963e3f96715.jpg
    322f7b58ae33ad8797898963e3f96715.jpg
    130.9 KB · Views: 0
  • c19955c21b3693c5a895a2f951fefd33.jpg
    c19955c21b3693c5a895a2f951fefd33.jpg
    103 KB · Views: 0
  • 76fafca4092f5864b01a159ac0d6b2ec.jpg
    76fafca4092f5864b01a159ac0d6b2ec.jpg
    128.8 KB · Views: 0
  • ae94d74d068195277e6f49f8ad442402.jpg
    ae94d74d068195277e6f49f8ad442402.jpg
    98.5 KB · Views: 0
OP
Q

quadrcr87

Well-known member
Joined
Jul 5, 2013
Messages
1,036
Location
Travelers Rest, SC
Nothing too exciting going on in the garage the past few days but I have been killing time practicing with my new router. I have never made a French cleat before and thought it would be a good way to hang my Ford Superduty grille. That ended up being a fail.


Here is how the grille has hung for the past 5 years. Just a piece of wire barely holding on a screw. The plan was to hang this on a cleat to hide the hardware and move it closer to the ceiling.
d4d3d8a56eba3fb1a7f0278cf3de9e09.jpg

The grille was removed from my old 2000 F250 with the legendary 7.3L diesel (front end converted).The grille serves as a reminder of that great truck and my desire for another diesel. Selling was the right decision at the time but I still miss it.
c4e5664e90a3549c4b1ef12ff967ad98.jpg

I build the cleat out of some scrap 3/4” plywood I had laying around. I used a 1/8” round over bit on all of the edges and a large chamfer bit to create the 45* angle for the cleat.

I find myself using the cart as a router fixture table because it’s easy to work on and clean up in the middle of the floor. I have some ideas on how to make this work better.....more on that later.
8731d84c0680990c28a7f5444bec0cd3.jpg

I took down the grille and used this opportunity to give the wall and ceiling a good cleaning.
7c65563dca45ddbbd4445390b1647abc.jpg
This wouldn't be GJ if I didn’t take the time to polish the grille and remove the 10 year old dried on bugs. It was removed from the truck due to pealing chrome sometime around 2010, but it still looks good from a distance.
0f02b68a5fe6de87c5c16a4674c51ec0.jpg
For a finish I used the same ebony stain and wipe on poly as the shelf I made earlier. This photo was taken before I added the front cleat supports.
d77910701e6dac854ae73cdc06dd8a71.jpg

I secured it to the grille with 2 of the existing mounting holes.
59bafede86209dbf47221e0a27a4a52b.jpg

Then I drilled and countersunk 2 holes to secure the cleat to a stud with 2” deck screws.
cdd9a070adeb5e300840fd9deb18dfb6.jpg

Test fitting the mount I realized something wasn’t right. It really did not hold very secure. A test fit with the grill confirmed it. It held but with a light pull on the grill the cleat would slip off. I think my issue is the height of the upper cleat and the distance of the grille from the wall. It puts too much leverage on the connection allowing it to pull from the wall instead of directing that force straight down.
de30cb0c3e0fbb41a59bb4d9d49b79de.jpg

I’ll master the French cleat on a future project. For now I abandoned it and just screwed the mount directly to the wall and attached the grille. I still accomplished my goal of practicing with the router.
59921bbb95e00d6ac0a44d5e105124ad.jpg

I had a couple orders arrive from Benchmark and Amazon. Now I can get the shelf brackets made this weekend and get started on the next project.
e05b332b07bdde4e60b6bd6c263235a0.jpg

Thanks for following along!


Sent from my iPhone using Tapatalk
 

Attachments

  • cdd9a070adeb5e300840fd9deb18dfb6.jpg
    cdd9a070adeb5e300840fd9deb18dfb6.jpg
    42.6 KB · Views: 0
  • 59bafede86209dbf47221e0a27a4a52b.jpg
    59bafede86209dbf47221e0a27a4a52b.jpg
    113.3 KB · Views: 0
  • e05b332b07bdde4e60b6bd6c263235a0.jpg
    e05b332b07bdde4e60b6bd6c263235a0.jpg
    128.5 KB · Views: 0
  • 59921bbb95e00d6ac0a44d5e105124ad.jpg
    59921bbb95e00d6ac0a44d5e105124ad.jpg
    94.4 KB · Views: 0
  • de30cb0c3e0fbb41a59bb4d9d49b79de.jpg
    de30cb0c3e0fbb41a59bb4d9d49b79de.jpg
    35.5 KB · Views: 0
  • d77910701e6dac854ae73cdc06dd8a71.jpg
    d77910701e6dac854ae73cdc06dd8a71.jpg
    117.2 KB · Views: 0
  • 0f02b68a5fe6de87c5c16a4674c51ec0.jpg
    0f02b68a5fe6de87c5c16a4674c51ec0.jpg
    136 KB · Views: 0
  • 7c65563dca45ddbbd4445390b1647abc.jpg
    7c65563dca45ddbbd4445390b1647abc.jpg
    114.2 KB · Views: 1
  • 8731d84c0680990c28a7f5444bec0cd3.jpg
    8731d84c0680990c28a7f5444bec0cd3.jpg
    121.4 KB · Views: 1
  • c4e5664e90a3549c4b1ef12ff967ad98.jpg
    c4e5664e90a3549c4b1ef12ff967ad98.jpg
    114 KB · Views: 1
  • d4d3d8a56eba3fb1a7f0278cf3de9e09.jpg
    d4d3d8a56eba3fb1a7f0278cf3de9e09.jpg
    114.2 KB · Views: 0
Last edited:

zmotorsports

ALLIANCE MEMBER
Joined
Oct 20, 2009
Messages
21,348
Location
Northern Utah
Nice job on the grille mount.

I can't believe I'm saying this but, those early 2000's Ford Powerstrokes were built like tanks. The only real weak point in my opinion is the 4R100 transmission and they can be built up to last. The 7.3 Navistar engine was a strong and reliable engine that can go several hundred thousand miles easily even with some abuse.

My BIL and sister bought a new 2000 4-door shortbed Powerstroke in late 1999 and it's still on the road running strong. He has about 150k miles on it now so I know I'll be doing a transmission here in the near future but otherwise some minor problems like the injector wiring harness running under the rocker cover, vacuum locking hub seal and some ball joints and it's been on the road reliably since new. He just had a new seat installed and had some paint touched up along with adding a Champaign color along the bottom body line and fender flares. Truck still looks good. He was looking at new ones about 3 years ago and I talked him out of it and convinced him to keep the old 7.3 Powerstroke and invest the $70k plus elsewhere. I think he really wanted a new one but was looking for someone to talk him into a new one vs. talking him into keeping the old one.
 
OP
Q

quadrcr87

Well-known member
Joined
Jul 5, 2013
Messages
1,036
Location
Travelers Rest, SC
Nice job on the grille mount.

The 7.3 Navistar engine was a strong and reliable engine that can go several hundred thousand miles easily even with some abuse.

Thanks Mike. I sold mine with about 220K on the odometer. I replaced the same items as your BIL and sister as well as a set of glow plugs and a starter solenoid. Midwest rust was starting to take over the truck so I even replaced the whole bed with one out of Texas. We repainted the quarter panels and cab corners at the same time. I knew the turbo and trans were going to be next on the list but I decided to sell it instead.

At the time I had a company truck so my wife was driving the Superduty as her daily. We decided to replace it with the Grand Cherokee she has now. Much better for her purposes. At some point I will replace my 2013 F150 with a diesel and all will be right in the world. The current Ford 6.7L looks to be a solid option.
 

Bigblue&Goldie

Well-known member
Joined
Mar 12, 2009
Messages
10,671
Location
AZ
I think we'd get along good.....this is the "new" love of my life when I got a few months ago. My 2nd 1999 7.3L. I call it my Grandpa Tow Rig Special.
 

Attachments

  • 20200522_151227.jpg
    20200522_151227.jpg
    152.3 KB · Views: 41
To avoid these ads, REGISTER NOW!
Top Bottom