
You are using an out of date browser. It may not display this or other websites correctly.
You should upgrade or use an alternative browser.
You should upgrade or use an alternative browser.
quadrcr87's garage projects
- Thread starter quadrcr87
- Start date
Now that I have a fresh blade it’s time to get back to the shelf brackets.
Since the labeling is only on one side I have to make my own so A)I use the right one for the material and B) it spins in the right direction. Maybe someday Benchmark will label both sides. I also jumped up from a 52 tooth to an 80T to see how I like it.

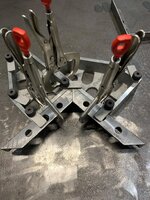
I cut 4 pieces of 1” angle iron with a 45* on each side. The goal was to match the bevel on the front edge of the shelf. The new blade worked well. Defiantly a smoother finish than than the 52T

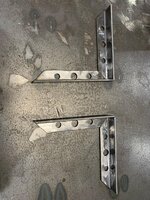
When it comes to design I think it’s fun to ask the BOSS for her opinion. It helps her feel a little involved when I’m spending a few hours out in the garage. In this case I drew out a few hole patterns. Ultimately she chose #3, which was the small/large/small hole arrangement.
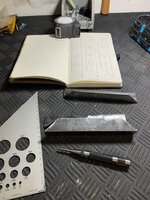
I just picked up this starrett automatic punch and it was so much faster, especially with an odd shaped piece without a vice.


I love step drill bits and I find it much easier to remember the diameter I need by marking a reference with a Sharpie.

I repeated the pattern on all 4 pieces.


Once again my minions proved invaluable for fixture abilities. If you pick a pair of these up I recommend the 6” c clamp pliers. They fit into the relief slots very well.


The 8” Monster square worked well too. The only issue is the rounded inside profile of angle iron prevents in from contacting in both faces.

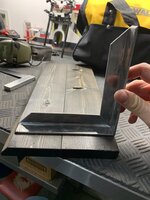
After seeing the bare steel against the wood I may not paint these after all. I am thinking about coating them with carnauba wax to prevent surface rust. Should be ok being indoors. What do you guys think?


If you have made it this far, thanks for following along!
Sent from my iPhone using Tapatalk
Since the labeling is only on one side I have to make my own so A)I use the right one for the material and B) it spins in the right direction. Maybe someday Benchmark will label both sides. I also jumped up from a 52 tooth to an 80T to see how I like it.
I cut 4 pieces of 1” angle iron with a 45* on each side. The goal was to match the bevel on the front edge of the shelf. The new blade worked well. Defiantly a smoother finish than than the 52T
When it comes to design I think it’s fun to ask the BOSS for her opinion. It helps her feel a little involved when I’m spending a few hours out in the garage. In this case I drew out a few hole patterns. Ultimately she chose #3, which was the small/large/small hole arrangement.
I just picked up this starrett automatic punch and it was so much faster, especially with an odd shaped piece without a vice.
I love step drill bits and I find it much easier to remember the diameter I need by marking a reference with a Sharpie.
I repeated the pattern on all 4 pieces.
Once again my minions proved invaluable for fixture abilities. If you pick a pair of these up I recommend the 6” c clamp pliers. They fit into the relief slots very well.
The 8” Monster square worked well too. The only issue is the rounded inside profile of angle iron prevents in from contacting in both faces.
After seeing the bare steel against the wood I may not paint these after all. I am thinking about coating them with carnauba wax to prevent surface rust. Should be ok being indoors. What do you guys think?
If you have made it this far, thanks for following along!
Sent from my iPhone using Tapatalk
Attachments
-
 9e4b5e5bba95de0c44094017dab64256.jpg102.6 KB · Views: 2
 -
 87d3a2c1cf65819dec345d4cff08f485.jpg106.4 KB · Views: 2
 -
 6f60b75534ec96981e9e8ce36eb07dc6.jpg128.9 KB · Views: 2
 -
 2ee7f22bdd24602678c06e7513f96e23.jpg125.7 KB · Views: 1
 -
 007074d30c3e891d30568636b2217ae5.jpg147.9 KB · Views: 1
 -
 a77931feb01e174732501cd8a56998e6.jpg166.9 KB · Views: 1
 -
 aa141f6c5d3d3749b836c757852d2736.jpg85.7 KB · Views: 0
 -
 1a193755e5ff38e661e17558f913bd87.jpg100.2 KB · Views: 0
 -
 4bd16031ba79faf09fa9a74165b0250b.jpg122.1 KB · Views: 0
 -
 9212bb0a10cad29d9a580c4a8b94845c.jpg116.9 KB · Views: 0
 -
 213b1a8973075fad3f2f3d5794f7d675.jpg77.9 KB · Views: 0
 -
 d91e615b2cf5595952d1cf0375164872.jpg99.3 KB · Views: 0
Last edited:
larry4406
Well-known member
Man you really turn out some neat projects!
I like the tool holder you made for your welding cart that you showed in Post 130 and have shamelessly stolen your pictures for a future project of mine.
I am also now researching the Evolution saw and Fireball Tool Minions and square that proved so helpful on your oil change cart build.
I like the tool holder you made for your welding cart that you showed in Post 130 and have shamelessly stolen your pictures for a future project of mine.
I am also now researching the Evolution saw and Fireball Tool Minions and square that proved so helpful on your oil change cart build.
Man you really turn out some neat projects!
I like the tool holder you made for your welding cart that you showed in Post 130 and have shamelessly stolen your pictures for a future project of mine.
Thanks Larry, I am just having fun and working on anything that catches my interest. I took the tool holder idea from SWAG Off-road. Check theirs out first before you start making one. It’s pretty reasonably priced and may work perfect for you.
Sent from my iPhone using Tapatalk
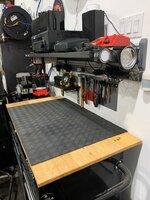
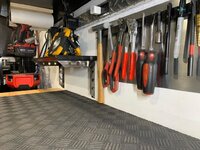
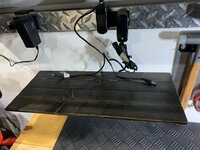
I decided to move forward with leaving the shelf brackets in bare metal. I coated them with Boeshield T-9. After a few hours it dried with an even and clear finish. I can also feel the paraffin wax coating left behind. I may have to re apply occasionally, but with any luck it will stay rust free.
With the power strip overhead, all of my charging cords rest on the shelf.


I really like how the bare finish shows the HAZ around the welds.

This project really cleaned up the bench. Now the hard part is keeping it clutter free.


I received a call from my dad last night asking me how far I was from Barrien Springs, MI. Next think I knew I was in my truck headed to pick up a wood lathe for his new hobby!
It’s a Rockwell/ Delta 46-111 model with a GE motor. I’ll be delivering it to him when this virus calms down or he gets the vaccine, whichever comes first.
He will have to figure out how he wants to mount it to the stand and setup the motor. This lathe and motor were never fitted to this universal stand. If anyone has experience with these and wants to offer some advise, I am all ears. I am thinking mounting the motor on a bracket below the lathe makes the most sense. I did a little research and found that Delta made a cast iron stand for these. Unfortunately, the pricing is higher than the lathe and tooling cost him.

Thanks for following along!
Sent from my iPhone using Tapatalk
With the power strip overhead, all of my charging cords rest on the shelf.
I really like how the bare finish shows the HAZ around the welds.
This project really cleaned up the bench. Now the hard part is keeping it clutter free.
I received a call from my dad last night asking me how far I was from Barrien Springs, MI. Next think I knew I was in my truck headed to pick up a wood lathe for his new hobby!
It’s a Rockwell/ Delta 46-111 model with a GE motor. I’ll be delivering it to him when this virus calms down or he gets the vaccine, whichever comes first.
He will have to figure out how he wants to mount it to the stand and setup the motor. This lathe and motor were never fitted to this universal stand. If anyone has experience with these and wants to offer some advise, I am all ears. I am thinking mounting the motor on a bracket below the lathe makes the most sense. I did a little research and found that Delta made a cast iron stand for these. Unfortunately, the pricing is higher than the lathe and tooling cost him.
Thanks for following along!
Sent from my iPhone using Tapatalk
Attachments
-
 91e0546e1b241fdb28795d754c9da3dc.jpg110.2 KB · Views: 0
 -
 2bc85da6ee6ec7790ca3d37df01b7afb.jpg118.8 KB · Views: 0
 -
 36a9ce0849b3359ce0fb41e2455f47bd.jpg108.5 KB · Views: 0
 -
 5fc9e3db8c7de668238d5e54398487b5.jpg125.1 KB · Views: 0
 -
 db59338dc9ec3d37385184fa31f5e896.jpg105.8 KB · Views: 0
 -
 44d2b6b7dc1f8aa8f48e7490b88f0eb4.jpg109.4 KB · Views: 0
Last edited:
XJSuperman
Well-known member
Wow that shelf looks great. I used the same hole pattern on my airtank feet. I see you already coated them, but I was going to suggest Boiled Linseed Oil for them. Probably wouldn't need recoating.
For your father's lathe, can you swing by, wipe it down, and leave it in the driveway for him? Then he can bring it in and get started on it.
For your father's lathe, can you swing by, wipe it down, and leave it in the driveway for him? Then he can bring it in and get started on it.
Wow that shelf looks great. I used the same hole pattern on my airtank feet. I see you already coated them, but I was going to suggest Boiled Linseed Oil for them. Probably wouldn't need recoating.
For your father's lathe, can you swing by, wipe it down, and leave it in the driveway for him? Then he can bring it in and get started on it.
Thanks XJSuperman. I considered linseed oil but I was concerned that it would take a very long time to dry. I do have some that I could apply in the future. Maybe Ill put it on a test piece and see if I like it.
I would definitely drop it off to him if he lived closer. Unfortunately he is about 6 hours away in Northern Michigan. It doesn't make sense to make the trip unless I can spend some time with him. When this pandemic is over, I plan to take a couple days off work and spend some quality time up there.
Is your username referring to a Jeep Cherokee? I restored a 1989 XJ as my first vehicle when I was 15. I can share some photos if you are interested.
XJSuperman
Well-known member
Yes it is, mine is a 2001. Bummer on the long trip.
Here is a before and after of my old Jeep. This was around 2002. My dad helped me restore it with a new long block, body work and paint. Once it was drivable I installed a 4.5” Rubicon Express lift and a set of 32” BFG Mud Terrains. It was a lot of fun to drive but I decided to sell it just before I left for college. It wasn’t the best on the freeway and I needed something that was better for towing.
They are great vehicles and it would be fun to get another one some day.


Sent from my iPhone using Tapatalk
They are great vehicles and it would be fun to get another one some day.
Sent from my iPhone using Tapatalk
Attachments


C91x
Well-known member
I'm glad you left the brackets raw. I always like how most of my projects look when they're still unpainted, especially if I tig weld any of it.
XJSuperman
Well-known member
The Jeep looks great, I bet that was a fun one. I actually bought mine for college, and it did pretty well going from Ohio to Iowa. These days...not so much, but Im working on that.
I'm glad you left the brackets raw. I always like how most of my projects look when they're still unpainted, especially if I tig weld any of it.
Thanks, I am glad I did as well. I feel like I’m finally getting to the point where I don’t mind looking at my welds. In the beginning my instinct was to grind them all flush to hide the ugly. Haha
I really want to get a TIG to start practicing but I can’t justify it yet. I have some machines that take priority like a plasma cutter, band saw and a drill press.
Sent from my iPhone using Tapatalk
The Jeep looks great, I bet that was a fun one. I actually bought mine for college, and it did pretty well going from Ohio to Iowa. These days...not so much, but Im working on that.
It was a lot of fun and a great learning experience. My dad let me do most of the work but was there to guide me when needed. I can tell you it made me appreciate my first car a lot more than my buddies that were driving mom’s old sedan.
Sent from my iPhone using Tapatalk
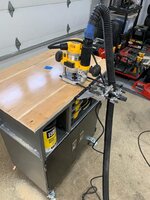
Some parts started showing up for the next project and I’m excited to get started. The first time I ran my router it became very obvious I needed a better way to fixture and hold wood. I also need a clean surface dedicated to wood projects that is free of grease and rough surfaces that cause damage.
After several hours of research, I decided a T-track table would be perfect. At the same time I also realized that I didn’t want to give up the floor space to store a full table. My solution is to build a removable top that rests on my oil change cart.

I considered a pre made table top from Rockler but the dimensions were a little off from what I needed. I am making the top 32”x20” which will give me a 2” overhang on all 4 sides of the cart. I plan to layout the track very similar to Rockler spaced 4” from the perimeter.

Before the table top build can begin I took care of a small project for the BOSS. All of the wood utensils, bowls and cutting board in our kitchen have been very neglected. Clearly she doesn’t take care of her tools as well as I do. Haha

I really didn’t realize how many wood items we had collected. It was a little eye opening seeing them all in the same place. Luckily most of it was in good shape and only needed a quick cleaning and a coat of oil. It soaked up the oil like a sponge. Very dry from multiple trips through the dish washer! A couple pieces needed some light sanding as well, especially the large cutting board.

Now that the BOSS is happy we can get to the real work.
Thanks for following along!
Sent from my iPhone using Tapatalk
After several hours of research, I decided a T-track table would be perfect. At the same time I also realized that I didn’t want to give up the floor space to store a full table. My solution is to build a removable top that rests on my oil change cart.
I considered a pre made table top from Rockler but the dimensions were a little off from what I needed. I am making the top 32”x20” which will give me a 2” overhang on all 4 sides of the cart. I plan to layout the track very similar to Rockler spaced 4” from the perimeter.
Before the table top build can begin I took care of a small project for the BOSS. All of the wood utensils, bowls and cutting board in our kitchen have been very neglected. Clearly she doesn’t take care of her tools as well as I do. Haha
I really didn’t realize how many wood items we had collected. It was a little eye opening seeing them all in the same place. Luckily most of it was in good shape and only needed a quick cleaning and a coat of oil. It soaked up the oil like a sponge. Very dry from multiple trips through the dish washer! A couple pieces needed some light sanding as well, especially the large cutting board.
Now that the BOSS is happy we can get to the real work.
Thanks for following along!
Sent from my iPhone using Tapatalk
Attachments


With the long weekend I was able to get some quality time in the garage. I made a trip up to Menards and picked up a 4x8 sheet of pre finished 3/4” plywood. It was the best quality ply I could find locally and that is pretty disappointing. Neither of my local lumber yards carry baltic birch which is what I was really after.
Luckily it warmed up to 40*F so I was able to run the circular saw outside and keep the dust out of the garage. I see a track saw in my future because accuracy is very difficult with my edge guide on the ground.

I picked up a 60T finish blade and it provided a very clean cut with minimal tear out.

Despite my effort to be accurate outside as the sun was setting, I was about 1/16” off. I cleaned it up with the router and squared up two 32x20” panels.


As part of my Rockler order I picked up a dust hose kit for my shop vac. I was tired of struggling to connect to various saws, sanders and the router. It works pretty well but the hose is a little heavy and it has some resistance when expanding to longer lengths.

Their bench cookies also work extremely well. With just 4, it holds a panel in place on the top of my cart just as I had planned. With 6 cookies it is even better.

I determined the position of the tracks based on the coverage of the clamps. 4” from the edge to the center of the rail was perfect.

I set up the router with an edge guide on the plunge base with a 3/4” straight bit. I took 3 passes to get to the final depth.

I test fit 1 rail to confirm the depth was good before finishing it up.

I ran the two shorter lengths at the same 4” spacing. The dust collection worked surprisingly well other than the shop vac filter clogging each pass!

After the tracks were done, I ran an 1/8” round over bit over all of the outer edges of the panel as the ply was very sharp and would chip easy.

I did some research on how to glue up the panels with the pre finish and I didn’t like the options. Some suggested construction adhesive but it didn’t seem right. So instead, I stripped them starting with 60 grit and finishing with 150 grit so I could use wood glue.


Sent from my iPhone using Tapatalk
Luckily it warmed up to 40*F so I was able to run the circular saw outside and keep the dust out of the garage. I see a track saw in my future because accuracy is very difficult with my edge guide on the ground.
I picked up a 60T finish blade and it provided a very clean cut with minimal tear out.
Despite my effort to be accurate outside as the sun was setting, I was about 1/16” off. I cleaned it up with the router and squared up two 32x20” panels.
As part of my Rockler order I picked up a dust hose kit for my shop vac. I was tired of struggling to connect to various saws, sanders and the router. It works pretty well but the hose is a little heavy and it has some resistance when expanding to longer lengths.
Their bench cookies also work extremely well. With just 4, it holds a panel in place on the top of my cart just as I had planned. With 6 cookies it is even better.
I determined the position of the tracks based on the coverage of the clamps. 4” from the edge to the center of the rail was perfect.
I set up the router with an edge guide on the plunge base with a 3/4” straight bit. I took 3 passes to get to the final depth.
I test fit 1 rail to confirm the depth was good before finishing it up.
I ran the two shorter lengths at the same 4” spacing. The dust collection worked surprisingly well other than the shop vac filter clogging each pass!
After the tracks were done, I ran an 1/8” round over bit over all of the outer edges of the panel as the ply was very sharp and would chip easy.
I did some research on how to glue up the panels with the pre finish and I didn’t like the options. Some suggested construction adhesive but it didn’t seem right. So instead, I stripped them starting with 60 grit and finishing with 150 grit so I could use wood glue.
Sent from my iPhone using Tapatalk
Attachments
-
 34e69f9abc39c5702f0095640b05f6dd.jpg120.9 KB · Views: 0
 -
 0ebc083ed019c81e14418f0ff8a0a499.jpg84.6 KB · Views: 0
 -
 ede08f90326dc4a564a19c5a4439e91e.jpg115.6 KB · Views: 0
 -
 ad29f5fc2bc71d2de97e8064efd49706.jpg89.7 KB · Views: 0
 -
 5495f5a4a1ffd62f2dab63352a97586a.jpg100.2 KB · Views: 0
 -
 5cf8d6f3ba2676331e8a155d99488d84.jpg86.1 KB · Views: 0
 -
 5e53ddc87a362c1e18cf8a0d241d87b5.jpg85.8 KB · Views: 0
 -
 12a6df6aa74b096aa552a85e88d4569b.jpg81.6 KB · Views: 0
 -
 9877a6284ceaf4493399449c93cb251e.jpg78.2 KB · Views: 0
 -
 f3cc091e96210f085fad7d8d4ad7fc09.jpg153.9 KB · Views: 0
 -
 674107e000658ee5e81d51769248e6e2.jpg57.4 KB · Views: 0
 -
 bdd8ba35f008277b23101ce14b499f03.jpg129.1 KB · Views: 0
 -
 a0bd392a4ea4b74bcda32cbc6ba82f92.jpg132.2 KB · Views: 0
Last edited:


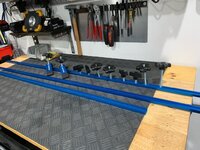
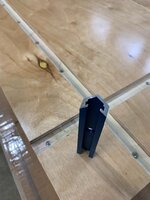
Turns out the wood was the easy part.... Fitting the T Track took some time and precision. Rocker sells an intersection kit for $25 but my layout would require 4 and I would still need to buy additional track. I decided to miter my own to lower the overall project costs.
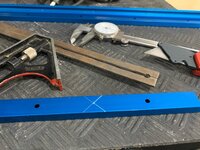
The blue anodizing worked just like layout dye. I was able to mark all of my cuts with a utility knife.

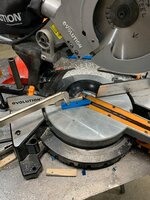
The long pieces were easy to clamp and cut but the 4” pieces were a little sketchy. I would like to come up with a better fence and clamp setup for this saw but I haven’t come up with a plan yet.

The cuts were pretty clean but I did spend some time with a file and a de-burring tool dialing in each piece.

Dust collection is almost non exists with this saw. I gave up on the vac hose pretty quick.

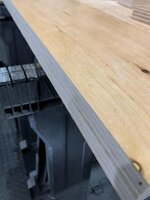
Not perfect but the T-nuts slide through with ease.

I can call this project complete. I am very happy with the versatility this layout with give me for routing and cutting. As a bonus I can flip the table over and have a smooth working surface for finishing and gluing.

I am a little concerned that I need to drill and add some additional screws at the intersections. I was able to use 1” screws so they do have a pretty strong hold. It will be easy enough to add more later if needed.

I will use some of my remaining ply to make some additional fixtures. The kit came with some extra T-bolts and hold down knobs that will be perfect for this. I can also use standard 1/4 and 5/16 bolts.
I have also considered adding a section of track to the bottom so that I can clamp the top to the cart. It would be easy enough to do.

So what do you think of the table? I am far from being an experienced wood worker but I am having fun learning.
Thanks for following along!
Sent from my iPhone using Tapatalk
The blue anodizing worked just like layout dye. I was able to mark all of my cuts with a utility knife.
The long pieces were easy to clamp and cut but the 4” pieces were a little sketchy. I would like to come up with a better fence and clamp setup for this saw but I haven’t come up with a plan yet.
The cuts were pretty clean but I did spend some time with a file and a de-burring tool dialing in each piece.
Dust collection is almost non exists with this saw. I gave up on the vac hose pretty quick.
Not perfect but the T-nuts slide through with ease.
I can call this project complete. I am very happy with the versatility this layout with give me for routing and cutting. As a bonus I can flip the table over and have a smooth working surface for finishing and gluing.
I am a little concerned that I need to drill and add some additional screws at the intersections. I was able to use 1” screws so they do have a pretty strong hold. It will be easy enough to add more later if needed.
I will use some of my remaining ply to make some additional fixtures. The kit came with some extra T-bolts and hold down knobs that will be perfect for this. I can also use standard 1/4 and 5/16 bolts.
I have also considered adding a section of track to the bottom so that I can clamp the top to the cart. It would be easy enough to do.
So what do you think of the table? I am far from being an experienced wood worker but I am having fun learning.
Thanks for following along!
Sent from my iPhone using Tapatalk
Attachments
-
 ba4bcc76a75a093fe0be92bfd30d8d3a.jpg113 KB · Views: 0
 -
 2e8362f813121cca5fcbaf644c121029.jpg138.2 KB · Views: 0
 -
 889d90edc5f94e74c342ff456f705dad.jpg64 KB · Views: 0
 -
 5f691590576d9964e168ca852f54f3a7.jpg148.5 KB · Views: 0
 -
 8fe6ca52592c6ec8ffff24c4645b52c0.jpg74.6 KB · Views: 0
 -
 3e33f06557f7f288c7cabc24b1197367.jpg85.3 KB · Views: 0
 -
 c76ebe3d14cf8e68616bcd1113024c0d.jpg96.3 KB · Views: 0
 -
 dab80161b5e53cb5f830768df5f7f325.jpg97 KB · Views: 0
Last edited:
Monza Harry
Well-known member
Turns out the wood was the easy part.... Fitting the T Track took some time and precision. Rocker sells an intersection kit for $25 but my layout would require 4 and I would still need to buy additional track. I decided to miter my own to lower the overall project costs.
Absolutely!
...
The long pieces were easy to clamp and cut but the 4” pieces were a little sketchy. I would like to come up with a better fence and clamp setup for this saw but I haven’t come up with a plan yet.
For the short pieces since they already have holes, "Screw Em!" ...down that is, to a piece of sacrificial lumber. For even greater rigidity you could slot the wood for them to be held firmly in place, or at least a back stop for the piece to be pressed against, therefore not relying on the narrowed fence section.
The cuts were pretty clean but I did spend some time with a file and a de-burring tool dialing in each piece.
Foreseeable
Dust collection is almost non exists with this saw. I gave up on the vac hose pretty quick.
More Suction!
Not perfect but the T-nuts slide through with ease.
I can call this project complete. I am very happy with the versatility this layout with give me for routing and cutting. As a bonus I can flip the table over and have a smooth working surface for finishing and gluing.
I am a little concerned that I need to drill and add some additional screws at the intersections. I was able to use 1” screws so they do have a pretty strong hold. It will be easy enough to add more later if needed.
Both sound like good ideas, perhaps a flat head screw at the intersection point, just add a flat to the end of the pieces to allow the screw to pass through, re-assemble and using a DP/mill C'fer the track and pilot drill for the screw?
I will use some of my remaining ply to make some additional fixtures. The kit came with some extra T-bolts and hold down knobs that will be perfect for this. I can also use standard 1/4 and 5/16 bolts.
I have also considered adding a section of track to the bottom so that I can clamp the top to the cart. It would be easy enough to do.
Both again should prove very versatile additions to your project especially being able to hold it still [clamping it to something without obstructions on top]. Have you considered threaded inserts for a less obtrusive way on the bottom? I use these frequently, allows 1/4-20 into wood for easy R & R of assemblies.
https://www.homedepot.ca/search?q=Threaded inserts#!q=Threaded inserts
So what do you think of the table? I am far from being an experienced wood worker but I am having fun learning.
Not to Shabby For sure! Adding multi-use tool to an existing one is a BIG win!
Thanks for following along!
No! Thank You for Sharing
Sent from my iPhone using Tapatalk


Those threaded inserts are available in a few sizes I have found #6, [Some Home Hardwares], #8 [Lee Valley] and I have seen M6 in the past but not recently. Harry
Attachments


Those threaded inserts are available in a few sizes I have found #6, [Some Home Hardwares], #8 [Lee Valley] and I have seen M6 in the past but not recently. Harry
Thanks Harry! I did have some 5/16-18 inserts on my Rocker order but they are on backorder. If I go with the T-track on the bottom it may prove useful for material clamping on that side as well.
I thought about adding a flat head screw right at the intersection point but I I dont think I could do it accurately without having a drill press or mill in my garage.
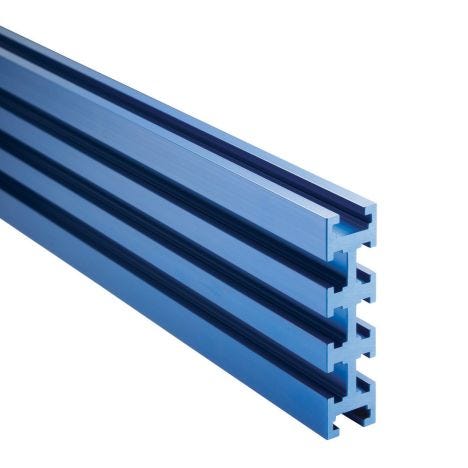
Good idea on screwing smaller pieces to a board for clamping in the saw. That would have worked for this project but the clamping issue is a problem for all small pieces that I cut. I wonder if I could replace the fence with an extrusion like this? I could then run a movable clamp off the track.
Last edited:
I had a productive day in the garage today and knocked out a couple of quick projects. First up was a busted taillight on the BOSS’s Jeep. We had a scary incident over the holidays where my Father in law slipped on the snow covered steps of his deck and slammed into the JEEP. Luckily his only injury was a bruised ego, bruised arm and sore hand from punching the taillight. It could have been much worse because he fell while helping his older brother out to his vehicle.

Other than having to pry off some clips on the back hatch cover, it was a very easy install.

Next up was an upgrade for my rolling shop stool. After 20 years, the foam was shot and the wood was digging into my thighs. It was never very comfortable to begin with now that I think about it.

I picked up some 2” foam and black vinyl. This was the only foam available at Hobby Lobby. I would have liked to find some memory foam but this will do just fine.

I cut a piece of 3/4 ply a few inches larger than the original since the frame rails would support it. Then I ran the router around the top to add a bevel. The bevel should help prevent the wood from digging into my thighs. It was extremely nice having a solid table to clamp the top onto.

I have never used threaded inserts in wood and figured this would be a great place for them. I must have drilled my holes a little crooked because I struggled getting them in straight. They still worked, but I need to learn to do this better next time.


First a used 3M spray adhesive to glue the foam to the wood. I then very crudely cut a bevel on the edge of the foam.

I attached the vinyl with the same pneumatic stapler and 3/8 staples I use to install atv and dirt bike seat covers.


The seat is way more comfortable than before. I am hopeful that my legs won’t go numb anymore. This $10 upgrade should last until I win the lottery and buy a Vyper chair. If you haven’t seen them before, follow the link and check out the Cadillac of shop seating.
https://www.vyperchair.com

Thanks for following along!
Sent from my iPhone using Tapatalk
Other than having to pry off some clips on the back hatch cover, it was a very easy install.
Next up was an upgrade for my rolling shop stool. After 20 years, the foam was shot and the wood was digging into my thighs. It was never very comfortable to begin with now that I think about it.
I picked up some 2” foam and black vinyl. This was the only foam available at Hobby Lobby. I would have liked to find some memory foam but this will do just fine.
I cut a piece of 3/4 ply a few inches larger than the original since the frame rails would support it. Then I ran the router around the top to add a bevel. The bevel should help prevent the wood from digging into my thighs. It was extremely nice having a solid table to clamp the top onto.
I have never used threaded inserts in wood and figured this would be a great place for them. I must have drilled my holes a little crooked because I struggled getting them in straight. They still worked, but I need to learn to do this better next time.
First a used 3M spray adhesive to glue the foam to the wood. I then very crudely cut a bevel on the edge of the foam.
I attached the vinyl with the same pneumatic stapler and 3/8 staples I use to install atv and dirt bike seat covers.
The seat is way more comfortable than before. I am hopeful that my legs won’t go numb anymore. This $10 upgrade should last until I win the lottery and buy a Vyper chair. If you haven’t seen them before, follow the link and check out the Cadillac of shop seating.
https://www.vyperchair.com
Thanks for following along!
Sent from my iPhone using Tapatalk
Attachments
-
 c8630a85b6cc3a0d3cbec6a539493569.jpg85.5 KB · Views: 0
 -
 26dfb162a7a407d57ce58c4d9785b85f.jpg161.8 KB · Views: 0
 -
 ef7fa8b7767049207d30009e1b9f7530.jpg124.1 KB · Views: 0
 -
 0ea0f61dd979a01b698f6842a1ee4635.jpg148.2 KB · Views: 0
 -
 2a11dd4e1f2550bb9d0e0e336180befa.jpg102.1 KB · Views: 0
 -
 ebc31a6e4b2d36a12a49dfdfa598aae8.jpg83.4 KB · Views: 0
 -
 cc2f3aaa084a24cda97aedc92a64ef45.jpg59 KB · Views: 0
 -
 95ca5f80e1c8806d08a685a7cc13b79d.jpg90.7 KB · Views: 0
 -
 6b19240b6af509a49c0df88720864301.jpg113.8 KB · Views: 0
 -
 6fe6d00d202e130960f8e96328b2e869.jpg118.9 KB · Views: 0
 -
 6f33c11aa6fd96af5fcac84a7468adb0.jpg110.5 KB · Views: 0
Last edited:
Jeff Ivers
Well-known member
Your cart/table/cabinet is very well designed and executed! I really like it. I have a shop stool very much like yours and recovered mine years ago with vinyl as you did. After a period that also started looking pretty bad. Last time, I reworked it, I used part of an old leather bomber jacket for recovering. Makes me feel like I have gone upscale.
Your cart/table/cabinet is very well designed and executed! I really like it. I have a shop stool very much like yours and recovered mine years ago with vinyl as you did. After a period that also started looking pretty bad. Last time, I reworked it, I used part of an old leather bomber jacket for recovering. Makes me feel like I have gone upscale.
Thanks Jeff. I am hoping it lasts a couple of years, but it is just a cheap piece of vinyl. It would be cool to find an old piece of brown leather with some patina on it.
This weekend’s project really put my router and wood skills to the test! A good friend of ours asked if I would be interested in making an ashtray for her husband. She saw some of my recent projects on Instagram and decided to challenge me. Since he is a friend of mine, I said yes. They moved to Cali a couple years ago and I miss them.
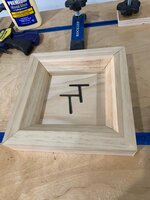
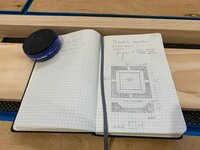
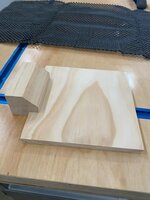
Step one was sketching out a design and sending it to her. It is a wood base with a steel insert. She said it looked great so I picked up some select pine at Menards to get started.

I started with a test piece to verify my measurement and set the frame profile. I routed a 45* bevel and cut a dado to inset the base board. I’m glad I made a test piece as I had to adjust the depth of the dado.


I clamped the full 2x2 frame piece one the table and machined both profiles.

Dust collection was not great working on the edge.

I did pick up this dust collector at HD and it solved my clogged filter issues. The bucket tips over a lot so I need some type of base to give it some weight.

Once the profile was cut I marked and cut the 45* miter joints. I marked each piece to keep the positions matched.

Everything was going great until I got to piece #4 and it didn’t match piece #1. Turns out you can’t trust select pine to be consistent thickness across a 4’ board. This really sucked. Lesson learned that I need to measure the wood before I start next time.

Luckily I had just enough material left over to remake a piece. I block sanded it before cutting the profile. It ended up needing a 020” taper across its length. This solved the fit issue and it won’t be noticeable once assembled.

I glued the miter joints and clamped it down to dry. I really need to pick up some more wood clamps. I only had 2 that were long enough so I had to get creative. I also put some wax paper down to protect the table from glue drips.

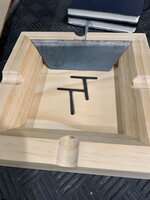
While the glue was drying I got started on the metal brand. “TT” for my friends initials.

I burned it into a test piece to get some practice since this was the first time making or using a brand. I was quite happy with the results.

I finished it off with a small handle. I’ll send this along with the ashtray in case he wants to put his mark on anything. He loves grilling and smoking, so I won’t be surprised if this gets burned into a nice cut of meat.

I burned it into both the top and bottom of the finished base. The top one will be covered up, but he will see it when he pulls out the steel insert for cleaning.

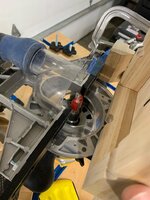
The last detail needed on the base was the cigar rests. Without having a router table I had to get a little creative again. I clamped a stop to the edge guide to locate the bit. This one needed some help from the BOSS! She held the router stable on the table as I cut all 4 sides with a 3/4” bit. It turned out well and we were very careful. I adjusted the cut depth 3 times to make sure it didn’t grab too hard.


With the wood base done now I need to make the steel insert. It’s going to be tricky.
Sent from my iPhone using Tapatalk
Step one was sketching out a design and sending it to her. It is a wood base with a steel insert. She said it looked great so I picked up some select pine at Menards to get started.
I started with a test piece to verify my measurement and set the frame profile. I routed a 45* bevel and cut a dado to inset the base board. I’m glad I made a test piece as I had to adjust the depth of the dado.
I clamped the full 2x2 frame piece one the table and machined both profiles.
Dust collection was not great working on the edge.
I did pick up this dust collector at HD and it solved my clogged filter issues. The bucket tips over a lot so I need some type of base to give it some weight.
Once the profile was cut I marked and cut the 45* miter joints. I marked each piece to keep the positions matched.
Everything was going great until I got to piece #4 and it didn’t match piece #1. Turns out you can’t trust select pine to be consistent thickness across a 4’ board. This really sucked. Lesson learned that I need to measure the wood before I start next time.
Luckily I had just enough material left over to remake a piece. I block sanded it before cutting the profile. It ended up needing a 020” taper across its length. This solved the fit issue and it won’t be noticeable once assembled.
I glued the miter joints and clamped it down to dry. I really need to pick up some more wood clamps. I only had 2 that were long enough so I had to get creative. I also put some wax paper down to protect the table from glue drips.
While the glue was drying I got started on the metal brand. “TT” for my friends initials.
I burned it into a test piece to get some practice since this was the first time making or using a brand. I was quite happy with the results.
I finished it off with a small handle. I’ll send this along with the ashtray in case he wants to put his mark on anything. He loves grilling and smoking, so I won’t be surprised if this gets burned into a nice cut of meat.
I burned it into both the top and bottom of the finished base. The top one will be covered up, but he will see it when he pulls out the steel insert for cleaning.
The last detail needed on the base was the cigar rests. Without having a router table I had to get a little creative again. I clamped a stop to the edge guide to locate the bit. This one needed some help from the BOSS! She held the router stable on the table as I cut all 4 sides with a 3/4” bit. It turned out well and we were very careful. I adjusted the cut depth 3 times to make sure it didn’t grab too hard.
With the wood base done now I need to make the steel insert. It’s going to be tricky.
Sent from my iPhone using Tapatalk
Attachments
-
 b02c07a3279ffa634822d6734db584e0.jpg79 KB · Views: 0
 -
 e87c02a37bdf3b191653cb0ceebfc82b.jpg116.7 KB · Views: 0
 -
 7645b13d1fda5d8bf91d2e4563e5c71c.jpg95 KB · Views: 0
 -
 899f05fcba7172c8f6f89e1c9863929e.jpg87.7 KB · Views: 0
 -
 cc95636a23539fce01ffa43c5b2d1799.jpg93.5 KB · Views: 0
 -
 dbd9b6e411cfce7f45771e308c2e53c7.jpg130.8 KB · Views: 0
 -
 edec9a7d31dff937fbc140b065b17a9d.jpg90.3 KB · Views: 0
 -
 95b1d797b20cc1bd9bb5f79a393a8781.jpg91.8 KB · Views: 0
 -
 3e98e76852c0cbc1d2fdf5bc0a6d5464.jpg85.2 KB · Views: 0
 -
 40fc75552739ec0e42196304ff7882a5.jpg96.7 KB · Views: 0
 -
 46b9bb3a9ea005a8123c276d02af9a4d.jpg56.3 KB · Views: 0
 -
 b60d12df857f9253005a2f6e2424c851.jpg78.9 KB · Views: 0
 -
 fb85e2a7270a69edc4916581e4f936b1.jpg77.4 KB · Views: 0
 -
 8c408a862d54776043fade7c18f745f1.jpg108.1 KB · Views: 0
 -
 7de9d2b6c640ae6efdfe8b05f682d268.jpg149 KB · Views: 0
 -
 19dfd4e646abd23dc2c0af278d1cd4ce.jpg70.4 KB · Views: 0
Last edited:
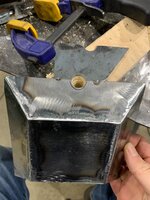
I got started on the steel insert but I ran out of steam to finish it tonight.
With an angle finder and some cardboard aided design I determined the angles were 55*.

With a little adjustment, I was happy with the fit. I am leaving the top edge a 1/16” proud of the wood. Once it is welded I will sand it flush. I will also need to figure out the best way to cut the cigar rests.

The plan it to fit the sides first and then measure and cut a plate for the bottom. Welding and finishing this this is going to be a long process. Anyone have any tips on how to weld this and make it look clean? Right now I’m planing on welding all of the inside seams and blend them with a carbide burr and sand paper. I could also use a small drum sander on my Dremel.

Thanks for following along!
Sent from my iPhone using Tapatalk
With an angle finder and some cardboard aided design I determined the angles were 55*.
With a little adjustment, I was happy with the fit. I am leaving the top edge a 1/16” proud of the wood. Once it is welded I will sand it flush. I will also need to figure out the best way to cut the cigar rests.
The plan it to fit the sides first and then measure and cut a plate for the bottom. Welding and finishing this this is going to be a long process. Anyone have any tips on how to weld this and make it look clean? Right now I’m planing on welding all of the inside seams and blend them with a carbide burr and sand paper. I could also use a small drum sander on my Dremel.
Thanks for following along!
Sent from my iPhone using Tapatalk
Attachments


C91x
Well-known member
Excellent fit up. Looks good
Bodj Built
Well-known member
For the cigar rests, tack weld a scrap piece to the edge that you want the cigar rest to be on. Then use a pilot drill/hole saw to cut halfway on to the plate you want to keep, and halfway onto the scrap piece. This lets you cut a complete circle without the teeth grabbing an edge and allows you to use a pilot hole
Bodj Built
Well-known member
Thanks for the kind words guys.
Bodj Built- That is a great idea to add material for drilling. That should get me close and I can refine the fit with a drum sander from there. I think we have a winner.
No problem. Glad I can help. I've actually never done that trick before, myself, but have seen it done and it worked great. Best of luck!


Trapps
ALLIANCE MEMBER
Super cool T-track set up! I spent 1 half an hour at Rockler last week just fiddling with all of the T-Track stuff. I'm planning a MFT this spring and I'll be referring back to your thread when I do!
Nice work!
Nice work!
Thanks Trapps. I have never been in a Rockler store but I bets it’s like a candy store. I’m just glad they have a nice website.
After struggling to get a mill scale off the sheet metal pieces I gave up. I threw them in a bin with white vinegar to soak overnight.
Rather than waste the rest of the night I mocked up a test piece. I wanted to get some practice matching the profile of the cigar rests.
I started off by tracing the piece with a long reach fine tip Fastcap marker. It is slightly oblong and just under 3/4” at the opening.

I then tacked on a scrap of the same 16 ga. steel. I marked center and drilled it out with a step bit to 5/8”.

Using a 1/2” drum in my Dremel I slowly worked up to the line. I used one of my test pieces as a guide to keep the drum at a 45* angle to the plate.

It took about 10 minutes of sanding and checking but I ended up with a very nice match to the profile. I’m glad I made this test piece. Now I feel ready to take this on when the project gets to this step.


I still have several hours to go but I’m making progress and that is something. Thanks for following along!
Sent from my iPhone using Tapatalk
After struggling to get a mill scale off the sheet metal pieces I gave up. I threw them in a bin with white vinegar to soak overnight.
Rather than waste the rest of the night I mocked up a test piece. I wanted to get some practice matching the profile of the cigar rests.
I started off by tracing the piece with a long reach fine tip Fastcap marker. It is slightly oblong and just under 3/4” at the opening.
I then tacked on a scrap of the same 16 ga. steel. I marked center and drilled it out with a step bit to 5/8”.
Using a 1/2” drum in my Dremel I slowly worked up to the line. I used one of my test pieces as a guide to keep the drum at a 45* angle to the plate.
It took about 10 minutes of sanding and checking but I ended up with a very nice match to the profile. I’m glad I made this test piece. Now I feel ready to take this on when the project gets to this step.
I still have several hours to go but I’m making progress and that is something. Thanks for following along!
Sent from my iPhone using Tapatalk
Attachments


stinkity stoink
Well-known member
Very nice !! I have to remember that hole on the edge trick. Hopefully old age doesn’t kick in more and I forget it by tonight.
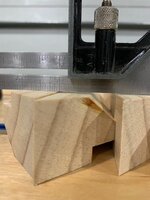
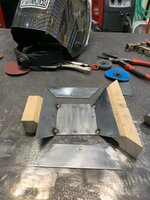
This metal insert really tested my patience. I still have a lot of finishing work to do, including the cigar rest cutouts.
The vinegar bath worked great. Final cleanup was a 320 grit disk followed by a smooth surfacing pad.

I started out with this delusion that I could just mock up the pieces on the welding table and it would fit. Boy was I wrong. 3 pieces in and I realized that getting a tight fit to the wood base was going to be near impossible this way and take way more time than I was willing to give.

At the peak of my frustration I took a step back and thought about how to do this more accurately. I even considered making a duplicate base to use as a jig.
In the end I settled on a single protective layer of foil.

I was then able to firmly hold the pieces in place and tack them. I burned through in 2 places but I can live with it. The dark stain will hide it.


After some careful sanding, I am getting very close to a flush fit.

Next step is to make the 4 cutouts and finish smoothing out the seems.

Thanks for following along!
Sent from my iPhone using Tapatalk
The vinegar bath worked great. Final cleanup was a 320 grit disk followed by a smooth surfacing pad.
I started out with this delusion that I could just mock up the pieces on the welding table and it would fit. Boy was I wrong. 3 pieces in and I realized that getting a tight fit to the wood base was going to be near impossible this way and take way more time than I was willing to give.
At the peak of my frustration I took a step back and thought about how to do this more accurately. I even considered making a duplicate base to use as a jig.
In the end I settled on a single protective layer of foil.
I was then able to firmly hold the pieces in place and tack them. I burned through in 2 places but I can live with it. The dark stain will hide it.
After some careful sanding, I am getting very close to a flush fit.
Next step is to make the 4 cutouts and finish smoothing out the seems.
Thanks for following along!
Sent from my iPhone using Tapatalk
Attachments
-
 78dd5c7ea7a3c84d3b9e23d34eb57eaf.jpg109.9 KB · Views: 0
 -
 2d7b2a1554b37dc1da0f3e73b708c70e.jpg119.1 KB · Views: 0
 -
 c3c9f606bb85a713a02f2dc36cf25a54.jpg157.9 KB · Views: 0
 -
 74d1c3601f63b6ff377f59052d9fbfef.jpg140.4 KB · Views: 0
 -
 2912e8c48dd4a7ea467687f934371600.jpg100.8 KB · Views: 0
 -
 550eb65c5691a19652321e110c24ce84.jpg119.6 KB · Views: 0
 -
 023efef57b83cd89bc4d41afc095d208.jpg104.2 KB · Views: 0
 -
 4d6dfc3703e43823180eb60b064b3230.jpg90.6 KB · Views: 0
Last edited:
mfg0772
Well-known member
Great projects. I like the variety.
mfg0772
Well-known member
Thank you! I tend to bounce around alot between automotive, construction, metal and wood. Someday I hope to earn the title of jack of all trades and master of none.
Some might look down on that title but I take it as a compliment. I'll try to to pretty much anything. None of this stuff is rocket science. Between YouTube, forums like this, and some determination, you can get pretty good results at nearly everything. I think mastering something to 90% is pretty easy, its that last 10% where years of practice comes in.
Made some big progress on the ashtray last night. A little final sanding and it’s ready to put on a finish. I am planning to use the same ebony stain I used on my shelf. I haven’t decided between wipe on poly or normal polyurethane. Will one hold up better than the other?
I wanted to leave the metal raw and just clear coat it. Unfortunately I couldn’t achieve the perfect finish I was hoping for so I am now leaning toward a satin black. The BOSS agrees. How well do you think high temp bbq paint will hold up?
I starting the metal finishing by welding a piece of scrap metal to each side and drilling to 5/8”. The tack welds were easy to grind off and smooth with minimal damage to the metal.

Next I spent at least 15 minutes per side fitting it to the the cigar cutout. I’m glad I had several 80 and 120 grit drum rolls on hand. Ordering abrasives in bulk has been much cheaper and more convenient then buying them in small packs at the big box store.

I was able to match the profile very close on all 4. It just took time and patience.

Then I moved on to smoothing the weld seams. This was a challenge and required alot of head scratching. I started with a round tip carbide and ran over every seam. Then a 120 grit rounded 3” flapper disk, 1/4” sanding drum on the Dremel, 3” 320 grit sanding disk, hand sanding and finally a surface finishing pad on the die grinder.
It was tough to get in the corners and not take off too much material. If I spent another 1-2 hours I could make it perfect but I decided it wasn’t worth it. After all, this job is only paying beer money.

Here is where I ended the night after grinding down the top edge flush to the wood.

The insert fits in all 4 directions but it fits perfect in 1. Should I put some type of mark on the steel and wood as a reference? I also thought it would be slick to embed a magnet in the wood base to secure the insert... maybe next time.


Thanks for following along!
Sent from my iPhone using Tapatalk
I wanted to leave the metal raw and just clear coat it. Unfortunately I couldn’t achieve the perfect finish I was hoping for so I am now leaning toward a satin black. The BOSS agrees. How well do you think high temp bbq paint will hold up?
I starting the metal finishing by welding a piece of scrap metal to each side and drilling to 5/8”. The tack welds were easy to grind off and smooth with minimal damage to the metal.
Next I spent at least 15 minutes per side fitting it to the the cigar cutout. I’m glad I had several 80 and 120 grit drum rolls on hand. Ordering abrasives in bulk has been much cheaper and more convenient then buying them in small packs at the big box store.
I was able to match the profile very close on all 4. It just took time and patience.
Then I moved on to smoothing the weld seams. This was a challenge and required alot of head scratching. I started with a round tip carbide and ran over every seam. Then a 120 grit rounded 3” flapper disk, 1/4” sanding drum on the Dremel, 3” 320 grit sanding disk, hand sanding and finally a surface finishing pad on the die grinder.
It was tough to get in the corners and not take off too much material. If I spent another 1-2 hours I could make it perfect but I decided it wasn’t worth it. After all, this job is only paying beer money.
Here is where I ended the night after grinding down the top edge flush to the wood.
The insert fits in all 4 directions but it fits perfect in 1. Should I put some type of mark on the steel and wood as a reference? I also thought it would be slick to embed a magnet in the wood base to secure the insert... maybe next time.
Thanks for following along!
Sent from my iPhone using Tapatalk
Attachments
-
 b0917adda278f102732c0abb9d87e6f5.jpg101.3 KB · Views: 0
 -
 d4f2685ab092db4464b0a88fe23befa7.jpg125.8 KB · Views: 0
 -
 8e1a530237a170543d57f909520f85c1.jpg127.7 KB · Views: 0
 -
 ccc284579b155f18e12d22fba372f363.jpg117.4 KB · Views: 0
 -
 f52dc7dc842e033508704b46992d12cd.jpg121.8 KB · Views: 0
 -
 4045fb0f939569aa4c70dabe8596ba28.jpg72.8 KB · Views: 0
 -
 a771f04bc4619905c42ac4a7fdf34bf5.jpg116.9 KB · Views: 0
 -
 b6696c9d1bd7a99fb1496609a0ce0a6b.jpg88.2 KB · Views: 0
Last edited:
XJSuperman
Well-known member
Gotta be honest, I started losing interest in the middle somewhere, I was having doubts, but then you finished with a solid piece! It looks great! I too like the magnet idea, and it wouldn't be anything to drill or route out a spot and glue one in a corner. Marking a corner would be ok if you did it on the underside where it wasn't visible.
I was trying to figure out how you could cleanly put the TT in the bottom of the metal insert but I think after the first cigar, it wouldn't clean right and ashes would be stuck to the brand if it was either welded on top or embossed in the insert. Sometimes simple is best. Well done.
I was trying to figure out how you could cleanly put the TT in the bottom of the metal insert but I think after the first cigar, it wouldn't clean right and ashes would be stuck to the brand if it was either welded on top or embossed in the insert. Sometimes simple is best. Well done.
Don't feel bad, I was having doubts about half way as well.Gotta be honest, I started losing interest in the middle somewhere, I was having doubts, but then you finished with a solid piece! It looks great!

I considered about etching or painting the brand onto the metal but I decided to just keep it simple. As for the magnets, If I had a drill press and the correct size forstner bit, I would probably do it. I don't want to screw it up so close to the finish line so I'm going to skip it.