To avoid these ads, REGISTER NOW!

Quarter panel problems and questions

Joined
May 31, 2013
Messages
18
Location
Gresham Oregon
New guy here, and was hoping for some advice as I move along. I'm working on a 67 Buick Skylark so there are no replacement panels available. I have also searched from Seattle to Phoenix looking for good quality replacement panels and no luck.
So I then set my sights on fair panels.

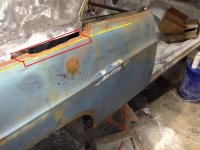
My car was damaged and had a partial panel replacement back in the dark ages and I cut that out with maybe a 1/4" beyond that old stick welded and overlapped repair leaving me at this point.

View media item 30927
I bought a quarter panel but upon stripping the thing down, I realize it is swiss cheese in the middle of the panel and the wheel well edge is **** so I am not planning on using it. It also has some damage up in the corner of the qtr window. This is the damage in the corner of the window. The black marker is approximately where my car is cut. This is qtr #1

View media item 30928

I have now found a partial panel that is in pretty good condition except that when the yard cut off the roof panel for some other guy last year, they swung really low on the quarter. Here is a picture of this panel roughly laid over my car. This is qtr 2, or the blue one in further reference.

View media item 30929
My question finally, is I want to use the blue panel because it is in good shape and has a straight body line, but there is that 2 inch gap. I'm hoping to take the first panel, and its damaged corner, straighten it out, and make a combo fix to make my car all purty again.

The question is technique. I'm thinking straighten the damage in the corner of qtr #1, then cut it off oversize and that will become the gap filler section.

At that point there are three different ways to proceed

1) Is it better off for me to fit the small gap filler section onto the blue panel, and then attach that assembly to the car,

2) Clamping the blue panel onto the car in final position, and then attaching the gap piece in to both the blue panel and car?

3) Or fitting the gap section on the car and finishing that in position, and then mount the blue quarter to the car.

I've never done this before and am trying to be cautious but have to deal with what metal I have. I know I have hours and hours of fitting and grinding and welding to do, so I want to start this right and not create more work/trouble than I have to.

So, which one?
 
Last edited:
To avoid these ads, REGISTER NOW!

rsanter

Well-known member
Joined
Dec 22, 2007
Messages
18,492
Location
visalia ca
Your pictures are not showing
From the description what you want to do should be no problem. Even making the filler from scratch can be done
When straightening damaged metal you want to go easy and try to look how the damage occurred and go in reverse. Take it a little at a time so you don't stretch the metal

Go to metal meet.com for tips

Bob
 
OP
H
Joined
May 31, 2013
Messages
18
Location
Gresham Oregon
If you need some help on the pics, let me know.

Yeah, I clicked the insert image link above and it asked to paste the url for the pictures. The pictures are actualy on my v8buick posting.
I now saved the pictures on my control panel and posted links to that in my post above. Let me know if this is now visible for everyone else.
 
Last edited:

Kevin54

MEMBER EMERITUS
Joined
Jan 12, 2005
Messages
29,341
Location
Urbana, Ohio
Not going to be able to answer without pics.

If you have the pic on your computer, try linking it to here by using the "Manage Attachments" in the Advanced replies. If it is too large, then you will need to link it from a pic hosting site. I use Imageshack for most of mine and have never had a problem. If you find that you can't get it to come through, send me a PM, I'll give you my e-mail and I'll put it up for you.
 
OP
H
Joined
May 31, 2013
Messages
18
Location
Gresham Oregon
Ok, did my latest change make the pictures visible to you guys? I hosted the pics on my control panel in an album.

Sorry for the confusion, every board is different I guess.
 
To avoid these ads, REGISTER NOW!

Kevin54

MEMBER EMERITUS
Joined
Jan 12, 2005
Messages
29,341
Location
Urbana, Ohio
Pics are showing up now.

You may want to see what MP&C has been up to with a '55 Chevy wagon and look through his complete thread. The way he has written things up makes it very easy to understand. And if you have questions, he would be the one to ask for a straight up answer. Once you go through his thread, you'll have a better understanding as to what YOU will need to do to fill in the void that you have.

The bad thing is that things have already been cut out and you are left with that huge void. Hopefully you can pick up what the radius is from the other side and duplicate it for the passenger side.

Good luck and keep us posted on what you are doing.
 

caper150

Well-known member
Joined
Nov 20, 2007
Messages
1,106
Location
Mantorville MN
your right on track with option #2. thats the way I'd do it. I did it on a Torino last year and it needed repair as well. If you have to pcs to do all the fill in with all that you have your off to a great start.
Heres a couple pics of what we did:
Before the quarter went on, everything repaired and epoxied.
PB170235_op_622x466.jpg

Quarter on, backside was epoxied before installation.
PB230165_op_622x466.jpg

a pic of the swiss cheese
PB250162_op_622x466.jpg

and after
PB250166_op_622x466.jpg

and just a cool pic
580411_10151652092212090_434818027_n.jpg


I find it easier to do repairs on the car rather than off to help eliminate any fitmet issues.
 
OP
H
Joined
May 31, 2013
Messages
18
Location
Gresham Oregon
That huge thread by MP&C is what brought me here in the first place. I spent over an hour reading that whole thread before I posted here. I will send him a PM and see what his opinion is as I can see how much talent he has.

I'm thinking I will lay a line about a half inch above that upper body line on the blue quarter and cut that and then make a similar cut on the 1st qtr to create that patch. I'm still working on the clean up and I have just a couple holes to fix around the wheel well, but then its on.

Thanks again.
 

MP&C

Well-known member
Joined
Oct 21, 2009
Messages
4,398
Location
Leonardtown, MD
Having a big gaping hole there you don't have much to go on as far as making another. If the opposite side is still intact, you can make a flexible shape pattern and invert it (inside-out) to make a pattern for this side. In the following link, post 105 toward the end, and the beginning of post 106 touch on using a flexible shape pattern and using it to gauge the panel when adding shape as you fabricate it.

http://www.garagejournal.com/forum/showthread.php?t=182565&page=6


Next, looking at what you have left of the sail panel, you have about all you can use for room for planishing a weld for installing your "bridge" patch. You should still be able to access the underside for hammer/dolly access. I wouldn't cut it up any higher as now you will be limiting how much access you have for planishing, unless you can find the factory leaded seam and duplicate the entire piece.


attachment.php


Next, if you have two parallel seams within the body line crease (yellow line), you will have a tendancy due to shrinking for the outer panel to pull inward, distorting the body line.


attachment.php


Planishing to stretch out the welds will help, but sometimes weld placement can work in your favor....


This is a rough sketch, as I'd use radiused corners to eliminate the stacking of the shinking in corners, but by forming your patch panels valley, then tipping the body line so the second seam is outside the body line, you are limiting the shrinking effects inside the body line as now there is only one weld seam inside instead of two. Planishing will still be needed to stretch a weld, but by having a weld seam on either side of the crease, it may make those effects more manageable.


attachment.php


Of course, all this assumes that you would have a bead roller with tipping dies or other means to make the folded bend. As another option, a new quarter panel could be made, here is one for a Holden Monaro made by Peter Tommasini, a metalshaper in Australia.


attachment.php
 

Attachments

  • 67Buick001.jpg
    67Buick001.jpg
    65 KB · Views: 291
  • 67Buick002.jpg
    67Buick002.jpg
    53.5 KB · Views: 291
  • 67Buick003.jpg
    67Buick003.jpg
    53.1 KB · Views: 288
  • Peter Tommasini Quarter Panel.jpg
    Peter Tommasini Quarter Panel.jpg
    50.9 KB · Views: 289
OP
H
Joined
May 31, 2013
Messages
18
Location
Gresham Oregon
GALLERY]


Here is the full picture of the panal with the crinkled corner of the window. I was planning on cutting the patch panel out of that rather than trying to form that since I don't have a pinch roller. Again the black sharpie line is approximately where the original panel on the car is cut.

I like the idea of cutting below the body line, I would have done just the opposite so you just saved me a headache there. Thank you.

So my next question is, should I work on that crinkled corner of the window when it is still part of the whole panel, or cut the patch off 3 inches oversize everywhere and work on that piece alone?

I'm not sure which would be the "best" way of doing it.
 
OP
H
Joined
May 31, 2013
Messages
18
Location
Gresham Oregon
Ok, so I'm not the fastest at getting back to people, but figured it would be nice to show how it came out.
GALLERY]


So this one above shows what the patch panel ended up looking like.

View media item 88587
This one is just a look forward after the tacks.

View media item 88588
And this one shows after all the welding was done. The end result came out quiet well but could stand to get slapped a bit as the weld line is a little bit sunken.

Thanks again for all the tips back 5 years ago.
 
To avoid these ads, REGISTER NOW!
Top Bottom