12ozd
Well-known member
Something a little different;
I just finished doing my garage floor.
It was a complete disaster form the day it was poured.
Slab was not flat, improper slope, bowls, Saw cut a crooked joint in the middle,etc. etc.
Contractor tried to repair w/ coating (applied by 2x4 and brick).
Had 3 different contractors tell me the only fix was to demo and re-pour.
That wasn't gonna happen, so You know the old saying...."Do it yourself"
(there is another thread I started w/ pics last year, if you're really bored)
Anyway.......I spent ALOT of time reading everyones flooring threads, and none really solved my issues. I needed alot of hide/build to cover the ugly.
Enter benwah, I Pm'd him w/ some questions, seeking advice, and he recommended a system I never heard of before, didn't know I've seen them, but would solve the ugly floor issues !
Double broadcast quartz floor..Here's how he explained it to me.
1. prime coat
2. 100% solids epoxy coat, broadcast to refusal with quartz or silica sand @ 20 mils
3. 100% solids epoxy coat, broadcast to refusal with quartz or silica sand @ 20 mils
4. clear or pigmented 100% solids epoxy coat
5. clear or pigmented polyurethane/polyaspartic (optional)
Sounds perfect !!I made a couple changes, I liked the quartz look, but not the price.
So benwah says; use sand for the first coat, it's going to be covered up anyway. Brilliant !..Quartz is $70.00 a bag, sand is $7.00 !
PM Justin @ GFLLC, he has exactly what I'm looking for.
Following his recommendations, ORDER PLACED !
Now for some pics;
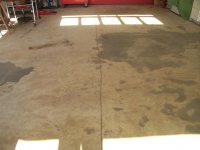
BEFORE
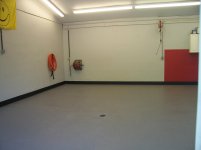
Crooked joint, "smear coat"

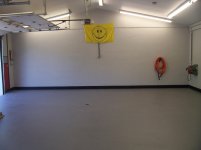
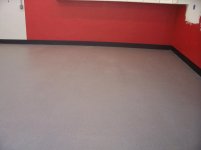
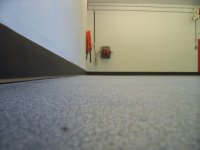
Finished corner

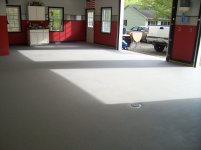
Drain

Kinda thick, huh?

l
I just finished doing my garage floor.
It was a complete disaster form the day it was poured.
Slab was not flat, improper slope, bowls, Saw cut a crooked joint in the middle,etc. etc.
Contractor tried to repair w/ coating (applied by 2x4 and brick).
Had 3 different contractors tell me the only fix was to demo and re-pour.
That wasn't gonna happen, so You know the old saying...."Do it yourself"
(there is another thread I started w/ pics last year, if you're really bored)
Anyway.......I spent ALOT of time reading everyones flooring threads, and none really solved my issues. I needed alot of hide/build to cover the ugly.
Enter benwah, I Pm'd him w/ some questions, seeking advice, and he recommended a system I never heard of before, didn't know I've seen them, but would solve the ugly floor issues !
Double broadcast quartz floor..Here's how he explained it to me.
1. prime coat
2. 100% solids epoxy coat, broadcast to refusal with quartz or silica sand @ 20 mils
3. 100% solids epoxy coat, broadcast to refusal with quartz or silica sand @ 20 mils
4. clear or pigmented 100% solids epoxy coat
5. clear or pigmented polyurethane/polyaspartic (optional)
Sounds perfect !!I made a couple changes, I liked the quartz look, but not the price.
So benwah says; use sand for the first coat, it's going to be covered up anyway. Brilliant !..Quartz is $70.00 a bag, sand is $7.00 !
PM Justin @ GFLLC, he has exactly what I'm looking for.
Following his recommendations, ORDER PLACED !
Now for some pics;
BEFORE
Crooked joint, "smear coat"

Finished corner

Drain

Kinda thick, huh?

l
Last edited:


 )
) )
) 


 )
)