To avoid these ads, REGISTER NOW!

Questions/advice needed mini split install

3rdgendslmech

Well-known member
Joined
Mar 12, 2017
Messages
499
Location
Maryland
mrcooldiy.jpg

mounting location 1.jpg

mounting location 2.jpg

mounting location 3.jpg
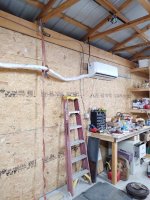
My Mrcool DIY came in today! I'm so pumped about getting this thing in and hooked up before the cold gets here for good. I went a little over size with the 24K just because for now the ceiling insulation is going to be consisting of sheets of 1/2 EPS board. That back wall and eave wall will be insulated with R19 and OSB in the next week or 2. Hopefully going to be extending in a couple years.
Anyhow, I'm looking for a little advice on where to mount the indoor unit.
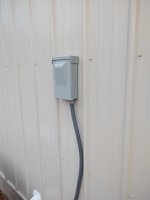
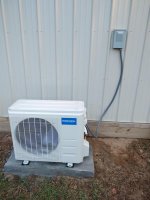
Option 1: With 25 of line I dont know just yet if I'll have enough to mount it between the 2 chrome hubcaps. That's the center of the 24' wall and was thinking about wrapping it to the right, along the eave wall and down beside the personnel door, then passing through the wall to the condenser. I kinda like this way better because it'll be set up to blow in the main area of where I'm at when working on vehicles.
Option 2 is in the middle of the eave wall and have maybe 4-6 feet of extra lineset.
The other question is what do you do with the extra lineset if you have it. I glanced through the manual but unless I missed it, they dont really explain what to do if you have extra line. I know it's best to coil it horizontally so the oil can't puddle at the bottom of the lines if it sits without running. Do you just coil it and lay it on top out of harms way?
 
Last edited:
To avoid these ads, REGISTER NOW!

jjrbus

Well-known member
Joined
Dec 8, 2018
Messages
604
Location
Florida
Both the indoor and outdoor unit require service, so need to keep them accessible. Putting the outside unit up a couple feet, may keep it out of harms way and out of snow. I have seen a couple options on linesets and from what I read coiling can cause the oil to puddle and cause problems.

I liked the serpentine method and went with that, the coil lines for the inside and outside units is in a serpentine style. HTH
 

Mike.VA

Well-known member
Joined
Jan 27, 2017
Messages
269
Location
Virginia (Lake Anna)
Been wanting to put a MiniSplit in mine for a few years. Looking forward to seeing your progress. Keep us posted with lots of pics.
Good Luck
 

dcg9381

Well-known member
Joined
Jun 20, 2018
Messages
11,627
Location
Austin, TX
I dont understand your shop layout, but right at the height of your lights seems right to me. There's a metal mount with those units. I'd probably bring a 2x6 across your vertical poles and build a "mount location" at light level or above.

Personally, I don't set the position of the compressor until the indoor units are set and I've run the lines.

As indicated above, you can circle the lineset (carefully, there is likely a spring tool or copper pipe bender to do this). Alternately, I'm getting to the point where I'm ready to cut and flare these myself.

At this point, I (personally) recommend the gaskets that you can get on amazon for the flares... IE - FlareSeal - some will disagree, but I'm using these going forward.
 

Kaizen

Well-known member
Joined
Jan 9, 2015
Messages
6,936
Location
New England
I wrapped about ten feet in two coils hanging behind my minisplit on the wall mounted flatform. So it’s vertical. Been there five years and zero issues. Goes without use all winter for five months. The whole horizontal vs vertical has equal opinions from what I read.


Sent from my iPhone using Tapatalk
 

Jackfre

Well-known member
Joined
Dec 26, 2010
Messages
4,406
Location
N CA
Don't locate the evap more than 8' off the floor. It throws the stat off if to high. Do not coil the excess line set. It traps oil. Lay it off in a serpentine fashion. Have to go trick or treating. see ya!
 
OP
3

3rdgendslmech

Well-known member
Joined
Mar 12, 2017
Messages
499
Location
Maryland
Don't locate the evap more than 8' off the floor. It throws the stat off if to high. Do not coil the excess line set. It traps oil. Lay it off in a serpentine fashion. Have to go trick or treating. see ya!

Yeah, the evap is gonna be set between 7-8 feet up. So I've got a question about serpentine method. Can you do this inside? A squiggly lineset running on the outside of metal rib panels is probably gonna be a PITA. If I was inside I could put a cabinet in front of it.
 

Jackfre

Well-known member
Joined
Dec 26, 2010
Messages
4,406
Location
N CA
Yeah, the evap is gonna be set between 7-8 feet up. So I've got a question about serpentine method. Can you do this inside? A squiggly lineset running on the outside of metal rib panels is probably gonna be a PITA. If I was inside I could put a cabinet in front of it.

Yes, it can go inside. Depending upon how much extra line set you have you might want to fabricate that flat on the floor. The tubing work hardens about instantly, so be careful.
 

Jackfre

Well-known member
Joined
Dec 26, 2010
Messages
4,406
Location
N CA
Yeah, the evap is gonna be set between 7-8 feet up. So I've got a question about serpentine method. Can you do this inside? A squiggly lineset running on the outside of metal rib panels is probably gonna be a PITA. If I was inside I could put a cabinet in front of it.

Yes, it can go inside. Depending upon how much extra line set you have you might want to fabricate that flat on the floor. The tubing work hardens about instantly, so be careful. You might consider stripping the insulation off, making the bends and sliding it back on.
 
OP
3

3rdgendslmech

Well-known member
Joined
Mar 12, 2017
Messages
499
Location
Maryland
Yes, it can go inside. Depending upon how much extra line set you have you might want to fabricate that flat on the floor. The tubing work hardens about instantly, so be careful. You might consider stripping the insulation off, making the bends and sliding it back on.

What do you mean it hardens instantly? I was under the impression the lines where somewhat flexible. Like after the refrigerant has been flowing through the lines? I unpacked everything the other night to inspect for damage but I didn't pull back the cover over the lines to see if they're copper or like a stainless type of braided line.
 
To avoid these ads, REGISTER NOW!

brewchief

Well-known member
Joined
Sep 20, 2008
Messages
2,370
Location
Michigan
What do you mean it hardens instantly? I was under the impression the lines where somewhat flexible. Like after the refrigerant has been flowing through the lines? I unpacked everything the other night to inspect for damage but I didn't pull back the cover over the lines to see if they're copper or like a stainless type of braided line.
Each time you bend the copper it gets harder, trying to bend and rebend a section it can get easier to kink each time. Just try to plan it where you can bend it to its final shape the first time.

Sent from my SM-G965U using Tapatalk
 

Jackfre

Well-known member
Joined
Dec 26, 2010
Messages
4,406
Location
N CA
Each time you bend the copper it gets harder, trying to bend and rebend a section it can get easier to kink each time. Just try to plan it where you can bend it to its final shape the first time.

Sent from my SM-G965U using Tapatalk

:thumbup: You roll it out and it is so smooth and nice. You feed it through the wall and try to make another bend and you have to be godzilla in heat to get it. I will put a spring bender on the tubing and just slide it along the pipe for support and to prevent kinks.
 
OP
3

3rdgendslmech

Well-known member
Joined
Mar 12, 2017
Messages
499
Location
Maryland
IMG_20191104_151514932.jpg

That's about all I've gotten done since Sunday Monday afternoon. I went with 2x4 studs and R19 Batts and saved a few bucks. It's covered with 7/16 OSB. Hoping by the end of the week to have this wall finished and start installing the unit.
I think for the outside unit I'm going to use deck blocks and build a covered frame to get it up off the ground and keep rain and snow off of it.
 

fitter30

Well-known member
Joined
Jun 23, 2019
Messages
2,957
Location
Peace Valley,mo
If your only goaaing to have 4-6' of extra line just move the condenser over there won't be enough line to loop it.
 
OP
3

3rdgendslmech

Well-known member
Joined
Mar 12, 2017
Messages
499
Location
Maryland
If your only goaaing to have 4-6' of extra line just move the condenser over there won't be enough line to loop it.

Yeah I talked to a tech at Ingram's and he said something similar. If you've got less than 7-8 feed left try to adjust things
I also asked what they recommend about storing the extra line and he said coiled vertically behind the condenser is just fine
 
OP
3

3rdgendslmech

Well-known member
Joined
Mar 12, 2017
Messages
499
Location
Maryland
IMG_20191120_204354187.jpg

IMG_20191120_204357307.jpg

Outside pad is poured. Fusible disconnect is mounted and wiringing is almost done. This the mock up for the lineset route. I've got to finish that last little bit of wall, move the light switches over closer to the door so they're out of the way. Then I figure I'd have to serpentine about 6 feet of line to take up the slack before running it through the wall and outside. I've got a lineset cover for the straight run, but I'm going to build a 30"x2" box the keep the vertical run safe from damage. So FYI...the 2 lines, the larger line is actually a steel braided line and the smaller line is made up of 2, 1/8" lines joined about 8" from the end of the line.
 
OP
3

3rdgendslmech

Well-known member
Joined
Mar 12, 2017
Messages
499
Location
Maryland
Just about. It's hooked up and I let it run for about an hour. Brought the temp up from 43 to 53 in about 20-30 minutes without any type of ceiling. So I imagine once I put in some foam board for a ceiling it'll get warmer faster and stay in.
Also need to secure the lineset with some 2" EMT clamps. I'll take and post some pics tomorrow
 
OP
3

3rdgendslmech

Well-known member
Joined
Mar 12, 2017
Messages
499
Location
Maryland
Here's some of the finished install pics. Inside still has to be dealt with but overall the install took maybe 4-6 hours.
 

Attachments

  • IMG_20191126_165354480.jpg
    IMG_20191126_165354480.jpg
    138.5 KB · Views: 32
  • IMG_20191126_165343400.jpg
    IMG_20191126_165343400.jpg
    32.9 KB · Views: 29
  • IMG_20191126_165352181.jpg
    IMG_20191126_165352181.jpg
    110.6 KB · Views: 32
  • IMG_20191126_165340770.jpg
    IMG_20191126_165340770.jpg
    120.5 KB · Views: 30
  • IMG_20191126_165333356.jpg
    IMG_20191126_165333356.jpg
    83 KB · Views: 28
To avoid these ads, REGISTER NOW!
Top Bottom