
MayerMR
Well-known member
Hey fellas, I'm new to the forum and pretty new to the whole vintage tool scene as well; though I've always had a preference for the "older" stuff, even though I'm a younger guy. I really enjoy tinkering in my garage, fixing things, and especially restoring old stuff. Mainly vintage motorcycles, but also my '87 Jeep Wagoneer XJ.
That said, I've been slowly accruing more and more antique tools, which was spurred by my need for a drill press. I started with a Harbor Freight press just as something to help me drill holes straighter. Well, as you can imagine, it wasn't good. The run out was awful so I returned it. And don't get my wrong, I'm not a HF hater - I have a lot of their stuff and depending on what you get, some of it is pretty decent stuff (their Pittsburgh sockets come to mind - really quite decent). But I digress; I then started searching for a better used drill press on Craigslist and doing some research on some of the better brands. One thing that kept coming up was that the older Delta, Atlas, and Walker-Turner machines were really great and can now be had at pretty good prices. Well wouldn't you know it, but a Walker-Turner DP turned up on CL later that week, and for only $90...I picked it up and was amazed that it had basically no run-out and was just an amazingly stout piece of equipment. Later on I picked up a very early Craftsman-branded Walker-Turner 8" table saw from eBay for only $50, then some Plomb ratchets (love'em) amongst some other old stuff. Basically, I'm hooked!
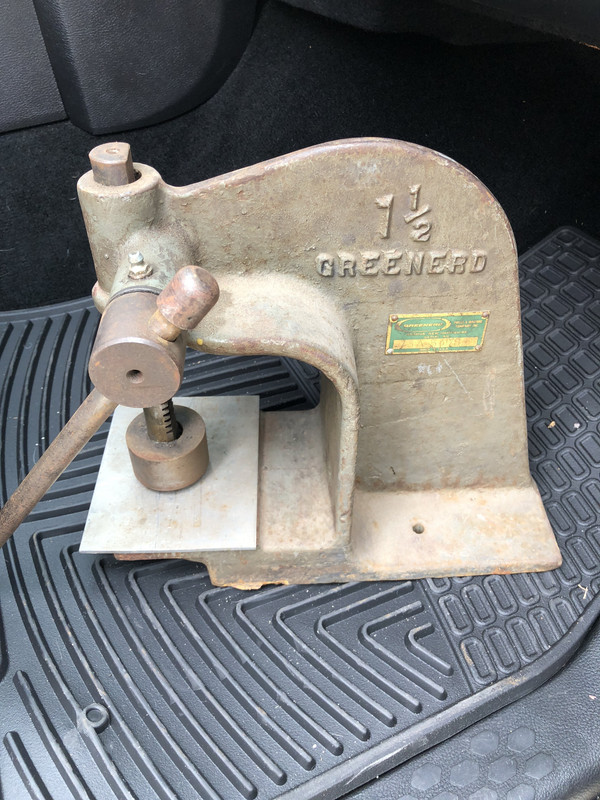
Anyway, I realized I needed an arbor press and last week this Greenerd 1 1/2 come up on the local Craigslist for the measly sum of $40. As you can imagine, I jumped on it for the price.
While totally functional as purchased, it was ratty looking and neglected. That won't do...
So this weekend was kind of rainy and cruddy out and I have a newborn daughter, so I'm kind of relegated to being inside much of the weekend to give my wife a break. I decided to tackle a quick project though - I have to keep my sanity as well!
I disassembled the press and soaked the parts in a bucket of hot water and dish soap for about an hour to loosen the dried on grease. Even after soaking I still had to scrub with a wire brush and toothpicks to clean all crevices completely.

The base of the frame was pretty rusted and at some point it had been welded to a table; two sides had some leftover slag/ragged edging left over. I cleaned that up on the grinder. Additionally, the previous owner used double-sided foam tape to affix the aluminum plate you seen in the first picture; unfortunately, the foam got wet at some point and it discolored the base plate. I put the base into a tub of Evapo-rust overnight to address the rust and see what would happen with the discoloration.

The rest of the moving parts also got the evapo-rust treatment overnight.

The next morning they looked pretty good. After rising off in the sink and a thorough drying with paper towels, I sprayed them down with Remington gun oil to prevent flash rusting until I got a chance to hit them with the wire wheel.

Moving into the frame; the evapo-rust was able to take care of the rust, but the discoloration on the base plate was untouched. I used a wire brush, dish soap, and scalding hot water to clean the frame.

After masking off the serial number plate and base plate as well as plugging the frame holes, I sprayed a coat of high-temp engine primer. I'm annoyed that I forgot to take pics, but after an hour of drying, I put it in the oven at 200 degrees for 45 mins to fully cure it.

After cooling (mostly, I still like to paint a piece when it's warm, when I can), I then sprayed several coats of Rust-Oleum Performance Enamel in Hunter Green onto the frame and let it cure overnight. I figured Greenerd, it's just gotta be Green! No need for oven curing with this enamel top coat, however, it does take up to a week for it to reach full hardness - Lord help you if you spray another coat before 7-days...you'll get a crackle finish whether you want it or not...ask me how I know...

Again, I forgot to take post-polishing photos of the parts during the polishing process. But for those with the sharp eyes, you may notice that there was some minor mushrooming on the top of the ram; I cleaned it up on the belt sander before hitting it with the wire wheel. I also threw the nuts and washers in my rock tumbler to polish them; much easier than trying to hold them against a grinder wire wheel and gives a more even finish.

And the finished product; after another 24hrs of curing I used a gold paint pen to highlight the cast in manufacturer name and model number and hand sanded the base plate a little. It's still got some discoloration so I'll disassemble it again so have room to take my power sander to it and give it a better finish. I need to anyway to properly grease the action and paste-wax all the newly polished metal to prevent future rusting. Admittedly, it's not an "as new" no defects polishing job, but this press will be used, so I just wanted to make it look better, not perfect.
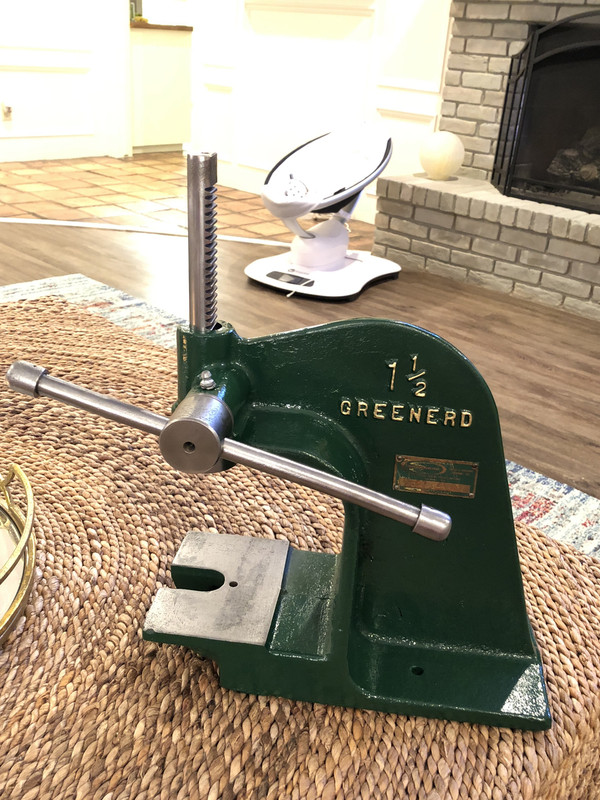
Total spend was $40 for the arbor press, a $6 can of spray paint, and my time (not including items I already had). All-in-all though, not too bad for a rainy weekend project! Thanks for reading!
And just for good measure, one more before/after shot!

That said, I've been slowly accruing more and more antique tools, which was spurred by my need for a drill press. I started with a Harbor Freight press just as something to help me drill holes straighter. Well, as you can imagine, it wasn't good. The run out was awful so I returned it. And don't get my wrong, I'm not a HF hater - I have a lot of their stuff and depending on what you get, some of it is pretty decent stuff (their Pittsburgh sockets come to mind - really quite decent). But I digress; I then started searching for a better used drill press on Craigslist and doing some research on some of the better brands. One thing that kept coming up was that the older Delta, Atlas, and Walker-Turner machines were really great and can now be had at pretty good prices. Well wouldn't you know it, but a Walker-Turner DP turned up on CL later that week, and for only $90...I picked it up and was amazed that it had basically no run-out and was just an amazingly stout piece of equipment. Later on I picked up a very early Craftsman-branded Walker-Turner 8" table saw from eBay for only $50, then some Plomb ratchets (love'em) amongst some other old stuff. Basically, I'm hooked!
Anyway, I realized I needed an arbor press and last week this Greenerd 1 1/2 come up on the local Craigslist for the measly sum of $40. As you can imagine, I jumped on it for the price.
While totally functional as purchased, it was ratty looking and neglected. That won't do...
So this weekend was kind of rainy and cruddy out and I have a newborn daughter, so I'm kind of relegated to being inside much of the weekend to give my wife a break. I decided to tackle a quick project though - I have to keep my sanity as well!
I disassembled the press and soaked the parts in a bucket of hot water and dish soap for about an hour to loosen the dried on grease. Even after soaking I still had to scrub with a wire brush and toothpicks to clean all crevices completely.
The base of the frame was pretty rusted and at some point it had been welded to a table; two sides had some leftover slag/ragged edging left over. I cleaned that up on the grinder. Additionally, the previous owner used double-sided foam tape to affix the aluminum plate you seen in the first picture; unfortunately, the foam got wet at some point and it discolored the base plate. I put the base into a tub of Evapo-rust overnight to address the rust and see what would happen with the discoloration.
The rest of the moving parts also got the evapo-rust treatment overnight.
The next morning they looked pretty good. After rising off in the sink and a thorough drying with paper towels, I sprayed them down with Remington gun oil to prevent flash rusting until I got a chance to hit them with the wire wheel.
Moving into the frame; the evapo-rust was able to take care of the rust, but the discoloration on the base plate was untouched. I used a wire brush, dish soap, and scalding hot water to clean the frame.
After masking off the serial number plate and base plate as well as plugging the frame holes, I sprayed a coat of high-temp engine primer. I'm annoyed that I forgot to take pics, but after an hour of drying, I put it in the oven at 200 degrees for 45 mins to fully cure it.
After cooling (mostly, I still like to paint a piece when it's warm, when I can), I then sprayed several coats of Rust-Oleum Performance Enamel in Hunter Green onto the frame and let it cure overnight. I figured Greenerd, it's just gotta be Green! No need for oven curing with this enamel top coat, however, it does take up to a week for it to reach full hardness - Lord help you if you spray another coat before 7-days...you'll get a crackle finish whether you want it or not...ask me how I know...
Again, I forgot to take post-polishing photos of the parts during the polishing process. But for those with the sharp eyes, you may notice that there was some minor mushrooming on the top of the ram; I cleaned it up on the belt sander before hitting it with the wire wheel. I also threw the nuts and washers in my rock tumbler to polish them; much easier than trying to hold them against a grinder wire wheel and gives a more even finish.
And the finished product; after another 24hrs of curing I used a gold paint pen to highlight the cast in manufacturer name and model number and hand sanded the base plate a little. It's still got some discoloration so I'll disassemble it again so have room to take my power sander to it and give it a better finish. I need to anyway to properly grease the action and paste-wax all the newly polished metal to prevent future rusting. Admittedly, it's not an "as new" no defects polishing job, but this press will be used, so I just wanted to make it look better, not perfect.
Total spend was $40 for the arbor press, a $6 can of spray paint, and my time (not including items I already had). All-in-all though, not too bad for a rainy weekend project! Thanks for reading!
And just for good measure, one more before/after shot!
Last edited: