baumgrenze
Member
My Tiger 16 drill press is blue. It does not have the smaller Hollywood Tools decal. In the 1970's my late neighbor. Mac, inherited it from his uncle, Bill (Wm Ordway,) who lived in southern California. Mac 'stored' it in my shop because he knew I would use it more than he would and he knew where it was if he needed it.
The quill return spring broke recently. My assessment is that it was repaired years ago by Bill. I'd like advice on the best way to drill and bend the rotating end of the spring.
1) Do I pull up the inner end of the spring and isolate it with a C-clamp and then draw the temper some by 'kissing' it with a propane torch flame?
2) How big a problem will it be to reinstall the spring once it is ready for reuse.
I will link a set of images and hope they survive long enough to allow comments. If others think they are worth downsizing to <164 KB I can do that and upload them to the website.
http://imgur.com/a/T21oG
http://imgur.com/a/XqJgf
Below are my comments on each of the images:
IMG_4414-16_Composite_TigerToolsDrill Press_A590.jpg
This is an overall image from the left face and the working face of the drill press. The right side is photographically inaccessible.
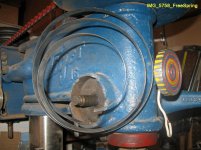
IMG_5752.JPG
You can see the break in the spring at around 8:00. The fixed end appears to be held down at around 5:30. I believe I need to remove this longer piece of spring and carefully bend the broken end towards the center shaft. This appears to be the first step in boring a hole for the pin that engages the spring at the moving end, near the shaft. What precautions need to be taken to avoid weakening the spring where it is bent?
There are six detents in the well that engage the inner face of the cover plate and anchor that plate in place maintaining tension on the return spring.
I remeasured the spring; it is 2.85" OD and 2.35" ID. The feed lever makes about 1.5 revolutions to reach full extension of the quill, so 12-13" of the spring is wound towards the central shaft as the quill is lowered to its maximum travel.
IMG_5753.JPG
This image shows inside of the quill spring well cover and details the short end of the broken quill return spring. Both ends are rough, indicative of a previous break. The 1/4-20 Allen screw (pointing downward in the image) which retains the rotating end of the return spring is inserted into a 1/4" hole that is 1/2" in from the rotating end of the spring. The threaded hole that retains the screw is tapped approximately half-way into the shaft collar which allows it to be driven in tightly. Both ends of the remaining fragment of the spring show rough breaks, suggesting that it broke before.
The outer diameter of the Allen screw fits more snugly into a 0.246" diameter hole made by a letter D drill. The above spring fragment has a 0.25" hole. Would a smaller hole or a 1/4-20 keeper nut improve the assembly or is it overkill.
The protuberance at 9:00 engages with one of the six detents in the spring well cast into the main drill press casting. The plate engages the quill feed shaft via an external 1/4-20 Allen screw. The Allen screw serves to retain the return spring tension by holding this plate so that the protuberance is engaged and also by engaging the feed shaft.
IMG_5754.JPG
This image shows the outer face of the quill return spring cover plate. The plate fits between two 1/4-20 Allen screws set into a collar that fits the shaft. Between the collar and the plate there is a large, thin spring washer. The central portion turns freely inside this plate.
The spring is tightened by using a Crescent wrench on the flats of the collar so that the quill to the top of its travel when the feed lever is returned to its resting position.
\IMG_5755.JPG
This image shows the most recent quill return spring break on the left and a perhaps earlier break on the right. The 1/4" hole engages a 1/4-20 Allen screw which is the attachment point for the moving end of the spring.
The spring is 0.505" wide and 0.036" thick. The wound outer diameter is 2.75" suggesting an approximate working length of 45".
The fragment is ~3.5" long. It seems to have the same temper as the rest of the spring.
thanks
baumgrenze
The quill return spring broke recently. My assessment is that it was repaired years ago by Bill. I'd like advice on the best way to drill and bend the rotating end of the spring.
1) Do I pull up the inner end of the spring and isolate it with a C-clamp and then draw the temper some by 'kissing' it with a propane torch flame?
2) How big a problem will it be to reinstall the spring once it is ready for reuse.
I will link a set of images and hope they survive long enough to allow comments. If others think they are worth downsizing to <164 KB I can do that and upload them to the website.
http://imgur.com/a/T21oG
http://imgur.com/a/XqJgf
Below are my comments on each of the images:
IMG_4414-16_Composite_TigerToolsDrill Press_A590.jpg
This is an overall image from the left face and the working face of the drill press. The right side is photographically inaccessible.
IMG_5752.JPG
You can see the break in the spring at around 8:00. The fixed end appears to be held down at around 5:30. I believe I need to remove this longer piece of spring and carefully bend the broken end towards the center shaft. This appears to be the first step in boring a hole for the pin that engages the spring at the moving end, near the shaft. What precautions need to be taken to avoid weakening the spring where it is bent?
There are six detents in the well that engage the inner face of the cover plate and anchor that plate in place maintaining tension on the return spring.
I remeasured the spring; it is 2.85" OD and 2.35" ID. The feed lever makes about 1.5 revolutions to reach full extension of the quill, so 12-13" of the spring is wound towards the central shaft as the quill is lowered to its maximum travel.
IMG_5753.JPG
This image shows inside of the quill spring well cover and details the short end of the broken quill return spring. Both ends are rough, indicative of a previous break. The 1/4-20 Allen screw (pointing downward in the image) which retains the rotating end of the return spring is inserted into a 1/4" hole that is 1/2" in from the rotating end of the spring. The threaded hole that retains the screw is tapped approximately half-way into the shaft collar which allows it to be driven in tightly. Both ends of the remaining fragment of the spring show rough breaks, suggesting that it broke before.
The outer diameter of the Allen screw fits more snugly into a 0.246" diameter hole made by a letter D drill. The above spring fragment has a 0.25" hole. Would a smaller hole or a 1/4-20 keeper nut improve the assembly or is it overkill.
The protuberance at 9:00 engages with one of the six detents in the spring well cast into the main drill press casting. The plate engages the quill feed shaft via an external 1/4-20 Allen screw. The Allen screw serves to retain the return spring tension by holding this plate so that the protuberance is engaged and also by engaging the feed shaft.
IMG_5754.JPG
This image shows the outer face of the quill return spring cover plate. The plate fits between two 1/4-20 Allen screws set into a collar that fits the shaft. Between the collar and the plate there is a large, thin spring washer. The central portion turns freely inside this plate.
The spring is tightened by using a Crescent wrench on the flats of the collar so that the quill to the top of its travel when the feed lever is returned to its resting position.
\IMG_5755.JPG
This image shows the most recent quill return spring break on the left and a perhaps earlier break on the right. The 1/4" hole engages a 1/4-20 Allen screw which is the attachment point for the moving end of the spring.
The spring is 0.505" wide and 0.036" thick. The wound outer diameter is 2.75" suggesting an approximate working length of 45".
The fragment is ~3.5" long. It seems to have the same temper as the rest of the spring.
thanks
baumgrenze