To avoid these ads, REGISTER NOW!

Rate my Reznor Install; asking pro's if it's right...

revamped

Well-known member
Joined
May 23, 2012
Messages
312
Location
Bremerton, WA
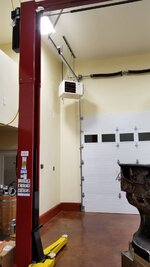
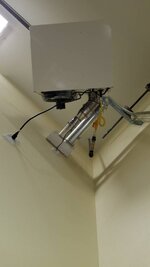
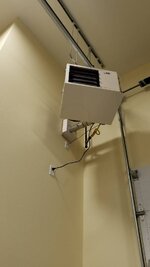
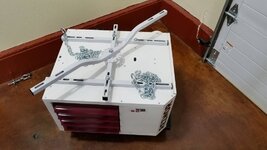
I changed my mind a few dozen times about hanging from the ceiling vs. Weld fabbing a bracket to mount between the king post from my door, and the wall. Since I would have needed to hang some kind of support at the corner to suspend... I just ended up doing this instead.

Added safety chains for good measure, the strut is bridging 3 trusses with 3/8 x 3" lag bolts.

All fasteners either lock nutted or I used heavy wall NICU Nyloc. (Just had them laying around)

I'd appreciate any advice as I move to the next phase installing the CC14 low profile aesthetic terminal and concentric box; looks like I have to do a type 3 4" 45 then reduced to 3" then straight through the box to termination. Then a separate 4" intake 45 and straight to the box.

Revamped 54619fe3c92fa00d6fc4499ae0289923.jpgfbf3941bfcdf9b557eb37cdbaa2a4d19.jpg5fe520484f950ed33d0d5680e2bc27ae.jpg66bd76ab83d86480fe3ff8205c283c5f.jpg
Sent from my SM-G955U using Tapatalk
 

Attachments

  • 54619fe3c92fa00d6fc4499ae0289923.jpg
    54619fe3c92fa00d6fc4499ae0289923.jpg
    53.4 KB · Views: 0
  • fbf3941bfcdf9b557eb37cdbaa2a4d19.jpg
    fbf3941bfcdf9b557eb37cdbaa2a4d19.jpg
    51.2 KB · Views: 1
  • 66bd76ab83d86480fe3ff8205c283c5f.jpg
    66bd76ab83d86480fe3ff8205c283c5f.jpg
    33.2 KB · Views: 4
  • 5fe520484f950ed33d0d5680e2bc27ae.jpg
    5fe520484f950ed33d0d5680e2bc27ae.jpg
    48.8 KB · Views: 8
To avoid these ads, REGISTER NOW!

bobbyjean

Well-known member
Joined
Aug 25, 2017
Messages
319
Location
hudson valley n.y.
revamped- you asked to rate the install.....to my eye it's overkill but maybe that's what you were going for...the unit generally come's ready to support off 3/8 " rod...will you hard pipe gas or use a flex connect? may want to make bracket for the gas line drop.
not sure about the 4 to 3 reducer you mention...either way ...looks great so far
 
OP
R

revamped

Well-known member
Joined
May 23, 2012
Messages
312
Location
Bremerton, WA
revamped- you asked to rate the install.....to my eye it's overkill but maybe that's what you were going for...the unit generally come's ready to support off 3/8 " rod...will you hard pipe gas or use a flex connect? may want to make bracket for the gas line drop.
not sure about the 4 to 3 reducer you mention...either way ...looks great so far
Thanks... yeah it's probably overkill. I didn't know how to use the rods in the pattern I would need to maintain a 45 degree angle and clear the door while meeting clearance around the unit and hitting the trusses. I figured spreading the load across 3 trusses would be good.

This way cost more, but got the heater out under the door track. Adding a valve and T with drip leg and flex. Looking for a unistrut mount for a pipe bracket now.

The chains are how I got the unit up there using my deer gambrel. Figured I'd leave them as a safety capture definitely overkill; but they'll just sit on a shelf taking up room otherwise.

Appreciate the feedback

Sent from my SM-G955U using Tapatalk
 
Last edited:

fartymarty

Well-known member
Joined
Nov 9, 2012
Messages
1,348
Location
Fort Worth
It looks nice up there.
I'm no pro, not even close.
I always have a fear (probably unfounded) of lag bolts with a longitudinal load on them, especially if exposed to vibration. I have no special knowledge of wood fiber strength etc., but I'll bet even knowledgeable people (pros, engineers, experienced builders) would agree that the lag bolts, even if perfectly centered in the rafters above, are the weakest part of the install.
If I'm correct on this, then I think you can get rid of the chain, as it's just adding to the lag bolt loading.
 

ForceFed70

Well-known member
Joined
Apr 27, 2010
Messages
3,441
Location
BC, Canada
Your mounting is definitely good and secure. A+ there.

Not sure I like the location tho. But I don't know your floor plan/layout - might be the best option available.
 

D45

Well-known member
Joined
Mar 21, 2014
Messages
4,836
Location
NW INDIANA
I would rather have it above the door roller tracks and away from the large doors
 
OP
R

revamped

Well-known member
Joined
May 23, 2012
Messages
312
Location
Bremerton, WA
I would rather have it above the door roller tracks and away from the large doors
I thought about going all the way to the ceiling, but it results in a loss of flow where I need it most. 12ft seems to be optimal by the specs and it keeps exhaust well below the eves.

Sent from my SM-G955U using Tapatalk
 
OP
R

revamped

Well-known member
Joined
May 23, 2012
Messages
312
Location
Bremerton, WA
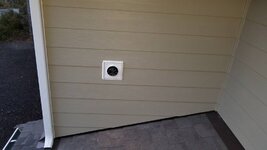
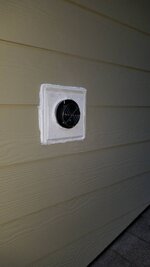
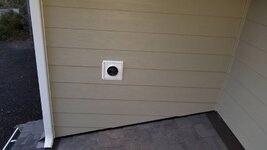
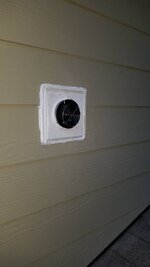
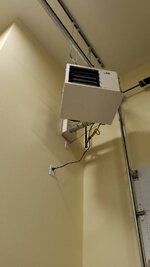
So, I really took a while to figure out how to do the install. I think it turned out great. Installed type 3 exhaust and the low profile aesthetic terminal and concentric kit.

I thought more about the mounting unistrut in one run, I was concerned that the 3 lag bolts wouldn't be enough, but looking at the bracket mounting instructions it recommends 4. Unit weighs 70lbs so it should be good.

I found an ecobee4 with extra sensor on Amazon warehouse open box for $150 which talks to my smart home hub so I can monitor and control from anywhere.

Saved $1200 doing the install myself. I think it all looks great and the low profile aesthetic terminal and concentric kit looks great since this side is seen from my house.b7ff53c7114b7600058a997000ce5eda.jpgdfd2d474618ea39368b88a4935d43cd6.jpgf078e8f09caf09ab1da4775a25f49584.jpg488e5526245286d9b2b1d4f2ba13f38f.jpg4a186bc60085ed929b5a14c6ca465593.jpg

Sent from my SM-G955U using Tapatalk
 

Attachments

  • 488e5526245286d9b2b1d4f2ba13f38f.jpg
    488e5526245286d9b2b1d4f2ba13f38f.jpg
    42.7 KB · Views: 4
  • f078e8f09caf09ab1da4775a25f49584.jpg
    f078e8f09caf09ab1da4775a25f49584.jpg
    37.4 KB · Views: 4
  • dfd2d474618ea39368b88a4935d43cd6.jpg
    dfd2d474618ea39368b88a4935d43cd6.jpg
    25.7 KB · Views: 3
  • b7ff53c7114b7600058a997000ce5eda.jpg
    b7ff53c7114b7600058a997000ce5eda.jpg
    31 KB · Views: 2
  • 4a186bc60085ed929b5a14c6ca465593.jpg
    4a186bc60085ed929b5a14c6ca465593.jpg
    29.7 KB · Views: 0
OP
R

revamped

Well-known member
Joined
May 23, 2012
Messages
312
Location
Bremerton, WA
What are the specs on the Reznor and the heated space?

Reznor 75K heating 40x40 building with loft. Total is 2046 sqft, but about 1500 is the floor space on the first level. Bathroom is insulated 360 with a cadet heater and underground 9ft so stable temps in there.

The reznor at 12ft throws 21ft contacting the floor and travels to 48ft so I have it pointed to the longest opposite corner of the building. air is nice and warm in the middle of my lift bay and you feel it continue into the weld shop area. Some of it splits the wall into the bar.

If I didn't have a hot work area in that corner, the right location would have been to mount it in the back of the building facing the front doors. I have had one oxy acetylene fire when I was young and I am now always overly cautious about my hot work areas having flammables.

Building stays at 50 easily and ramps up to 60 in about 15 minutes no problem. The loft gets a little toasty though, but I have plenty of windows up there if needed. Price to pay having high ceilings and trying to keep heat low.

The ecobee4 also has a remote sensor so I can mount it in the loft and control the heat based on motion sensors up there to set a second heat setting if someone goes up there.

Not sure what else you mean by specs. just a DIY guy.
 

ItsNemo

Well-known member
Joined
Mar 5, 2016
Messages
4,806
Location
Canada
I was under the impression that the vent must extend away from the building for these units?
 
OP
R

revamped

Well-known member
Joined
May 23, 2012
Messages
312
Location
Bremerton, WA
I was under the impression that the vent must extend away from the building for these units?

I was worried about the same thing. I confirmed with the distributor that this vent kit only required 1.5" of intake clearance from the trim, as long as all instructions and lengths are followed. Seemed very risky, but the vent kit is made by reznor and good to 75K BTU.

My vent is in the front of the building so I didn't want large vents coming through the roof or from the side wall, the alcove is visible from almost everywhere so this trimmed out very nicely and looks great!

Here is the kit link:

http://www.reznorhvac.com/files/I-UDAS-UDBS-ASC (A.1) PN209344R6 smallest.pdf
 

thammel

Well-known member
Joined
Oct 3, 2005
Messages
2,245
Location
Maryland
Looks just like my install. You even did a neater job on the cc-14 box on the inside wall. One thing you might want to look into; the outside grill has short little tube standoffs between the two concentric pipes. I found rust either on the standoffs or the screw hardware. So I replaced it all with stainless steel (I bought short section of stainless tubing at the local hardware store (yeah, real hardware store) and cut little lengths to be the standoffs.

Tom
 
OP
R

revamped

Well-known member
Joined
May 23, 2012
Messages
312
Location
Bremerton, WA
Looks just like my install. You even did a neater job on the cc-14 box on the inside wall. One thing you might want to look into; the outside grill has short little tube standoffs between the two concentric pipes. I found rust either on the standoffs or the screw hardware. So I replaced it all with stainless steel (I bought short section of stainless tubing at the local hardware store (yeah, real hardware store) and cut little lengths to be the standoffs.

Tom

Hey Tom,
Thanks for the advice. I will keep an eye on any rust and if necessary drill and replace the rivets. Thanks for the feedback. Another thing that really made me cautious is not having a wall thimble, but when I asked about it... the supplier stated that the concentric box acts as a wall thimble since there is a 4" sleeve over the 3" pipe.

I still find myself looking up there every day looking for any heat discoloration on the painted trim but so far it looks great.
 

thammel

Well-known member
Joined
Oct 3, 2005
Messages
2,245
Location
Maryland
They're right - no need for a thimble. The outer concentric pipe carries the cool inlet air and the inner pipe carries the hot exhaust. So the high temp is away from combustibles.

Tom
 
To avoid these ads, REGISTER NOW!

Enjoytheride

Member
Joined
Aug 10, 2015
Messages
14
Revamped. . . . What did you do power wise? 12/2 on a 20 amp circuit?


Reznor 75K heating 40x40 building with loft. Total is 2046 sqft, but about 1500 is the floor space on the first level. Bathroom is insulated 360 with a cadet heater and underground 9ft so stable temps in there.

The reznor at 12ft throws 21ft contacting the floor and travels to 48ft so I have it pointed to the longest opposite corner of the building. air is nice and warm in the middle of my lift bay and you feel it continue into the weld shop area. Some of it splits the wall into the bar.

If I didn't have a hot work area in that corner, the right location would have been to mount it in the back of the building facing the front doors. I have had one oxy acetylene fire when I was young and I am now always overly cautious about my hot work areas having flammables.

Building stays at 50 easily and ramps up to 60 in about 15 minutes no problem. The loft gets a little toasty though, but I have plenty of windows up there if needed. Price to pay having high ceilings and trying to keep heat low.

The ecobee4 also has a remote sensor so I can mount it in the loft and control the heat based on motion sensors up there to set a second heat setting if someone goes up there.

Not sure what else you mean by specs. just a DIY guy.
 
OP
R

revamped

Well-known member
Joined
May 23, 2012
Messages
312
Location
Bremerton, WA
Revamped. . . . What did you do power wise? 12/2 on a 20 amp circuit?

I have a string of 20a outlets and a LED porch light. At the end I put a switch and outlet at 10ft. It all runs on a 20a breaker, but that wall won't see much action as it's motorcycle parking and a display wall.
The heater doesn't draw much amperage at all.
 
OP
R

revamped

Well-known member
Joined
May 23, 2012
Messages
312
Location
Bremerton, WA
They're right - no need for a thimble. The outer concentric pipe carries the cool inlet air and the inner pipe carries the hot exhaust. So the high temp is away from combustibles.

Tom

Thanks Tom, all is good and it feels great in there
 

1967Chevelle

Well-known member
Joined
Jan 4, 2016
Messages
57
Location
NS
how did you attach the Termination hood that is supplied in the reznor vent kit to the stainless steel pipe, there is no room for the gear clamp??
 
OP
R

revamped

Well-known member
Joined
May 23, 2012
Messages
312
Location
Bremerton, WA
how did you attach the Termination hood that is supplied in the reznor vent kit to the stainless steel pipe, there is no room for the gear clamp??

If I remember correctly, it was a press fit and I used a wood dowel to flare one side then stainless screws through the lap. I was confused at first thinking it was Male to Male but the piece is slightly oversized for that reason.
That is.... if I'm understanding your question
 

1967Chevelle

Well-known member
Joined
Jan 4, 2016
Messages
57
Location
NS
If I remember correctly, it was a press fit and I used a wood dowel to flare one side then stainless screws through the lap. I was confused at first thinking it was Male to Male but the piece is slightly oversized for that reason.
That is.... if I'm understanding your question


Thanks for the reply, did you fasten it with screws and high temperature silicone ?
What brand of stainless steel vent did you use ?
And did you install a condensation drain in the vent system with the slope toward the unit heater as per vent manufacture instructions ?
 

HoosierBuddy

Well-known member
Joined
May 9, 2006
Messages
2,931
Location
Southern Indiana
I only looked at the gas hookup, because that's in my wheelhouse.

I think I see a brass 1/4 turn shut off valve right before the appliance connector?

If so...I see no issues. I like it.

Phil
 

earlybirds

Well-known member
Joined
Feb 12, 2010
Messages
70
Location
eastern Iowa
I used the same quicksling bracket that you used to hang my 125 lb. 100,000 BTU Modine sealed combustion heater. I just used 4 lag bolts to attach the bar to the bottom of a truss about 3ft. from the truss end. Works great. These brackets are rated for up to 200 lb. load. You don't need the chains.

Does your heater have any vibration being suspended on such long rods?
 
OP
R

revamped

Well-known member
Joined
May 23, 2012
Messages
312
Location
Bremerton, WA
Thanks all, no real vibration to speak of. The stainless CL3 vent piping came from a couple of internet suppliers... easy to google.
I used stainless screws inside the kit, and the low profile kit does not require a condensate drain as long as it's a short run and angled 1/4" downward to outside. I've had no real condensation to speak of, no drips but you can see vapor rise outside the building.
Most importantly was to not exit too close to the eaves so the vapor escapes and doesn't build up under the eaves but still high enough for snow load.
 

Jeeper89

Well-known member
Joined
Oct 29, 2015
Messages
86
Location
Rockford MI
Any issues with the vent exiting that close to an inside corner? I looked into at unit heater for my garage and the only place I can exit is near an inside corner. Per the instructions it said I had to be a minimum of 6' away from the inside corner. The wall is only 4' so I went with a vent less heater and I'm not very happy with it.
 
OP
R

revamped

Well-known member
Joined
May 23, 2012
Messages
312
Location
Bremerton, WA
Any issues with the vent exiting that close to an inside corner? I looked into at unit heater for my garage and the only place I can exit is near an inside corner. Per the instructions it said I had to be a minimum of 6' away from the inside corner. The wall is only 4' so I went with a vent less heater and I'm not very happy with it.

Not at all. My system works perfectly and the vapor clears the structure. I'm probably 3ft from the corner.

Look up the low profile concentric kit! It has a much more forgiving install and I believe it might have been 2ft limit. My installation was better than spec and no shortcuts. I was surprised it was so forgiving. That stainless vent is a PITA to work but it is solid!
 

Jeeper89

Well-known member
Joined
Oct 29, 2015
Messages
86
Location
Rockford MI
Thanks for the info. I just finished the vent free install a few weeks ago. The heater seems to work ok but the pilot goes out from time to time and it has a bit of a funny smell. In any case the gas line is ran to the garage and I'm sure I could sell the vent free unit. With warmer weather working its way in I have some time to think about it. Nice install by the way. I have a unit heater at my old place but I didn't have to get as creative as you.
 

1967Chevelle

Well-known member
Joined
Jan 4, 2016
Messages
57
Location
NS
If I remember correctly, it was a press fit and I used a wood dowel to flare one side then stainless screws through the lap. I was confused at first thinking it was Male to Male but the piece is slightly oversized for that reason.
That is.... if I'm understanding your question

Thanks for the reply,

its hard to see from the pictures, did you use a Appliance connector to connect to the stainless or did you just connect the 45 degree elbow directly to the appliance?
 
To avoid these ads, REGISTER NOW!
Top Bottom